

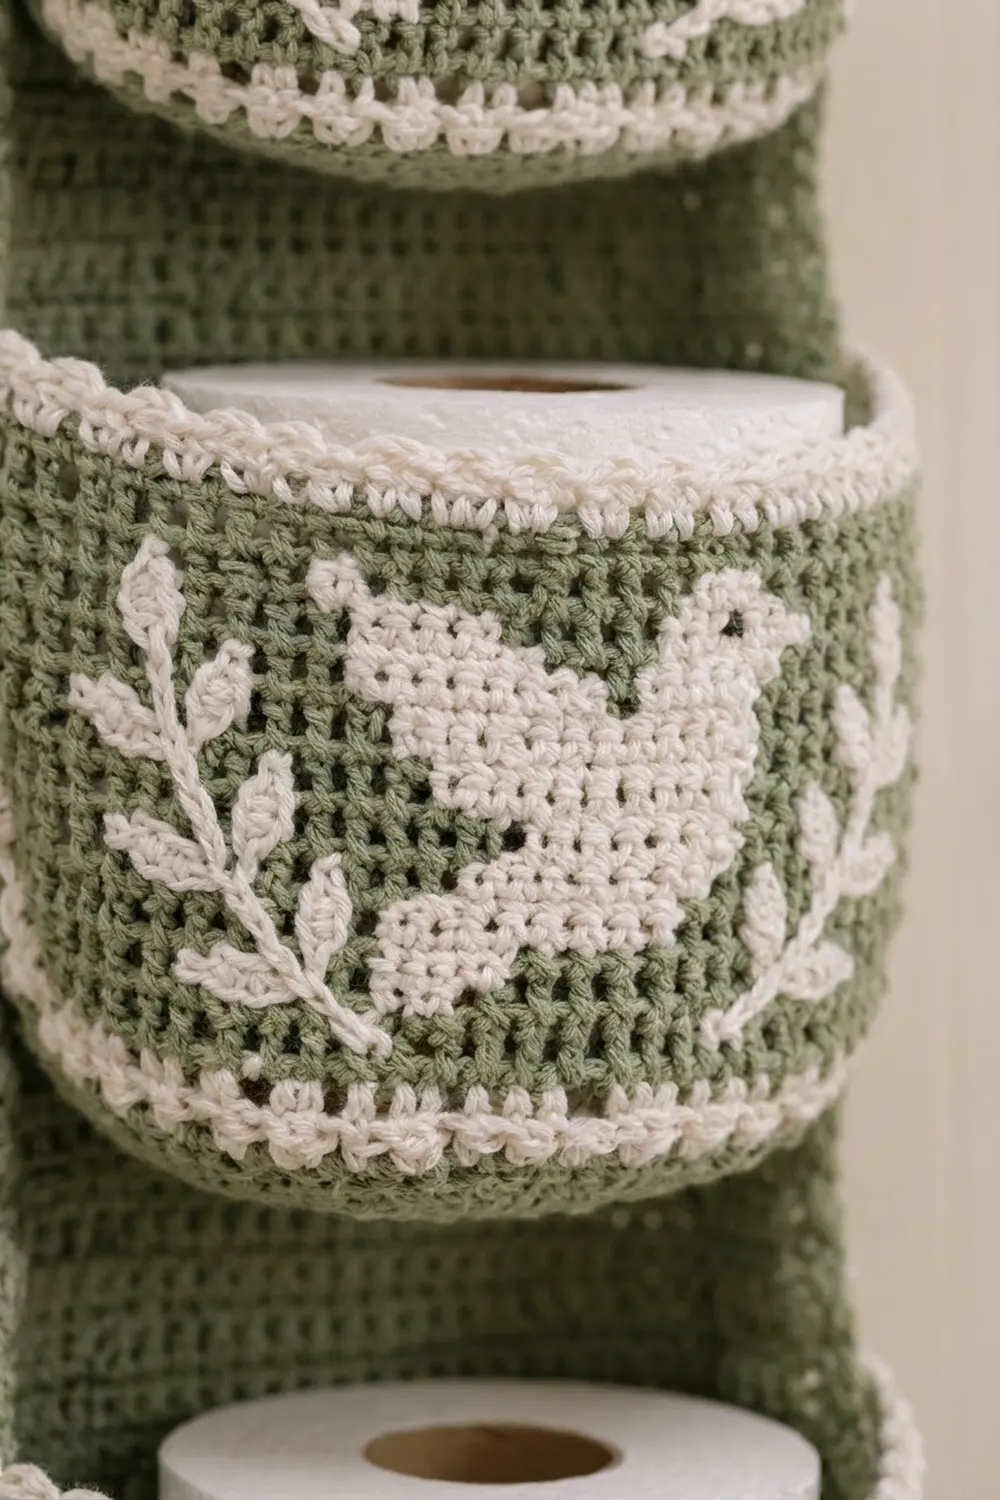
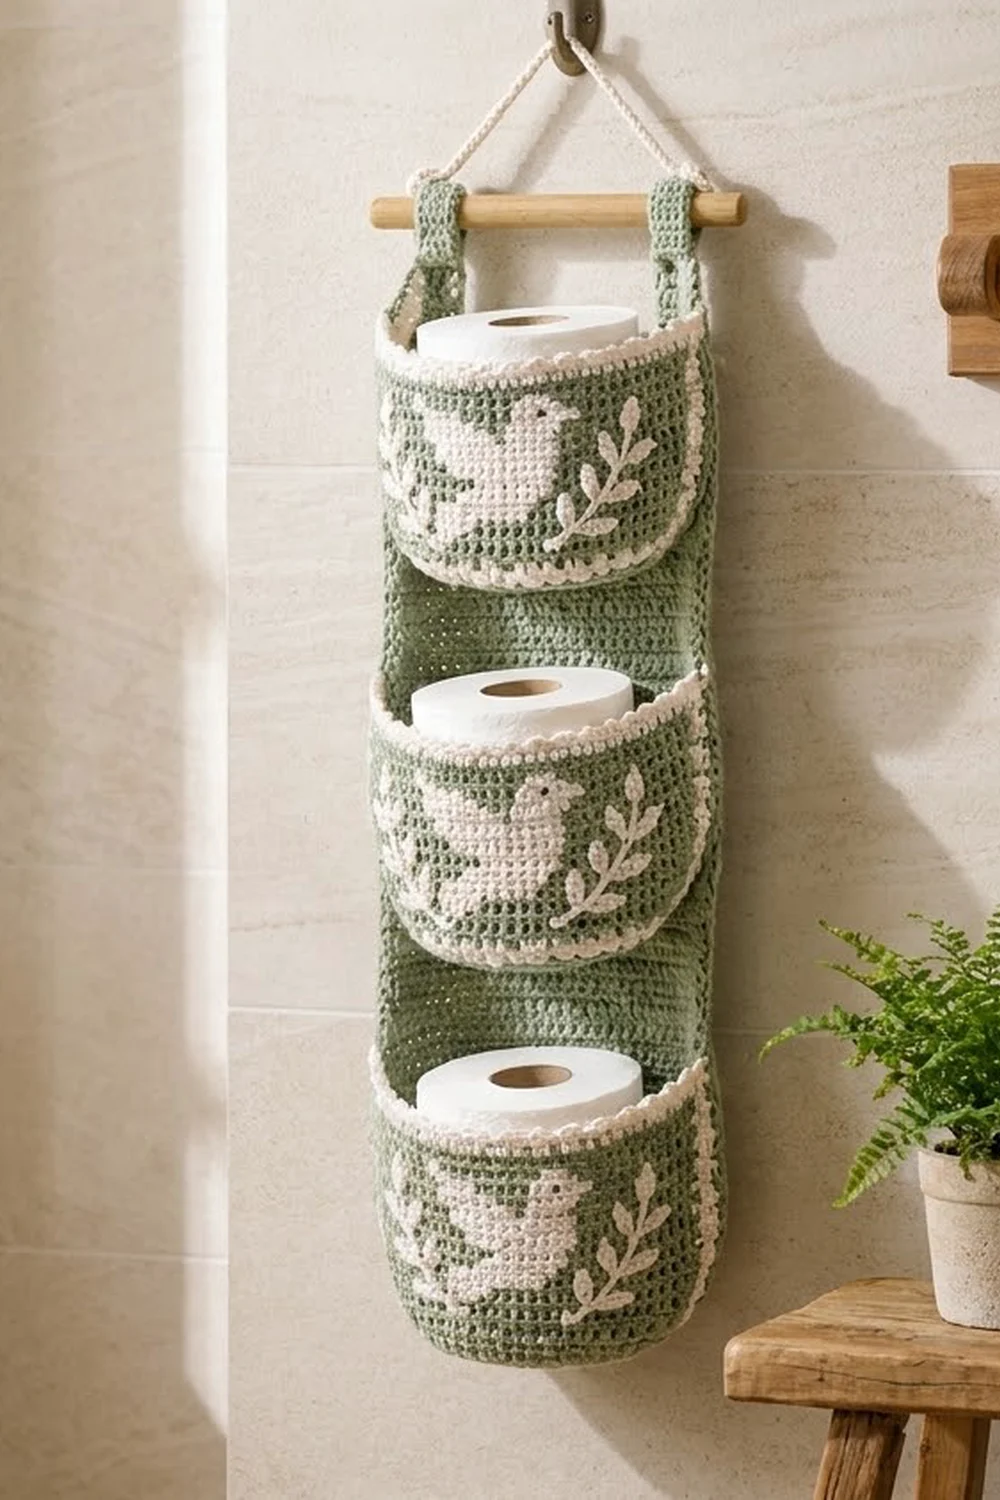
This hanging organizer holds three spare rolls in a slim vertical stack. A sage green back panel carries three rounded pockets. Each pocket has a cream dove between two leaf sprigs on the front, a cream ridge at the base, and a cream rim finished with tiny picots.
The palette is just two colors: soft sage and warm cream. The look is quiet, a little Scandinavian, and suits a bathroom all year. The dove motif is worked in tapestry crochet, so the colorwork is part of the fabric and there is no appliqué to sew on.
The pattern uses US crochet terms. The finished panel measures about 7.5 x 18.5 in (19.1 x 47 cm). With the strap loops, the holder is about 21.5 in (54.6 cm) tall.
To make it, you work the back panel flat in rows of single crochet. Each pocket starts as an oval base worked in rounds, and then the sides are worked straight up in tapestry single crochet. You sew the pockets to the panel stitch-to-stitch, add a two-round edging around the panel, and attach the straps over a wooden dowel.
Finished Size and Construction
- Finished size: panel 7.5 x 18.5 in (19.1 x 47 cm); about 21.5 in (54.6 cm) tall with the straps
- Skill level: Intermediate (tapestry crochet in the round)
- Terminology: US
- Yarn weight: worsted (#4), cotton or cotton blend
- Hook: 4.5 mm (US 7)
- Number of pieces: 6 (1 back panel, 3 pockets, 2 straps)
- Layout: 3 pockets stacked vertically and centered on the panel
- Pocket size: sides 4 in (10.2 cm) tall; base about 6.25 x 4.5 in (15.9 x 11.4 cm) before sewing
- Panel size before border: 7 x 18 in (17.8 x 45.7 cm)
- Border depth: about 0.25 in (0.6 cm) per side
Materials
Use a smooth worsted cotton or cotton blend, about 190 m (208 yd) per 100 g. Cotton holds the pocket shape and is easy to wash. Avoid fuzzy yarn because it blurs the dove.
- Sage green (A): 220 g, about 420 m (459 yd)
- Cream (B): 80 g, about 150 m (164 yd)
These amounts include a margin of roughly 10–20%.
Tools:
– 4.5 mm (US 7) hook
– Tapestry needle
– 4 locking stitch markers
– Scissors and a measuring tape
– Wooden dowel, 10 in (25.4 cm) long and 0.5 in (1.3 cm) thick
– Optional: 20 in (50.8 cm) of cord to hang the dowel
Abbreviations (US Terms)
- ch: chain
- sc: single crochet
- sl st: slip stitch
- st(s): stitch(es)
- BLO: back loop only
- rev sc: reverse single crochet (crab stitch), worked left to right
- inc: 2 sc in the same stitch
- sp: space
- A / B: sage / cream
Tapestry sc: Carry the unused color along the tops of the stitches and work over it so it is hidden inside each sc. To change color, work the last sc before the change until 2 loops remain on the hook, then pull through with the new color.
Picot: ch 3, sl st in the 3rd ch from hook.
Gauge and Checkpoints
Gauge: 16 sts x 18 rows/rounds = 4 x 4 in (10.2 x 10.2 cm) in sc. Tapestry sc should match this. If it comes out tighter, keep the carried strand loose.
Work one pocket first. It tests both plain and tapestry gauge, and you can check it against a real roll.
Checkpoints:
– Panel width after Row 1: 7 in (17.8 cm)
– Panel length after Row 81: 18 in (45.7 cm)
– Pocket base after Rnd 10: about 6.25 x 4.5 in (15.9 x 11.4 cm), measuring 18 in (45.7 cm) around
– Pocket sides after Rnd 28: 4 in (10.2 cm) tall
If your pieces are too big, go down 0.5 mm in hook size. If they are too small, go up 0.5 mm. Don’t add or remove stitches, because the pockets are sewn to the panel stitch-to-stitch.
Back Panel
With A, ch 29.
Row 1: Sc in the 2nd ch from hook and in each ch across, turn. (28 sts)
Rows 2–81: Ch 1 (does not count as a st), sc in each st across, turn. (28 sts)
Fasten off. The panel is 7 x 18 in (17.8 x 45.7 cm).
Number the stitches 1–28 on each row. The pockets attach to sts 5–24, the center 20 sts, which leaves 4 sts free on each side.
Pocket (make 3)
Oval Base
With A, ch 9.
Rnd 1: 3 sc in the 2nd ch from hook, sc in the next 6 ch, 3 sc in the last ch. Working along the other side of the chain, sc in the next 6 ch. Join with a sl st to the first sc. (18 sts)
From here on, start each round with ch 1 (not counted as a st) and join with a sl st to the first sc.
Rnd 2: [Inc in each of the next 3 sts, sc in the next 6] twice. (24 sts)
Rnd 3: [(Sc in the next st, inc) 3 times, sc in the next 6] twice. (30 sts)
Rnd 4: [(Sc in the next 2, inc) 3 times, sc in the next 6] twice. (36 sts)
Rnd 5: [(Sc in the next 3, inc) 3 times, sc in the next 6] twice. (42 sts)
Rnd 6: [(Sc in the next 4, inc) 3 times, sc in the next 6] twice. (48 sts)
Rnd 7: [(Sc in the next 5, inc) 3 times, sc in the next 6] twice. (54 sts)
Rnd 8: [(Sc in the next 6, inc) 3 times, sc in the next 6] twice. (60 sts)
Rnd 9: [(Sc in the next 7, inc) 3 times, sc in the next 6] twice. (66 sts)
Rnd 10: [(Sc in the next 8, inc) 3 times, sc in the next 6] twice. (72 sts)
Fasten off A. Checkpoint: 6.25 x 4.5 in (15.9 x 11.4 cm), 18 in (45.7 cm) around.
Mark the back. Lay the base flat. On one long straight side, count out the 20 center sts and mark the first one M1 and the last one M2. These 20 sts are the BACK. The other 52 sts are the FRONT.
Sides
Rnd 11 (cream ridge): Join B with a sl st in the back loop of the st at M1. Ch 1, sc BLO in each st around, join. (72 sts) The unworked front loops of Rnd 10 form the sewing line for the base. Move M1 and M2 up to the matching sts of Rnd 11.
Rnd 12: Join A. Working over B, sc in each st around, join. (72 sts)
Rnds 13–23 (motif): Carry B in every round. Each round is worked as follows:
– 20 sts A (back)
– 11 sts A
– 5 sts left sprig chart
– 2 sts A
– 16 sts dove chart
– 2 sts A
– 5 sts right sprig chart (same chart as the left)
– 11 sts A
That makes 20 + 11 + 5 + 2 + 16 + 2 + 5 + 11 = 72 sts.
In the charts below, X = B and . = A. Work each line left to right as written. The charts are listed from the top round (Rnd 23) down to Rnd 13, so start at the bottom line.
Rnd   Sprig   Dove
23    ..X..   ..XXX.....XXX...
22    X.X.X   ...XXXX..XXXXX..
21    .XXX.   ....XXXXXXXXXXXX
20    ..X..   .....XXXXXXXXX..
19    X.X.X   XX...XXXXXXXXX..
18    .XXX.   .XXXXXXXXXXXXX..
17    ..X..   ..XXXXXXXXXXXX..
16    X.X.X   ....XXXXXXXXX...
15    .XXX.   ......XXXXXX....
14    ..X..   ........XX......
13    ..X..   ................
Rnds 24–26: With A, still carrying B, sc in each st around. (72 sts) Fasten off A after Rnd 26.
Rnds 27–28: With B, sc in each st around. (72 sts) Checkpoint: the sides measure 4 in (10.2 cm), which is 18 rounds (Rnds 11–28).
Rnd 29 (picot rim): Sl st in each of the 20 back sts. Sc in the next 4 sts, picot; repeat from * across the 52 front sts. Join. (20 sl st + 52 sc + 13 picots) Fasten off and weave in the ends.
The flat back keeps the seam smooth. The picots run only across the visible front.
Straps (make 2)
With A, ch 5.
Row 1: Sc in the 2nd ch from hook and in each ch across, turn. (4 sts)
Rows 2–36: Ch 1, sc in each st, turn. (4 sts)
Fasten off and leave a 12 in (30.5 cm) tail. Each strap is 1 x 8 in (2.5 x 20.3 cm).
Make All Pieces
- Back panel x 1: A only, about 75 g
- Pockets x 3: about 35 g A + 22 g B each (105 g A + 66 g B in total)
- Straps x 2: about 5 g A each
- Panel border: about 10 g A
Layout (front view, row numbers on the panel):
     [strap]                 [strap]
+-------------------------------------+ Row 81
|  Rows 77-81: plain                  |
|  [ POCKET 3 ]  base Row 59, rim 76  |
|  Rows 49-58: gap                    |
|  [ POCKET 2 ]  base Row 31, rim 48  |
|  Rows 21-30: gap                    |
|  [ POCKET 1 ]  base Row 3,  rim 20  |
|  Rows 1-2: plain                    |
+-------------------------------------+ Row 1
Joining
Method: Use a whipstitch with A and a tapestry needle, working from the right side.
Base seam: Place Pocket 1’s back against the panel. Whipstitch each of the 20 free front loops of Rnd 10 (M1 to M2) to sts 5–24 of panel Row 3, matching one loop to one st. That gives 20 stitches to 20 stitches with no easing.
Rim seam: The pocket’s back wall is Rnds 11–28, which is 18 rounds. Panel Rows 3–20 are also 18 rows, so the back wall lies flat. Whipstitch the 20 back sl sts of Rnd 29 to sts 5–24 of panel Row 20.
Side tacks: Tack the back wall to the panel at st 5 and at st 24, from the base up to the rim, so the pocket can’t fold sideways.
Repeat for Pocket 2 (Rows 31 and 48) and Pocket 3 (Rows 59 and 76).
Tension: Pull each stitch snug but not tight. The panel should not pucker. If it does, take out that stitch and sew it again.
Checkpoint: The panel is still 7 x 18 in (17.8 x 45.7 cm), and the pocket fronts bulge out about 4.5 in (11.4 cm).
Border
Border gauge: 4 sc per inch along every edge. Along the sides, 81 rows at 4.5 rows per inch is 18 in, and 18 in at 4 sc per inch needs 72 sc. So you work 8 sc for every 9 rows.
Rnd 1: With the right side facing, join A in st 1 of Row 81.
– Top: Sc in each of the 28 sts, ch 1 (corner).
– Side: [Sc in each of the next 8 row ends, skip 1 row end] 9 times, for 72 sc, then ch 1 (corner).
– Bottom: Sc in each of the 28 foundation ch, ch 1 (corner).
– Side: Repeat the side instructions for 72 sc, ch 1 (corner).
– Join with a sl st.
That is 28 + 72 + 28 + 72 = 200 sc plus 4 ch-1 corner sps. The corner chains are not counted as stitches.
Rnd 2: Ch 1. Working left to right, rev sc in each sc and 1 rev sc in each corner sp. Join. (204 sts) Fasten off.
Why it works: The top and bottom have 28 sts, which is 7 in (17.8 cm), the same as the panel. The sides have 72 sts, which is 18 in (45.7 cm), the same as the 81 rows. Because the stitch counts match the edges, the border neither ruffles nor pulls in. The two rounds add about 0.25 in (0.6 cm) on each side, so the panel finishes at 7.5 x 18.5 in (19.1 x 47 cm).
Attach the straps: Place each strap over core sts 3–6 or 23–26. Fold it in half over the dowel. Sew one end 1 in (2.5 cm) down the front of the panel and the other end 1 in (2.5 cm) down the back. This leaves a loop about 3 in (7.6 cm) tall above the panel.
Final Blocking
- Take out the dowel.
- Spray the whole holder until it is damp, or soak it in cool water and press the water out with a towel.
- Lay it flat and pin the panel to 7.5 x 18.5 in (19.1 x 47 cm).
- Stuff each pocket with a toilet roll wrapped in a plastic bag so it dries rounded.
- Smooth the picots so they all point upward.
- Let it dry completely, then put the dowel back in.
Final Quality-Control Checklist
- The panel is 7.5 x 18.5 in (19.1 x 47 cm) with straight edges.
- All 3 pockets are centered on sts 5–24 with even 2.2 in (5.6 cm) gaps.
- None of the carried yarn shows through the doves or sprigs.
- The cream ridges and rims sit level.
- The rim has 13 picots on each pocket.
- The straps are the same length, so the holder hangs straight.
- All ends are woven in on the back.
Troubleshooting
- Base cups or ruffles: Check the counts for Rnds 2–10, and try a hook 0.5 mm smaller or larger.
- Green shows through the cream: Hold the carried strand behind your working yarn and tug it gently every few stitches.
- The dove is off-center: Re-check M1 before Rnd 13. There must be exactly 11 A sts on each side of the motif.
- The pocket is too shallow for your rolls: Add 1 more plain A round after Rnd 26. Then sew the rim seam 1 row higher, so the seam rows still match the number of rounds.
- The panel sags: Tighten the side tacks, or use a thicker dowel.
Care
Hand wash in cool water with mild soap, press out the water in a towel, and dry flat with a roll in each pocket. Don’t tumble dry.
Final Notes
Every measurement depends on the gauge of 16 sts x 18 rows = 4 in (10.2 cm). The 28-st panel is 7 in (17.8 cm) wide and its 81 rows are 18 in (45.7 cm) long. The 72-st pocket rounds sew to the panel 20 sts to 20 sts, and the 18 side rounds match 18 panel rows. The 200-st border adds 0.25 in (0.6 cm) per side, for a finished panel of 7.5 x 18.5 in (19.1 x 47 cm). If you check each stage as you go, the finished holder will hang straight.
Happy crocheting!