

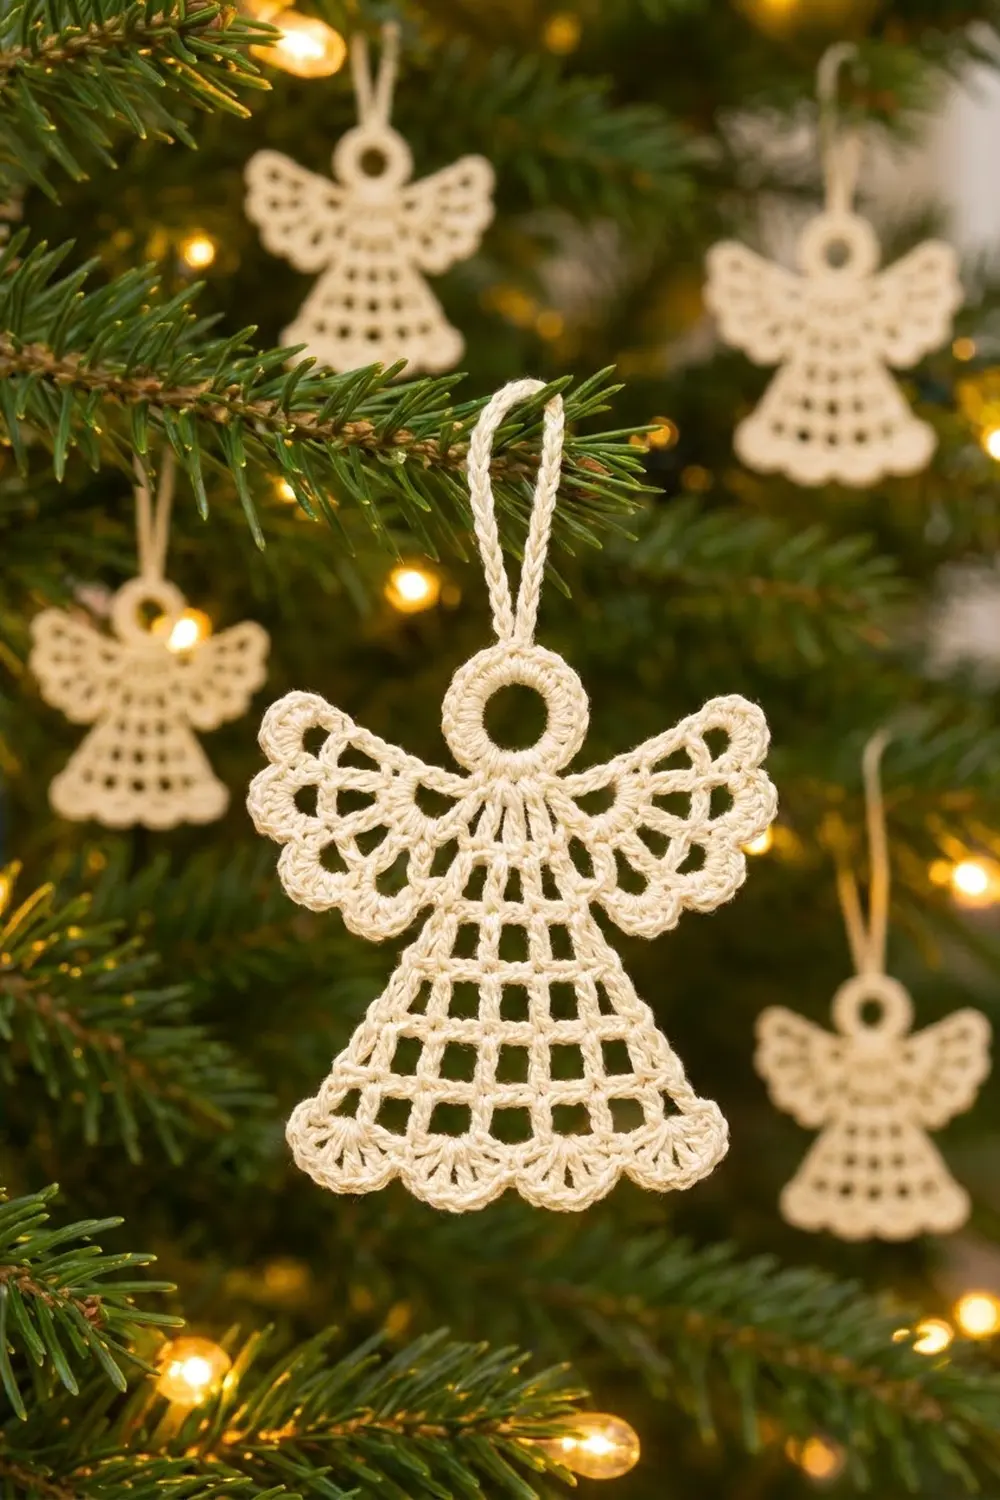
This little angel is a lace ornament made in one piece from a single cream cotton thread. Her head is a round open ring. Her filet mesh skirt widens into a bell shape. She has two fan-shaped wings with scalloped edges and a hem of five small shells. A slim chain loop at the top of her head lets her hang from a tree branch.
Using only one color keeps her soft and old-fashioned, like vintage starched snowflakes. Cream, ivory, and white all suit her. For a dressier tree, she also looks good in pale gold or silver metallic thread.
This pattern uses US crochet terms. The finished angel measures about 4.25 in (10.8 cm) from wingtip to wingtip and 3.25 in (8.3 cm) from the top of the head to the bottom of the hem. The hanging loop adds about 1.5 in (3.8 cm).
The construction is simple:
– Make the head ring first.
– Work a short dc yoke into the bottom of the ring.
– Work the mesh skirt downward from the yoke in rows.
– Finish the skirt with the hem shells.
– Work the two wings into the ends of the yoke.
– Add the hanging loop last.
Finished Size and Construction
- Finished size: 4.25 in (10.8 cm) wide x 3.25 in (8.3 cm) tall, not counting the loop
- Hanging loop: about 1.5 in (3.8 cm) long
- Skill level: Easy-intermediate (filet mesh, shells, working around a post)
- Terminology: US crochet terms
- Yarn weight: Size 3 cotton crochet thread
- Hook: 2.25 mm (US B-1)
- Number of pieces: 1 (worked in one piece; no sewing)
- Layout: Single standalone motif
- Piece size: 4.25 in x 3.25 in (10.8 cm x 8.3 cm)
- Size before border (hem): skirt 3.33 in (8.5 cm) wide; head to last mesh row 2.75 in (7.0 cm) tall
- Border depth (hem shells): 0.5 in (1.3 cm)
Materials
Yarn: Use size 3 mercerized cotton crochet thread. It has a slight sheen, shows stitch detail well, and takes starch evenly. Avoid acrylic or fuzzy fibers. They won’t keep the wing fans and mesh squares crisp after blocking.
- Cream (one color only): 6 g, about 15 m (16 yd) per angel
This amount includes extra for checking your gauge, making the hanging loop, and weaving in the ends. If you plan to make a set of angels for a tree, one 50 g ball makes about eight.
Tools:
- 2.25 mm (US B-1) crochet hook
- Tapestry needle with a small eye
- Small sharp scissors
- 1 locking stitch marker
- Blocking mat or folded towel
- Rustproof pins
- Spray starch or fabric stiffener
- Ruler or tape measure
Abbreviations (US Terms)
- ch – chain
- sl st – slip stitch
- sc – single crochet
- dc – double crochet
- sp – space
- st(s) – stitch(es)
- tch – turning chain
- RS – right side
Special stitch – Shell: Work 5 dc into the same stitch or space.
Working around a post: Put the hook around the upright body of the stitch (or under the turning chain) instead of into its top loops. This lets you build a fan from a single stitch at the edge of a row.
Gauge and Checkpoints
On an ornament, gauge matters mostly because it controls how well the wings and skirt line up. Make one test angel before starting a set, and measure it at each stage.
Mesh gauge: 3 mesh spaces (dc, ch 2) = 1 in (2.5 cm) wide, and 3 mesh rows = 1 in (2.5 cm) tall, after light blocking.
Checkpoints:
- After the head (Rnd 1): the ring measures 0.75 in (1.9 cm) across the outer edge.
- After the yoke (Row 1): the yoke is about 1.5 in (3.8 cm) wide at its widest and 0.33 in (0.8 cm) deep.
- After Row 2 (4 spaces): the first mesh row is 1.33 in (3.4 cm) wide.
- After Row 6 (10 spaces): the skirt is 3.33 in (8.5 cm) wide, and the angel is 2.75 in (7.0 cm) tall from the top of the head.
- After the hem (Row 7): the angel is 3.25 in (8.3 cm) tall and the hem is about 3.5 in (8.9 cm) wide.
- After the wings: the wingspan is 4.25 in (10.8 cm). Each wing reaches about 1.375 in (3.5 cm) out from the yoke.
If your angel is too big: go down to a 2.0 mm hook, or check that your ch-2 spaces aren’t loose. Loose chains make a floppy mesh.
If your angel is too small: go up to a 2.5 mm hook. Tight mesh also makes the skirt curl, so a slightly bigger hook usually fixes both problems.
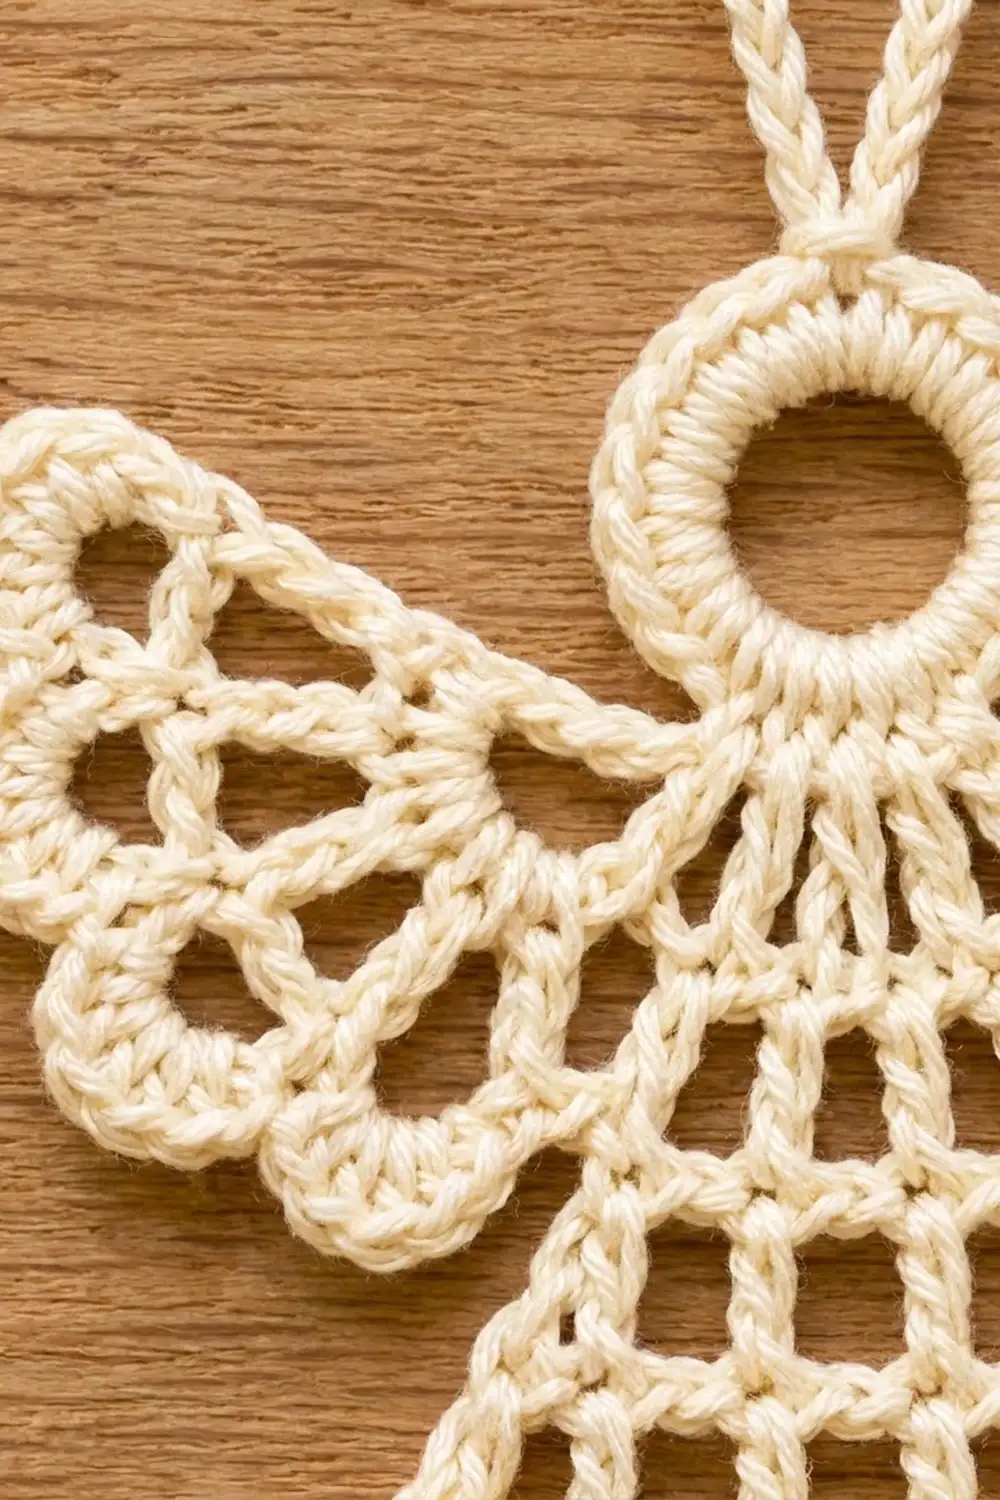
Head
Ch 10, sl st in first ch to form a ring.
Rnd 1 (RS): Ch 1, work 20 sc into the ring, sl st in first sc to join. (20 sc)
The join sits at the top of the head. Number the sc 1 to 20 in the direction you worked. Sc 1 is the first sc after the ch 1. Sc 8 through 14 are the 7 sts centered at the bottom of the ring, with sc 11 at the exact bottom. Place the marker in sc 11. Fasten off, leaving a 4 in (10.2 cm) tail.
Checkpoint: the ring is 0.75 in (1.9 cm) across and lies flat. If it ruffles, the sc are packed too loosely. If it cups, the starting chain was too tight.
Yoke
Row 1 (RS): Join thread with a sl st in sc 8. Ch 3 in sc 8 (counts as dc), 2 dc in sc 9, 2 dc in sc 10, 3 dc in sc 11, 2 dc in sc 12, 2 dc in sc 13, 1 dc in sc 14. Turn. (13 dc: 1 + 2 + 2 + 3 + 2 + 2 + 1)
The 3 dc in the marked center st keep the yoke symmetrical and make it fan gently away from the head. These radiating dc form the angel’s shoulders. Remove the marker.
Skirt
The skirt is a filet mesh. Each mesh space is one ch-2 between two dc. The turning ch-5 counts as dc + ch 2 throughout.
Row 2: Ch 5 (counts as dc + ch 2), skip next 2 dc, dc in next dc, ch 2, skip next 2 dc, dc in next dc twice, ch 2, skip next 2 dc, dc in top of tch. Turn. (5 dc, 4 ch-2 sp)
The dc land on yoke sts 1, 4, 7, 10, and 13, so the 13-st yoke divides exactly into 4 spaces.
Row 3 (increase): Ch 5 (counts as dc + ch 2), dc in first dc (the st at the base of the ch-5), ch 2, dc in next dc 4 times, working the last dc in 3rd ch of tch, ch 2, dc again in same st as last dc. Turn. (7 dc, 6 ch-2 sp)
This row adds 1 space at each edge: 4 + 2 = 6 spaces.
Row 4 (even): Ch 5 (counts as dc + ch 2), skip first ch-2 sp, dc in next dc, ch 2, dc in next dc 5 times, working the last dc in 3rd ch of tch. Turn. (7 dc, 6 ch-2 sp)
Row 5 (increase): Ch 5, dc in first dc, ch 2, dc in next dc 6 times, working the last dc in 3rd ch of tch, ch 2, dc again in same st. Turn. (9 dc, 8 ch-2 sp)
Row 6 (increase): Ch 5, dc in first dc, ch 2, dc in next dc 8 times, working the last dc in 3rd ch of tch, ch 2, dc again in same st. Turn. (11 dc, 10 ch-2 sp)
Checkpoint: the skirt is 3.33 in (8.5 cm) wide across Row 6. Its sides slope outward in a bell shape, and you have 5 rows of mesh squares. Don’t fasten off.
Border: Scalloped Hem
On this piece, the hem is the border. It runs only along the bottom edge.
Border gauge: one shell plus its sc spans 2 mesh spaces, which is 0.67 in (1.7 cm). The shells add 0.5 in (1.3 cm) of depth.
Row 7 (hem): Ch 1, sc in first dc, shell (5 dc) in next dc, sc in next dc 5 times, working the last sc in 3rd ch of tch. Fasten off. (6 sc + 5 shells of 5 dc = 6 + 25 = 31 sts)
Skip the ch-2 spaces in this row. The shells sit on dc 2, 4, 6, 8, and 10. The sc sit on dc 1, 3, 5, 7, 9, and 11.
Why the math works: Row 6 has 11 dc. With an odd count, the row can alternate sc, shell, sc and still begin and end with an sc. That keeps the hem symmetrical, with an sc anchoring each bottom corner. Each repeat (shell + sc) uses 2 dc, so 5 repeats use 10 dc. Add the starting sc: 10 + 1 = 11. The shells flare slightly past the mesh, which takes the hem from 3.33 in (8.5 cm) to about 3.5 in (8.9 cm).
Wings (Make 2)
The wings are worked directly onto the ends of the yoke (Row 1). Work them the same way on both sides.
First wing: Join thread with a sl st around the post of the last dc of Row 1 (the dc in sc 14).
Wing Row 1: Ch 4 (counts as dc + ch 1), dc around same post, ch 1 4 times, dc around same post. Turn. (6 dc, 5 ch-1 sp)
Wing Row 2: Ch 6 (counts as dc + ch 3), dc in next dc, ch 3, dc in next dc 3 times, ch 3, dc in 3rd ch of tch. Turn. (6 dc, 5 ch-3 sp)
The longer ch-3 spaces open up the fan and form the open arches of the wing.
Wing Row 3: Ch 1, sc in first dc, shell (5 dc) in next ch-3 sp, sc in next dc 5 times, working the last sc in 3rd ch of tch. Fasten off. (6 sc + 5 shells of 5 dc = 6 + 25 = 31 sts)
Second wing: Join with a sl st around the beginning ch-3 of Row 1 (in sc 8). Repeat Wing Rows 1–3.
Checkpoint: each wing reaches about 1.375 in (3.5 cm) out from the yoke, and the angel is 4.25 in (10.8 cm) across from wingtip to wingtip. Each wing should have 5 scallops along its outer edge.
Hanging Loop
Join thread with a sl st in sc 1 at the top of the head. Ch 25, sl st in the same sc. Fasten off. Folded in half, the loop is about 1.5 in (3.8 cm) long.
Weave in all ends through the backs of the sc and dc. Never run them across open mesh, where they would show.
Final Blocking
Blocking turns a soft lace angel into a crisp ornament. Pin it while it’s damp and let it dry completely.
- Wet the angel in cool water and press out the extra water in a towel. Don’t wring it.
- Lay it RS up on the blocking mat.
- Pin the head into a round shape. A pin through the center of the ring helps.
- Pin the hem corners so the hem is 3.5 in (8.9 cm) wide and the angel is 3.25 in (8.3 cm) tall.
- Pin the corners of the mesh squares along the sides so the edges are straight and slope evenly.
- Pin each hem shell at its center point to open the scallops.
- Angle each wing slightly upward. Pin the center of each wing shell so the wingspan is 4.25 in (10.8 cm).
- Spray with starch, or brush on fabric stiffener, until the thread is evenly damp.
- Let it dry for at least 12 hours. Remove the pins only when it is fully stiff.
Final Quality-Control Checklist
- The head ring is round, flat, and 0.75 in (1.9 cm) across.
- The yoke has 13 dc, centered under the head.
- The skirt has 5 mesh rows, with 4, 6, 6, 8, and 10 spaces.
- The hem has 5 even shells, with an sc at each corner.
- Each wing has 5 ch-3 arches and 5 scallops.
- Both wings match in size and angle.
- The hanging loop sits at the top center of the head.
- The angel measures 4.25 in x 3.25 in (10.8 cm x 8.3 cm).
- No tails show through the mesh.
Troubleshooting
The skirt is lopsided. On each increase row, check for a dc at the base of the ch-5 at the start and a dc in the same st at the end. Missing either one makes the count uneven.
The mesh squares look slanted. Your ch-2 is probably too tight compared with your dc. Loosen the chains, or pin the squares straight when blocking.
The yoke pulls the head out of shape. The yoke must use only sc 8–14. Using more sts stretches the ring.
The wings curl forward. Wing Row 1 gets crowded on a short post. Spread the dc along the full height of the post, then block firmly.
One wing is bigger than the other. Count the ch-3 spaces in Wing Row 2 on both wings. Each must have 5.
The hem ruffles. You probably worked the shells into the ch-2 spaces instead of into the dc. Rework Row 7 into the dc only.
Care
Hand wash in cool water with mild soap, then block and starch again to restore the shape. Store flat in tissue paper so the wings and hem don’t get crushed.
Final Notes
Each measurement builds on the one before:
– The 20-sc head ring is 0.75 in (1.9 cm) across.
– Its 7 bottom sts make a 13-dc yoke, which divides into 4 mesh spaces.
– Three increase rows widen the skirt to 10 spaces, or 3.33 in (8.5 cm).
– The 11 dc of Row 6 hold 5 hem shells, which bring the angel to 3.25 in (8.3 cm) tall.
– Two 5-arch wings bring the span to 4.25 in (10.8 cm).
If every checkpoint matches, your angel will hang straight and even.
Happy crocheting!