

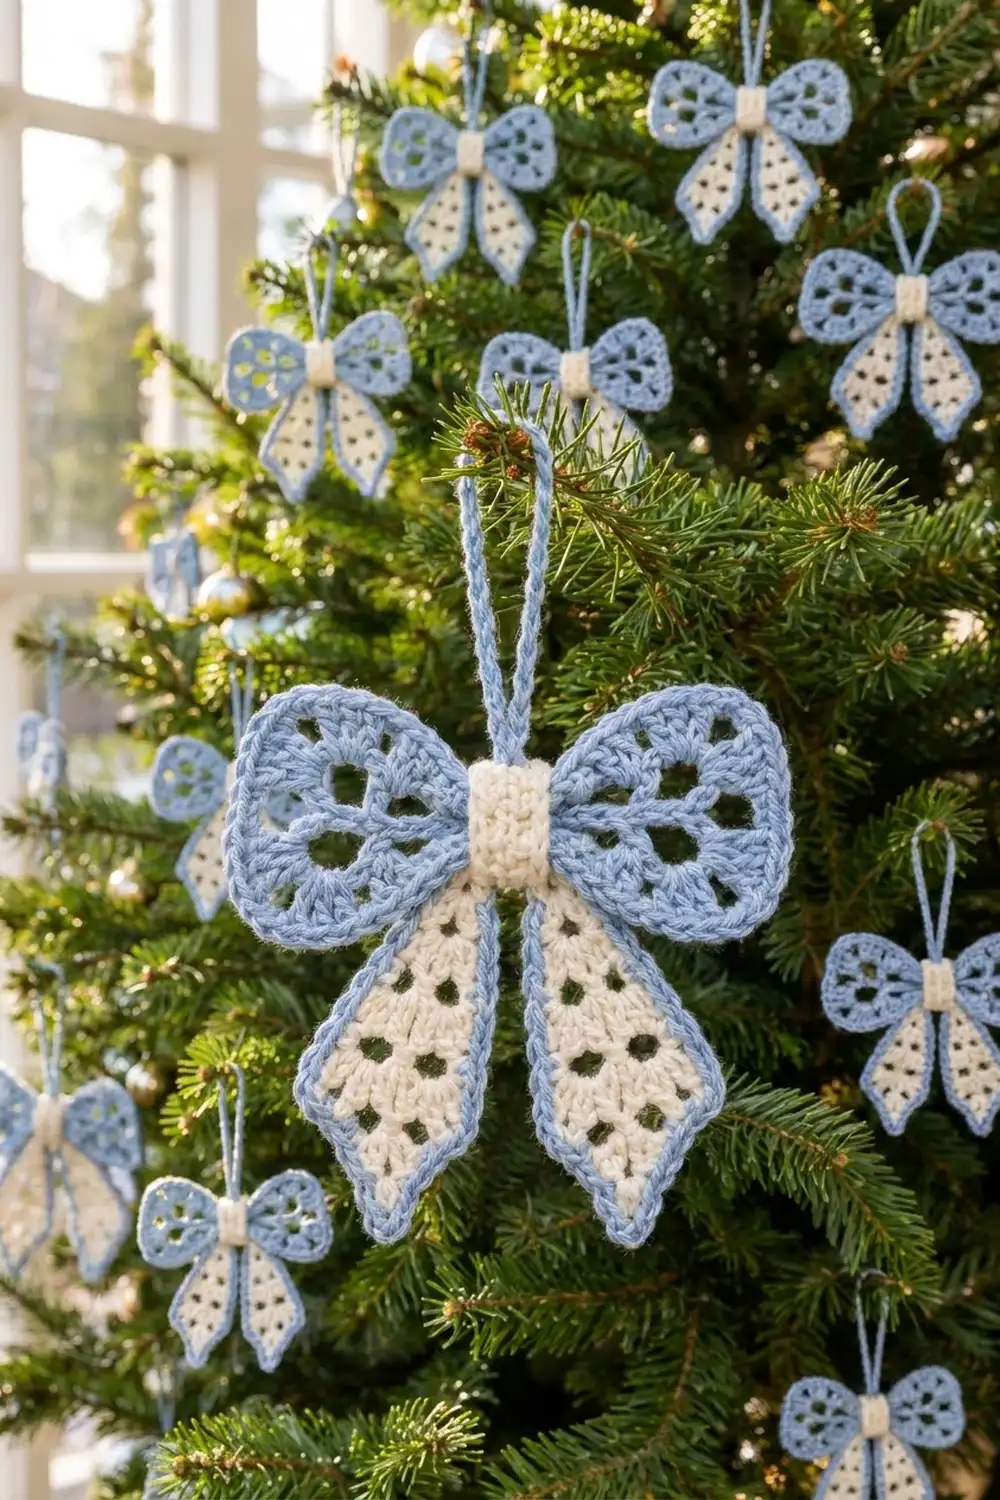
This little bow is made for the tree. Two lacy powder-blue wings sit over a pair of cream eyelet tails. A ribbed cream band cinches the middle, and a slim blue cord loop lets it hang from any branch.
The colors are soft and wintry. Light blue is used for the wings, the tail edging and the loop. Warm cream is used for the tails and the center band. The open windows in the wings and the staggered holes in the tails let the greenery show through, so a whole set looks light rather than heavy.
The pattern uses US crochet terms. The finished bow measures 5.25 in (13.3 cm) wide and 5.5 in (14.0 cm) tall, or 8 in (20.3 cm) tall including the hanging loop.
Construction is simple. You crochet two wings in the round and two tails in rows, then edge each tail with one round of blue. Next you make a short ribbed center band and a slip-stitch cord. Finally you pinch, stack and wrap everything into one bow.
Finished Size and Construction
- Finished size: 5.25 in (13.3 cm) wide x 5.5 in (14.0 cm) tall; 8 in (20.3 cm) tall with loop
- Skill level: Easy to intermediate
- Terminology: US crochet terms
- Yarn weight: Light (DK / #3) cotton or cotton blend
- Hook: 3.5 mm (E-4)
- Number of pieces: 1 finished ornament, assembled from 6 small parts (2 wings, 2 tails, 1 center band, 1 cord)
- Layout: Wings side by side at the top, tails angled downward in a V behind them, band over the center, loop rising from the back
- Wing size: 2.75 in (7.0 cm) across
- Tail size before border: 1.4 in (3.6 cm) wide x 4.0 in (10.2 cm) long
- Tail border depth: 1 round of sc, about 0.15 in (0.4 cm) per edge
- Tail size after border: 1.7 in (4.3 cm) wide x 4.3 in (10.9 cm) long
Materials
Choose a smooth, tightly plied cotton. It shows the stitches clearly, holds the lace open and keeps the rope-like wing edge crisp. Acrylic works but will look softer and fuzzier.
- Color A, light blue: 15 g, about 35 m (38 yd)
- Color B, cream: 10 g, about 23 m (25 yd)
These amounts include a comfortable margin for a gauge test and for weaving in ends. One 50 g ball of each color will make several ornaments.
Tools:
- 3.5 mm (E-4) crochet hook
- Tapestry needle
- Scissors
- Stitch marker
- Rust-proof pins and a foam blocking mat
- Spray bottle with water
- Ruler or tape measure
Abbreviations (US Terms)
- ch – chain
- sl st – slip stitch
- sc – single crochet
- dc – double crochet
- dc2tog – double crochet 2 together
- BLO – back loop only
- sp – space
- sk – skip
- st(s) – stitch(es)
- RS – right side
Special stitch – dc2tog: (Yarn over, insert hook in next st, pull up a loop, yarn over, pull through 2 loops) twice, yarn over and pull through all 3 loops on hook. Counts as 1 st.
Back-bump slip stitch: Insert the hook into the raised bump on the back of the chain instead of the front loops. This gives the cord a rounded, braided look.
Gauge and Checkpoints
Gauge: 20 dc and 10 rows = 4 in (10.2 cm); 20 sc and 22 rows = 4 in (10.2 cm). Each dc row is 0.4 in (1.0 cm) tall, and 7 dc measure 1.4 in (3.6 cm).
Make one wing and one tail before anything else. They are your real gauge test.
Checkpoints:
- Wing after Round 2: 1.7 in (4.3 cm) across
- Wing after Round 3: 2.4 in (6.1 cm) across
- Wing after Round 5: 2.75 in (7.0 cm) across, lying flat
- Tail after Row 8: 1.4 in (3.6 cm) wide x 3.2 in (8.1 cm) long
- Tail after Row 10: 4.0 in (10.2 cm) along the long side
- Center band after Row 12: 0.8 in (2.0 cm) wide x 2.2 in (5.6 cm) long
Too big? Go down to a 3.25 mm hook. Too small? Go up to a 3.75 mm hook. If the wing ruffles, Round 5 is too loose; if it cups, Round 5 is too tight. Change the hook size rather than the stitch counts.
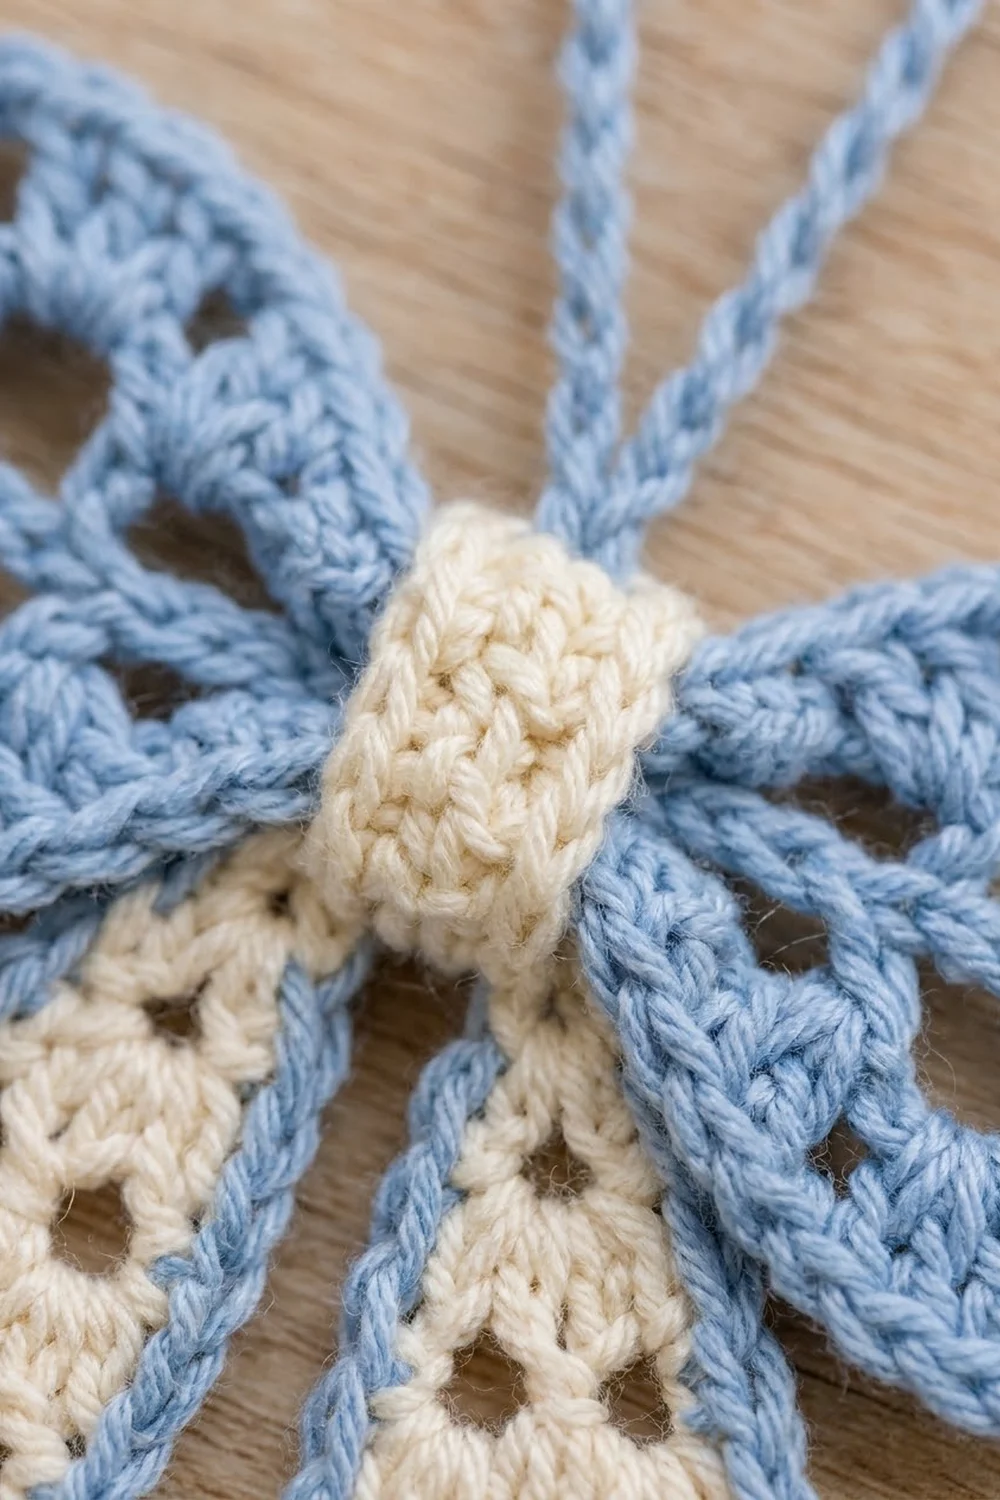
Wings (Make 2, Color A)
Each wing is a small lace circle. Later it is pinched at one point to form the fan shape.
Round 1: Ch 6, sl st to first ch to form a ring. Ch 1, 12 sc in ring. Join with sl st to first sc. (12 sc)
Round 2: Ch 3 (counts as dc), dc in same st, ch 2, sk next st, 2 dc in next st, ch 2, sk next st; repeat from * 4 more times. Join with sl st to top of ch-3. (12 dc in 6 pairs, 6 ch-2 sps)*
Round 3: Sl st in next dc and into next ch-2 sp. Ch 3 (counts as dc), 3 dc in same sp, ch 2, 4 dc in next ch-2 sp, ch 2; repeat from * 4 more times. Join with sl st to top of ch-3. (24 dc in 6 shells, 6 ch-2 sps)*
The ch-2 spaces above the Round 2 pairs make the large open windows around the center ring.
Round 4: Ch 1, sc in each dc and 3 sc in each ch-2 sp around. Join. (24 sc + 18 sc = 42 sc)
Round 5 (rope edge): Ch 1, sc in next 6 sts, 2 sc in next st; repeat from * 5 more times. Join. (42 sc worked 1 per st + 6 extra = 48 sc)*
Fasten off, leaving a 12 in (30.5 cm) tail for cinching. Check: 2.75 in (7.0 cm) across.
Tails (Make 2, Color B)
The tails are worked flat in dc rows with staggered eyelets, then shaped to a slanted point.
Row 1 (RS): Ch 9. Dc in 4th ch from hook (the skipped ch count as dc) and in each of next 5 ch. Turn. (7 sts)
Row 2 (eyelet A): Ch 3 (counts as dc throughout), dc in next st, ch 1, sk next st, dc in next st, ch 1, sk next st, dc in last 2 sts. Turn. (5 dc + 2 ch-1 sps = 7 sts)
Row 3: Ch 3, dc in each dc and each ch-1 sp across. Turn. (7 sts)
Row 4 (eyelet B): Ch 3, dc in next 2 sts, ch 1, sk next st, dc in last 3 sts. Turn. (6 dc + 1 ch-1 sp = 7 sts)
Row 5: Repeat Row 3. (7 sts)
Row 6: Repeat Row 2. (7 sts)
Row 7: Repeat Row 3. (7 sts)
Row 8: Repeat Row 4. (7 sts)
Check: 1.4 in (3.6 cm) wide x 3.2 in (8.1 cm) long. The holes alternate two, then one, which gives the staggered eyelet pattern.
Row 9 (shaping): Ch 3, dc in next 3 sts, dc2tog over next 2 sts, leave last st unworked. Turn. (5 sts)
Row 10 (shaping): Sl st in first 2 sts, ch 3 (counts as dc), dc in each of last 3 sts. (4 sts)
Both decreases fall on the same edge, so that edge steps inward and forms the slanted point. The other edge stays straight for all 10 rows and is 4.0 in (10.2 cm) long. Fasten off and weave in ends.
Make the second tail exactly the same. During assembly you will flip it over, which mirrors the slant so the points angle outward.
Tail Border (Color A, Both Tails)
Border gauge: One round of sc adds about 0.15 in (0.4 cm) to each edge. Each tail grows from 1.4 in x 4.0 in (3.6 cm x 10.2 cm) to 1.7 in x 4.3 in (4.3 cm x 10.9 cm).
Round 1: With RS facing, join Color A in the first foundation ch at the top of the tail. Work in this order:
- Top edge: Ch 1, 3 sc in first foundation ch (corner), sc in next 5 ch, 3 sc in last ch (corner). (11 sc)
- Straight side: 2 sc in each row-end of Rows 1–10. (20 sc)
- Row 10 end: 3 sc in the outer st of Row 10 (point), sc in each of next 3 sts. (6 sc)
- Slanted edge: Work down the stepped edge: 1 sc in each of the 2 slip-stitched Row 9 sts, 2 sc in the Row 9 row-end, 2 sc in the unworked Row 8 st. (6 sc)
- Inner side: 2 sc in each row-end of Rows 8–1. (16 sc)
Join with sl st to first sc. (11 + 20 + 6 + 6 + 16 = 59 sc)
Fasten off and weave in ends.
Why the math works: A dc row is about as tall as two sc are wide, so 2 sc per dc row-end keeps the sides flat. Ten rows x 0.4 in = 4.0 in (10.2 cm) of dc, which matches 20 sc at 5 sc per inch. The top edge has 7 foundation stitches. Each corner stitch gets 3 sc, which adds 2 extra per corner, so the top edge is 7 + 4 = 11 sc and lies flat without pulling. The extra stitches at the point keep the tip sharp instead of rounded.
Center Band (Make 1, Color B)
Row 1: Ch 5. Sc in 2nd ch from hook and in each ch across. Turn. (4 sc)
Rows 2–12: Ch 1, sc in BLO of each st across. Turn. (4 sc each row)
Working in back loops builds raised ridges that look like ribs once the band is wrapped. Check: 0.8 in (2.0 cm) wide x 2.2 in (5.6 cm) long. Fasten off, leaving a 10 in (25.4 cm) tail for sewing.
Hanging Cord (Make 1, Color A)
Ch 36. Sl st in the back bump of 2nd ch from hook and in each ch across. (35 sl sts)
The cord should measure about 6 in (15.2 cm). Fasten off, leaving a 6 in (15.2 cm) tail.
Assembly
- Pinch the wings. Thread a wing’s long tail onto the needle. Run it in and out along the outer edge for about 1 in (2.5 cm). Pull firmly to gather that section into a tight point, then wrap the yarn 3 times around the gathers. Secure it but do not cut. Repeat on the second wing.
- Place the tails. Lay both tails RS up, then flip one over so the slanted points face outward. Overlap their top edges by about 0.5 in (1.3 cm) so they form a narrow V.
- Add the wings. Place the wings over the top of the tails with the pinched points touching at the center. The total width should be 5.25 in (13.3 cm).
- Add the cord. Fold the cord in half. Lay both ends behind the center, overlapping the back of the tails by 0.5 in (1.3 cm). The loop should rise about 2.5 in (6.4 cm) above the wings.
- Tie it together. Use the wing tails to stitch the pinched points, tail tops and cord ends together in a tight bundle.
- Wrap the center. Wrap the center band around the bundle with the ridges facing out and the short ends meeting at the back. Whipstitch the ends together, catching the bundle once or twice so the band cannot slide.
- Weave in all remaining ends on the back.
Size checkpoint: 5.25 in (13.3 cm) wide, 5.5 in (14.0 cm) from the top of the wings to the tail points, and 8 in (20.3 cm) including the loop.
Final Blocking
- Spray the ornament until it is damp but not wet.
- Pin it flat on the mat, RS up.
- Pin each wing open into a smooth fan, pushing a pin through each window to round it out.
- Pin each tail straight along its long edge and pin the point sharp.
- Pin the loop into a neat teardrop.
- Check the overall size: 5.25 in x 5.5 in (13.3 cm x 14.0 cm).
- Let it dry completely, then unpin.
For extra stiffness on the tree, lightly mist with fabric stiffener before step 2.
Final Quality-Control Checklist
- Each wing has 48 sc in Round 5 and 6 clear windows
- Each wing measures 2.75 in (7.0 cm) before pinching
- Each tail has 7 sts in Rows 1–8, 5 sts in Row 9 and 4 sts in Row 10
- The tail eyelets are staggered, not stacked
- Each tail border has 59 sc and lies flat
- The tail points angle outward as mirror images
- The center band has 12 ridged rows and the seam is hidden at the back
- The loop is centered and firmly anchored
- All ends are woven in on the back
Troubleshooting
Wing cups or curls: Round 5 is too tight. Rework it with a slightly larger hook.
Wing ruffles: Round 4 or 5 is too loose. Go down a hook size for those rounds.
Windows close up: Your chains are too tight. Make the ch-2 spaces a little looser.
Tails curve: The border is uneven. Count the side stitches again: 20 on the straight side, 16 on the inner side.
Both tail points face the same way: Flip one tail over so its wrong side faces up.
Center band too loose: Remove 1 or 2 rows, or stitch it tighter at the back.
Bow tilts on the tree: The loop is off-center. Sew its ends again directly behind the band.
Care
Hand-wash in cool water with mild soap, press the water out in a towel, and reshape the bow flat to dry. Store it flat or hanging so the wings keep their shape.
Final Notes
The measurements build on each other and are easy to check. Each wing grows from a 12-sc ring to 48 sc and 2.75 in (7.0 cm). Each tail is 7 sts and 10 rows, 1.4 in x 4.0 in (3.6 cm x 10.2 cm), and one 59-sc border brings it to 1.7 in x 4.3 in (4.3 cm x 10.9 cm). The 0.8 in (2.0 cm) band and the 6 in (15.2 cm) cord pull everything into a 5.25 in x 5.5 in (13.3 cm x 14.0 cm) bow that stands 8 in (20.3 cm) tall with its loop. Once the first bow is right, the rest go quickly, and a full set makes a lovely blue-and-cream tree.
Happy crocheting!