

This shooting star is a small, lacy holiday ornament. A cream five-point star sits on the left. Three curved buttery-yellow tails sweep out from its right side, getting shorter from top to bottom. A slim yellow chain loop at the top point lets it hang from a branch or a gift tag.
The star has a small open ring in the center and five puffy double crochet clusters with open chain spaces between them. Its solid pointed tips are finished with a single crochet edge. Each tail is a narrow crescent strip with rectangular eyelets separated by pairs of double crochet bars, and its ends taper into slip stitches.
The pattern uses US crochet terms throughout. The finished ornament measures about 5.5 in (14.0 cm) wide and 3.5 in (8.9 cm) tall, not counting the loop. The star alone is 2.5 in (6.4 cm) from point to point.
First, crochet the star in the round. Next, work three tails flat in rows from a foundation chain and sew them behind the star. Finally, add a chain loop. That makes four crocheted pieces plus a loop, joined into one ornament.
Finished Size and Construction
- Finished size: about 5.5 in (14.0 cm) wide x 3.5 in (8.9 cm) tall, plus a 1.25 in (3.2 cm) hanging loop
- Skill level: Easy to intermediate (clusters, graduated stitch heights, light sewing)
- Terminology: US crochet terms
- Yarn weight: Size 3 cotton crochet thread / light fingering cotton
- Hook: 2.25 mm (US B-1)
- Number of pieces: 4 (1 star, 3 tails), plus 1 chain loop
- Layout: Star on the left; tails fan out to the right, with the long tail on top and the short tail at the bottom
- Star size: 2.5 in (6.4 cm) point to point
- Star size before border: 2.25 in (5.7 cm) point to point
- Border depth: 1 round of sc, about 0.125 in (0.3 cm)
- Tail lengths (inner edge): 3.75 in (9.5 cm), 3.25 in (8.3 cm), and 2.75 in (7.0 cm)
Materials
Choose a smooth mercerized cotton thread in size 3, or a light fingering-weight cotton. Mercerized cotton gives crisp stitch definition, keeps the star points sharp after blocking, and won’t fuzz on a tree. Avoid fluffy or stretchy yarns, because they will close up the eyelets.
- Color A, Cream: 5 g, about 14 m (15 yd), for the star
- Color B, Buttery Yellow: 5 g, about 14 m (15 yd), for the three tails and the hanging loop
These quantities include a margin for a gauge test and long sewing tails.
Tools:
- 2.25 mm (US B-1) crochet hook
- Tapestry needle with a small eye
- Scissors
- Stitch marker
- Ruler or measuring tape
- Rust-proof pins and a foam blocking mat
- Spray bottle with water, or light spray starch (optional)
Abbreviations (US Terms)
- ch – chain
- sl st – slip stitch
- sc – single crochet
- hdc – half double crochet
- dc – double crochet
- tr – treble crochet
- sk – skip
- sp – space
- st(s) – stitch(es)
- MR – magic ring
- beg-CL – beginning cluster
- CL – 3-dc cluster
Beginning cluster (beg-CL): Ch 2. [Yo, insert hook in the same st, yo and pull up a loop, yo and draw through 2 loops] twice. Yo and draw through all 3 loops on hook.
3-dc cluster (CL): [Yo, insert hook in the indicated st, yo and pull up a loop, yo and draw through 2 loops] 3 times. Yo and draw through all 4 loops on hook.
Gauge and Checkpoints
Gauge: 14 sc = 2 in (5.1 cm) with a 2.25 mm hook. Gauge matters mainly so the tails are the right size for the star.
Make the star first as your test piece, and measure at each checkpoint:
- After Round 1: the ring is about 0.6 in (1.5 cm) across.
- After Round 2: about 1.25 in (3.2 cm) across, measured from cluster to cluster.
- After Round 3: 2.25 in (5.7 cm) point to point.
- After Round 4 (border): 2.5 in (6.4 cm) point to point.
- Tail A, Row 1: the strip of 27 sc is about 3.75 in (9.5 cm) long before curving.
If the star is more than 0.25 in (0.6 cm) too big, change to a 2.0 mm hook. If it is too small, change to a 2.5 mm hook. Use that same hook for the tails so the proportions stay correct.
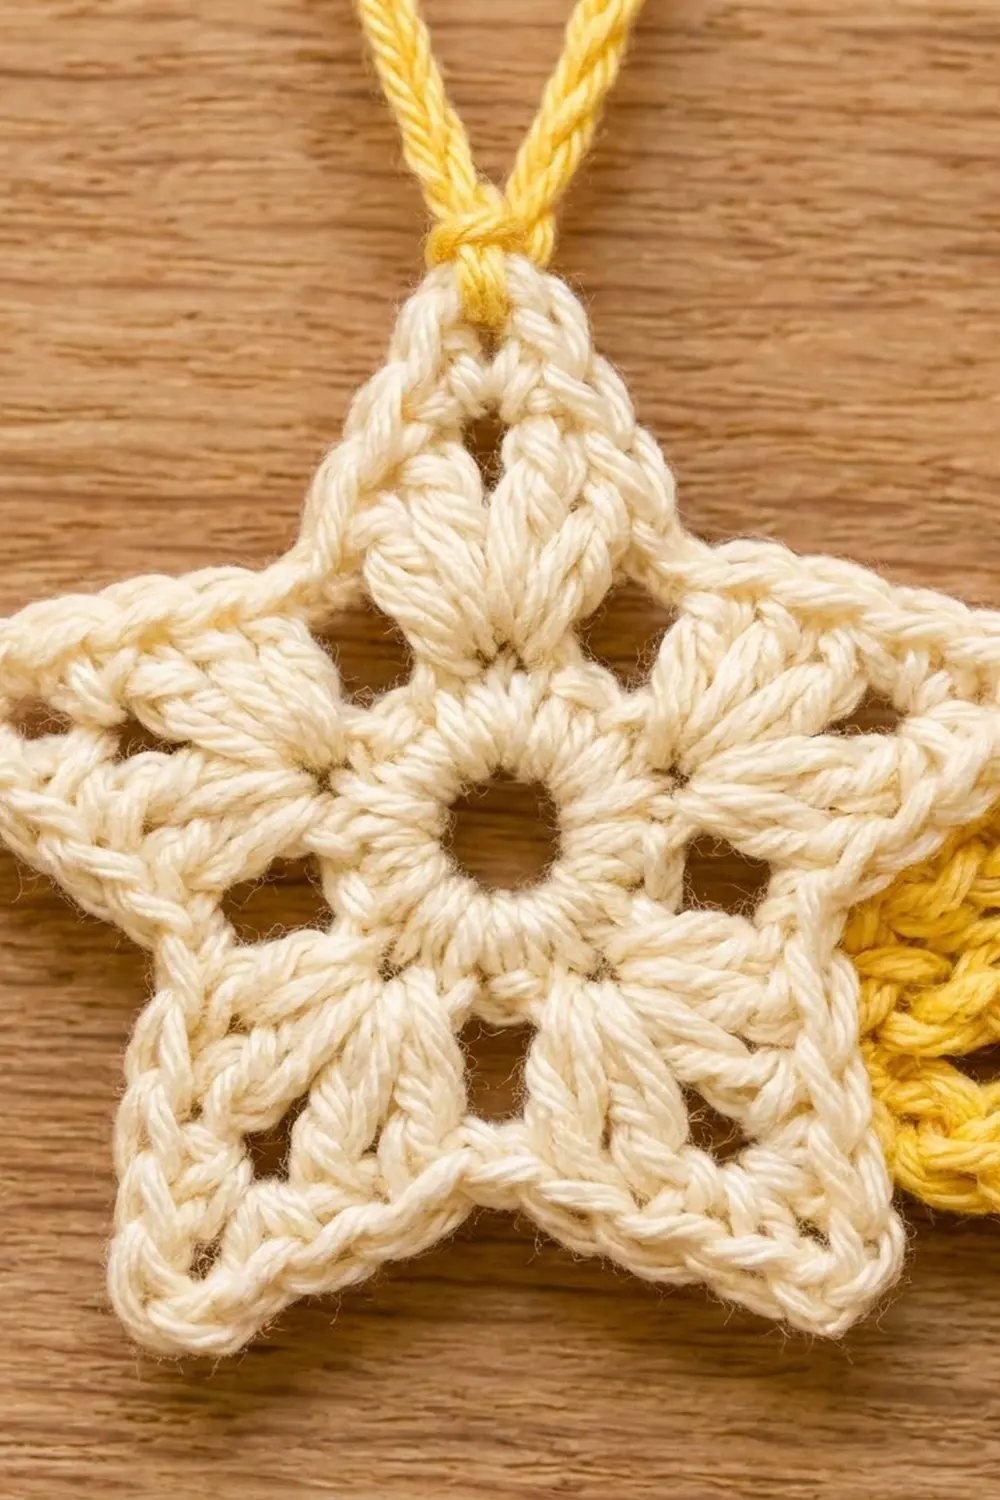
Star (Make 1, Color A)
Round 1: Make a MR. Ch 3 (counts as dc), then work 14 dc into the ring. Pull the ring snug, but leave a small open hole in the center. Join with sl st to the top of the beginning ch-3. (15 dc)
Round 2: Beg-CL in the same st. Ch 4, sk 2 sts, CL in next st. Repeat from * 3 more times. Ch 4, sk the last 2 sts, and join with sl st to the top of the beg-CL. (5 clusters, 5 ch-4 sps)
Check: each repeat uses 3 sts of Round 1 (1 cluster st + 2 skipped sts), and 5 x 3 = 15.
Round 3 (points): Ch 1. Sc in the top of the beg-CL (this is a valley sc).
In the next ch-4 sp, work (sc, hdc, 2 dc, tr, ch 2, tr, 2 dc, hdc, sc). Sc in the top of the next CL. Repeat from * 3 more times.
In the last ch-4 sp, work (sc, hdc, 2 dc, tr, ch 2, tr, 2 dc, hdc, sc). Join with sl st to the first sc. (55 sts: 5 valley sc + 5 points of 10 sts each; 5 ch-2 tip sps)
The tr stitches give each point its height, and the ch-2 makes a sharp tip. The clusters sit at the inner corners, and the ch-4 spaces show as lacy windows behind each point. Do not fasten off.
Tails (Make 3, Color B)
All three tails are built the same way:
- Row 1 is a sc foundation.
- Row 2 rises from slip stitches to double crochet and back down, with eyelets in the middle.
- Row 3 adds extra sc into each eyelet. This makes the outer edge longer, which curves the strip into a crescent.
Leave a 10 in (25.4 cm) starting tail on each piece for sewing.
Tail A (Long)
Row 1: Ch 28. Sc in 2nd ch from hook and in each ch across. (27 sc)
Row 2: Ch 1, turn. Sl st in first 3 sts, sc in next 2 sts, hdc in next 2 sts. Ch 2, sk 2 sts, dc in next 2 sts. Repeat from * 2 more times. Ch 2, sk 2 sts, hdc in next 2 sts, sc in next 2 sts, sl st in last 2 sts. (19 sts + 4 ch-2 sps)
Check: 3 + 2 + 2 + (3 x 4) + 2 + 2 + 2 + 2 = 27 sts of Row 1 used.
Row 3 (trim): Ch 1, turn. Sl st in first 2 sl sts, sc in next 2 sc, sc in next 2 hdc. 3 sc in ch-2 sp, sc in next 2 dc. Repeat from * 2 more times. 3 sc in last ch-2 sp, sc in next 2 hdc, sc in next 2 sc, sl st in last 3 sl sts. (19 sts worked 1 per st + 12 sc in 4 ch-2 sps = 31 sts)
Fasten off with a short end and weave it in.
Tail B (Medium)
Row 1: Ch 24. Sc in 2nd ch from hook and in each ch across. (23 sc)
Row 2: Ch 1, turn. Sl st in first 3 sts, sc in next 2, hdc in next 2. Ch 2, sk 2, dc in next 2. Repeat from * once more. Ch 2, sk 2, hdc in next 2, sc in next 2, sl st in last 2. (17 sts + 3 ch-2 sps)
Row 3 (trim): Ch 1, turn. Work as for Tail A, Row 3, but repeat from * only 1 more time (2 repeats in total) before the last ch-2 sp. (17 sts worked 1 per st + 9 sc in 3 ch-2 sps = 26 sts)
Tail C (Short)
Row 1: Ch 20. Sc in 2nd ch from hook and in each ch across. (19 sc)
Row 2: Ch 1, turn. Sl st in first 3 sts, sc in next 2, hdc in next 2, ch 2, sk 2, dc in next 2, ch 2, sk 2, hdc in next 2, sc in next 2, sl st in last 2. (15 sts + 2 ch-2 sps)
Row 3 (trim): Ch 1, turn. Work as for Tail A, Row 3, but work the * section only once before the last ch-2 sp. (15 sts worked 1 per st + 6 sc in 2 ch-2 sps = 21 sts)
Pin each tail into a gentle curve with the foundation edge on the inside. Along the inner edge, Tail A should measure 3.75 in (9.5 cm), Tail B 3.25 in (8.3 cm), and Tail C 2.75 in (7.0 cm). Each tail is about 0.4 in (1.0 cm) wide at its center.
Make All Pieces
- Color A: 1 star
- Color B: Tail A, Tail B, Tail C, and 1 hanging loop (made during joining)
Layout, seen from the front:
        [loop]
          |
       [ STAR ]  ~~~~~~ Tail A (long, top)
       [      ]  ~~~~~ Tail B (medium, middle)
       [      ]  ~~~~ Tail C (short, bottom)
The starting end of each tail sits behind the right side of the star. The tails fan out to the right and curve downward, with about 0.125 in (0.3 cm) between them.
Border (Star, Color A)
Pick the star back up from your live loop at the end of Round 3.
Border gauge: 6 sc per side of each point, about 0.85 in (2.2 cm) along each edge.
Round 4 (border): Ch 1. Skip the valley sc you joined into.
Sc in each of next 5 sts (sc, hdc, 2 dc, tr). Work (sc, ch 2, sc) in the ch-2 tip sp. Sc in each of next 5 sts (tr, 2 dc, hdc, sc). Sk the valley sc. Repeat from * 4 more times.
Join with sl st to the first sc. (60 sc + 5 ch-2 tips)
Per side: Each point has 2 sides. Each side has 5 sc worked into the point’s stitches plus 1 sc of the tip pair, for 6 sc per side. The ch-2 tip itself is not counted on either side.
Why the math works:
- Round 3 has 10 stitches per point and 1 valley sc between points.
- The border works 1 sc into each of the 10 point stitches and adds 2 sc at the tip. That gives 12 sc per point: 5 x 12 = 60 sc, which also equals 10 sides x 6 sc.
- Skipping the 5 valley sc pulls each inner corner in tight, so the star stays crisp instead of ruffling.
- One sc round adds about 0.125 in (0.3 cm) at each point. That takes the star from 2.25 in (5.7 cm) to 2.5 in (6.4 cm).
Fasten off and weave in the ends on the wrong side.
Joining
Method: Whipstitch with the Color B starting tails. Sew on the back of the star only, so no stitches show on the front.
- Lay the star right side down. Find the valley between the right point and the lower-right point.
- Place the starting end of Tail A (the end where Row 2 begins with 3 sl sts) behind the right point, about 0.25 in (0.6 cm) above the valley. Overlap it onto the star by 0.25 in (0.6 cm).
- Place Tail B behind the valley itself, and Tail C behind the upper edge of the lower-right point.
- Stitch-to-stitch logic: For each tail, sew the first 3 foundation stitches to 3 consecutive Round 3 stitches on the back of the star. Work through the back bars only, and keep out of the border. Make 1 whipstitch per stitch, so each tail gets 3. Then add 1 tacking stitch through the Row 3 edge so the tail lies flat.
- Tension: Pull each stitch just snug enough for the tail to lie flat. If it’s too tight, the point will cup. If it’s too loose, the tail will droop when the ornament hangs.
- Weave each end through the backs of 4–5 star stitches, then trim.
Hanging loop (Color B): Join with sl st in the ch-2 tip sp of the top point. Ch 18, sl st back into the same tip sp, and fasten off. Weave the ends into the back of the border. The loop stands about 1.25 in (3.2 cm) tall.
Size checkpoint: Measured flat, the ornament is about 5.5 in (14.0 cm) from the left star point to the farthest tail tip. It is about 3.5 in (8.9 cm) from the top point to the lowest tail tip.
Final Blocking
- Mist the ornament with water or spray starch until it is damp but not dripping.
- Lay it right side up on the blocking mat.
- Pin the 5 star tips so the star measures 2.5 in (6.4 cm) point to point.
- Push a pin straight down into each of the 5 valleys to sharpen the inner corners.
- Use a pin tip to open the center ring and the ch-4 windows.
- Shape each tail into a smooth curve. Pin both tapered ends, then pin the eyelets open.
- Check the size again: 5.5 in (14.0 cm) x 3.5 in (8.9 cm).
- Let it dry for at least 4 hours before you unpin it.
Final Quality-Control Checklist
- The star has 5 even points, each with 6 sc per side and a ch-2 tip.
- The center ring is open and round.
- The 5 clusters are puffy and evenly spaced.
- Row 3 of the tails has 31, 26, and 21 sts.
- Every eyelet is open and rectangular.
- The tails go from long to short, top to bottom, with even gaps.
- No sewing shows on the front.
- The loop is centered on the top point.
- All ends are securely woven in.
Troubleshooting
- Rounded star points: Check that you worked the ch-2 at each tip, then pin the tips sharply while blocking.
- The star ruffles: You probably worked into the valley sc on Round 4. Skip it.
- The center hole is too big: Pull the magic ring tighter before you join Round 1.
- The tails won’t curve: Check that you worked 3 sc in every ch-2 sp on Row 3, then block with starch.
- The tails twist: Your foundation chain may have been twisted. Re-block to straighten them.
- The ornament tips forward when hung: Move the tail seams slightly higher.
Care
Hand wash in cool water with mild soap. Press out the water in a towel and dry the ornament flat, pinned to shape. Store it flat so the points stay crisp.

Final Notes
Here is the measurement chain:
- Gauge: 14 sc = 2 in (5.1 cm).
- The star goes from a 0.6 in (1.5 cm) ring to 1.25 in (3.2 cm) after the clusters, 2.25 in (5.7 cm) after the points, and 2.5 in (6.4 cm) after the border.
- The tails measure 3.75 in (9.5 cm), 3.25 in (8.3 cm), and 2.75 in (7.0 cm).
- Joined, the ornament is 5.5 in (14.0 cm) x 3.5 in (8.9 cm), plus a 1.25 in (3.2 cm) loop.
If each checkpoint matches, the finished ornament will match too.
Happy crocheting!