

The Hollyberry Cascade is a hanging strand curtain made from slim green cords, each one dotted with holly clusters. Every cluster has two pointed holly leaves and three plump burgundy berries, so the window looks like a soft, festive rain of greenery.
The palette is just two colors: moss green for the cords and leaves, and deep burgundy red for the berries. The style is cozy and traditional, and the open strands still let daylight through.
This pattern uses US crochet terms. The finished panel has 12 strands spaced 3 in (7.6 cm) apart, covering about 36 in (91.4 cm) of rod. Each strand hangs 64 in (162.6 cm) from the top of the rod.
The construction is simple and modular. You crochet each cord as one long slip-stitch cord, work the leaves around a foundation chain, make the berries in the round, then sew 8 holly clusters to each cord. The top of every cord folds into a loop that slides over the rod.
Finished Size and Construction
- Finished size: 12 strands, about 36 in (91.4 cm) wide on the rod, 64 in (162.6 cm) long
- Skill level: Easy
- Terminology: US
- Yarn weight: Worsted (medium #4)
- Hook: 4.0 mm (US G-6)
- Number of pieces: 12 cords, 192 leaves, 288 berries (96 holly clusters)
- Layout: 12 strands in one row, 3 in (7.6 cm) apart, with clusters staggered between neighboring strands
- Piece size: cord drop 60 in (152.4 cm); leaf 3 in x 1.5 in (7.6 cm x 3.8 cm); berry 0.75 in (1.9 cm)
- Size before border: 60 in (152.4 cm) drop below the loop join
- Border depth: top hanging loop 4 in (10.2 cm) tall; no edging along the strands
Materials
Choose a smooth, firm acrylic or cotton-blend worsted yarn with good stitch definition. A tightly plied yarn gives crisp leaf points and a cord that doesn’t stretch much under the weight of the clusters. The amounts below assume about 183 m per 100 g.
- Moss green: 650 g, about 1,190 m (cords and leaves)
- Deep burgundy red: 300 g, about 549 m (berries)
These amounts include a margin of about 15-20% for gauge differences, sewing tails, and a test swatch.
Tools:
- 4.0 mm (US G-6) crochet hook
- Tapestry needle
- Polyester fiberfill (one small bag)
- Locking stitch markers (at least 10)
- Measuring tape
- Scissors
- Blocking mat and rust-proof pins
- Spray bottle
Abbreviations (US Terms)
- ch – chain
- sl st – slip stitch
- sc – single crochet
- hdc – half double crochet
- dc – double crochet
- sc2tog – single crochet 2 together
- st(s) – stitch(es)
- rnd – round
Special stitch – picot: ch 3, sl st in 3rd ch from hook. Each picot makes one sharp holly point.
Slip-stitch cord: a chain with a sl st worked into the back bump of each ch. Working into the back bump keeps the “V” of the chain visible, which gives the cord its braided look.
Gauge and Checkpoints
Make one test piece of each element before you make the full set.
- Cord gauge: ch 21, sl st in back bump of 2nd ch from hook and each ch across: 20 sl st = 5 in (12.7 cm), or 4 sts per 1 in (2.5 cm).
- Leaf after Rnd 1: 2.5 in x 1.25 in (6.4 cm x 3.2 cm).
- Finished leaf: 3 in x 1.5 in (7.6 cm x 3.8 cm), including points.
- Finished, stuffed berry: 0.75 in (1.9 cm) across.
If your cord is too long (fewer than 4 sts per inch), switch to a 3.75 mm hook. If it’s too short, switch to a 4.5 mm hook. Cord gauge matters most, because every placement in this pattern is counted in stitches.
If your leaves are too big, use a 3.75 mm hook for the leaves only. If your berries are loose and stuffing shows through, use a smaller hook for the berries. Firm fabric matters more than exact size.
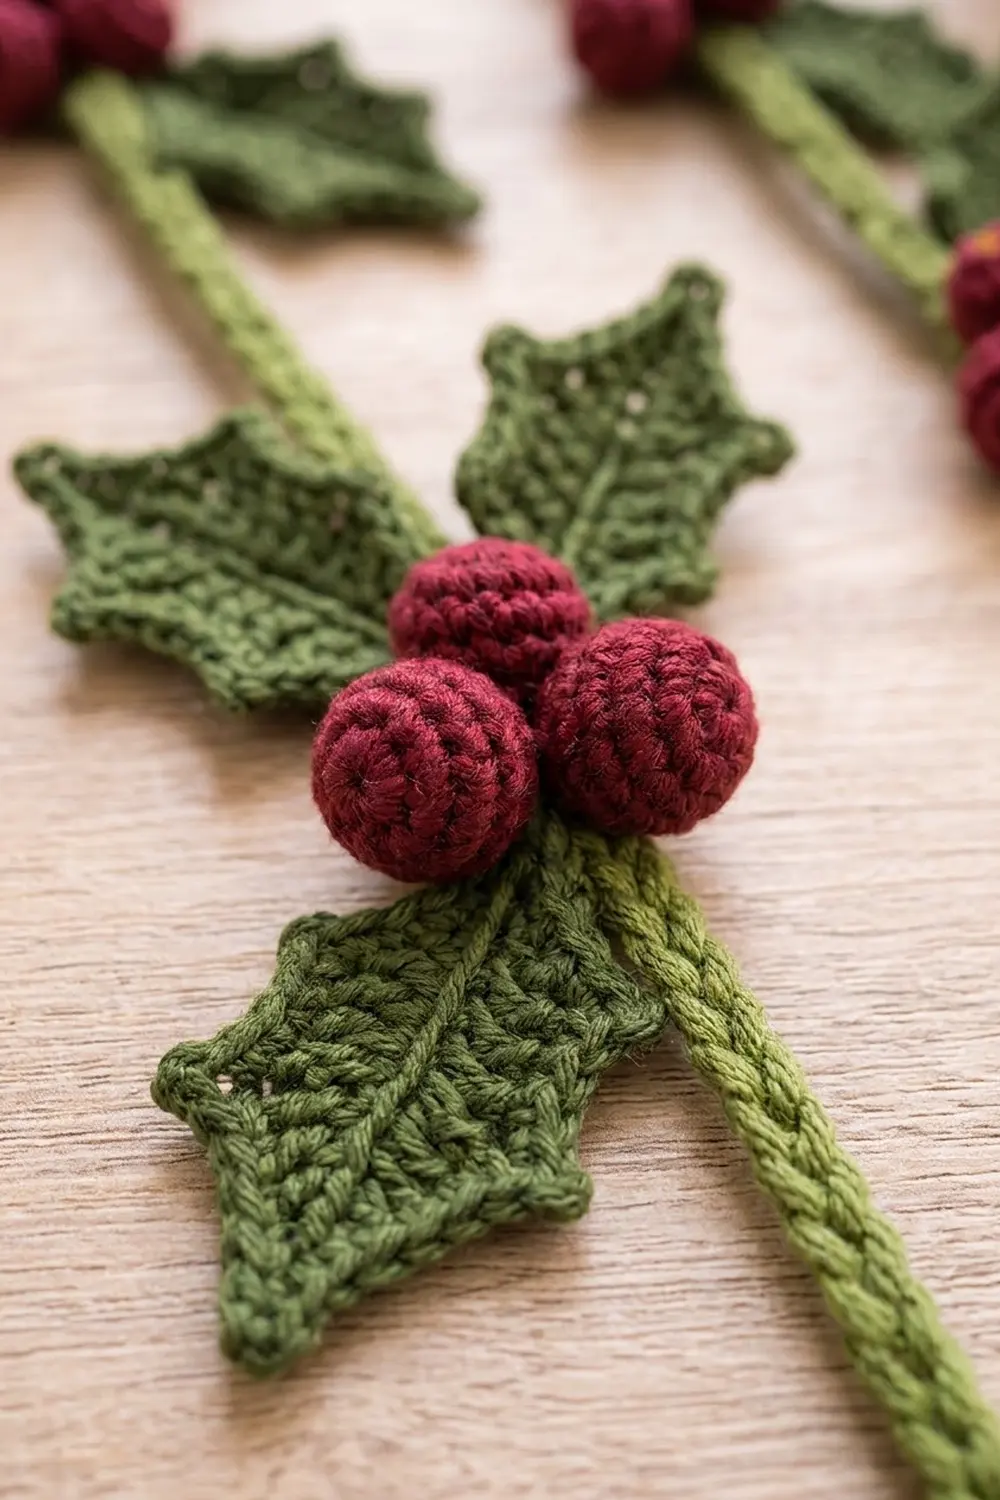
Cord (Make 12)
With moss green, ch 273.
Row 1: Sl st in back bump of 2nd ch from hook and in back bump of each ch across. (272 sl st)
Fasten off, leaving a 10 in (25.4 cm) tail.
The end where you finished (next to the starting slipknot) is the top, and it holds both yarn tails. The other end is the bottom.
Checkpoint: the cord measures 68 in (172.7 cm) laid flat without stretching.
Mark the cord, counting from the top:
- Sts 1-32 become the hanging loop.
- St 33 is the loop join and the first st of the drop.
- The drop is sts 33-272: 240 sts = 60 in (152.4 cm).
Holly Leaf (Make 192)
With moss green, ch 12.
Rnd 1: Sc in 2nd ch from hook, hdc in next ch, dc in next 7 ch, hdc in next ch, 5 sc in last ch (leaf tip). Working along the opposite side of the foundation ch: hdc in next ch, dc in next 7 ch, hdc in next ch, sc in last ch. Join with sl st to first sc. (25 sts: 10 per side + 5 at tip)
The tall dc in the middle and the short sts at each end create the pointed-oval shape. The foundation chain stays visible down the center as the raised vein.
Rnd 2: Ch 1. Side A: sc in first 2 sts, picot, sc in next 3 sts, picot, sc in next 3 sts, picot, sc in next 2 sts. Tip: sc in next 2 sts, (sc, picot, sc) in next st, sc in next 2 sts. Side B: sc in next 2 sts, picot, sc in next 3 sts, picot, sc in next 3 sts, picot, sc in next 2 sts. Join with sl st to first sc. (26 sc + 7 picots)
Count check: Side A 10 sc + tip 6 sc + Side B 10 sc = 26 sc. Three points per side plus one tip point = 7 points.
Fasten off, leaving an 8 in (20.3 cm) tail at the base for sewing. Weave in the starting tail.
Checkpoint: 3 in x 1.5 in (7.6 cm x 3.8 cm).
Berry (Make 288)
With deep burgundy red:
Rnd 1: Magic ring, 6 sc in ring. (6 sts)
Rnd 2: 2 sc in each st around. (12 sts)
Rnd 3: Sc in each st around. (12 sts)
Rnd 4: Sc2tog 6 times. (6 sts)
Stuff firmly with a small pinch of fiberfill before Rnd 4 closes. Fasten off, leaving an 8 in (20.3 cm) tail. Thread the tail through the front loops of the last 6 sts, pull closed, and keep the tail for sewing.
Checkpoint: 0.75 in (1.9 cm) across, round and firm.
Make All Pieces
Totals per color:
- Moss green: 12 cords + 192 leaves (8 clusters x 2 leaves x 12 strands)
- Deep burgundy red: 288 berries (8 clusters x 3 berries x 12 strands)
The strands alternate between two placements so neighboring strands are staggered. Odd strands (1, 3, 5, 7, 9, 11) use Placement A. Even strands (2, 4, 6, 8, 10, 12) use Placement B.
Layout grid (rod at top, seen from inside the room; each A or B is one strand, 3 in / 7.6 cm apart):
ROD ==============================================
     1   2   3   4   5   6   7   8   9  10  11  12
     A   B   A   B   A   B   A   B   A   B   A   B
Joining (Attaching Clusters to Cords)
The strands are never joined to each other. Here, “joining” means sewing 8 holly clusters onto each cord.
Cluster positions, counted in drop sts from the loop join (st 33 = drop st 1):
- Placement A: drop sts 16, 44, 72, 100, 128, 156, 184, 212. The first cluster is at 4 in (10.2 cm) and the last at 53 in (134.6 cm), followed by a 28-st tail = 7 in (17.8 cm).
- Placement B: drop sts 30, 58, 86, 114, 142, 170, 198, 226. The first cluster is at 7.5 in (19.1 cm) and the last at 56.5 in (143.5 cm), followed by a 14-st tail = 3.5 in (8.9 cm).
Clusters are always 28 sts = 7 in (17.8 cm) apart. Placement B is shifted 14 sts (3.5 in / 8.9 cm), exactly half a repeat, which creates the staggered look.
Stitch-to-stitch logic for one cluster:
- Place a marker on the target drop st.
- Lay Leaf 1 with its base on the marked st, tip angled up and out to the left at about 45 degrees. With small stitches, sew the base sc sts through the center of the marked st and the st above it.
- Lay Leaf 2 on the opposite side, base on the marked st and the st below it, tip angled down and out to the right. Sew it the same way.
- Sew two berries side by side directly over the leaf bases, centered on the marked st.
- Sew the third berry centered above them, so the three berries form a triangle that hides both leaf bases.
- Pass each tail through the cord twice, knot it on the back, and bury the end inside a berry or leaf.
Tension advice: Sew firmly enough that the leaves don’t flop forward, but not so tight that the cord puckers. Lay the strand flat after each cluster; the cord should stay straight.
Size checkpoint: After all 8 clusters, the drop should still measure 60 in (152.4 cm) from the loop join to the bottom. If it’s shorter, your sewing is too tight. Loosen it and redo the last cluster.
Border (Top Hanging Loop and Bottom Finish)
This curtain has no edging along the strands. The “border” is the finished top loop and bottom tip on each cord.
Border gauge: same as the cord, 4 sts per 1 in (2.5 cm).
Top loop:
- Fold the top end of the cord down so st 1 lies against st 33.
- Using the 10 in (25.4 cm) top tail, sew st 1 to st 33 with 3-4 firm passes through both sts.
- The loop uses sts 1-32: 16 sts per side = 4 in (10.2 cm) tall, with an 8 in (20.3 cm) inner circumference.
The loop fits easily over a rod up to 1.25 in (3.2 cm) in diameter.
Bottom finish: The bottom is the turning-chain end, which already has no tail. Give it a light tug so the last st sits flat.
Why the math works: 32 loop sts + 240 drop sts = 272 sts, which matches the Row 1 count. At 4 sts per inch, the 240-st drop measures 60 in (152.4 cm). Add the 4 in (10.2 cm) loop and you get the full hanging length of 64 in (162.6 cm). Placement A uses 212 + 28 = 240 drop sts and Placement B uses 226 + 14 = 240 drop sts, so both placements fit the same cord exactly.
Final Blocking
- Lightly mist each leaf with water until it’s damp but not soaked.
- Pin each leaf flat on the blocking mat, pinning every picot outward to sharpen the points.
- Pin the center vein straight from base to tip.
- Roll each berry gently between your palms to round it. Don’t pin the berries.
- Let everything dry completely.
- Hang each finished strand by its loop for 24 hours. The cord may stretch 1-2% under the weight of the clusters, which is normal.
- Check the drop again. If a strand hangs lower than its neighbors, sew the loop join one or more sts lower (for example, st 1 to st 35). Each 2 sts you move the join raises the strand by 0.25 in (0.6 cm).
Final Quality-Control Checklist
- Each cord has 272 sl st and a 4 in (10.2 cm) loop.
- Each drop measures 60 in (152.4 cm).
- Every leaf has 26 sc and 7 points and measures 3 in x 1.5 in (7.6 cm x 3.8 cm).
- Every berry is firmly stuffed and 0.75 in (1.9 cm) across.
- Each strand has 8 clusters spaced 7 in (17.8 cm) apart.
- Odd strands use Placement A; even strands use Placement B.
- Each cluster has 2 leaves on opposite sides and 3 berries in a triangle.
- All tails are knotted and buried.
- Strands hang 3 in (7.6 cm) apart on the rod.
Troubleshooting
The cord twists into a spiral. Your slip stitches are too tight. Work looser or go up a hook size, then hang the cord overnight with a light weight at the bottom.
A leaf curls into a cup. The Rnd 1 dc are too loose compared with the chain. Chain a little looser, or block more firmly.
The points are rounded instead of sharp. Pull each picot sl st snug, and pin the points during blocking.
The berries look square. Stuff them more firmly and roll them between your palms.
The clusters droop forward. Add one more stitch through the leaf base and the back of the cord.
Strands hang at different lengths. Check the cord gauge on each strand, then adjust the loop join as described in Final Blocking.
Care
Hand wash in cool water with mild soap, press the water out in a towel, and dry flat before rehanging. Store the strands loosely coiled to protect the berries.

Final Notes
The measurement chain is simple. At 4 sts per inch you get a 272-st cord, split into a 32-st loop and a 240-st drop of 60 in (152.4 cm). Each strand has 8 clusters spaced 28 sts (7 in / 17.8 cm) apart, and Placement B shifts them 14 sts for the stagger. Twelve strands spaced 3 in (7.6 cm) apart cover about 36 in (91.4 cm) of rod and hang 64 in (162.6 cm) long. Get the cord gauge right first, and every other number follows from it.
Happy crocheting!