

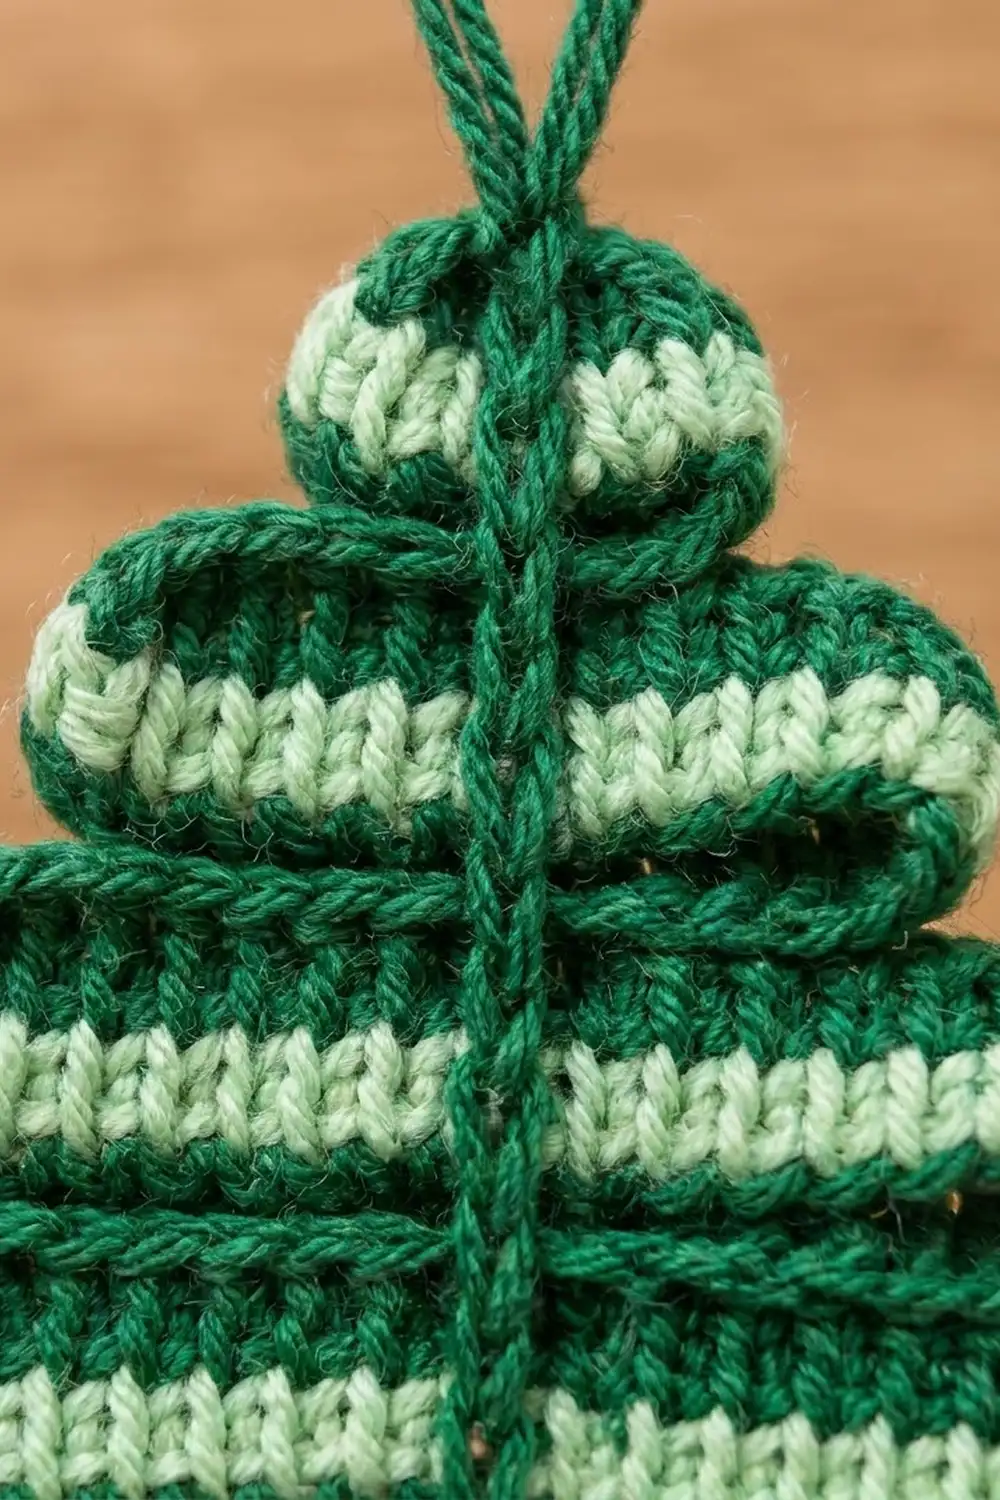
This little tree ornament is made from one long striped ribbon of crochet, folded back and forth like ribbon candy into five stacked tiers. Each tier is a soft, rounded loop of strip: dark green on the outer edges with a fresh light green stripe through the middle. A dark green chain runs straight up the center and holds all the folds in place. It carries on above the top to become the hanging loop. A small brown trunk peeks out under the bottom tier.
The colors are classic and calm: forest green, mint or light green, and chocolate brown. The look is tidy and graphic, with a compact, knit-like texture from tight single crochet. It suits a natural or Scandinavian tree just as well as a bright, busy one.
This pattern uses US crochet terms. The finished ornament measures about 4 in (10.2 cm) wide and 3.5 in (8.9 cm) tall, not counting the hanging loop. The loop adds about 1.5 in (3.8 cm).
Construction is simple. First you crochet a long two-row strip in light green and edge it all the way around in dark green. Then you fold it into five tiers using stitch markers. A column of surface slip stitches locks the folds and becomes the hanger. Finally, you add a tiny brown trunk.
Finished Size and Construction
- Finished size: about 4 in (10.2 cm) wide x 3.5 in (8.9 cm) tall, plus a 1.5 in (3.8 cm) hanging loop
- Skill level: Easy / advanced beginner
- Terminology: US crochet terms
- Yarn weight: DK (#3), cotton or cotton blend
- Hook: 3.5 mm (E-4)
- Number of pieces: 1 ornament, made from 1 folded strip plus 1 small trunk piece
- Layout: 5 tiers stacked bottom to top, widest at the bottom, centered on a vertical chain
- Strip size before border: 13.2 in (33.5 cm) long x 0.33 in (0.8 cm) wide
- Border depth: 1 round of sc, about 0.17 in (0.4 cm) on each long edge
- Strip size after border: about 13.6 in (34.5 cm) long x 0.67 in (1.7 cm) wide
Materials
Choose a smooth, firm DK cotton. Cotton keeps the folds crisp and shows the stitch texture clearly. Acrylic works too, but the tiers will be a little springier and may need more tacking.
- Dark green (DG): 6 g, about 13 m, for the border, center chain, and hanging loop
- Light green (LG): 5 g, about 10 m, for the strip
- Brown (BR): 2 g, about 4 m, for the trunk
These quantities include a margin for your gauge swatch and weaving in ends.
Tools:
- 3.5 mm (E-4) crochet hook
- 4 locking stitch markers
- Tapestry needle
- Straight pins
- Scissors
- Ruler or tape measure
- Spray bottle and blocking mat (optional)
Abbreviations (US Terms)
- ch – chain
- sc – single crochet
- sl st – slip stitch
- st(s) – stitch(es)
- DG / LG / BR – dark green / light green / brown
- RS – right side
Special stitch – surface slip stitch: Hold the yarn behind the work. Insert the hook from front to back through the fabric (here, through all stacked layers). Yarn over and pull a loop up through the fabric and through the loop on your hook. Each surface sl st forms one “V” of a chain on the front.
Gauge and Checkpoints
Gauge: 20 sc and 24 rows = 4 in (10.2 cm) in sc. That is 5 sc and 6 rows per 1 in (2.5 cm).
Gauge matters here because the strip length controls the tier widths. Make a short test first: ch 11, then work 6 rows of 10 sc. It should measure 2 in (5.1 cm) wide and 1 in (2.5 cm) tall.
Checkpoints:
- After Row 2 of the strip: 13.2 in (33.5 cm) long, 0.33 in (0.8 cm) wide.
- After the border: about 13.6 in (34.5 cm) long, 0.67 in (1.7 cm) wide.
- After folding: bottom tier about 4 in (10.2 cm) wide, stacked tiers about 3 in (7.6 cm) tall.
- After the trunk: total height about 3.5 in (8.9 cm) without the loop.
If your strip is too long: go down a hook size (3.25 mm) and restart. A longer strip makes wide, floppy tiers.
If your strip is too short: go up a hook size (3.75 mm). A short strip gives a narrow, crowded tree.
The Strip
The strip is worked lengthwise. The two LG rows form the light stripe. The DG border forms the dark edges and rounds off both ends.
With LG, ch 67.
Row 1 (RS): Sc in 2nd ch from hook and in each ch across. Turn. (66 sc)
Row 2: Ch 1 (does not count as a st), sc in each st across. (66 sc) Fasten off LG.
Checkpoint: the strip should measure 13.2 in (33.5 cm) long. Keep it flat and untwisted.
Border
The border is one round of DG sc worked all around the strip. It frames the light stripe on both long edges and turns the square ends into soft curves.
Border gauge: same as the main fabric. Work 5 sc per 1 in (2.5 cm) along the long edges and 1 sc per row end on the short ends.
Round 1: With RS facing, join DG with a sc in the first st of Row 2.
- Long edge 1 (top of Row 2): 2 more sc in the same first st (3 sc in corner), sc in next 64 sts, 3 sc in last st. (70 sc on this edge)
- Short end 1: Sc in the end of each of the 2 rows. (2 sc)
- Long edge 2 (along the foundation chain): 3 sc in the first ch, sc in next 64 ch, 3 sc in the last ch. (70 sc on this edge)
- Short end 2: Sc in the end of each of the 2 rows. (2 sc)
Join with a sl st to the first sc. (144 sc total)
Fasten off, leaving a 12 in (30.5 cm) DG tail for tacking the folds.
Why the math works: Each long edge started with 66 sts. The two end sts each get 3 sc instead of 1, so each long edge gains 2 sts: 66 + 2 = 70. The corner sts are counted inside those 70, not added again. The short ends get 1 sc per row end, so 2 + 2 = 4. Total: 70 + 70 + 4 = 144. The 3-sc corners plus only 2 sc across each end give the rounded, ribbon-like tips.
Marking the Tiers
Lay the strip flat, RS up. Count the 66 original stitches along the top edge and ignore the extra corner sc. Place markers after these stitches:
- Marker 1: after st 20 (tier 1, bottom, 20 sts = 4 in / 10.2 cm)
- Marker 2: after st 36 (tier 2, 16 sts = 3.2 in / 8.1 cm)
- Marker 3: after st 49 (tier 3, 13 sts = 2.6 in / 6.6 cm)
- Marker 4: after st 59 (tier 4, 10 sts = 2 in / 5.1 cm)
- Remaining sts 60–66 form tier 5, the top (7 sts = 1.4 in / 3.6 cm)
Check: 20 + 16 + 13 + 10 + 7 = 66 sts.
Folding the Tree
- Lay sts 1–20 horizontally as the bottom tier, with the start of the strip at the left.
- At Marker 1, fold the strip up and back to the left, RS still facing you. Do not crease it flat. Let the fold form a soft, rounded loop at the right end.
- Position tier 2 so it overlaps the top of tier 1 by about one row. Each upper tier sits about 0.6 in (1.5 cm) above the one below.
- Angle the fold slightly inward so tier 2 is centered over tier 1. Pin.
- At Marker 2, fold up and back to the right. Repeat for Marker 3 (fold left) and Marker 4 (fold right).
- Tier 5 is the shortest. Curl its tail end down behind itself so the top looks like a small rounded dome. Pin.
Checkpoint: the folded tree should be about 4 in (10.2 cm) wide at the bottom. It should be about 3 in (7.6 cm) tall from the bottom edge of tier 1 to the top of tier 5. Adjust the overlaps before tacking.
Tacking: Thread the DG tail on a tapestry needle. Work a few small stitches on the back at each fold and where each tier overlaps the one below. Keep the stitches in the DG border so they do not show on the front. Remove the pins.
Center Chain and Hanging Loop
The center chain is a column of surface slip stitches running straight up the middle. It holds every layer together and continues as the loop.
- Find the center of the bottom edge of tier 1 (between sts 10 and 11). With DG, make a slip knot and keep it on the back.
- Working upward through all layers, work surface sl sts in a straight vertical line:
- Tier 1: 4 surface sl sts
- Tier 2: 4 surface sl sts
- Tier 3: 4 surface sl sts
- Tier 4: 3 surface sl sts
- Tier 5: 3 surface sl sts
(18 surface sl sts total, about 3 in / 7.6 cm) - Where tiers overlap, push the hook through both layers. This is what locks the folds.
- At the top of tier 5, ch 18 (about 3 in / 7.6 cm of chain).
- Sl st into the last surface sl st to form the loop. The loop stands about 1.5 in (3.8 cm) tall.
- Fasten off. Weave the tail down the back of the center column.
Keep the surface sl sts relaxed. If they are tight, the tree will pucker into a vertical crease.
Trunk
With BR, ch 4.
Row 1: Sc in 2nd ch from hook and in next 2 ch. Turn. (3 sc)
Rows 2–4: Ch 1, sc in each st across. Turn. (3 sc)
Fasten off, leaving an 8 in (20.3 cm) tail. The trunk measures 0.6 in (1.5 cm) wide x 0.67 in (1.7 cm) tall.
Center the trunk under the bottom of the center chain. Tuck Row 4 behind tier 1 so about 0.5 in (1.3 cm) of trunk shows below the tree. Whipstitch it to the back of tier 1 with the BR tail.
Final height: about 3 in (7.6 cm) of tiers plus 0.5 in (1.3 cm) of trunk = about 3.5 in (8.9 cm).
Final Blocking
- Weave in all remaining ends on the back, through stitches of the same color.
- Lay the ornament face up on a blocking mat.
- Mist lightly with water until just damp.
- Shape each fold into an even, rounded curve. Check that all tiers are centered on the chain.
- Measure: the bottom tier should be 4 in (10.2 cm) wide, and the tree 3.5 in (8.9 cm) tall without the loop.
- Pin the bottom corners and the top dome if needed. Do not pin through the fold curves, or they will flatten.
- Let dry completely, about 2–4 hours.
- Cotton can also be steam-blocked: hover the iron above the work, never press.
Final Quality-Control Checklist
- Strip has 66 sts per row and 144 border sts.
- Light green stripe is visible along the full length of every tier.
- Dark green border is even on both long edges with no gaps.
- 5 tiers, each narrower than the one below, all centered.
- Fold ends are rounded, not creased flat.
- Center chain is straight and vertical, with no puckering.
- Hanging loop is secure and about 1.5 in (3.8 cm) tall.
- Trunk is centered and firmly attached.
- No loose ends or tacking stitches visible on the front.
- Size is about 4 in (10.2 cm) x 3.5 in (8.9 cm).
Troubleshooting
The strip twists like a corkscrew. The foundation chain was twisted. Lay it flat before Row 1, or use a foundation single crochet row instead.
The tiers look lopsided. Re-pin before tacking. Angle each fold inward so the tier centers over the chain line.
The border ruffles. You likely added extra sts. Count: 70 per long edge, 2 per short end.
The border pulls the strip into a curve. Your border is tighter than the strip. Go up half a hook size for the border round only.
The center column puckers. Your surface sl sts are too tight. Unpick them and redo them with a looser hand or a hook one size larger.
The folds flatten over time. Add one more tacking stitch on the back at each fold, and re-block.
Care
Hand wash in cool water with mild soap and lay flat to dry, reshaping the folds while damp. Store flat or hanging, not crushed in a box.

Final Notes
Everything in this ornament depends on one measurement chain. A gauge of 5 sc per 1 in (2.5 cm) gives a 66-st strip of 13.2 in (33.5 cm). The border round of 144 sts brings it to 0.67 in (1.7 cm) wide. Markers at 20, 36, 49, and 59 sts set the five tiers, from 4 in (10.2 cm) down to 1.4 in (3.6 cm). Stacked with a slight overlap, they reach about 3 in (7.6 cm). The trunk brings the total to about 3.5 in (8.9 cm) tall.
Make one for a gift tag, or a whole set for your own tree. Each one takes well under an hour once your gauge is set.
Happy crocheting!