

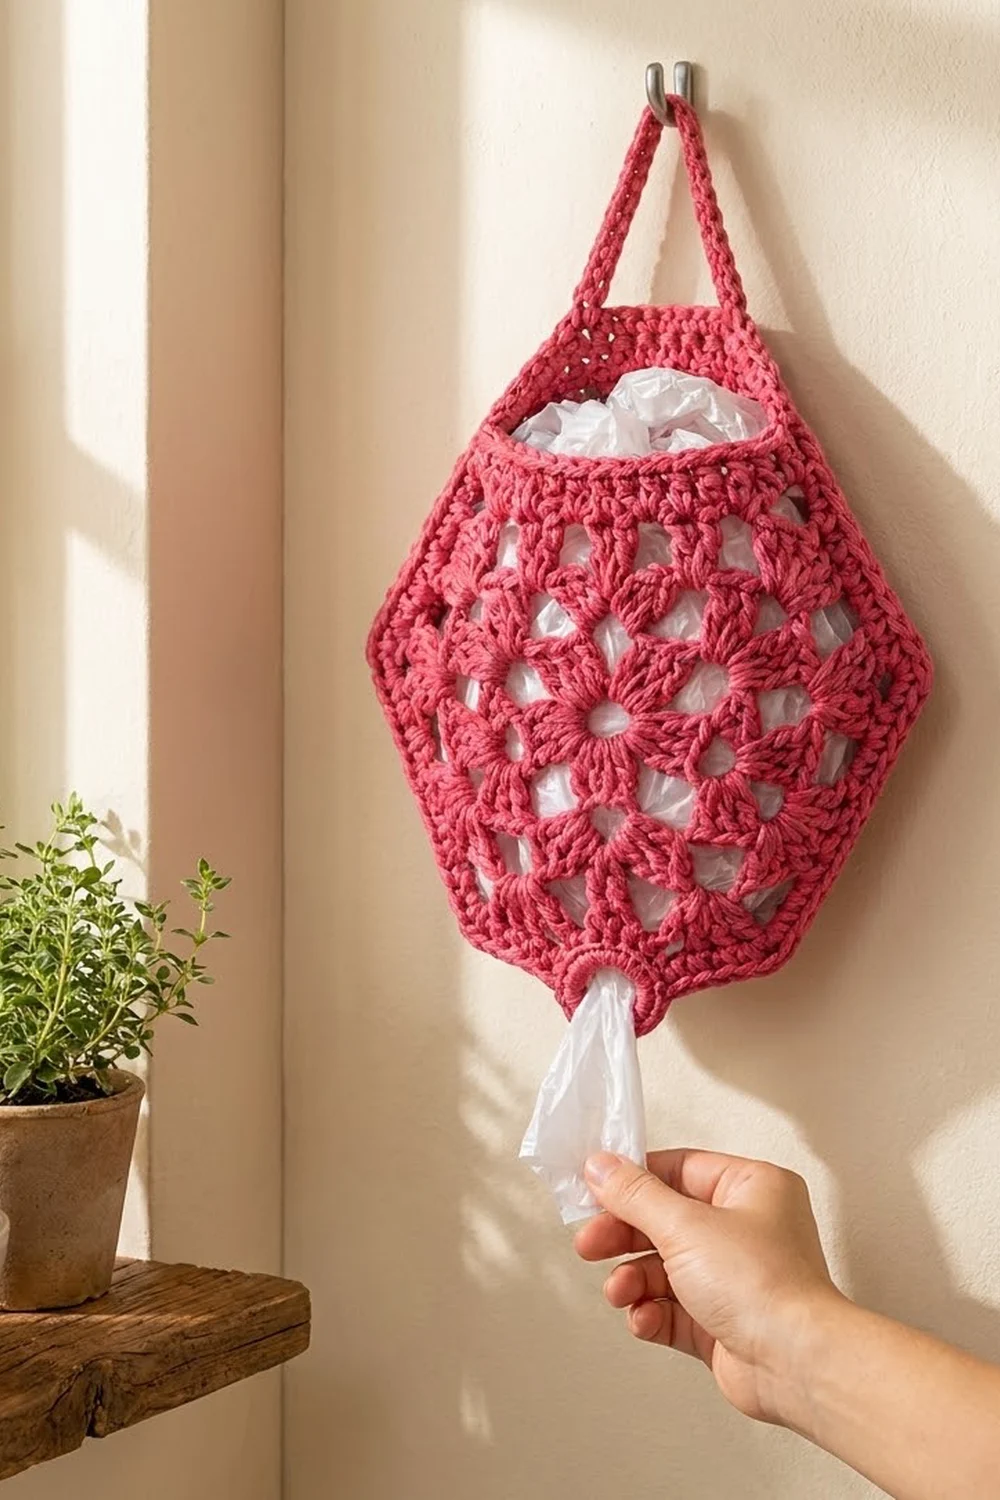
The Raspberry Bloom Bag Holder is a hanging pouch for storing plastic grocery bags. You stuff bags in through the wide mouth at the top and pull them out one at a time through the small ring at the bottom. It hangs flat against a wall or door and looks like decor, not storage.
The body is two matching granny-style hexagons, each with a six-petal flower in the center. It’s worked in one solid raspberry pink cotton. On top there’s a firm single-crochet band, a narrow strap forms the hanging arch, and a round dispensing ring sits at the bottom.
The pattern uses US crochet terms. The finished body measures 10.75 in (27.3 cm) wide from point to point and 10.25 in (26.0 cm) tall from the top rim to the bottom edge. The ring adds about 0.5 in (1.3 cm) below the body, and the strap rises about 2.5 in (6.4 cm) above the rim.
To make it, you crochet two hexagon panels in the round, join them wrong sides together with single crochet, and leave the top side and the center of the bottom side open. Then you work a band around the top opening and a short collar around the bottom opening, make a strap, and sew it on.
Finished Size and Construction
- Finished body size: 10.75 in (27.3 cm) wide x 10.25 in (26.0 cm) tall
- Overall height including ring and strap: about 13.25 in (33.7 cm)
- Skill level: Easy / advanced beginner
- Terminology: US crochet terms
- Yarn weight: Worsted (#4) cotton
- Hook: 4.5 mm (US 7)
- Number of pieces: 3 (2 hexagon panels + 1 strap)
- Layout: front panel and back panel stacked wrong sides together, with a flat side at the top and points at the left and right
- Panel size: 9.0 in (22.9 cm) flat to flat, 10.4 in (26.4 cm) point to point, 5.2 in (13.2 cm) per side
- Panel size before sc edge: 8.5 in (21.6 cm) flat to flat
- Top band depth: 1.0 in (2.5 cm)
Materials
Yarn: Use a smooth worsted-weight cotton or cotton blend. Cotton holds its shape when the pouch is full and doesn’t stretch out on the hook. Acrylic works too, but the panels will sag more over time.
- Raspberry Pink: 85 g, about 160 m (175 yd)
This amount includes a margin of about 15% for your gauge check and tails.
Tools:
- 4.5 mm (US 7) crochet hook
- Tapestry needle
- 6 locking stitch markers
- Scissors and measuring tape
- Blocking mat, rustproof pins, and a spray bottle
Abbreviations (US Terms)
- ch – chain
- sl st – slip stitch
- sc – single crochet
- dc – double crochet
- sp(s) – space(s)
- st(s) – stitch(es)
- beg – beginning
- rep – repeat
- RS / WS – right side / wrong side
Special term: corner. A corner is (3 dc, ch 2, 3 dc) worked into one ch-2 sp.
Gauge and Checkpoints
Edge gauge: 20 sc = 4 in (10.2 cm), measured along the sc edge of a finished panel.
Panel gauge: After Round 3, the hexagon measures 4.0 in (10.2 cm) flat to flat.
Make one full panel and check it before you make the second one. These are the measurements to check:
- After Round 1: about 1.0 in (2.5 cm) across
- After Round 3: 4.0 in (10.2 cm) flat to flat
- After Round 6: 8.5 in (21.6 cm) flat to flat
- After Round 7: 9.0 in (22.9 cm) flat to flat, 10.4 in (26.4 cm) point to point, 5.2 in (13.2 cm) per side
If your panel is too big, go down one hook size to 4.0 mm (US G-6). If it’s too small, go up to 5.0 mm (US H-8). If you’re off by less than 0.25 in (0.6 cm) at Round 7, keep your hook and let blocking fix the difference.
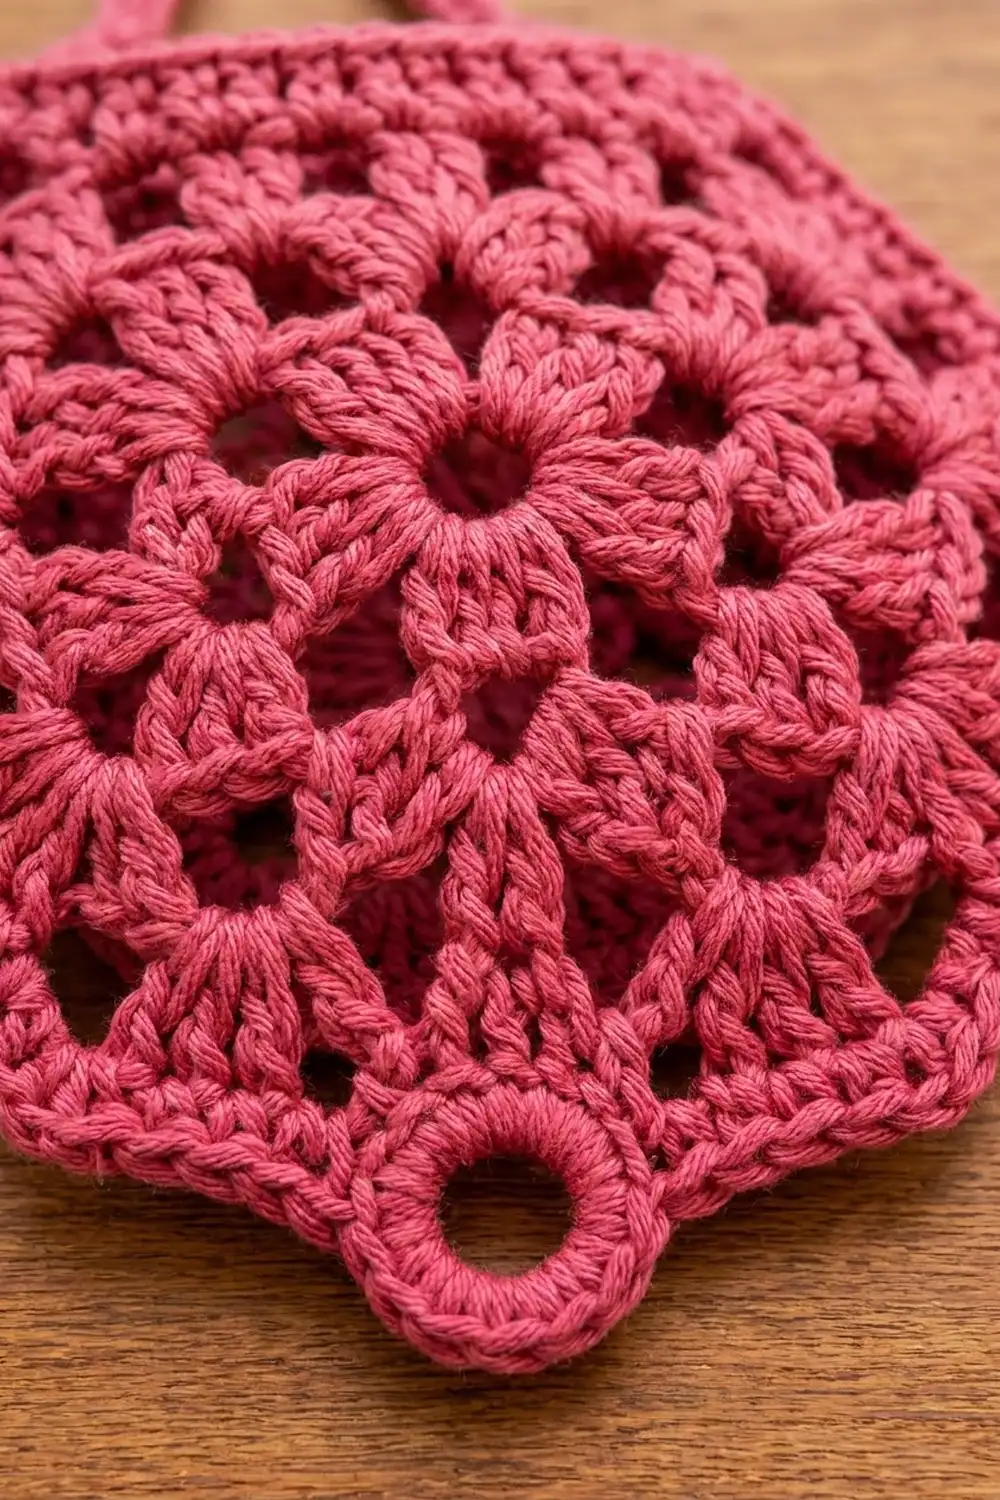
Hexagon Panel (Make 2)
Each round starts with a ch 3, which counts as the first dc. Join every round with a sl st to the top of the beg ch-3. Don’t turn: keep the RS facing you throughout.
Round 1: Make a magic ring. Ch 3, 2 dc in the ring, ch 2. 3 dc in the ring, ch 2; rep from * 4 more times. Pull the ring tight and join. (18 dc, 6 ch-2 sps)*
These six 3-dc groups are the flower petals, and the ring at the center stays as a small hole.
Round 2: Sl st in the next 2 dc and into the ch-2 sp. Ch 3, then (2 dc, ch 2, 3 dc) in the same sp, ch 1. Corner in the next ch-2 sp, ch 1; rep from * 4 more times. Join. (36 dc, 6 ch-2 corner sps, 6 ch-1 sps)*
Round 3: Sl st in the next 2 dc and into the ch-2 sp. Ch 3, then (2 dc, ch 2, 3 dc) in the same sp, ch 1, 3 dc in the next ch-1 sp, ch 1. Corner in the next ch-2 sp, ch 1, 3 dc in the next ch-1 sp, ch 1; rep from * 4 more times. Join. (54 dc, 6 ch-2 corner sps, 12 ch-1 sps)*
Check: the panel should be 4.0 in (10.2 cm) flat to flat.
Round 4: Sl st in the next 2 dc and into the ch-2 sp. Ch 3, then (2 dc, ch 2, 3 dc) in the same sp, ch 1, (3 dc in the next ch-1 sp, ch 1) twice. Corner, ch 1, (3 dc in the next ch-1 sp, ch 1) twice; rep from * 4 more times. Join. (72 dc, 6 ch-2 corner sps, 18 ch-1 sps)*
Round 5: Work the same way as Round 4, but with 3 groups between corners. (90 dc, 6 ch-2 corner sps, 24 ch-1 sps)
Round 6: Work the same way, with 4 groups between corners. (108 dc, 6 ch-2 corner sps, 30 ch-1 sps)
Each side now has 6 dc groups (counting the two corner halves) and 5 ch-1 sps. Check: the panel should be 8.5 in (21.6 cm) flat to flat.
Round 7 (sc edge, conversion round): Ch 1. Sc in the same st as the join and in each dc and each ch-1 sp around, and work 3 sc in each ch-2 corner sp. Join to the first sc. (108 sc in dc + 30 sc in ch-1 sps + 18 sc in corners = 156 sc)
Count per side: each corner has 1 center st (the middle sc of the 3), and there are 25 sts between corner center sts on each side. With one corner per side, that’s 6 x 25 + 6 = 156. Place a marker in each corner center st.
Fasten off and weave in the ends. Check: 9.0 in (22.9 cm) flat to flat, with each side 5.2 in (13.2 cm) long.
Strap (Make 1)
Ch 46.
Round 1: Sc in the 2nd ch from hook and in the next 43 ch (44 sc), then 3 sc in the last ch. Rotate and work along the bottom loops of the chain: sc in the next 43 ch, then 2 sc in the last ch (the same ch that holds the first sc). Join. (44 + 3 + 43 + 2 = 92 sc)
Round 2: Sl st in each st around. (92 sl st)
Fasten off and leave a 12 in (30.5 cm) tail. The strap is a narrow flat oval with rounded ends, about 8.8 in (22.4 cm) long and 0.5 in (1.3 cm) wide.
Make All Pieces
All pieces use Raspberry Pink:
- Hexagon panels: 2 (about 28 g each)
- Strap: 1 (about 5 g)
- Joining, band and ring: about 12 g
Layout, seen from the front with the panels stacked:
        [ top: open, banded ]
       /                     \
 [left point]  FRONT/BACK  [right point]
       \                     /
     [ bottom: joined | ring | joined ]
Choose the neater panel as the front. Turn both panels so one side is flat across the top and the left and right points are corners.
Joining
Method: sc through both layers, WS together, with the front panel facing you.
Line up the panels so their corner markers match. Each side has 25 sts between corners on both panels, so every stitch on the front has a partner stitch on the back.
Join the yarn at the top-left corner center st, working through both layers. Then work counterclockwise:
- Top-left corner: 1 sc
- Upper-left side: 25 sc
- Left point: 3 sc in the corner st
- Lower-left side: 25 sc
- Bottom-left corner: 3 sc
- Bottom side: 8 sc through both layers, then 9 sc through the front panel only, then 8 sc through both layers (8 + 9 + 8 = 25)
- Bottom-right corner: 3 sc
- Lower-right side: 25 sc
- Right point: 3 sc
- Upper-right side: 25 sc
- Top-right corner: 1 sc
That’s 139 sc in total. Leave the 25 sts on the top side of each panel unworked; this is the mouth. Fasten off.
Tension: Keep the joining sc as relaxed as the Round 7 sc. If you pull them tight, the sides will curl inward. If you work them too loose, the edge will ripple.
Checkpoint: The joined body should be 10.75 in (27.3 cm) wide from point to point. The joining sc adds about 0.25 in (0.6 cm) at each point.
Border: Top Band and Bottom Ring
Border gauge: 20 sc = 4 in (10.2 cm), the same as the edge gauge.
Top Band
Round 1: With the front facing you, join the yarn in the top-right joining sc. Ch 1 and sc in the same st. Sc in each of the 25 front top sts, sc in the top-left joining sc, then sc in each of the 25 back top sts. Join. (26 front + 26 back = 52 sc)
Rounds 2–4: Ch 1, sc in each st around. Join. (52 sc)
Round 5: Sl st loosely in each st around. (52 sl st)
Fasten off. The band should be 1.0 in (2.5 cm) deep.
Why the math works: Each side of the band starts with 1 piece x 25 sts plus 1 shared corner st, so 26 per side. At 5 sc per inch, 52 sts make a circumference of 10.4 in (26.4 cm). Pressed flat, that’s 5.2 in (13.2 cm) across, exactly the length of the top side of a panel. The band stands straight without flaring or pulling in.
Bottom Ring
Round 1: Join the yarn at the right end of the bottom opening. Sc in each of the 9 unworked back panel sts, then sc in each of the 9 front-only joining sc. Join. (9 + 9 = 18 sc)
Round 2: Ch 1, sc in each st around. Join. (18 sc)
Round 3: Sl st in each st around. (18 sl st)
Fasten off. At 5 sc per inch, 18 sts make a circumference of 3.6 in (9.1 cm). That’s 1.8 in (4.6 cm) across when flat, which leaves an opening about 1.25 in (3.2 cm) wide. It’s snug enough to hold the bags in but lets one pull through easily. The ring sticks out about 0.5 in (1.3 cm) below the body.
Attach the Strap
Overlap each end of the strap 0.75 in (1.9 cm) inside the band, one at the top-left corner and one at the top-right corner. Sew each end through the band with the strap tail, using small whipstitches on all four edges of the overlap. Make sure the strap isn’t twisted. It should form an arch about 2.5 in (6.4 cm) high above the rim.
Final Blocking
- Spray the whole holder until it’s evenly damp but not dripping.
- Lay it flat on the blocking mat with the front facing up.
- Pin the left and right points 10.75 in (27.3 cm) apart.
- Pin the top rim and the bottom edge 10.25 in (26.0 cm) apart, keeping the top and bottom sides straight.
- Straighten all six sides. Open up the petals and the ch-1 eyelets with your fingertip.
- Shape the ring into a circle around a marker or pen, and lay the strap in a smooth arch.
- Let it dry completely before you unpin it.
Final Quality-Control Checklist
- Both panels measure 9.0 in (22.9 cm) flat to flat before joining
- Each panel has 156 sc, with 25 sts between corner center sts
- The joining round has 139 sc, and the top 25 sts on each panel are free
- The bottom opening is centered, with 8 joined sts on each side of it
- The band has 52 sts in every round and doesn’t flare
- The ring has 18 sts and lets a bag pull through
- The strap ends are secure and the strap isn’t twisted
- All ends are woven in on the inside
Troubleshooting
The panel cups. Your dc are too tight. Loosen up, or go up one hook size.
The panel ruffles. Your ch-1 sps are too long. Make each ch 1 snug against the hook.
The corners don’t line up when joining. Recount Round 7; each side needs exactly 25 sts between corners.
The band flares. Your sc tension is looser than the edge gauge. Rework the band with a hook one size smaller.
Bags won’t pull through the ring. Work Round 3 of the ring loosely, or skip it and fasten off after Round 2.
The strap stretches. Rework Round 2 of the strap as firmer sl sts, or add a second round of sl sts.
Care
Hand wash or machine wash cold on a gentle cycle in a mesh bag. Reshape while damp and dry flat.
Final Notes
Everything in this holder depends on a few measurements:
- Round 3 measures 4.0 in (10.2 cm) flat to flat.
- Round 7 measures 9.0 in (22.9 cm), with 25 sts between corners on each side.
- Both panels join stitch for stitch into a body 10.75 in (27.3 cm) wide.
- The top band has 52 sts and matches the 5.2 in (13.2 cm) top side.
- The bottom ring has 18 sts and leaves a 1.25 in (3.2 cm) opening.
If you hit each checkpoint in order, the holder will hang flat with a straight band and a ring the bags pull through easily.
Happy crocheting!