

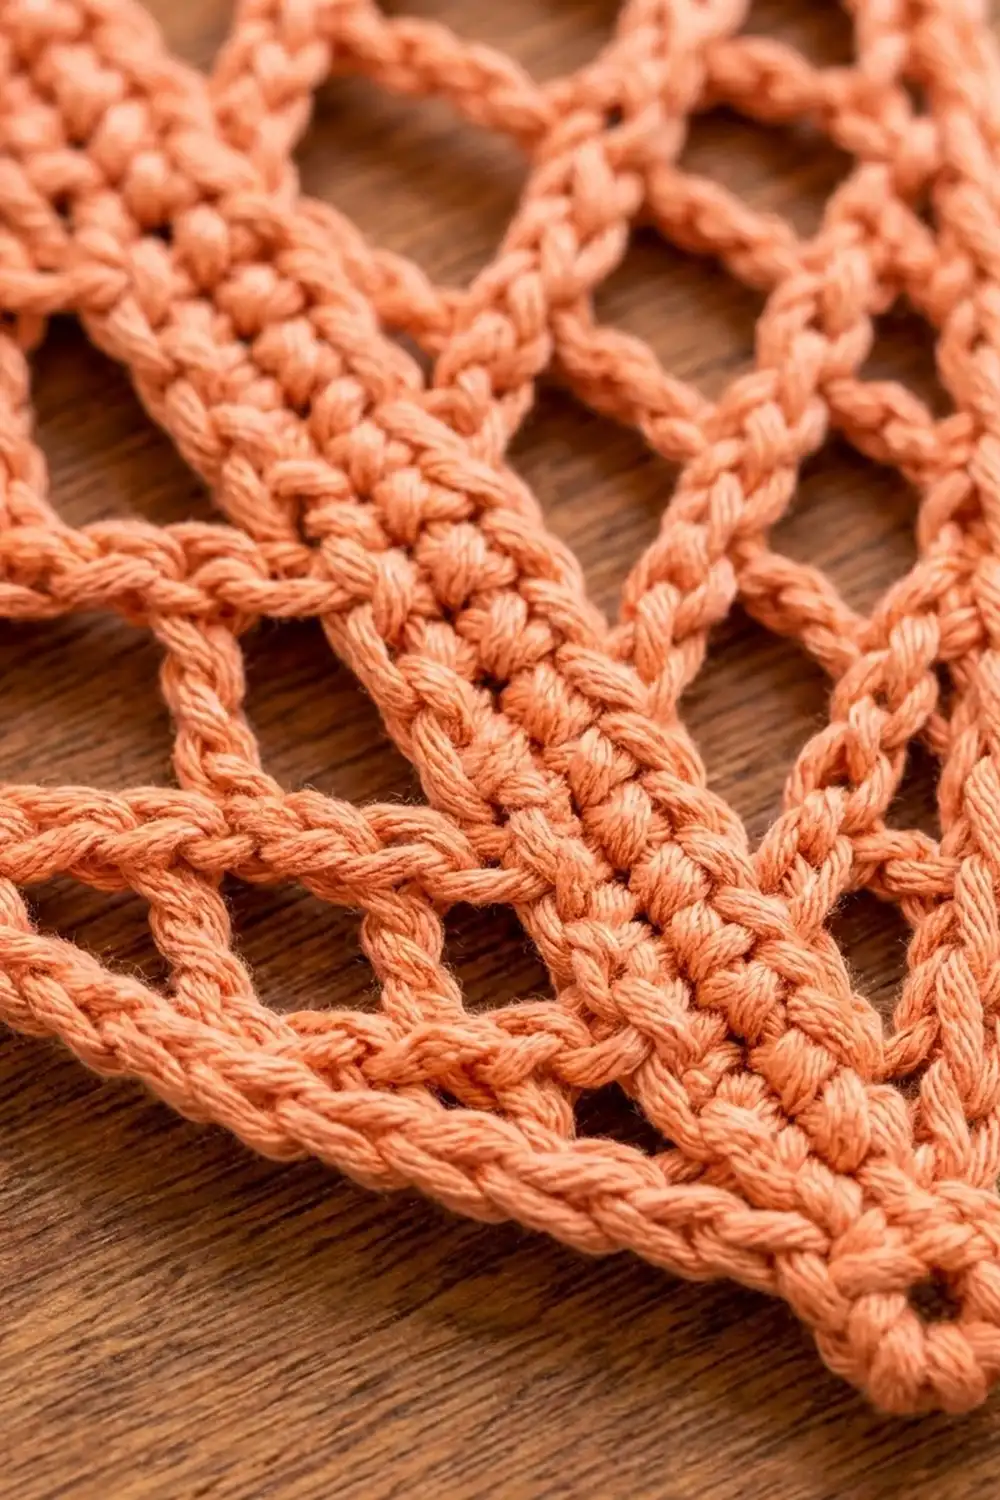
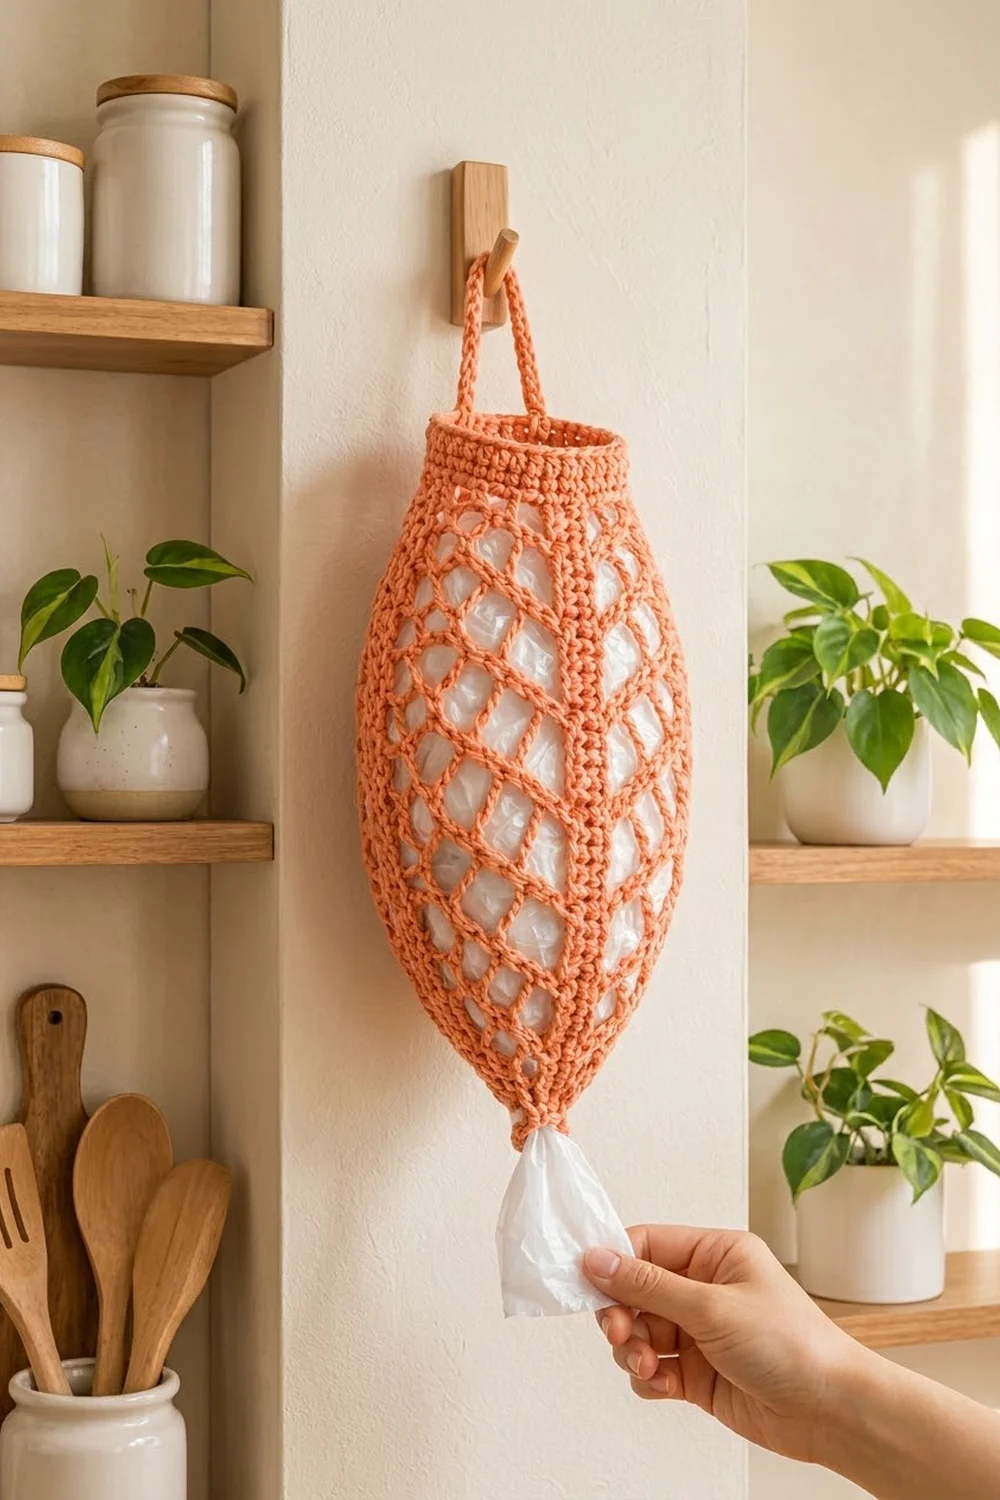
This leaf-shaped bag holder turns a pile of plastic grocery bags into something you will want hanging on your kitchen wall. A solid center spine runs from the pointed tip up to a firm rim, and open chain-space “veins” branch out on both sides like a real leaf. When it hangs from its cord, it fills out into a soft rounded pod, and you pull out one bag at a time through the small opening at the tip.
The sample uses one warm coral-orange cotton. A single color shows off the lattice and keeps the look clean and modern. Any solid color works, but light-to-mid shades show the vein texture best.
The pattern uses US crochet terms. Laid flat, the finished holder is about 6½ in (16.5 cm) wide at its widest point and 12¼ in (31.1 cm) tall from tip to rim, not counting the hanging cord.
Construction is simple. The body is one seamless tube worked in the round from the bottom tip upward. Two 3-stitch spines (front and back) go straight up, while the mesh panels between them grow, stay even, then shrink to make the leaf outline. A solid single crochet band closes the top, and a separate slip-stitch cord is sewn inside the rim to make the hanging loop.
Finished Size and Construction
- Finished size: 6½ in (16.5 cm) wide x 12¼ in (31.1 cm) tall, laid flat
- Skill level: Easy-intermediate
- Terminology: US crochet terms
- Yarn weight: Worsted (#4), cotton or cotton blend
- Hook: 5.0 mm (H-8)
- Number of pieces: 2 (body + hanging cord), sewn into one finished item
- Layout: Single item, no grid
- Body size before top band: 6½ in (16.5 cm) wide x 11¼ in (28.6 cm) tall
- Top band depth: 1 in (2.5 cm)
- Hanging cord: about 9 in (22.9 cm) long before folding
Materials
Choose a smooth, firm cotton in worsted weight. Cotton holds the lattice open and does not stretch out under the weight of the bags. Avoid fuzzy or loosely plied yarns, because they blur the veins and snag on plastic.
- Coral orange: 70 g, approximately 133 m (145 yd)
Tools:
- 5.0 mm (H-8) crochet hook
- Tapestry needle
- 2 stitch markers (1 in a contrasting color for the start of the round)
- Scissors
- Measuring tape
- Rust-proof pins and a rolled towel for blocking
The yarn amount includes a margin of about 15 percent for your gauge check and weaving in ends.
Abbreviations (US Terms)
- ch: chain
- sl st: slip stitch
- sc: single crochet
- dc: double crochet
- sk: skip
- sp: space
- st(s): stitch(es)
- rnd: round
Special term – spine: the 3 dc that sit directly above the 3 spine dc of the round below. The front spine starts each round, and the back spine is halfway around. Always work 1 dc into the top of each spine dc so the spines stack into a straight, solid column.
Special term – panel: the mesh section between the two spines. Every panel starts with ch 2 after a spine and ends with ch 2 before the next spine. So a panel with k dc has k + 1 ch-2 spaces.
Counting rule: To measure around, count every dc and every chain as 1 stitch unit. Round total = (spine dc + panel dc) + (2 x number of ch-2 sps).
Gauge and Checkpoints
Gauge: 14 sts = 4 in (10.2 cm) in sc, and 8 rnds of dc = 4 in (10.2 cm). In the mesh, 14 stitch units (dc and chains) = 4 in (10.2 cm). Each dc round is ½ in (1.3 cm) tall, and each sc round is ¼ in (0.6 cm) tall.
Test piece first: Work Rnds 1–5 of the body and lay it flat with the spines centered front and back. It should measure 4 in (10.2 cm) wide and about 2¼ in (5.7 cm) tall. If it matches, keep going: your test piece becomes the start of the holder.
Checkpoints (laid flat):
- After Rnd 2: about 2¼ in (5.7 cm) wide
- After Rnd 5: 4 in (10.2 cm) wide, 2¼ in (5.7 cm) tall
- After Rnd 11: 6½ in (16.5 cm) wide, 5¼ in (13.3 cm) tall
- After Rnd 19: still 6½ in (16.5 cm) wide, 9¼ in (23.5 cm) tall
- After Rnd 23: about 4¾ in (12.1 cm) wide, 11¼ in (28.6 cm) tall
- Finished: 12¼ in (31.1 cm) tall
If your piece is too big: go down to a 4.5 mm (7) hook and keep your chains snug. If it’s too small: go up to a 5.5 mm (I-9) hook. Being off by up to ¼ in (0.6 cm) at the widest point is fine.
Body
Work the body in joined rounds with the right side facing the whole time. Do not turn. Place a marker in the first stitch of each round.
Foundation: Ch 12, sl st in first ch to form a ring. This ring is the opening at the leaf tip where the bags come out.
Rnd 1: Ch 1, 16 sc in ring, sl st to first sc to join. (16 sc)
Rnd 2 (set-up): Ch 3 (counts as dc), dc in next 2 sc (front spine made), ch 2, sk 2 sc, dc in next sc, ch 2, sk 2 sc, dc in next 3 sc (back spine made); rep from * to * once, sl st to top of beginning ch-3. (8 dc, 4 ch-2 sps; 16 sts around; k = 1 per panel)
Each panel now has 1 dc and 2 ch-2 sps. From here on, each round uses one of three panel types.
Increase panel: Ch 2, then (dc in next ch-2 sp, ch 2) in every ch-2 sp of the panel. The panel gains 1 dc.
Even panel: Ch 2, sk first ch-2 sp, then (dc in next ch-2 sp, ch 2) in each remaining ch-2 sp. The dc count stays the same. Because the dc move half a space sideways each time, they build the diagonal vein lines.
Decrease panel: Ch 2, sk first ch-2 sp, then (dc in next ch-2 sp, ch 2) in each ch-2 sp except the last; sk last ch-2 sp. The panel loses 1 dc.
Round template: Ch 3 (counts as dc), dc in next 2 dc (front spine), work panel, dc in each of next 3 spine dc (back spine), work panel, sl st to top of ch-3.
Rnd 3 (increase): Work both panels as increase panels. (10 dc, 6 ch-2 sps; 22 sts around)
Rnd 4 (even): Work both panels as even panels. (10 dc, 6 ch-2 sps; 22 sts around)
Rnd 5 (increase): (12 dc, 8 ch-2 sps; 28 sts around)
Check your test-piece measurements now.
Rnd 6 (even): (12 dc, 8 ch-2 sps; 28 sts around)
Rnd 7 (increase): (14 dc, 10 ch-2 sps; 34 sts around)
Rnd 8 (even): (14 dc, 10 ch-2 sps; 34 sts around)
Rnd 9 (increase): (16 dc, 12 ch-2 sps; 40 sts around)
Rnd 10 (even): (16 dc, 12 ch-2 sps; 40 sts around)
Rnd 11 (increase): (18 dc, 14 ch-2 sps; 46 sts around; k = 6 per panel)
The leaf is now at full width: 46 sts around, 23 per flat side, 6½ in (16.5 cm) across.
Rnds 12–19 (even, 8 rnds): Work both panels as even panels in each round. (18 dc, 14 ch-2 sps; 46 sts around in every round)
Rnd 20 (decrease): Work both panels as decrease panels. (16 dc, 12 ch-2 sps; 40 sts around)
Rnd 21 (even): (16 dc, 12 ch-2 sps; 40 sts around)
Rnd 22 (decrease): (14 dc, 10 ch-2 sps; 34 sts around; k = 4 per panel)
Rnd 23 (even): (14 dc, 10 ch-2 sps; 34 sts around)
Lay the body flat with the spines centered. You should see a pointed tip, gentle curves out to the widest section, and a softer taper toward the top. Diagonal veins should angle away from the spine on both sides.
Hanging Cord
Ch 33. Sl st in the back bump of 2nd ch from hook and in each ch across. (32 sl st) Fasten off, leaving a 10 in (25.4 cm) tail.
The cord is about 9 in (22.9 cm) long. Tie an overhand knot about ½ in (1.3 cm) from each end. The knots keep the cord from pulling through the band.
Border: Top Band
The top band is the border for this piece. It closes the mesh, gives the rim some body, and anchors the hanging cord.
Border gauge: 14 sc = 4 in (10.2 cm), and 4 sc rnds = 1 in (2.5 cm).
Rnd 24 (conversion): Ch 1, sc in each dc and 2 sc in each ch-2 sp around, sl st to first sc. (14 sc worked 1-per-existing dc + 20 sc worked into the 10 ch-2 sps = 34 sc) Laid flat, that’s 17 sc per side, front and back.
Rnds 25–27: Ch 1, sc in each sc around, sl st to first sc. (34 sc each round; 17 per side)
Rnd 28: Ch 1, sl st loosely in each sc around, join to first sl st. (34 sl st) Fasten off and weave in the end.
Why the math works: Rnd 23 measures 34 stitch units around (14 dc + 10 ch-2 sps x 2). Rnd 24 puts exactly one sc on each of those units, so the band keeps the same 34-stitch circumference at the same gauge of 14 sts per 4 in. That’s 34 sc = about 9¾ in (24.8 cm) around, or about 4¾ in (12.1 cm) laid flat. The band doesn’t flare or pull in; it just firms up the opening. The slip-stitch round adds a neat rolled edge without adding height.
Attaching the cord: Fold the cord in half and turn the body so the back spine faces you. Place the cord ends inside the band, one on each side of the back spine and about 1 in (2.5 cm) apart, with the knots sitting just below Rnd 24. Thread the tail on a tapestry needle and whipstitch each end firmly to the inside of the band through Rnds 24–27. The loop rises about 3 in (7.6 cm) above the rim.
Final Blocking
- Soak the holder in cool water for 10 minutes, then gently press out the water. Do not wring it.
- Roll it in a towel to remove extra moisture.
- Lay it flat with the front spine centered and the back spine directly underneath.
- Shape the outline: a pointed tip, 6½ in (16.5 cm) across the widest section, 4¾ in (12.1 cm) at the rim, and 12¼ in (31.1 cm) tall.
- Open each ch-2 space with your fingertips so the veins run in clean diagonal lines.
- Pin the edges if needed and let it dry completely.
- Optional: once it’s dry, slip a rolled hand towel inside for a few hours to set the rounded pod shape.
Final Quality-Control Checklist
- Round totals match: 16, 22, 28, 34, 40, 46, then 40 and 34 at the top
- Both spines are straight, 3 dc wide, and directly opposite each other
- The two panels have the same number of dc in every round
- The body is 6½ in (16.5 cm) wide and 11¼ in (28.6 cm) tall before the band
- The band has 34 sc in every round, 17 per side
- The finished height is 12¼ in (31.1 cm)
- The bottom ring stretches to about 1½ in (3.8 cm) across so bags can pull through
- The cord is knotted and stitched firmly through four band rounds
- All ends are woven in along the spines, where they hide best
Troubleshooting
Spine drifts sideways: You worked a spine dc into a ch-2 sp. Always work spine dc into the tops of the 3 spine dc below.
Panels have different counts: Before starting each round, count the ch-2 sps in each panel. Each panel must have k + 1.
Veins run straight up instead of diagonally: On even rounds, make sure you skip the first ch-2 sp. That sideways shift is what creates the diagonal.
Rim flares: Your sc is looser than your dc mesh. Go down half a hook size for Rnds 24–28.
Rim pulls in: Work Rnd 24 more loosely, and check that you put 2 sc in every ch-2 sp.
Bags fall out of the tip: Your bottom ring is too loose. Remake the foundation with ch 10 and work 16 sc into the ring.
Holder sags when full: Switch to a firmer cotton or tighten your gauge.
Care
Hand wash in cool water and lay flat to dry. You can also machine wash cotton on a gentle cycle in a mesh bag, then reshape it while damp.
Final Notes
Here’s the measurement chain. The 16-stitch ring sets a narrow pointed tip. Each increase round adds 6 stitches until you reach 46 stitches and 6½ in (16.5 cm) at Rnd 11. Eight even rounds build the long middle, and two decrease rounds bring you down to 34 stitches at 11¼ in (28.6 cm). The 34-stitch band matches that circumference exactly and adds 1 in (2.5 cm), for a finished height of 12¼ in (31.1 cm). Check each stage, and the leaf shape will take care of itself.
Happy crocheting!