

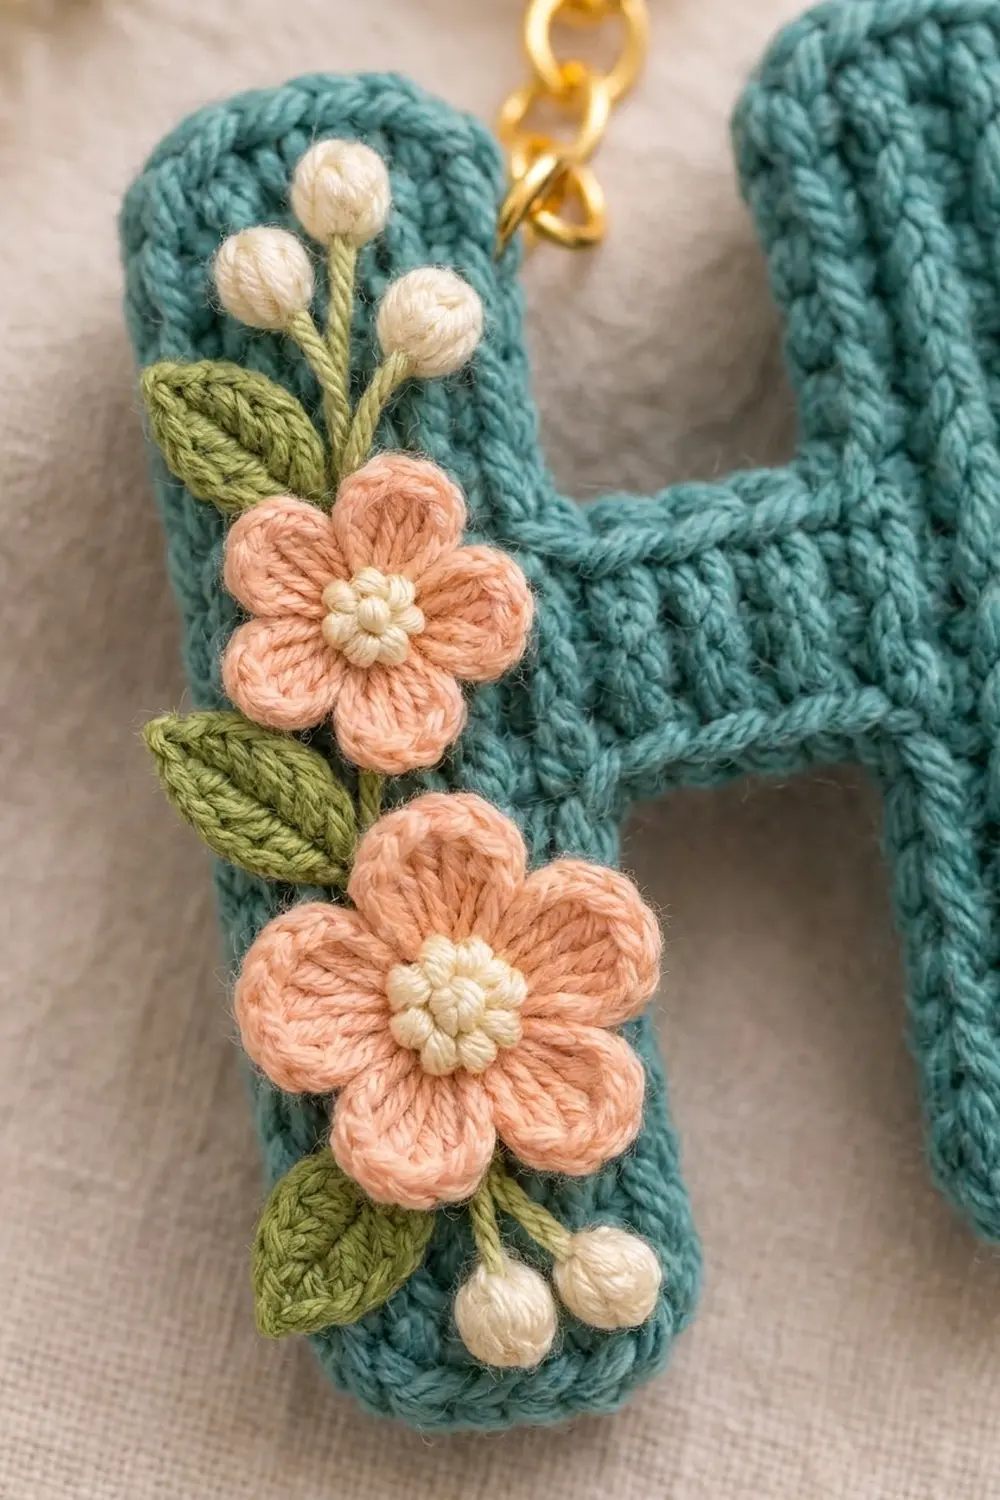
This small letter H is a quick, personal accessory. It is a ribbed teal monogram with peach flowers, soft green leaves and cream berry sprigs running down one side. It hangs from a gold split ring and chain, so you can use it as a bag charm, a key fob or a gift tag that stays useful.
The colors are calm and vintage. The letter is teal, the flowers are peach, the flower centers and berries are cream, and the leaves and stems are sage green. The ribbed surface looks knitted, but it is just single crochet worked in the back loop only.
This pattern uses US crochet terms. The finished keychain body is 3.5 in (8.9 cm) tall and 3.3 in (8.4 cm) wide, not counting the hardware.
The letter is worked flat in one continuous piece, in rows that run the full height of the letter. First you make the left upright. Then you work the crossbar off its side. Last, you extend the work up and down with chains and foundation stitches to form the right upright. A two-round edging rounds the corners, and the small appliqués are sewn on at the end.
Finished Size and Construction
- Finished size: 3.5 in (8.9 cm) tall x 3.3 in (8.4 cm) wide
- Skill level: Intermediate (uses foundation single crochet)
- Terminology: US
- Yarn weight: DK (light, #3), cotton or cotton blend
- Hooks: 3.5 mm (E-4) for the letter; 3.25 mm (D-3) for the appliqués
- Number of pieces: 1 letter body, plus 10 small sewn-on appliqués (2 flowers, 3 leaves, 5 berries)
- Layout: single letter H, with the uprights joined by a crossbar slightly above center
- Upright size before border: 3.2 in (8.1 cm) long x 1 in (2.5 cm) wide
- Size before border: 3.2 in (8.1 cm) tall x 3 in (7.6 cm) wide
- Border depth: 0.15 in (0.4 cm) on every edge
Materials
Choose a smooth, tightly plied DK cotton. It shows the ribbed ridges clearly, keeps its shape on a keychain and doesn’t fuzz much with handling.
- Color A, teal: 8 g / 20 m (letter body and edging)
- Color B, peach: 2 g / 5 m (flower petals)
- Color C, cream: 1 g / 3 m (flower centers and berries)
- Color D, sage green: 1 g / 3 m (leaves and embroidered stems)
All quantities include a small extra amount for your gauge swatch and sewing tails.
Tools:
- 3.5 mm (E-4) and 3.25 mm (D-3) crochet hooks
- Tapestry needle
- 1 in (2.5 cm) gold split key ring
- Short gold chain, about 0.8 in (2.0 cm), with 2 jump rings
- Flat-nose pliers
- Stitch markers
- Blocking board and rustproof pins
- Spray bottle
Abbreviations (US Terms)
- ch – chain
- sl st – slip stitch
- sc – single crochet
- hdc – half double crochet
- dc – double crochet
- BLO – back loop only
- sc2tog – single crochet 2 together
- st(s) – stitch(es)
- rnd – round
- RS – right side
Special stitch: fsc extension (foundation single crochet added to the end of a row). Insert hook into the base of the last st made (the two strands at its bottom), yo and pull up a loop, yo and pull through 1 loop (this forms the new “chain” base), yo and pull through both loops on hook. One fsc made. For the next fsc, insert hook into the chain base of the fsc you just made and repeat.
Gauge and Checkpoints
Gauge: 5 sts and 6 rows = 1 in (2.5 cm) in sc BLO with the 3.5 mm hook. That is 20 sts and 24 rows = 4 in (10.2 cm).
Test one piece first. Work Rows 1–6 of the left upright as your swatch, and measure it before you go on.
Checkpoints:
- After Row 6: the left upright is 3.2 in (8.1 cm) long x 1 in (2.5 cm) wide.
- After Row 12: the crossbar is 1 in (2.5 cm) wide x 1 in (2.5 cm) tall (5 sts).
- After Row 18: the letter is 3 in (7.6 cm) wide x 3.2 in (8.1 cm) tall.
- After the edging: the letter is 3.3 in (8.4 cm) wide x 3.5 in (8.9 cm) tall.
If your upright is too long (over 3.3 in / 8.4 cm), go down a hook size. If it is too short (under 3.1 in / 7.9 cm), go up a hook size. Row height matters less here. If 6 rows measure more than 1.1 in (2.8 cm), crochet a little tighter or use a smaller hook.
Letter Body
Use Color A and the 3.5 mm hook. Every row after Row 1 is worked in BLO, which makes the vertical ridges.
Left Upright
Ch 17.
Row 1: Sc in 2nd ch from hook and in each ch across. (16 sc)
Turn the work so Row 1 runs vertically, with its last stitch at the top. Odd rows travel upward and even rows travel downward.
Rows 2–6: Ch 1, turn, sc BLO in each st across. (16 sc each row)
Row 6 ends at the bottom of the upright. Fasten off.
Checkpoint 1: 3.2 in (8.1 cm) x 1 in (2.5 cm).
Crossbar
Count the Row 6 stitches from the bottom. The crossbar uses stitches 7–11. That leaves 6 sts below and 5 sts above, so the bar sits slightly above center.
Row 7: Join Color A in the back loop of the 7th st from the bottom, ch 1, sc BLO in same st and in next 4 sts. (5 sc) Leave the top 5 sts unworked.
Rows 8–12: Ch 1, turn, sc BLO in each st across. (5 sc each row)
Row 12 ends at the lower edge of the crossbar. Do not fasten off.
Checkpoint 2: 1 in (2.5 cm) x 1 in (2.5 cm).
Right Upright
Row 13: Ch 7. Sc in 2nd ch from hook and in next 5 ch (6 sc), sc BLO in each of the 5 crossbar sts (5 sc), then work 5 fsc extensions upward. (16 sts: 6 + 5 + 5)
The 6 sts on the chain form the lower part of the upright, and the 5 fsc form the upper part. This matches the left upright, with 6 sts below the bar and 5 above.
Rows 14–18: Ch 1, turn, sc BLO in each st across. (16 sc each row)
Row 18 ends at the bottom-right corner. Do not fasten off.
Checkpoint 3: 3 in (7.6 cm) wide x 3.2 in (8.1 cm) tall. The body has 222 sts in total: 96 in the left upright, 30 in the crossbar and 96 in the right upright.
Border
Work the edging with Color A and the 3.5 mm hook, with the RS facing. The RS is whichever side you choose for the flowers.
Border gauge: 5 sc = 1 in (2.5 cm) along stitch edges. Along row ends, work 1 sc in each row end.
Edge Map
The H outline has 12 straight edges, 8 outer corners and 4 inner corners:
| Edge | Worked into | Sc |
|---|---|---|
| Right upright bottom | row ends of Rows 13–18 | 6 |
| Right upright inner, lower | free loops of Row 13 chain | 6 |
| Crossbar bottom | row ends of Rows 7–12 | 6 |
| Left upright inner, lower | bottom 6 sts of Row 6 | 6 |
| Left upright bottom | row ends of Rows 1–6 | 6 |
| Left upright outer | free loops of foundation ch | 16 |
| Left upright top | row ends of Rows 1–6 | 6 |
| Left upright inner, upper | top 5 sts of Row 6 | 5 |
| Crossbar top | row ends of Rows 7–12 | 6 |
| Right upright inner, upper | bases of the 5 fsc | 5 |
| Right upright top | row ends of Rows 13–18 | 6 |
| Right upright outer | tops of Row 18 | 16 |
There are 90 edge positions in total.
Outer corners: work 2 extra sc into the corner, around the side of the corner stitch.
Inner corners: work an sc2tog using the last position of one edge and the first position of the next edge. Each sc2tog turns 2 positions into 1 st.
Rnd 1
Ch 1, do not turn. Work in the order of the table:
2 sc in the corner (outer corner 1); 6 sc across right upright bottom; 2 sc in corner (outer corner 2); 5 sc up right inner lower edge, sc2tog over the last chain loop and the first crossbar row end; 4 sc along crossbar bottom, sc2tog over the last crossbar row end and the first Row 6 st; 5 sc down left inner lower edge; 2 sc in corner (outer corner 3); 6 sc across left bottom; 2 sc in corner (outer corner 4); 16 sc up left outer edge; 2 sc in corner (outer corner 5); 6 sc across left top; 2 sc in corner (outer corner 6); 4 sc down left inner upper edge, sc2tog over the last Row 6 st and the first crossbar row end; 4 sc along crossbar top, sc2tog over the last crossbar row end and the first fsc base; 4 sc up right inner upper edge; 2 sc in corner (outer corner 7); 6 sc across right top; 2 sc in corner (outer corner 8); 16 sc down right outer edge. Sl st to first sc.
Stitch count: 90 positions + 16 corner sts (8 corners x 2) − 4 (one per sc2tog) = 102 sc.
Rnd 2
Ch 1, sl st loosely in BLO of each sc around. (102 sl sts) Join to first sl st and fasten off.
This round makes the raised rim that outlines the letter.
Why the Math Works
On the long outer edges, 16 sc sit over 16 sts, an exact 1:1 match at 5 sts per in. Each short end has 6 row ends plus 2 extra sc at each corner, so 10 sts sit over a 1 in (2.5 cm) end. Those extra stitches curve the ends into their rounded shape.
On the crossbar, 6 row ends would crowd a 1 in (2.5 cm) edge that only needs 5 sts to lie flat. The sc2tog at each inner corner takes out the extra stitch, so the bar stays flat and the inside corners stay crisp.
Each edging round adds about 0.075 in (0.2 cm), so the two rounds add 0.15 in (0.4 cm) on each side. That takes the width from 3 in (7.6 cm) to 3.3 in (8.4 cm) and the height from 3.2 in (8.1 cm) to 3.5 in (8.9 cm).
Appliqués
Use the 3.25 mm hook. Leave a 6 in (15.2 cm) tail on every piece for sewing.
Flower Centers (make 2)
With Color C, make a magic ring, ch 1, 5 sc in ring, pull tight, sl st to first sc. (5 sc) Fasten off Color C.
Large Flower (make 1)
Rnd 2: Join Color B in any center sc. (Ch 2, 3 dc, ch 2, sl st) in same st, sl st in next st; repeat from * 4 more times. (5 petals) Fasten off. The flower is about 1 in (2.5 cm) across.
Small Flower (make 1)
Rnd 2: Join Color B in any center sc. (Ch 2, 2 dc, ch 2, sl st) in same st, sl st in next st; repeat from * 4 more times. (5 petals) Fasten off. The flower is about 0.8 in (2.0 cm) across.
Add 3 small Color C French knots to the center of each flower for the knotted look.
Leaves (make 3)
With Color D, ch 5. Sc in 2nd ch from hook, hdc in next ch, dc in next ch, then work (hdc, ch 2, sl st in 2nd ch from hook, hdc) in last ch for the pointed tip. Working along the other side of the chain: dc in next ch, hdc in next ch, sc in last ch. Sl st to first sc. (8 sts plus tip picot) Fasten off. Each leaf is about 0.6 in (1.5 cm) long.
Berries (make 5)
With Color C, make a magic ring, ch 1, 4 sc in ring, then pull it very tight so the stitches cup into a bead. Fasten off. Each berry is about 0.2 in (0.5 cm) across.
Assembly on the Left Upright
- Pin the small flower about 0.6 in (1.5 cm) below the top edge, centered on the upright.
- Pin the large flower below it, slightly overlapping the small flower’s lowest petal.
- Tuck one leaf to the left of the small flower, one to the left between the flowers and one below the large flower. Let the tips reach just past the left rim.
- Place 3 berries above the small flower and 2 berries below the large flower.
- With Color D, embroider short stems in stem stitch from each berry down toward the nearest flower.
- Sew every piece down with small stitches through the back loops, hiding the stitches under the petals.
- Weave in all ends on the wrong side.
Hardware
Open a jump ring with pliers and pass it through 2 edging stitches at the top inner corner of the left upright. Attach the chain to it, then attach the split ring to the chain with the second jump ring. Close both rings fully so the yarn can’t slip out.
Final Blocking
- Lightly mist the letter with water until it is damp but not soaked.
- Lay it RS up on the blocking board.
- Pin the four corners of each upright, easing the rounded ends into shape.
- Pin the crossbar edges straight and the inner corners square.
- Check the size: 3.5 in (8.9 cm) tall x 3.3 in (8.4 cm) wide.
- Keep the pins outside the appliqués so the flowers stay raised.
- Let it dry completely, at least 4 hours, before you unpin it.
Final Quality-Control Checklist
- Each upright is 16 sts long and 6 rows wide.
- The crossbar is 5 sts tall and 6 rows wide, slightly above center.
- Edging Rnd 1 has 102 sc and Rnd 2 has 102 sl sts.
- All 8 outer corners are rounded and all 4 inner corners lie flat.
- The finished size is 3.5 in (8.9 cm) x 3.3 in (8.4 cm).
- The flowers, leaves and berries are secure, with no visible stitches.
- Both jump rings are fully closed.
- All ends are woven in on the wrong side.
Troubleshooting
The ridges look flat. Make sure every row after Row 1 is worked in BLO only.
The right upright is lopsided. Count Row 13: 6 sc on the chain, 5 crossbar sc and 5 fsc. An extra fsc makes the top longer.
The crossbar edges ripple. Check that you worked an sc2tog at each inner corner.
The ends look square. Make sure you added 2 extra sc at each outer corner.
The rim pulls tight. Work the Rnd 2 slip stitches more loosely, or use a 4 mm (G-6) hook for that round only.
The keychain curls. Block it again, pin it firmly and let it dry completely.
Care
Spot clean with mild soap and cool water, press flat in a towel and air dry. Don’t soak it, because soaking can loosen the appliqués and tarnish the hardware.

Final Notes
The measurements build in a short chain. Each upright is 3.2 in (8.1 cm) x 1 in (2.5 cm), and the crossbar is 1 in (2.5 cm) square. The full body is 3 in (7.6 cm) x 3.2 in (8.1 cm), and the two edging rounds bring it to 3.3 in (8.4 cm) x 3.5 in (8.9 cm). Check your swatch upright and count Row 13 carefully, and the rest will fall into place.
Happy crocheting!