
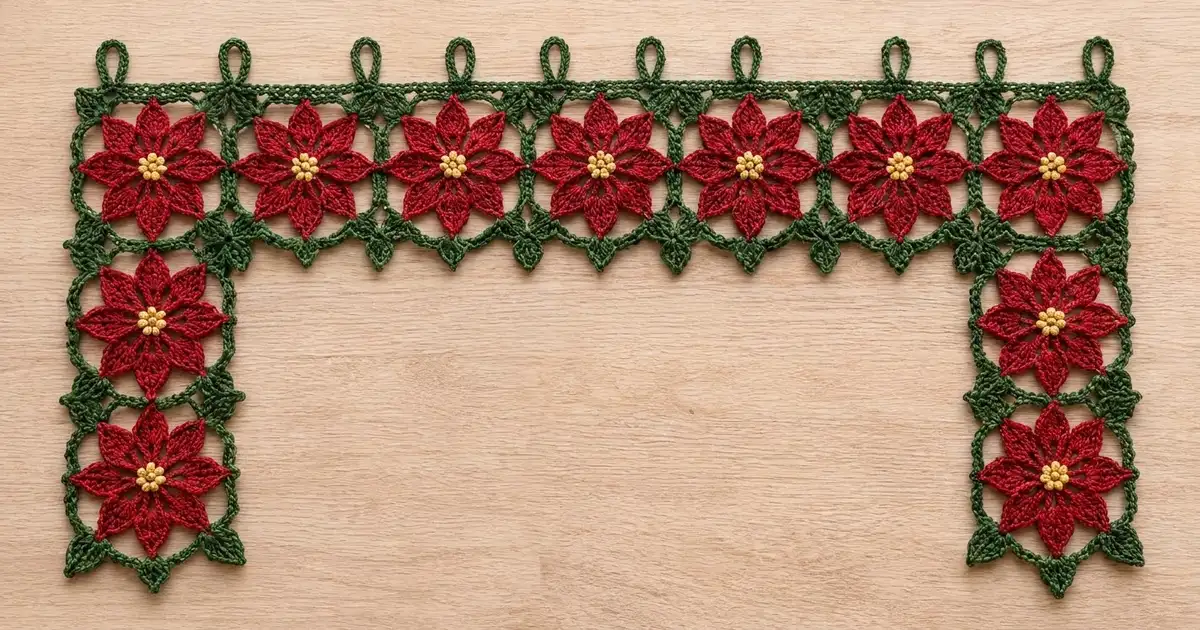
This valance frames a window with a row of bright red poinsettias. Each square motif has a golden bobble center, 8 pointed cranberry petals, and a forest-green frame with a little leaf at every corner. When you join the motifs, those corner leaves gather into small green clusters, a lot like holly tucked between the blooms.
The design uses three colors: deep red, forest green, and golden yellow. The style is classic and slightly lacy. Open windows sit between the petals, but the square frame stays firm enough to hang neatly on a curtain rod.
All instructions use US crochet terms. The finished valance measures 23.3 in (59.2 cm) wide and 18.8 in (47.8 cm) tall, not counting the hanging loops. Each leg is 5.3 in (13.5 cm) wide, and the opening between the legs is 12.7 in (32.3 cm) wide.
Here is the construction in brief. Make 11 square motifs, worked in the round from the center out. Join them with single crochet seams into an inverted U. Then work a 2-round border around the whole outline and add 6 hanging loops in the second round.
Finished Size and Construction
- Finished size: 23.3 in x 18.8 in (59.2 cm x 47.8 cm), not counting the loops; about 20 in (50.8 cm) tall with the loops
- Skill level: Intermediate
- Terminology: US crochet terms
- Yarn weight: DK (light worsted, category 3) cotton or cotton blend
- Hook: 3.5 mm (E-4)
- Number of pieces: 11 identical square motifs
- Layout: 5 motifs across the top, with 3 motifs below each end motif (inverted U)
- Motif size: 4.5 in (11.4 cm) square, not counting the corner leaves
- Size before border: 22.5 in x 18 in (57.2 cm x 45.7 cm)
- Border depth: 0.4 in (1.0 cm), 2 rounds of single crochet
- Corner leaves: stick out about 0.75 in (1.9 cm) past each corner; they are not included in any measurement
Materials
Use a smooth mercerized cotton or cotton blend in DK weight. Cotton holds the pointed petal tips well and keeps the valance from sagging on the rod. Avoid fuzzy yarns, because they blur the eyelets and the leaf shapes.
- Color A, golden yellow (centers): 10 g / 24 m
- Color B, deep cranberry red (petals): 80 g / 192 m
- Color C, forest green (frames, joining, border, loops): 90 g / 216 m
These quantities assume about 120 m per 50 g and already include a safety margin of roughly 15 percent.
Tools:
– 3.5 mm (E-4) crochet hook
– Tapestry needle
– Stitch markers
– Rust-proof blocking pins and a blocking mat
– Spray bottle
– Measuring tape
– Scissors
Abbreviations (US Terms)
- ch – chain
- sl st – slip stitch
- sc – single crochet
- hdc – half double crochet
- dc – double crochet
- tr – treble crochet
- dtr – double treble crochet
- sc2tog – single crochet 2 together
- sc3tog – single crochet 3 together
- sp – space
- st(s) – stitch(es)
- RS / WS – right side / wrong side
Special stitches:
- Bobble: *Yarn over, insert hook in st, pull up a loop, yarn over, pull through 2 loops; repeat from * 2 more times in the same st (4 loops on hook), yarn over, pull through all 4 loops.
- Beginning bobble: Ch 2, then work the bobble as above, but with only 2 repeats (3 loops on hook). Yarn over and pull through all 3 loops.
- Petal: In the same ch-4 sp work (sc, hdc, 2 dc, tr, ch 3, tr, 2 dc, hdc, sc). That is 10 sts plus a ch-3 tip.
- Leaf: Ch 7. Working back along the chain: sl st in 2nd ch from hook, sc in next ch, hdc in next ch, dc in next ch, hdc in next ch, sc in last ch. The leaf is not counted as a stitch.
Gauge and Checkpoints
Make 1 complete motif before you buy the rest of your yarn or start the second motif. Check it against these numbers:
- After Rnd 2: the yellow center measures 1 in (2.5 cm) across.
- After Rnd 3: the ring measures 1.75 in (4.4 cm) across.
- After Rnd 4: the flower measures 4 in (10.2 cm) from one petal tip to the opposite tip.
- After Rnd 6: the square measures about 4.25 in (10.8 cm) per side.
- After Rnd 7: the square measures 4.5 in (11.4 cm) per side. That works out to 25 sc = 4.5 in (11.4 cm).
If your motif is too big: go down to a 3.25 mm (D-3) hook. Also check that your dtr sts are not being pulled extra tall.
If your motif is too small: go up to a 3.75 mm (F-5) hook. Also check that the ch-7 loops in Rnd 5 are not too tight.
Every finished size in this pattern depends on that 4.5 in (11.4 cm) motif, so getting it right now saves you trouble later.
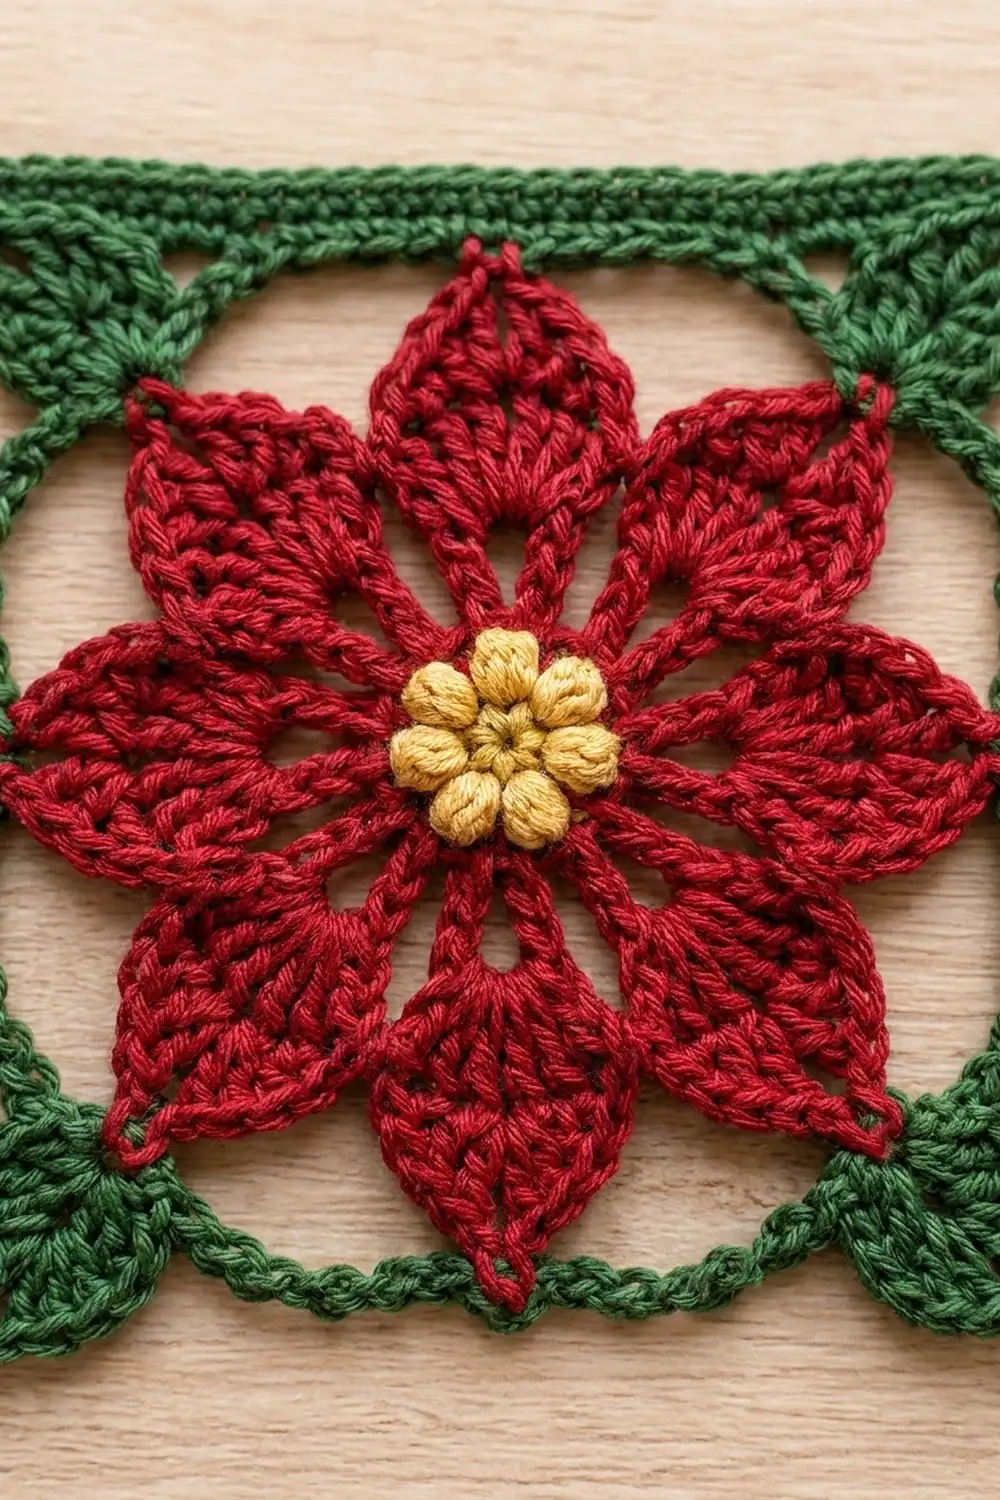
Poinsettia Motif (Make 11)
Center
Rnd 1 (Color A): Make a magic ring. Ch 1, then work 8 sc in the ring. Join with a sl st to the first sc. (8 sc)
Rnd 2: Beginning bobble in the same st, ch 1, bobble in next sc, ch 1; repeat from * 6 more times. Join with a sl st to the top of the beginning bobble. (8 bobbles, 8 ch-1 sps)* Fasten off Color A.
Push each bobble toward the RS so the center looks domed and knobby.
Petals
Rnd 3 (Color B): Join Color B with a sc in any ch-1 sp. Ch 4, sc in next ch-1 sp, ch 4; repeat from * 6 more times. Join with a sl st to the first sc. (8 sc, 8 ch-4 sps)*
Rnd 4: Sl st into the first ch-4 sp. Work 1 Petal in each ch-4 sp around. Join with a sl st to the first sc. (8 petals: 80 sts plus 8 ch-3 tips) Fasten off Color B.
Each petal sits over a ch-4 loop, which leaves a small eyelet at its base. The tr-ch 3-tr peak is what makes the pointed tip.
Green Frame
Rnd 5 (Color C): Join Color C with a sc in any ch-3 petal tip. This is a side tip. Ch 7, sc in next tip (corner tip), ch 7, sc in next tip (side tip); repeat from * 3 more times, but leave out the final sc on the last repeat. Join with a sl st to the first sc. (8 sc: 4 side and 4 corner; 8 ch-7 loops)*
The loops reach from tip to tip and leave open triangular windows between the petals.
Rnd 6 (squaring round): Ch 1, sc in the same side sc. In the next ch-7 loop work (2 sc, 2 hdc, 3 dc, 2 tr). In the corner sc work (dtr, ch 3, dtr). In the next ch-7 loop work (2 tr, 3 dc, 2 hdc, 2 sc). Sc in the next side sc. Repeat from * to * 3 more times, but leave out the final sc on the last repeat. Join with a sl st to the first sc. (84 sts plus 4 corner ch-3 sps)
Per side, between the corner ch-3 sps, you have: dtr + 9 + side sc + 9 + dtr = 21 sts. The st heights rise from sc at mid-side to dtr at the corner, which pushes the circle out into a square.
Rnd 7 (edge and leaves): Ch 1, sc in each st to the first corner ch-3 sp. In the corner sp work (2 sc, Leaf, 2 sc). Sc in each of the next 21 sts; repeat from * around, finishing with sc in the remaining sts. Join with a sl st to the first sc. (100 sc; 25 sc per side, plus 4 leaves)*
Each side’s count of 25 = 2 corner sc + 21 + 2 corner sc. The 2 sc on each side of a leaf belong to that side, so no corner stitch is counted twice. Fasten off and weave in all ends.
Lay the motif flat and check that it measures 4.5 in (11.4 cm) per side.
Make All Pieces
Make 11 motifs in total. Per color, that is:
- Color A: 11 centers (Rnds 1–2)
- Color B: 11 petal rounds (Rnds 3–4)
- Color C: 11 frames (Rnds 5–7)
Before joining, lightly steam or spray-block every motif to 4.5 in (11.4 cm) square. Motifs that are all the same size make much straighter seams.
Layout grid (RS facing up; X = motif, . = open space):
Row 1:  X  X  X  X  X
Row 2:  X  .  .  .  X
Row 3:  X  .  .  .  X
Row 4:  X  .  .  .  X
The top row has 5 motifs. Each leg is 1 motif wide and 4 motifs tall, counting the end motif of the top row. The open area is 3 motifs wide and 3 motifs tall.
Joining
Method: Hold 2 motifs WS together and use Color C. Work 1 sc through both loops of each matching pair of sts along 1 side, which makes 25 sc per seam. The seam ridge ends up on the WS.
Stitch-to-stitch logic: Both sides have 25 sts, so each st meets exactly one partner. Start in the first corner sc after a leaf and end in the last corner sc before the next leaf. Leave the leaves free and fold them toward the RS.
Order:
1. Join motifs 1 through 5 side by side to make the top row (4 seams).
2. Join 3 motifs in a column below motif 1, one at a time (3 seams).
3. Join 3 motifs in a column below motif 5 (3 seams).
That is 10 seams in total.
Tension: Keep your join sc at the same tension as Rnd 7. If you work them tighter, the seams pucker. If you work them looser, the seams look wavy. Lay the piece flat after each seam to check.
Size checkpoint: The joined piece should measure 22.5 in (57.2 cm) across the top row and 18 in (45.7 cm) from the top edge to the bottom of each leg.
Border
Border gauge: same as Rnd 7, 25 sc = 4.5 in (11.4 cm). Each round adds about 0.2 in (0.5 cm) per edge.
The outline has 6 outside (convex) corners: the 2 top corners and 2 at the bottom of each leg. It also has 2 inside (concave) corners where the legs meet the underside of the top row. Fold every leaf to the RS and work behind it.
Border Rnd 1 (Color C): With RS facing, join with a sc in the first st of the top edge at the top-left corner. Work sc in each st around, as follows:
- Top edge: 125 sc (5 motifs x 25)
- Outer side, each: 100 sc (4 x 25)
- Leg bottom, each: 25 sc (1 x 25)
- Inner leg side, each: 74 sc, then 1 shared sc2tog
- Inner top edge: 73 sc between the 2 shared sc2tog
At each convex corner, ch 2 between the last st of one edge and the first st of the next. At each concave corner, sc2tog over the last st of the inner leg side and the first st of the inner top edge. Join with a sl st to the first sc. (598 sts plus 6 ch-2 corner sps)
Why the math works: The inner edges each run 3 motifs, or 75 sts. Each sc2tog uses 1 st from each of the 2 edges it connects: 74 + 1 shared on each leg side, and 73 + 2 shared along the inner top. Totals: 125 + 2(100) + 2(25) + 2(75) + 75 = 600 motif sts, minus 2 for the sc2togs = 598. The seams add no extra sts, because every seam end sits on a motif corner sc that is already counted.
Border Rnd 2 (with hanging loops): Sl st into the top-left ch-2 sp.
Hanging Loop = ch 14, then sl st in the sc just made.
- Top edge: Sc in the corner sp (st 1), Hanging Loop. Sc in next 25 sts, Hanging Loop. Sc in next 25 sts, Hanging Loop; repeat from * 2 more times. Sc in next 25 sts, Hanging Loop. Then work (sc, ch 2, sc) in the corner sp. (127 sc and 6 loops)* The 4 middle loops land exactly over the 4 top-row seams, and the end loops sit at the corners.
- Outer sides: 102 sc each (1 from each corner sp + 100).
- Leg bottoms: 27 sc each.
- Inner leg sides: 74 sc each (1 from the corner sp + 73). At each concave corner, sc3tog over the last sc, the shared sc2tog, and the next sc.
- Inner top edge: 71 sc between the 2 sc3tog.
At each convex corner, work (sc, ch 2, sc) in the ch-2 sp. Join with a sl st and fasten off. (606 sts plus 6 ch-2 sps)
Check: 598 + 12 corner sc − 4 (2 sc3tog each remove 2) = 606.
Final Blocking
- Weave in all remaining ends along the seams on the WS.
- Lay the valance RS up on a blocking mat.
- Pin the outer edges straight: 23.3 in (59.2 cm) across the top and 18.8 in (47.8 cm) down each outer side.
- Pin the opening to 12.7 in (32.3 cm) wide, with each leg 5.3 in (13.5 cm) wide.
- Pin out each petal tip and each corner leaf to a point.
- Spray with water until damp, but not soaked.
- Let it dry completely, then unpin.
Final Quality-Control Checklist
- All 11 motifs measure 4.5 in (11.4 cm) per side.
- Each motif has 8 petals and 8 bobbles, and every petal tip is caught by Rnd 5.
- Each seam has 25 sc and lies flat.
- The leaf clusters at the junctions face the RS.
- The border lies flat at all 6 convex and 2 concave corners.
- There are 6 loops, evenly spaced about 4.5 in (11.4 cm) apart.
- All ends are secured.
Troubleshooting
- Center cups upward: The magic ring is pulled too tight. Loosen it slightly before you weave in the end.
- Petals curl: Your tr sts are too tight. Block firmly, or go up a hook size for Rnd 4.
- Motif stays round instead of square: Check that you worked the dtr pairs in the corner sc only, with 9 sts in each loop.
- Inner corners bulge: Make sure you worked the sc2tog in Rnd 1 and the sc3tog in Rnd 2.
- Valance droops between loops: Use a firmer cotton, or add one extra loop at the middle of the top edge on Rnd 2.
Care
Hand wash in cool water with mild soap, roll it in a towel, and dry it flat. Re-pin the petal points while the valance is damp if they need refreshing.

Final Notes
Everything comes back to one number: the 4.5 in (11.4 cm) motif with 25 sc per side. Eleven motifs joined into an inverted U give 22.5 in x 18 in (57.2 cm x 45.7 cm). Two border rounds bring it to 23.3 in x 18.8 in (59.2 cm x 47.8 cm), and the loops add about 1.25 in (3.2 cm) at the top. Check the first motif, keep your seams even, and your poinsettias will hang straight all season.
Happy crocheting!