

This café curtain is made from two filet crochet panels. Each one shows a reindeer in mid-leap over a pair of small pine trees. The open mesh lets winter light through while the solid blocks make the reindeer stand out clearly against the glass.
The whole piece uses one cream or ivory cotton. That keeps the look calm and Scandinavian, and the open grid shows up well against a snowy window. The pattern uses US crochet terms throughout.
The finished curtain is 19 x 11.75 in (48.3 x 29.8 cm) without the tabs. With the hanging tabs it is 20.75 in (52.7 cm) tall. Each panel is 9 x 11 in (22.9 x 27.9 cm) of filet mesh before any edging.
You crochet two identical panels in rows from a written chart, then add a single crochet edging round to each. Next you slip stitch the panels together along one long side, work a two-round single crochet border around the whole curtain, and finish with eight hanging tabs along the top.
Finished Size and Construction
- Finished size: 19 x 11.75 in (48.3 x 29.8 cm), plus 1 in (2.5 cm) tabs
- Skill level: Intermediate (filet charting, keeping an even mesh)
- Terminology: US
- Yarn weight: Sport (2), mercerized cotton
- Hook: 3.25 mm (US D-3)
- Number of pieces: 2 identical panels
- Layout: 2 panels side by side (1 row of 2)
- Panel size (mesh only): 9 x 11 in (22.9 x 27.9 cm), 21 blocks x 25 rows
- Panel size after edging round: 9.25 x 11.25 in (23.5 x 28.6 cm)
- Size before border: 18.5 x 11.25 in (47.0 x 28.6 cm)
- Border depth: 2 rounds, 0.25 in (0.6 cm) per side
Materials
Use a smooth, mercerized sport-weight cotton. It gives crisp mesh squares and blocks well. Fuzzy or very soft yarns blur the reindeer outline, so skip them for this project.
- Cream/ivory: 150 g, about 465 m (3 balls of 50 g/155 m)
Tools:
– 3.25 mm (US D-3) crochet hook
– Tapestry needle
– Rust-proof pins and a blocking mat
– Measuring tape
– Spray bottle
– 8 curtain clip rings and a café rod, for hanging
These quantities include a margin of about 15% for your gauge swatch and blocking adjustments.
Abbreviations (US Terms)
- ch: chain
- sl st: slip stitch
- sc: single crochet
- dc: double crochet
- sk: skip
- sp: space
- st(s): stitch(es)
- tch: turning chain
- RS / WS: right side / wrong side
- O: open mesh
- F: filled block
Special stitches
- Open mesh (O): ch 2, sk 2 sts, dc in next dc.
- Filled block (F): dc in each of next 3 sts. Over an open mesh below, that means 2 dc in the ch-2 sp and 1 dc in the next dc.
- Row start: ch 5. This counts as the first dc plus ch 2, so it forms the first open mesh. Then sk the ch-2 sp (or 2 dc) and dc in the next dc.
- Row end: the last st of every row is a dc in the 3rd ch of the tch-5.
Every row has 21 blocks, which is 64 sts: 22 dc posts plus 42 ch or dc between them. The first and last block of every row is open, so every row starts and ends the same way.
Gauge and Checkpoints
Gauge: 7 blocks = 3 in (7.6 cm) wide, and 10 rows = 4.4 in (11.2 cm) tall, in filet mesh after blocking.
Swatch 7 blocks x 10 rows before you start (ch 26, then follow Row 1 below with 6 repeats). Block it and measure. If it is too large, go down a hook size. If it is too small, go up one. Then crochet Panel A completely before you make Panel B. That way you can check the full size once before committing.
Checkpoints for each panel:
– Width at any row: 9 in (22.9 cm)
– After Row 5: 2.2 in (5.6 cm) tall
– After Row 10: 4.4 in (11.2 cm)
– After Row 20: 8.8 in (22.4 cm)
– After Row 25: 11 in (27.9 cm)
A panel that is off by more than 0.5 in (1.3 cm) won’t block to size. Re-check your gauge and redo it.
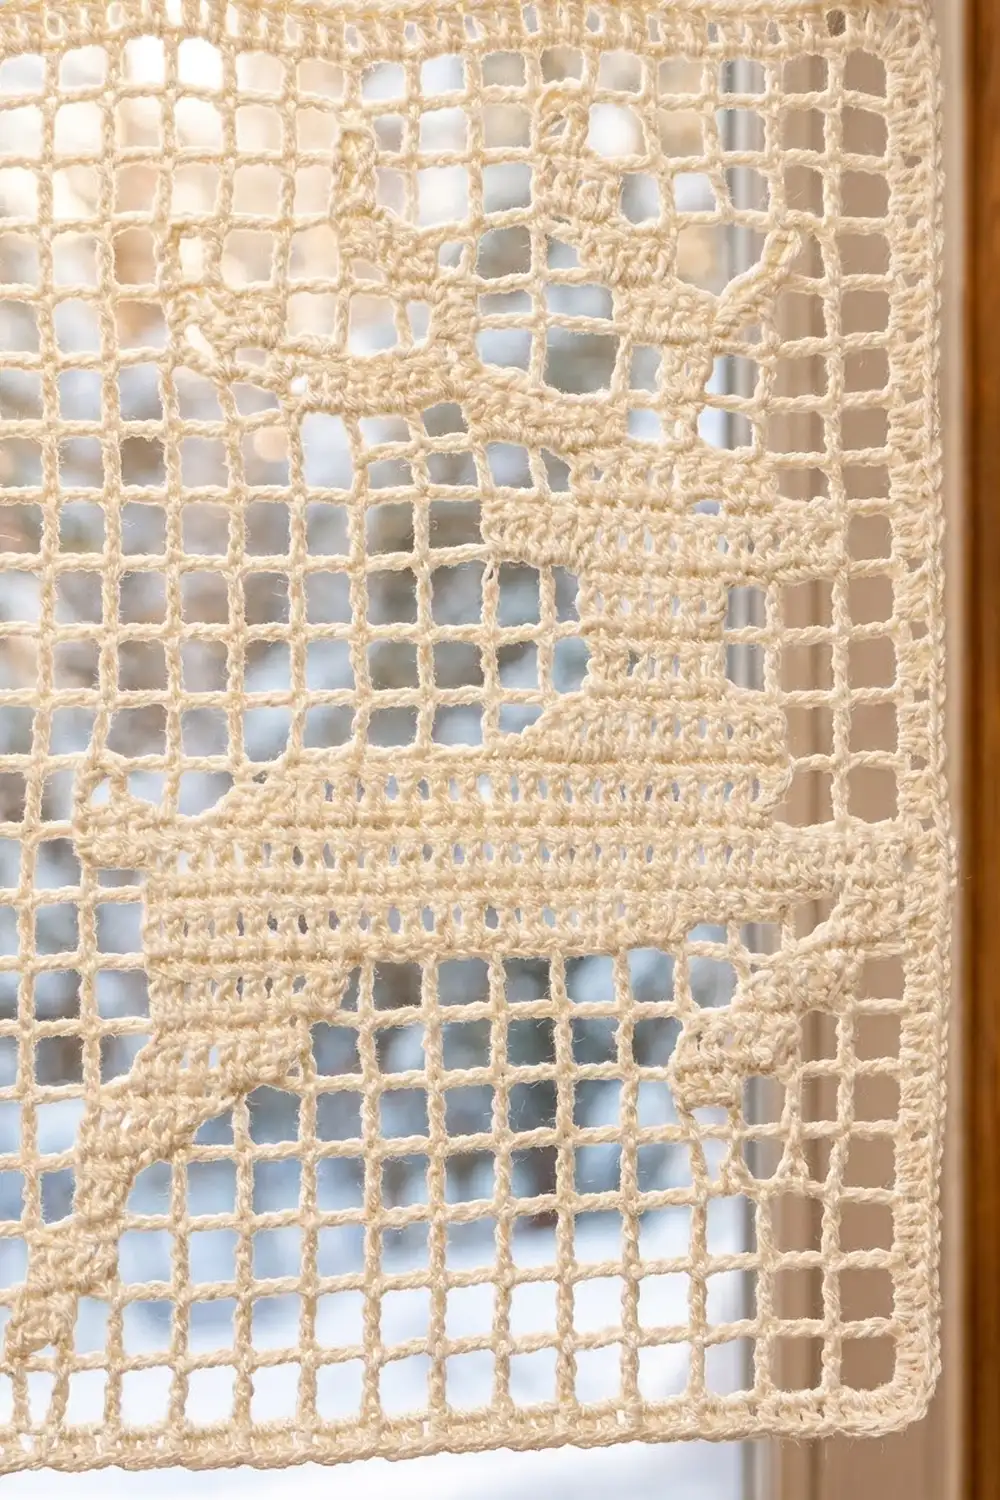
Panel (Make 2)
Foundation: Ch 68.
Row 1 (RS): Dc in 8th ch from hook. Ch 2, sk 2 ch, dc in next ch. Repeat from * to * 19 more times. Turn. (21 O; 64 sts)
Rows 2–25 follow the written chart below. Each row is listed in the order you work it. Odd rows are worked RS facing, so they run right to left as seen from the front. Even rows are worked WS facing, so they run left to right as seen from the front. Every row begins with the row start and ends with the row end described above. Turn at the end of each row.
Rows 2–7 (trees):
– Row 2: 4 O, 1 F, 11 O, 1 F, 4 O. (tree trunks)
– Row 3: 2 O, 5 F, 7 O, 5 F, 2 O.
– Row 4: 3 O, 3 F, 9 O, 3 F, 3 O.
– Row 5: 3 O, 3 F, 9 O, 3 F, 3 O.
– Row 6: 4 O, 1 F, 11 O, 1 F, 4 O. (tree tips)
– Row 7: 21 O.
Check after Row 7: 64 sts. The trees sit in columns 3–7 and 15–19, with two open columns between each tree and the side edge.
Rows 8–12 (legs):
– Row 8: 2 O, 2 F, 17 O. (hind hoof, lower left)
– Row 9: 16 O, 2 F, 3 O.
– Row 10: 4 O, 2 F, 10 O, 2 F, 3 O. (front hooves appear on the right)
– Row 11: 4 O, 2 F, 7 O, 3 F, 5 O.
– Row 12: 6 O, 3 F, 5 O, 3 F, 4 O.
Rows 13–15 (body):
– Row 13: 5 O, 10 F, 6 O.
– Row 14: 5 O, 12 F, 4 O.
– Row 15: 5 O, 12 F, 4 O. (the tail extends to column 5 on the left)
Check after Row 15: 64 sts. The panel should measure 6.6 in (16.8 cm) tall.
Rows 16–20 (neck and head):
– Row 16: 12 O, 4 F, 5 O.
– Row 17: 5 O, 3 F, 13 O.
– Row 18: 13 O, 4 F, 4 O.
– Row 19: 3 O, 4 F, 14 O. (muzzle points right)
– Row 20: 14 O, 3 F, 4 O.
Rows 21–25 (antlers and top mesh):
– Row 21: 4 O, 1 F, 2 O, 1 F, 13 O.
– Row 22: 12 O, 2 F, 2 O, 2 F, 3 O.
– Row 23: 3 O, 1 F, 1 O, 1 F, 1 O, 1 F, 1 O, 1 F, 11 O.
– Row 24: 11 O, 1 F, 2 O, 1 F, 3 O, 1 F, 2 O.
– Row 25: 21 O. Do not fasten off.
Every chart row adds up to 21 blocks. Columns 1 and 21 and Rows 1 and 25 are entirely open, which gives the motif its mesh frame.
Panel edging round (RS): Ch 1, then work around the panel:
- Top edge: 3 sc in the first dc (corner). Sc in each of the next 62 sts. 3 sc in the last dc (corner).
- Side edge: 3 sc around each of the 25 row-end posts.
- Bottom edge: 3 sc in the base of the corner dc. Sc in each of the 62 foundation sts between the corners. 3 sc in the base of the next corner dc.
- Second side: 3 sc around each of the 25 row-end posts.
- Sl st to the first sc and fasten off.
Edging counts (corner-center sc included in each side):
– Top and bottom: 1 corner + 1 + 62 + 1 + 1 corner = 66 sc each
– Each side: 1 corner + 1 + 75 + 1 + 1 corner = 79 sc each
– Total: 4 corner groups of 3 (12) + 2 x 62 + 2 x 75 = 286 sc
The edged panel measures 9.25 x 11.25 in (23.5 x 28.6 cm).
Make All Pieces
Make 2 panels in cream: Panel A and Panel B. Both are worked from the same chart, so both reindeer face right.
Layout (RS facing):
[ A ][ B ]
Joining
Lay Panel A to the left of Panel B, both RS up, bottoms aligned. Hold them RS together, with Panel A’s right edge matched to Panel B’s left edge.
Join the yarn in the top corner-center sc of both panels. Working through the back loop of Panel A’s st and the front loop of Panel B’s matching st together, sl st in each st down the edge. You will end at the bottom corner-center sc. That is 79 sl sts: one per pair of matching sts, with corner centers matched to corner centers. Fasten off.
Keep your slip stitches as loose as the edging. A tight seam pulls the panels into a V at the top. Open the seam flat and check that it lies level without puckering.
Checkpoint: the joined piece measures 18.5 x 11.25 in (47.0 x 28.6 cm).
Border
Border gauge: 22 sc = 3 in (7.6 cm), which matches the panel edging.
Round 1 (RS): Join the yarn in the top-left corner-center sc of Panel A. Ch 1 and 3 sc in that st. Then:
- Top: sc in each of the next 130 sts, then 3 sc in Panel B’s top-right corner center.
- Right side: sc in each of the next 77 sts, then 3 sc in the corner center.
- Bottom: sc in each of the next 130 sts, then 3 sc in the corner center.
- Left side: sc in each of the next 77 sts.
- Sl st to the first sc.
At the seam, the two inner corner-center sts sit side by side (Panel A’s and Panel B’s). Each one gets exactly 1 sc. Don’t add a stitch into the seam gap.
Round 1 counts:
– Top and bottom: 2 panels x 66 = 132, plus 2 corner extras = 134 sc
– Each side: 79 + 2 = 81 sc
– Total: 2 x 134 + 2 x 81 − 4 shared corners = 426 sc
Round 2: Ch 1. Sc in each st, working 3 sc in each corner-center sc. Sl st to the first sc.
– Top and bottom: 136 sc
– Each side: 83 sc
– Total: 434 sc
Do not fasten off. Sl st along the top edge to the next tab position, or fasten off and rejoin for each tab.
Why the math works: each panel’s top edge is 66 sc over 9 in (22.9 cm), which is 7.33 sc per in. The joined top of 132 sts covers 18 in (45.7 cm) at that same rate, and the seam adds nothing to it. The sides use 3 sc per filet row. That comes out slightly under gauge, which keeps the long edges from rippling.
Hanging tabs (make 8): Number Round 2’s top-edge sts 1–136, from the top-left corner center to the top-right corner center. The tabs go on sts 3–8, 21–26, 39–44, 57–62, 75–80, 93–98, 111–116 and 129–134. That gives a 2-st margin at each end and 12-st gaps between tabs. The seam falls at the center of the middle gap, between sts 68 and 69.
For each tab, with RS facing:
1. Row 1: join the yarn in the first tab st, ch 1, sc in the same st and in the next 5 sts. Turn. (6 sc)
2. Rows 2–5: ch 1, sc in each st. Turn. (6 sc)
3. Row 6 (eyelet): ch 1, sc 2, ch 2, sk 2, sc 2. Turn.
4. Row 7: ch 1, sc 2, 2 sc in the ch-2 sp, sc 2. Turn. (6 sc)
5. Row 8: ch 1, sc in each st. Fasten off. (6 sc)
Each tab is about 0.8 x 1 in (2.0 x 2.5 cm).
Final Blocking
- Weave in all ends along solid blocks or edging, never across open mesh.
- Soak the curtain in cool water for 10 minutes, then press the water out in a towel. Don’t wring it.
- Pin it to 19 x 11.75 in (48.3 x 29.8 cm), starting with the four outer corners.
- Pin the center of each edge, then pin along the edges every 1 in (2.5 cm).
- Pin the seam straight from top to bottom.
- Nudge the mesh squares so the columns run straight. Pin the tabs upright.
- Let it dry fully, at least 24 hours, before you unpin it.
Final Quality-Control Checklist
- Both panels have 21 blocks x 25 rows, and every row has 64 sts.
- Columns 1 and 21 and Rows 1 and 25 are fully open.
- Each panel edging has 66 / 79 / 66 / 79 sc, for 286 in total.
- The seam has 79 sl sts, with corner centers matched.
- Border Round 1 has 134 / 81 sc per side, and Round 2 has 136 / 83.
- There are 8 tabs, evenly spaced and symmetrical about the seam.
- The blocked curtain measures 19 x 11.75 in (48.3 x 29.8 cm).
Troubleshooting
- The mesh leans or skews: your tension differs between RS and WS rows. Block it hard and keep your ch-2 lengths consistent.
- The reindeer looks shifted: you probably read a row in the wrong direction. Odd rows run right to left as seen from the front.
- The panel is narrower at the top: you’re missing the final dc in the tch-5. Count to 22 posts on every row.
- The edging ruffles: you have too many sc along the sides. Use exactly 3 per row end.
- The seam puckers: your sl sts are too tight. Rework them with a hook one size larger.
- The tabs are uneven: recount the top-edge placement from the corner center, which is st 1.
Care
Hand wash in cool water with a mild detergent, then block flat to dry. Avoid hanging it while it is wet, because the mesh will stretch lengthwise.

Final Notes
The measurements build in a chain from your gauge. Seven blocks = 3 in (7.6 cm) gives 9 x 11 in (22.9 x 27.9 cm) panels. The edging round brings each panel to 9.25 x 11.25 in (23.5 x 28.6 cm). Joining two panels makes 18.5 x 11.25 in (47.0 x 28.6 cm), and the two-round border finishes the curtain at 19 x 11.75 in (48.3 x 29.8 cm), with 1 in (2.5 cm) tabs on top. If you check each stage against its target, the reindeer will hang straight and even in your window.
Happy crocheting!