

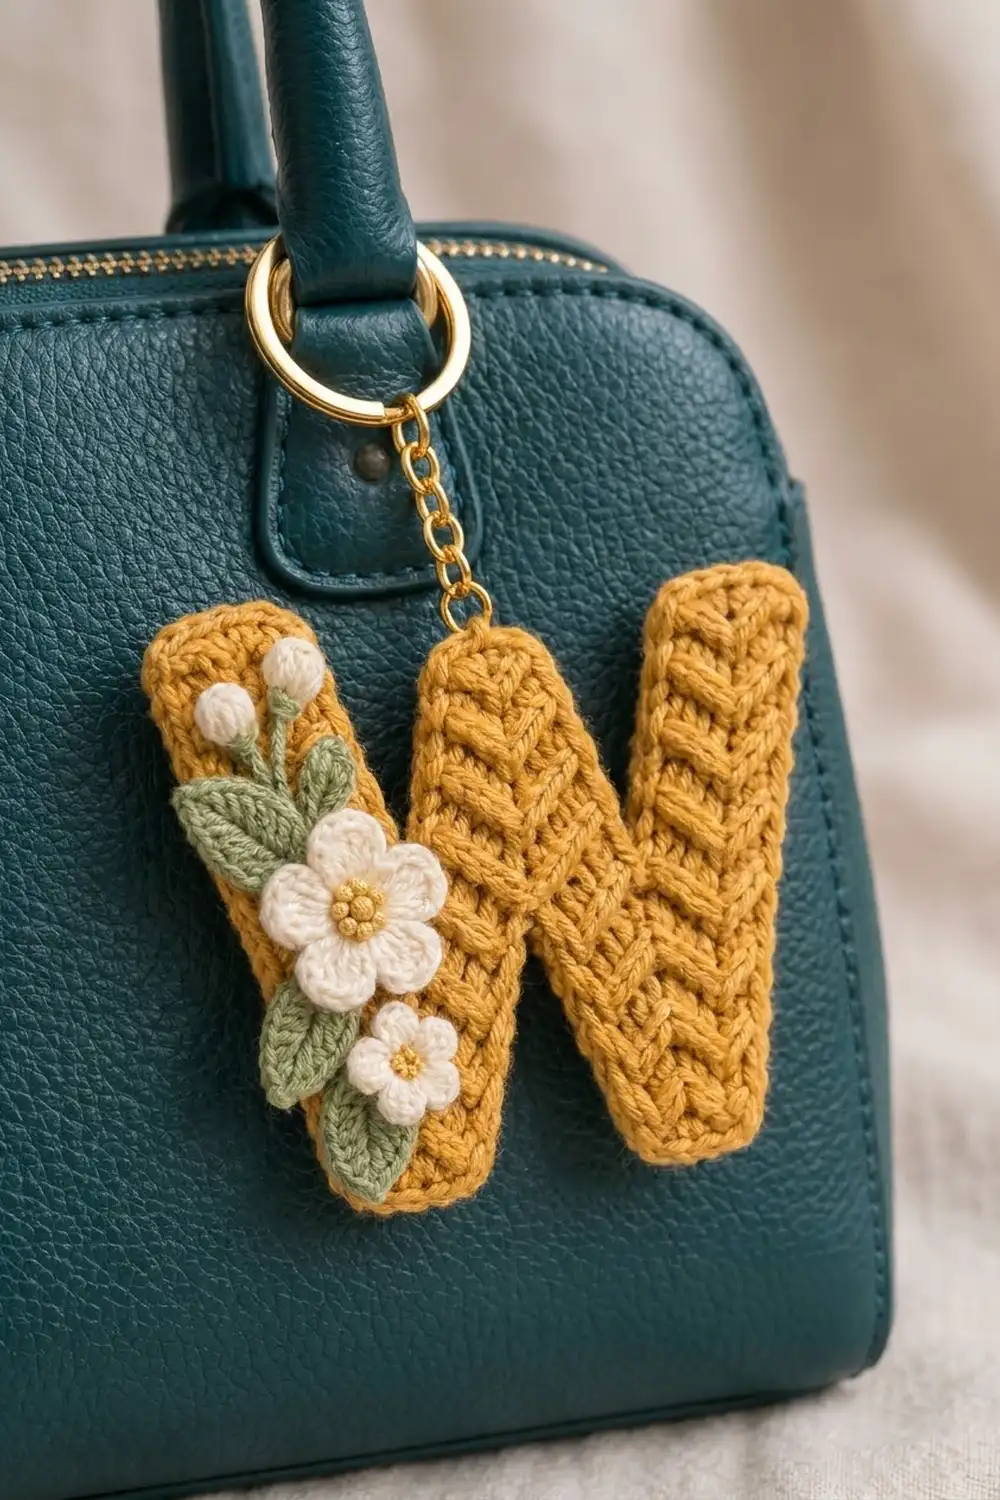
This little letter W is a cheerful monogram keychain. A mustard-gold body is covered in neat chevron ridges, and a spray of cream flowers and sage leaves climbs the left stroke. It makes a sweet personalized gift, a bag charm or a quick stash-buster.
The palette is warm and soft: mustard for the letter, cream for the blossoms and buds, and sage green for the leaves and stems. The texture comes from a simple single-crochet ripple worked in back loops only. Every row forms a small V, so each stroke looks almost knitted.
This pattern uses US crochet terms. The finished letter measures about 4.5 in (11.4 cm) wide and 3.75 in (9.5 cm) tall. The keyring and chain add about 1.5 in (3.8 cm) above the letter.
Construction is straightforward. You work four narrow chevron strips from the top down, seam them where they touch to make one solid W, and then work a two-round edging around the whole outline. Last, you make the small flowers, buds and leaves, sew them onto the left stroke and add the hardware.
Finished Size and Construction
- Finished size: 4.5 in (11.4 cm) wide x 3.75 in (9.5 cm) tall, plus hardware
- Skill level: Easy-intermediate
- Terminology: US crochet terms
- Yarn weight: DK (light worsted, #3), cotton or cotton blend
- Hook: 3.0 mm
- Number of pieces: One letter body (four strokes seamed into a single W), plus 2 flowers, 2 buds and 4 leaves sewn on as appliqués
- Layout: Four diagonal strokes; the outer strokes are 26 rows long and the inner strokes are 22 rows long
- Stroke size: 1 in (2.5 cm) wide; 3.7 in (9.4 cm) long for the outer strokes and 3.1 in (7.9 cm) long for the inner strokes
- Size before border: about 4.25 in (10.8 cm) x 3.5 in (8.9 cm)
- Border depth: about 1/8 in (0.3 cm) on every edge
Materials
Choose a smooth, firmly twisted DK cotton so the chevron ridges stay crisp. Fuzzy or very splitty yarn will blur the texture.
- Mustard (main color): 20 g, about 45 m
- Cream (flowers and buds): 5 g, about 11 m
- Sage green (leaves and stems): 4 g, about 9 m
These quantities include a comfortable margin over what the sample used.
Tools:
– 3.0 mm crochet hook
– Tapestry needle
– 1 gold split keyring, 1 in (2.5 cm), with a short chain and a jump ring
– Small pliers for opening the jump ring
– Stitch markers
– Blocking mat and rust-proof pins
– Spray bottle with water
Abbreviations (US Terms)
- ch – chain
- sl st – slip stitch
- sc – single crochet
- hdc – half double crochet
- dc – double crochet
- BLO – back loop only
- sc2tog – single crochet 2 together
- st(s) – stitch(es)
- RS – right side
Special stitch: sc2tog BLO. Insert the hook in the back loop of the next st, yarn over and pull up a loop. Insert the hook in the back loop of the following st, yarn over and pull up a loop. Yarn over and pull through all 3 loops on the hook.
Standing sc: Start with a slip knot on the hook. Insert the hook in the stitch, yarn over, pull up a loop, yarn over and pull through both loops.
Gauge and Checkpoints
Gauge in sc BLO, worked flat, is 6 sts and 7 rows = 1 in (2.5 cm). A swatch of 12 sts x 14 rows should measure 2 in (5.1 cm) square.
Make Stroke 1 first and treat it as your test piece.
- Checkpoint 1 (Stroke 1, 26 rows): 1 in (2.5 cm) wide and 3.7 in (9.4 cm) long. The chevron pulls the 7 sts in slightly, so it is narrower than a flat swatch.
- Checkpoint 2 (inner strokes, 22 rows): 1 in (2.5 cm) wide and 3.1 in (7.9 cm) long.
- Checkpoint 3 (seamed W, before border): about 4.25 in (10.8 cm) x 3.5 in (8.9 cm).
- Checkpoint 4 (after border): about 4.5 in (11.4 cm) x 3.75 in (9.5 cm).
If the stroke is wider than 1.1 in (2.8 cm) or longer than 3.9 in (9.9 cm), go down to a 2.75 mm hook. If it is narrower than 0.9 in (2.3 cm), go up to a 3.25 mm hook. Do not change the stitch or row counts. The border math depends on them.
The Chevron Strokes
All four strokes use the same 7-stitch ripple row. One sc2tog at each edge and 3 sc in the center stitch keep the count at 7. Because you work from the top down, the point of each V faces downward.
Stroke 1 (Left Outer Stroke)
With mustard, ch 8.
Row 1: Sc in the 2nd ch from hook and in each ch across. Turn. (7 sc) This flat row becomes the square top of the stroke.
Row 2 (ripple row): Ch 1 (does not count as a st). Sc2tog BLO over the first 2 sts, sc BLO in the next st, 3 sc BLO in the next st (the center st), sc BLO in the next st, sc2tog BLO over the last 2 sts. Turn. (7 sts)
Count check: the row uses 2 + 1 + 1 + 1 + 2 = 7 sts and makes 1 + 1 + 3 + 1 + 1 = 7 sts. The middle sc of each 3-sc group is always the 4th stitch of the next row, so the V stays centered.
Rows 3–26: Repeat Row 2. (7 sts in each row)
Fasten off and weave in the ends. Place a marker on the RS of Row 1 so you can keep the strokes facing the same way.
Stroke 4 (Right Outer Stroke)
Work exactly as for Stroke 1: 26 rows of 7 sts.
Strokes 2 and 3 (Inner Strokes)
Work as for Stroke 1, but stop after Row 22. (7 sts in each row)
Leave a 12 in (30.5 cm) tail on Stroke 2 and on Stroke 3 for seaming.
Assemble the Letter
Lay out the four strokes with Row 1 at the top and the marked sides facing you. Slant Stroke 1 down to the right and Stroke 2 up to the right so their bottoms meet. Repeat with Strokes 3 and 4.
- Left bottom point: Whipstitch the last 4 row-ends on the right edge of Stroke 1 (Rows 23–26) to the last 4 row-ends on the left edge of Stroke 2 (Rows 19–22). Match the bottoms row-end to row-end.
- Right bottom point: Join the last 4 row-ends on the right edge of Stroke 3 (Rows 19–22) to the last 4 row-ends on the left edge of Stroke 4 (Rows 23–26) the same way.
- Center peak: Whipstitch the first 4 row-ends on the right edge of Stroke 2 (Rows 1–4) to the first 4 row-ends on the left edge of Stroke 3 (Rows 1–4), with the tops level.
Ease each seam gently so the strokes splay apart at a slight angle. The W should now lie flat and measure close to Checkpoint 3.
Flowers, Buds and Leaves
Large Flower (make 1)
Round 1: With mustard, make a magic ring and work 5 sc into it. Join with a sl st to the first sc. (5 sc) Fasten off mustard.
Round 2: Join cream with a standing sc in any st, then sc in the same st. Work 2 sc in each remaining st. Join. (10 sc)
Round 3: (Hdc, 2 dc, hdc) in the next st, sl st in the next st. Repeat from * to * 5 times in total. (5 petals, each 4 sts, plus 5 sl sts)
Fasten off and leave a 6 in (15.2 cm) tail. The flower should be about 1.1 in (2.8 cm) across.
Small Flower (make 1)
Round 1: With mustard, make a magic ring and work 5 sc into it. Join. (5 sc) Fasten off.
Round 2: With cream, (sl st, ch 2, dc, ch 2, sl st) in the next st. Repeat 5 times in total. (5 petals)
Fasten off and leave a tail. The flower should be about 0.7 in (1.8 cm) across.
Buds (make 2)
With cream, make a magic ring, ch 2, and work 4 dc into the ring. Pull the ring tight so it cups into a ball, then sl st to the top of the ch-2. Fasten off. Tuck the starting tail inside the bud to pad it.
Stems: With sage, ch 7 for each bud. Fasten off, leaving tails at both ends.
Leaves (make 4)
With sage, ch 7.
Side 1: Sc in the 2nd ch from hook, hdc in the next ch, dc in each of the next 2 ch, hdc in the next ch, then 3 sc in the last ch (this makes the tip).
Side 2: Working along the other side of the chain, hdc in the next ch, dc in each of the next 2 ch, hdc in the next ch, and sc in the last ch. Sl st to the first sc. (13 sts)
Fasten off. Each leaf is about 0.9 in (2.3 cm) long. If you like, add a center vein with one long straight stitch in cream.
Border
The border runs around the whole outline of the W. It turns the seamed strokes into one continuous shape and gives the rolled edge you see in the photo.
Border gauge: Work 1 sc per stitch along the tops and bottoms, and 1 sc per row-end along the sides. Since 7 sc rows = 1 in (2.5 cm), one sc per row-end matches the edge length exactly, so it neither pulls in nor ruffles.
Corner rule: Work 3 sc into each of the 10 outer corner stitches. That adds 2 extra sts per corner.
Notch rule: At each of the 3 inner notches, work sc2tog over the last free row-end before the notch and the first free row-end after it. That removes 1 st per notch.
Round 1: With the RS facing, join mustard with a standing sc in the top-left corner stitch of Stroke 1. Work around the W clockwise:
| Section | Stitches | Count |
|---|---|---|
| Stroke 1 top | Work 2 more sc in the corner st (3 sc in the corner in total), sc in the next 5 sts, 3 sc in the last st | 11 |
| Stroke 1 right edge, left notch, Stroke 2 left edge | Sc in 21 row-ends, sc2tog over the next 2 row-ends (the notch), sc in 17 row-ends | 39 |
| Stroke 2 top | 3 sc in the first st, sc in the next 6 sts | 9 |
| Stroke 3 top | Sc in the next 6 sts, 3 sc in the last st | 9 |
| Stroke 3 right edge, right notch, Stroke 4 left edge | Sc in 17 row-ends, sc2tog, sc in 21 row-ends | 39 |
| Stroke 4 top | 3 sc in the first st, sc in the next 5 sts, 3 sc in the last st | 11 |
| Stroke 4 outer edge | Sc in each of 26 row-ends | 26 |
| Stroke 4 bottom | 3 sc in the first st, sc in the next 6 sts | 9 |
| Stroke 3 bottom | Sc in the next 6 sts, 3 sc in the last st | 9 |
| Stroke 3 left edge, peak notch, Stroke 2 right edge | Sc in 17 row-ends, sc2tog, sc in 17 row-ends | 35 |
| Stroke 2 bottom | 3 sc in the first st, sc in the next 6 sts | 9 |
| Stroke 1 bottom | Sc in the next 6 sts, 3 sc in the last st | 9 |
| Stroke 1 outer edge | Sc in each of 26 row-ends | 26 |
Join with a sl st to the first sc. (241 sc)
Why the math works: Count the free edges.
- Tops and bottoms: 8 edges x 7 sts = 56.
- Outer sides: 26 + 26 = 52.
- Inner sides: 22 + 18 + 18 + 18 + 18 + 22 = 116.
That gives 224 base stitches. Subtract 3 for the notches to get 221. Add 10 corners x 2 extra sts = 20. The total is 241, which matches the sum of the table.
Round 2: Working loosely, sl st in each sc around. (241 sl sts) Join and fasten off.
This round adds about 1/8 in (0.3 cm) of firm rolled edge on every side. The letter should now match Checkpoint 4.
Attach the Appliqués and Hardware
Use the tails to sew everything onto the left stroke (Stroke 1), stitching through the front layer only.
- Center the large flower about 1.2 in (3.0 cm) below the top of Stroke 1.
- Place the small flower about 0.6 in (1.5 cm) below the large flower.
- Sew the two bud stems so they rise from behind the large flower toward the top corner, then sew a bud to the end of each stem.
- Tuck two leaves at the upper left of the large flower, one beside the small flower, and one near the bottom of the stroke.
- Open the jump ring and pass it through both loops of the Round 2 sl st at the top-right corner of Stroke 1. Hook on the chain and keyring, then close the jump ring firmly.
Final Blocking
- Lightly mist the letter with water until it is damp, not wet.
- Pin it to the mat at 4.5 in (11.4 cm) x 3.75 in (9.5 cm).
- Put a pin at every outer corner and at each bottom point.
- Ease the three notches open so each one makes a clean V.
- Smooth the chevron rows with your fingertips so the ridges line up.
- Leave it to dry completely, about 6–8 hours.
- Unpin. If you blocked before sewing on the appliqués, attach them now.
Final Quality-Control Checklist
- [ ] Each stroke has exactly 7 sts per row, and the V points stay centered.
- [ ] The outer strokes have 26 rows and the inner strokes have 22.
- [ ] All three seams are 4 row-ends long and lie flat.
- [ ] Border Round 1 totals 241 sc.
- [ ] The corners are crisp and the notches are not puckered.
- [ ] The finished size is 4.5 in (11.4 cm) x 3.75 in (9.5 cm).
- [ ] The appliqués are secure, with no stitches showing on the back.
- [ ] The jump ring is fully closed.
Troubleshooting
- The strip curls or the V drifts to one side: The 3-sc group must go into the 4th stitch. Recount after each row.
- The edges are wavy: Your sc2tog is too loose. Tighten the final pull-through.
- The border ruffles: You probably worked extra sc on the sides. Use exactly 1 per row-end.
- The notches pucker: Check that you made only one sc2tog per notch, then block the V open.
- The flower petals cup: Steam the flower lightly before sewing it on.
- The letter is too floppy: Go down a hook size, or use a firmer cotton.
Care
Hand wash in cool water, press out the water in a towel and dry flat. Do not tumble dry, because the heat can loosen the appliqués and tarnish the hardware.

Final Notes
The measurement chain is simple:
- 6 sts and 7 rows per inch (2.5 cm) give 1 in (2.5 cm) wide strokes.
- At that gauge, 26 and 22 rows give strokes 3.7 in (9.4 cm) and 3.1 in (7.9 cm) long.
- Seamed together, the strokes make a 4.25 in x 3.5 in (10.8 cm x 8.9 cm) letter.
- The 241-stitch border adds 1/8 in (0.3 cm) all around, for a finished size of 4.5 in x 3.75 in (11.4 cm x 9.5 cm).
Check your gauge on Stroke 1, and the rest of the letter will fall into place.
Happy crocheting!