

This teardrop ornament has a sunburst center. Sixteen slender spokes radiate from a small solid disc, an open frame holds them in place, and a soft row of scallops finishes the edge. The top spoke runs all the way up into the point, so the ornament reads as a raindrop or a glass bauble when it hangs on the tree.
The sample is made in one raspberry pink. That gives it a warm, classic holiday look against green branches and still lets the stitch texture show. The spokes are chains with slip stitches worked back along them, so each one looks like a tiny braided cord.
This pattern uses US crochet terms. The finished ornament measures 5 in (12.7 cm) wide by 6.25 in (15.9 cm) tall, not counting the hanging loop. The loop adds about 1 in (2.5 cm).
It is made in one piece and in a fixed order. First you work the center disc in the round, then the spokes, then a chain outline that links the spoke tips, then a single crochet band, and finally a shell border with the hanging loop built into its first stitch. There is no sewing and no joining.
Finished Size and Construction
- Finished size: 5 in (12.7 cm) wide × 6.25 in (15.9 cm) tall, plus a 1 in (2.5 cm) loop
- Skill level: Easy / advanced beginner
- Terminology: US crochet terms
- Yarn weight: Worsted (#4), cotton or cotton blend
- Hook: US G-6 (4.0 mm)
- Number of pieces: 1
- Layout: Single teardrop motif, point at the top
- Piece size before the border (after Round 5): 4 in (10.2 cm) × 5.75 in (14.6 cm)
- Frame size (after Round 4): 3.5 in (8.9 cm) × 5.25 in (13.3 cm)
- Border depth: 0.5 in (1.3 cm) at the sides and bottom
Materials
Yarn: Use a smooth worsted-weight cotton or cotton blend. Cotton holds the spokes straight and blocks crisply. Soft acrylic also works, but the spokes may look wavy unless you block them firmly. Pick a yarn with clear stitch definition. Fuzzy yarns hide the slip-stitch texture.
- Raspberry pink: 20 g, about 40 m (44 yd)
That quantity includes a comfortable margin over what the ornament actually uses (about 15 g). The extra covers a gauge swatch and some re-working.
Tools:
– US G-6 (4.0 mm) crochet hook
– Tapestry needle
– Scissors
– Stitch marker
– Ruler or tape measure
– Blocking mat and rust-proof pins
– Spray bottle with water (optional: light spray starch)
Abbreviations (US Terms)
- ch – chain
- sl st – slip stitch
- sc – single crochet
- dc – double crochet
- st(s) – stitch(es)
- sk – skip
- MR – magic ring
Special stitch: shell. Work 5 dc in the same stitch.
Special technique: spoke. Ch the number given, sl st in the 2nd ch from the hook and in each remaining ch back to the disc. The ch you skipped becomes the tip ch of the spoke. You will work into it later.
Gauge and Checkpoints
Gauge matters for the frame. If your chains are too loose or too tight, the outline will not match the spoke lengths.
Chain gauge: 4 ch = 1 in (2.5 cm), measured on a relaxed chain.
Disc gauge: after Round 2 the center disc measures 1 in (2.5 cm) across.
Treat your first ornament as the test piece and check it at every stage:
- After Round 2: disc measures 1 in (2.5 cm) across.
- After Round 3: the top spoke reaches 3 in (7.6 cm) from the disc edge, and a short spoke reaches 1.25 in (3.2 cm).
- After Round 4: the frame measures 3.5 in (8.9 cm) × 5.25 in (13.3 cm), lightly stretched.
- After Round 5: 4 in (10.2 cm) × 5.75 in (14.6 cm).
- After Round 6: 5 in (12.7 cm) × 6.25 in (15.9 cm).
If your piece is too big: go down to a US 7 (4.5 mm)… no, go down a size, to a 3.75 mm (US F-5) hook, or tighten your chains. Loose chains are the most common cause.
If your piece is too small: go up to a 4.5 mm (US 7) hook. Tight chains make the outline pull, and the spokes will bow.
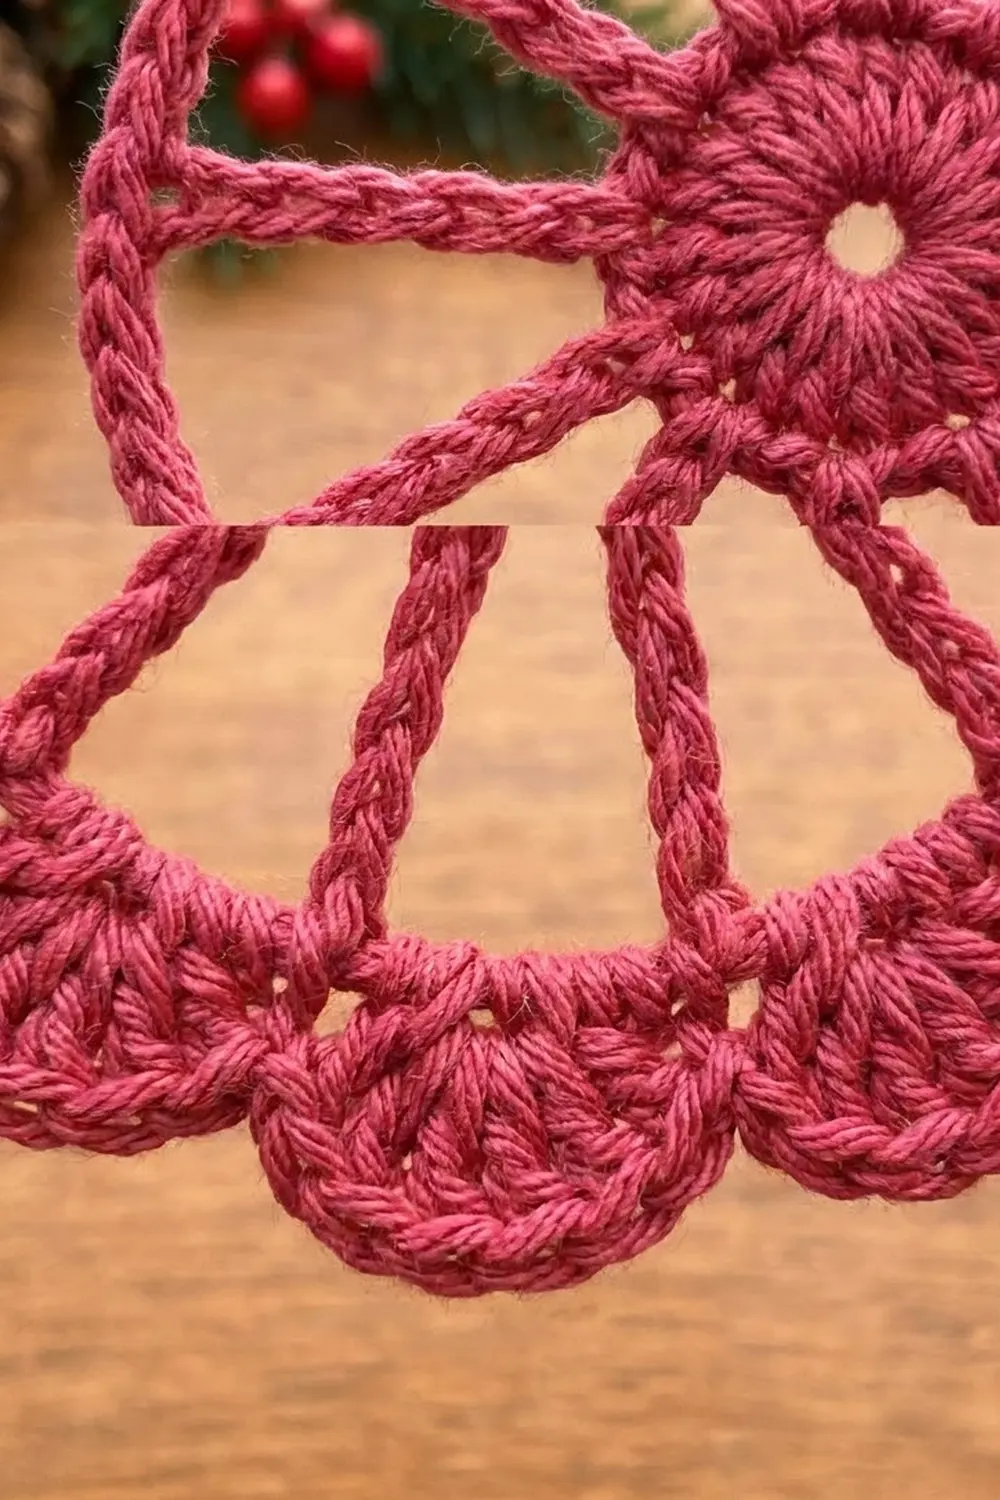
Pattern
Center Disc
Round 1: Make an MR. Ch 1, work 8 sc in the ring. Sl st to the first sc. Pull the ring closed, but leave a small hole in the center. (8 sc)
Round 2: Ch 1, work 2 sc in each st around. Sl st to the first sc. (16 sc)
Place a marker in the first sc. That stitch is sc 1, and the top spoke grows from it.
Checkpoint: the disc should be 1 in (2.5 cm) across.
Spokes
Round 3: You will make one spoke from each sc of Round 2. Spokes are numbered 1–16 in the order you work them. Spoke 1 is the top of the ornament.
- Spoke 1 (top): Ch 12, sl st in 2nd ch from hook and in each ch across (11 sl st). Sl st in next sc.
- Spoke 2: Ch 7, sl st in 2nd ch from hook and in each ch across (6 sl st). Sl st in next sc.
- Spokes 3–15 (13 spokes): Ch 5, sl st in 2nd ch from hook and in each ch across (4 sl st). Sl st in next sc. Repeat 12 more times.
- Spoke 16: Ch 7, sl st in 2nd ch from hook and in each ch across (6 sl st). Sl st in next sc. That last sl st lands in sc 1, which closes the round.
Fasten off. (16 spokes: 1 long, 2 medium, 13 short)
The two medium spokes sit on either side of the long one. Together they form the tapered top. The 13 short spokes form the rounded bottom.
Checkpoint: from the disc edge, the long spoke is 3 in (7.6 cm), the medium spokes are about 1.75 in (4.4 cm), and the short spokes are 1.25 in (3.2 cm).
Outline Frame
Round 4: Join the yarn with a sl st in the tip ch of spoke 1. Ch 1, sc in the same tip ch. This is st 1.
- Ch 7, sc in tip ch of spoke 2.
- Ch 3, sc in tip ch of spoke 3.
- Ch 2, sc in tip ch of spoke 4.
- Ch 2, sc in tip ch of next spoke. Repeat 10 times, until you have worked spoke 14.
- Ch 2, sc in tip ch of spoke 15.
- Ch 3, sc in tip ch of spoke 16.
- Ch 7, sl st to the first sc.
Count: 16 sc + 44 ch = 60 sts. The chains are 7 + 3 + 2 + (10 × 2) + 2 + 3 + 7 = 44.
Keep the chains relaxed but not loose. Each one should sit flat between its tips without pulling the spokes toward each other.
Checkpoint: 3.5 in (8.9 cm) × 5.25 in (13.3 cm) with the spokes straight.
Solid Band
Round 5: Ch 1. Work 1 sc in each sc and 1 sc in each ch around. Work into the ch itself, not into the space under it, so the band lies flat. Sl st to the first sc. (60 sc)
The first sc sits at the top point, and that is st 1 for the border. This is a 1-per-stitch round. The count stays at 60 + 0 = 60.
Checkpoint: 4 in (10.2 cm) × 5.75 in (14.6 cm).
Border
Border gauge: each shell plus its sc covers 4 sts of Round 5, about 1 in (2.5 cm) of edge, and stands 0.5 in (1.3 cm) tall.
For counting, Round 5 divides into four zones:
– Point: st 1 (1 st)
– First upper edge: sts 2–15, from the point down to spoke 4 (14 sts)
– Rounded bottom: sts 16–46, from spoke 4 to spoke 14 (31 sts)
– Second upper edge: sts 47–60 (14 sts)
Total: 1 + 14 + 31 + 14 = 60.
Round 6 (shells and loop): Ch 1, sc in st 1. Ch 10, sl st in the same st 1 to form the hanging loop.
Next, sk 1 st, shell in next st, sk 1 st, sc in next st. Repeat around. On the 15th repeat, replace the final sc with a sl st in the first sc to join. Fasten off.
Counts by zone:
– Point: 1 sc + ch-10 loop
– First upper edge: 4 shells (in sts 3, 7, 11, 15) and 3 sc (sts 5, 9, 13)
– Rounded bottom: 7 shells (in sts 19, 23, 27, 31, 35, 39, 43) and 8 sc (sts 17, 21, 25, 29, 33, 37, 41, 45)
– Second upper edge: 4 shells (in sts 47, 51, 55, 59) and 3 sc (sts 49, 53, 57)
Round total: 15 shells (75 dc) + 15 sc = 90 sts, plus the ch-10 loop.
Why the math works: the shell repeat uses 4 sts (sk, shell, sk, sc), and 60 ÷ 4 = 15 with nothing left over. The repeat starts on the sc at the point, so the last repeat ends back at st 1 and the round closes cleanly. With no shell at the very tip, the point stays sharp and the loop sits centered. The scallops fall evenly along both upper edges, 4 each, so the teardrop stays symmetrical.
Checkpoint: 5 in (12.7 cm) × 6.25 in (15.9 cm), plus a loop about 1 in (2.5 cm) tall.
Final Blocking
- Weave in all ends along the back of the outline or the solid band. Do not weave them into the spokes, because that thickens them.
- Wet the ornament fully in cool water. Gently press the water out in a towel. Do not wring it.
- Lay it face up on the blocking mat with the point at the top.
- Pin the point first, then the center of the bottom, so the piece measures 6.25 in (15.9 cm) tall.
- Pin each side at its widest point, so it measures 5 in (12.7 cm) across.
- Straighten every spoke. Pin the center of each shell outward so the scallops round out evenly.
- Optional: mist lightly with starch for a stiffer ornament.
- Let it dry completely, at least 12 hours, before unpinning.
Final Quality-Control Checklist
- Center disc is round, with a small hole.
- There are 16 spokes, all straight and none twisted.
- The top spoke runs right up to the point.
- Round 4 has 60 sts and Round 5 has 60 sc.
- There are 15 shells: 4 on each upper edge and 7 around the bottom.
- The loop is centered at the point and measures about 1 in (2.5 cm).
- The ornament measures 5 in (12.7 cm) × 6.25 in (15.9 cm).
- All ends are hidden and secure.
Troubleshooting
The spokes curve or wave. Your chains are tighter than your slip stitches. Work the sl sts more loosely, or use a hook one size larger for the spokes only.
The frame pulls the spokes inward. The chains in Round 4 are too tight. Re-work the round with a relaxed tension, or add 1 ch to the 7-ch top gaps, then skip 1 extra st in Round 5 so the count stays 60.
The edge ruffles. The shells are crowded. Check that you skip exactly 1 st on each side of every shell, and lower your dc height.
The point is rounded. Pin it sharply when you block. Also make sure Round 5 has only 1 sc in st 1.
Count is off in Round 5. You probably missed a tip sc or a chain. Recount Round 4 by zone (14 + 1 + 31 + 14).
Care
Hand wash in cool water, press out the water in a towel, and reshape the ornament flat to dry. Store it flat between tissue paper so the spokes stay straight.
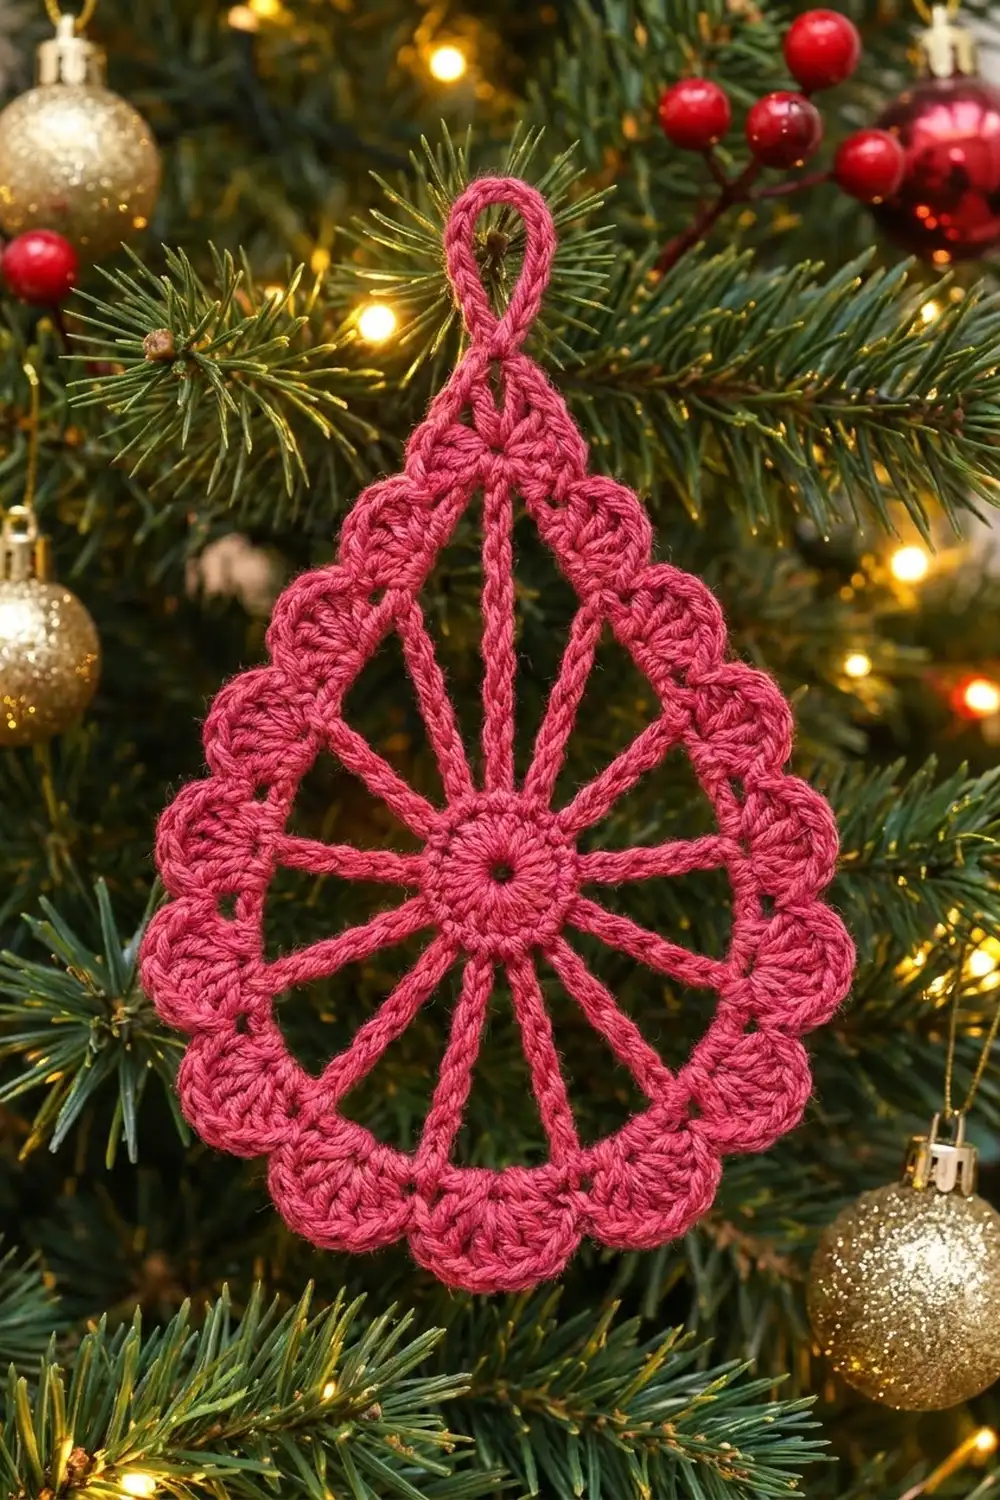
Final Notes
The size of this ornament depends on a short chain of measurements. A 1 in (2.5 cm) disc carries spokes of 3 in (7.6 cm), about 1.75 in (4.4 cm) and 1.25 in (3.2 cm). Those spokes give a 3.5 in × 5.25 in (8.9 cm × 13.3 cm) frame. The solid band brings it to 4 in × 5.75 in (10.2 cm × 14.6 cm), and the shells finish it at 5 in × 6.25 in (12.7 cm × 15.9 cm). If you check each stage as you go, every ornament you make will match. Make one for the tree, add one to a gift, and enjoy watching the sunburst catch the lights.
Happy crocheting!