

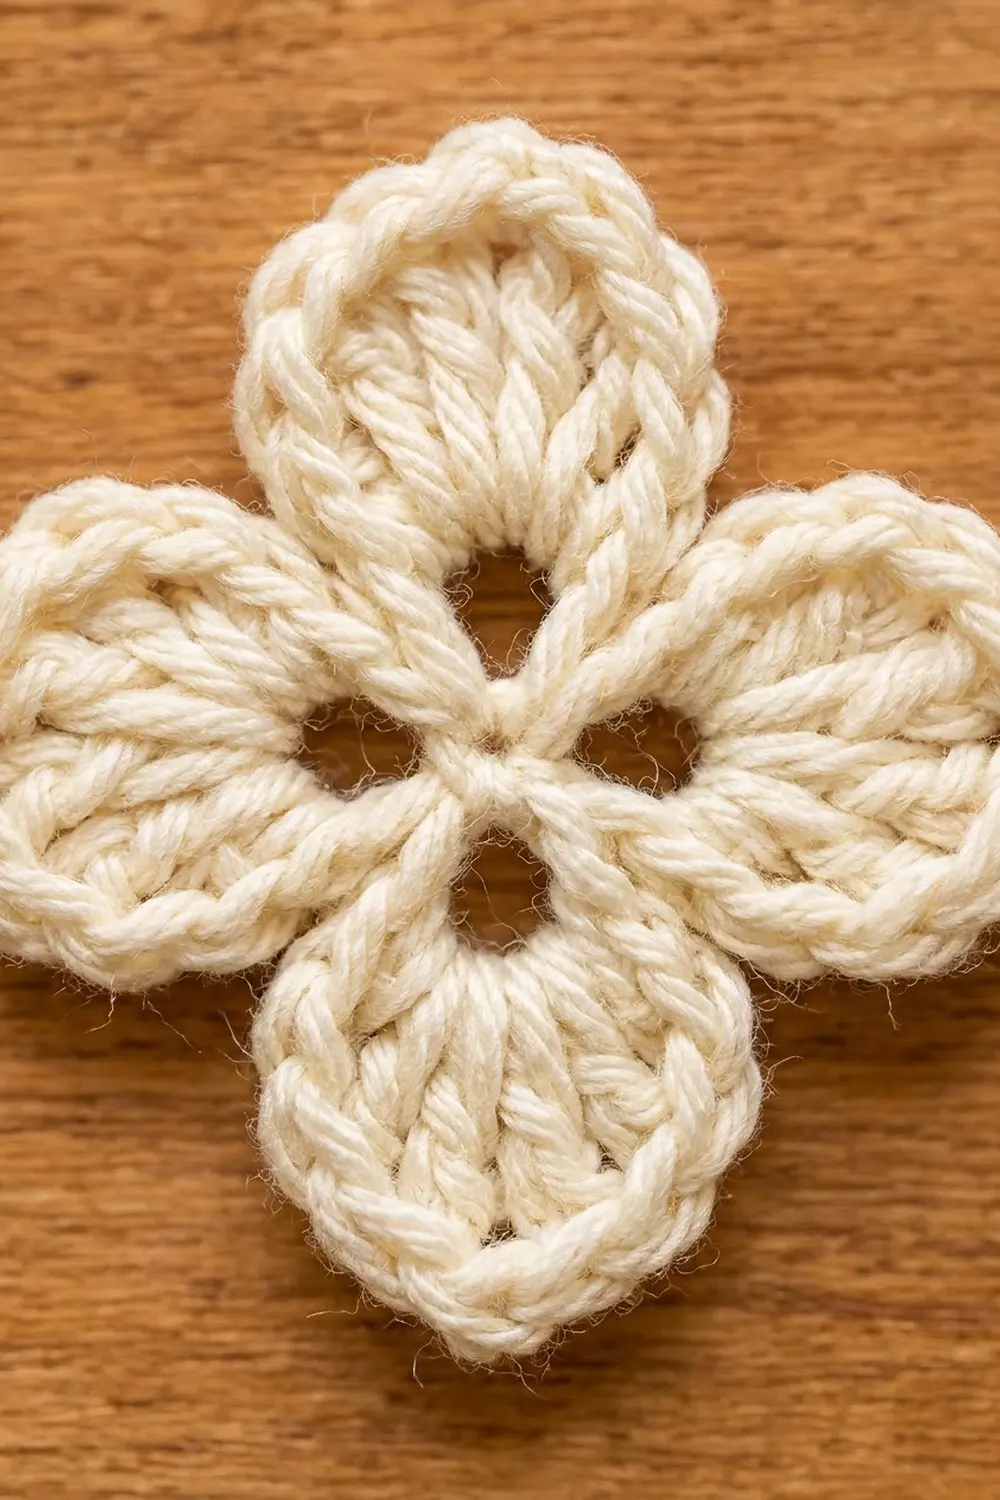
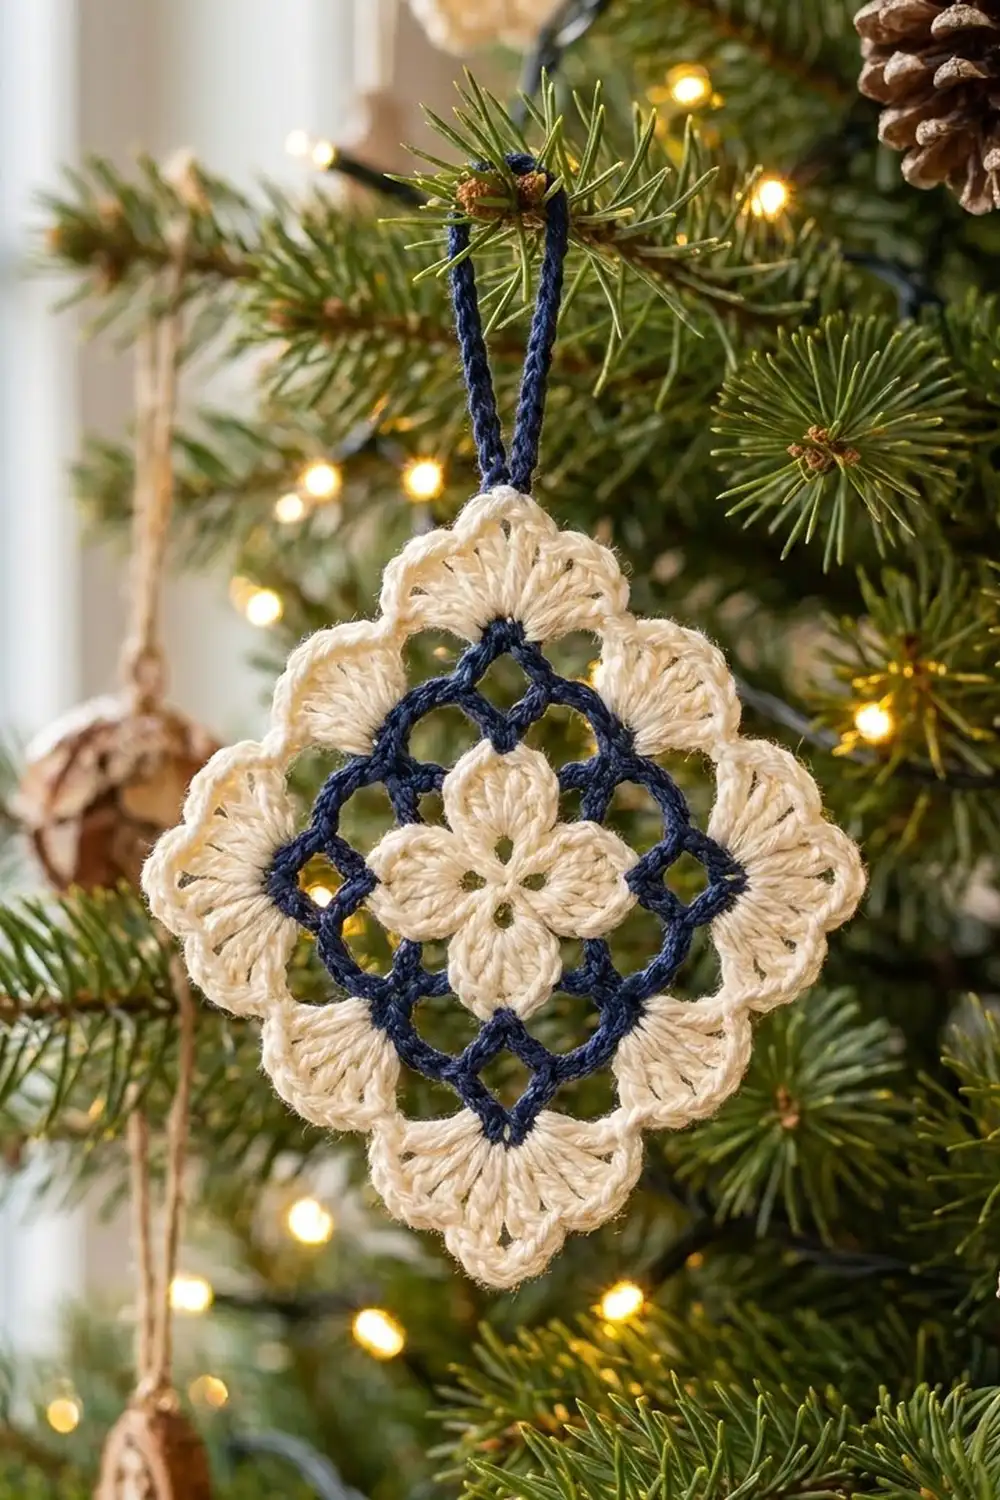
The Winter Lattice Diamond is a small, lacy Christmas ornament worked in two colors: soft cream and deep navy. A cream four-petal flower sits in the center. Around it is an open navy chain lattice, and a cream shell border finishes the edge in scallops.
The colors give it a calm, Nordic look that suits a natural tree, a gift tag, or a window hook. It is worked as one single piece, in rounds, and hangs on point as a diamond from a navy loop at the top corner.
The finished ornament measures 4 in (10.2 cm) per side, 5.7 in (14.5 cm) from point to point, and 7.2 in (18.3 cm) tall including the hanging loop. This pattern uses US crochet terms throughout.
Construction is simple. You make the cream flower in two rounds, work two navy mesh rounds, finish with one cream shell round, and then add a navy hanging loop. You won’t need any sewing or joining.
Finished Size and Construction
- Finished size: 4 in (10.2 cm) per side; 5.7 in (14.5 cm) point to point
- Height with loop: 7.2 in (18.3 cm)
- Skill level: Easy
- Terminology: US crochet terms
- Yarn weight: DK (weight 3), cotton or cotton blend
- Hook: 3.5 mm (E-4)
- Number of pieces: 1
- Layout: single square, hung on point as a diamond
- Piece size: 4 in (10.2 cm) per side
- Size before border (after Round 4): 3.25 in (8.3 cm) per side
- Border depth: about 3/8 in (1.0 cm) on each side
Materials
Yarn: Use a smooth mercerized or matte cotton in DK weight. Cotton shows the shell texture and chain lattice clearly and blocks crisply. An acrylic DK will work too, but the shells will be softer and less sharply defined.
- Color A, Cream: 8 g, about 19 m
- Color B, Navy: 5 g, about 12 m (this includes the hanging loop)
These quantities include a margin of roughly 25% for your gauge swatch, yarn tails, and small differences in tension.
Tools:
- 3.5 mm (E-4) crochet hook
- Tapestry needle
- Scissors
- Stitch marker
- Ruler or tape measure
- Blocking mat and rust-proof pins
- Spray bottle with water
- Optional: fabric stiffener or starch
Abbreviations (US Terms)
- ch: chain
- sl st: slip stitch
- sc: single crochet
- hdc: half double crochet
- dc: double crochet
- sp: space
- MR: magic ring
- rep: repeat
- st(s): stitch(es)
Special stitches:
- Petal: (hdc, 3 dc) in the next dc, then (3 dc, hdc) in the following dc. Each petal has 8 sts.
- Petal-tip gap: the small gap between the 4th and 5th stitches of a petal, at the center of its rounded tip.
- Corner shell: (4 dc, ch 2, 4 dc) in the same ch-5 corner loop.
- Side shell: 5 dc in the same ch-5 loop.
Gauge and Checkpoints
Exact gauge isn’t critical for an ornament, but these measurements keep the shells and lattice in proportion. Work Rounds 1–2 as a test piece first and measure before you go on.
- After Round 1: 0.75 in (1.9 cm) across
- After Round 2 (flower): 1.75 in (4.4 cm) from one petal tip to the opposite petal tip
- After Round 3: 2.6 in (6.6 cm) per side, measured corner loop to corner loop
- After Round 4: 3.25 in (8.3 cm) per side
- After Round 5 (border): 4 in (10.2 cm) per side
A tolerance of ±0.125 in (0.3 cm) per checkpoint is fine.
If your flower is too big: go down to a 3.25 mm hook, or tighten the ch-2 spaces in Round 1.
If your flower is too small: go up to a 3.75 mm hook.
Chain loops tend to grow more than solid stitches. If Round 3 is on target but Round 4 measures over 3.5 in (8.9 cm), work the Round 4 chains a little tighter.
Pattern
Round 1 – Flower Center (Color A, Cream)
Make a MR with Color A.
Ch 3 (counts as dc), dc in ring, ch 2, [2 dc in ring, ch 2] 3 times. Sl st to the top of the beginning ch-3. Pull the ring closed.
Count: 8 dc and 4 ch-2 sps.
The four ch-2 sps become the small openings between the petals.
Round 2 – Petals (Color A)
Ch 2 (counts as hdc), 3 dc in the same st, (3 dc, hdc) in the next dc, sl st in the next ch-2 sp. *Petal over the next 2 dc, sl st in the next ch-2 sp; rep from * 2 more times.
Count: 4 petals of 8 sts each (32 sts), plus 4 sl sts, for 36 sts.
Fasten off, leaving a 6 in (15.2 cm) tail, and weave it in on the back. The flower should measure 1.75 in (4.4 cm) from tip to opposite tip. Each petal tip now points to one future corner of the diamond.
Round 3 – Inner Lattice (Color B, Navy)
Join Color B with a sl st in any petal-tip gap. Ch 1.
(Sc, ch 5, sc) in the same gap, which makes the corner loop. Ch 5, sc in the next sl st between petals, ch 5.
*(Sc, ch 5, sc) in the next petal-tip gap, ch 5, sc in the next sl st between petals, ch 5; rep from * 2 more times. Sl st to the first sc.
Count: 12 sc and 12 ch-5 loops. That is 4 corner loops and 8 side loops, with 2 side loops per side.
The sc worked into the sl sts between petals pull the navy close to the flower, forming the small inner diamond.
Round 4 – Outer Lattice (Color B)
Sl st in the next 3 ch to reach the center of the corner loop. Ch 1, (sc, ch 5, sc) in the same corner loop.
*[Ch 5, sc in the next ch-5 side loop] 2 times, ch 5, (sc, ch 5, sc) in the next corner loop; rep from * 2 more times. [Ch 5, sc in the next ch-5 side loop] 2 times, ch 5, sl st to the first sc.
Count: 16 sc and 16 ch-5 loops. That is 4 corner loops and 12 side loops, with 3 side loops per side.
Fasten off Color B and weave in the end. The square should measure 3.25 in (8.3 cm) per side.
Border
Border Gauge
The border is a single round of shells. Each finished side holds 19 sts across about 4 in (10.2 cm), which is roughly 4.75 sts per inch (1.9 sts per cm) along the edge.
In this pattern, the per-side count includes the 4 dc on each half of the two corner shells at the ends of that side. The corner ch-2 sps are not counted as stitches.
Round 5 – Shell Border (Color A, Cream)
Join Color A with a sl st in any corner loop. Ch 3 (counts as dc), 3 dc, ch 2, 4 dc in the same loop. This is the first corner shell.
*Side shell in the next side loop, sc in the next side loop, side shell in the next side loop, corner shell in the next corner loop; rep from * 2 more times. Side shell in the next side loop, sc in the next side loop, side shell in the next side loop. Sl st to the top of the beginning ch-3.
Count per side: 4 dc (corner half) + 5 dc + 1 sc + 5 dc + 4 dc (corner half) = 19 sts.
Total: 4 corner shells of 8 dc each (32 dc), 8 side shells of 5 dc each (40 dc), and 4 sc, for 76 sts plus 4 corner ch-2 sps.
Check: 19 sts × 4 sides = 76 sts. Every corner shell is split evenly, with 4 dc counted on each of its two sides, so no stitch is counted twice.
Why the math works: Round 4 gives each side exactly 3 ch-5 side loops plus half of each corner loop. Two 5-dc shells and one sc fill the 3 side loops. The 4 + 4 dc corner shells fan around the 90-degree turn, and the ch-2 at each point creates the sharp tip. That gives two fans per side and a fan at each corner, which is 12 fans in all, for a scalloped edge that lies flat. The border adds about 3/8 in (1.0 cm) on each side, taking the piece from 3.25 in (8.3 cm) to 4 in (10.2 cm) per side.
Fasten off and weave in the end.
Hanging Loop (Color B)
Hold the ornament as a diamond with one corner at the top. Join Color B with a sl st in the ch-2 sp of the top corner shell.
Ch 16, then sl st in the same ch-2 sp to form a loop. Work 22 sc over the chain loop, covering it fully, and sl st in the ch-2 sp again.
Fasten off, leaving a 6 in (15.2 cm) tail. Weave the tail down through the corner shell to anchor the loop firmly. The finished loop stands about 1.5 in (3.8 cm) above the top point.
Final Blocking
- Weave in all remaining ends along stitches of the same color so that no cream shows on navy and no navy shows on cream.
- Pin the ornament on a blocking mat as a square, 4 in (10.2 cm) per side.
- Pin each corner ch-2 sp first, then check that the diagonal is 5.7 in (14.5 cm) both ways.
- Pin the center of each sc between the side shells so the sides are straight, then pin each shell gently outward to open the fans.
- Use a pin to open each ch-5 loop of the navy lattice and each small hole in the flower center.
- Mist with water until damp, or brush on diluted fabric stiffener for a crisper ornament.
- Let it dry completely before you unpin it, usually 6 to 12 hours.
- Shape the hanging loop with your fingers so it stands upright while it dries.
Final Quality-Control Checklist
- The flower has 4 even petals and 4 visible center holes.
- Each petal tip points to a corner of the diamond.
- Round 3 has 12 ch-5 loops and Round 4 has 16.
- Each side has 3 navy side loops under the border.
- Each side has 19 border sts (4 + 5 + 1 + 5 + 4), for 76 sts in total.
- All 4 corner shells have a clear ch-2 tip.
- The ornament measures 4 in (10.2 cm) per side and 5.7 in (14.5 cm) point to point.
- The hanging loop is centered on the top corner and secure.
- No ends are visible on the front.
Troubleshooting
Petals cup upward: The Round 1 ch-2 sps are too tight. Rework Round 1 with slightly looser chains.
Center holes close up: Make sure you work the sl st into the ch-2 sp rather than into a dc, and don’t pull it tight.
Navy lattice ruffles: The chains are too loose. Try ch 4 instead of ch 5 in Round 4 only, and block firmly.
Lattice pulls the flower out of shape: The chains are too tight. Go up a hook size for the navy rounds only.
Border waves: Check that you have exactly 5 dc per side shell and 4 + 4 dc per corner. Extra dc cause ruffling.
Corners look rounded: Make sure each corner has its ch 2, and pin the corner tips firmly when blocking.
Hanging loop leans to one side: Re-anchor the tail through the center of the top corner shell.
Care
Hand wash in cool water with mild soap, press out the water in a towel, and reshape the ornament flat to dry. If you used stiffener, reapply it after washing.
Final Notes
The whole ornament depends on one simple measurement chain:
- A 1.75 in (4.4 cm) flower grows to 2.6 in (6.6 cm) after Round 3.
- Round 4 brings it to 3.25 in (8.3 cm) per side.
- The 19-stitch-per-side shell border adds 3/8 in (1.0 cm) all around, for a finished square of 4 in (10.2 cm) per side and 5.7 in (14.5 cm) from point to point.
Check each stage and the final ornament will look just like the design. Make a few in matching colors for a coordinated tree, or tie one onto a wrapped gift.
Happy crocheting!