

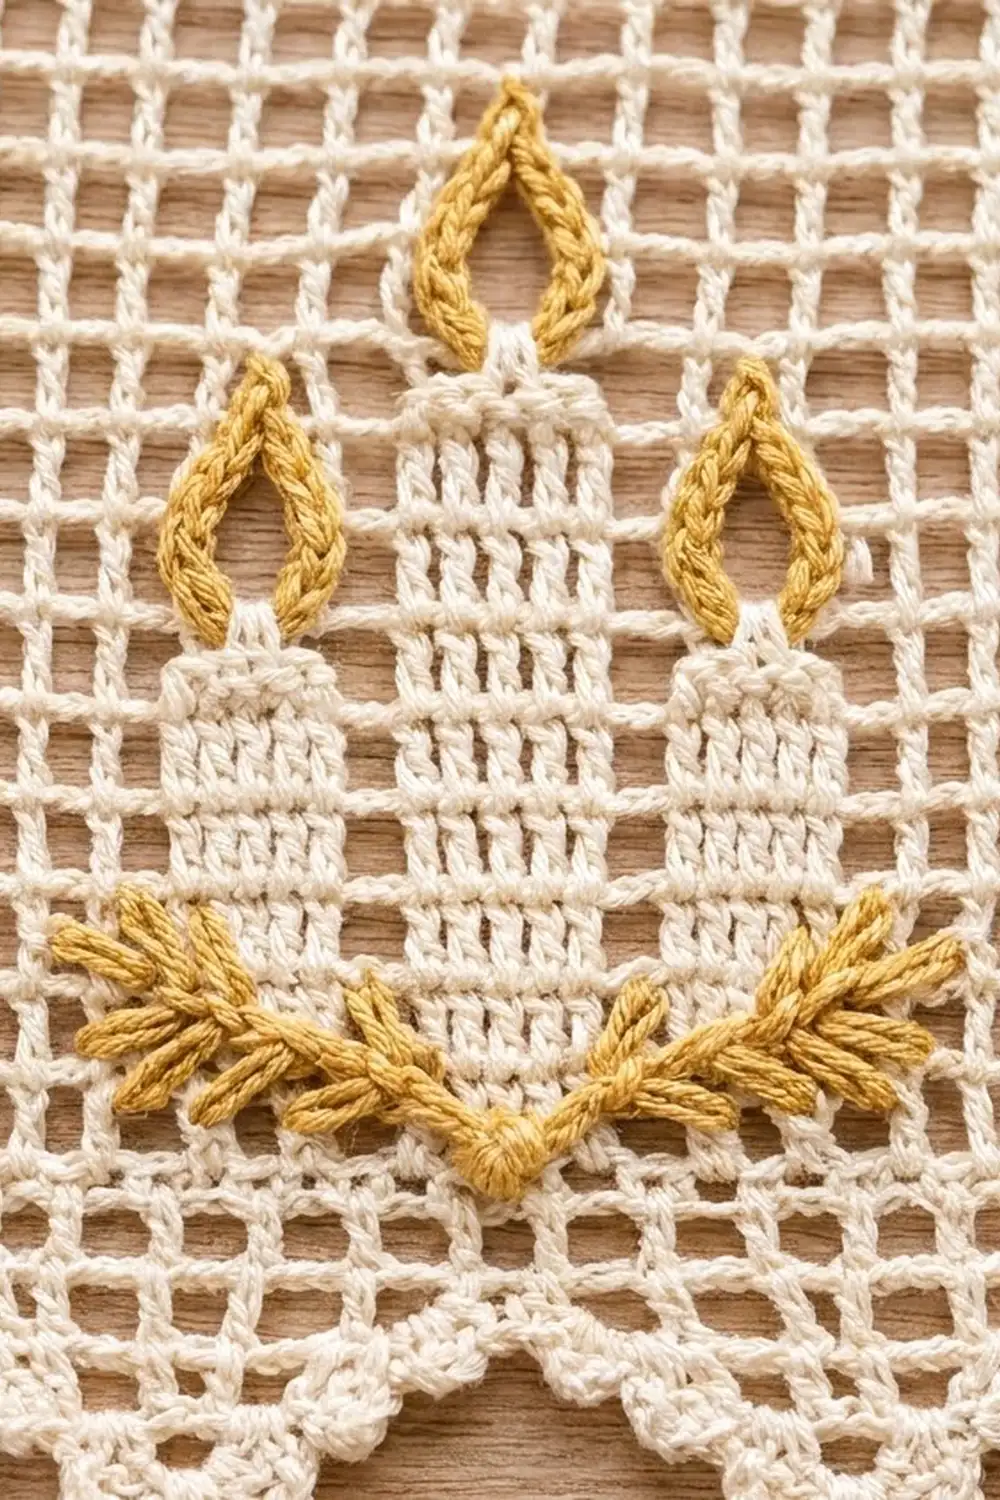
The Advent Glow Valance is a light, airy filet crochet curtain with four repeats of a glowing three-candle scene across a soft cream mesh. Each candle is a column of solid filet blocks. The golden flames and leafy sprigs are embroidered on top afterward, so you only crochet with one color.
The palette is calm and seasonal: warm cream for the mesh and candles, and golden mustard for the flames and greenery. The pointed picot edge along the bottom catches the light, and nine small loops along the top slip onto clip rings or a slim rod.
This pattern uses US crochet terms. The finished valance measures 32 in (81.3 cm) wide by 15.25 in (38.7 cm) tall, not counting the hanging loops.
You work it as a single piece from the bottom up in rows of filet mesh. Then you add pointed triangles along the foundation edge, a corded edging row, a looped top border, and the gold surface embroidery.
Finished Size and Construction
- Finished size: 32 in (81.3 cm) wide × 15.25 in (38.7 cm) tall; 16 in (40.6 cm) including loops
- Skill level: Intermediate
- Terminology: US
- Yarn weight: Fine (#2) sport-weight mercerized cotton
- Hook: 3.25 mm (US D-3)
- Number of pieces: 1 (single continuous panel)
- Layout: 64 filet squares wide × 26 rows tall; 4 motif repeats of 16 squares each
- Square size: 0.5 in (1.3 cm) wide and tall
- Size before border: 32 in × 13 in (81.3 cm × 33.0 cm)
- Bottom border depth: 2.25 in (5.7 cm)
- Top loop height: 0.75 in (1.9 cm)
Materials
Pick a smooth, mercerized cotton. It gives crisp mesh lines and keeps its shape against a window. Avoid fuzzy or very stretchy yarns, because they blur the candle blocks.
- Cream (main color): 200 g / about 620 m (678 yd), based on 50 g balls of about 155 m (169 yd)
- Golden mustard (embroidery): 30 g / about 93 m (102 yd)
Tools:
– 3.25 mm (US D-3) crochet hook
– Tapestry needle and a sharp chenille needle
– Removable stitch markers
– Measuring tape
– Blocking mats, rust-proof pins and spray starch
– Scissors
Both quantities include a margin of roughly 25% for your gauge swatch and small tension differences.
Abbreviations (US Terms)
- ch – chain
- sl st – slip stitch
- sc – single crochet
- dc – double crochet
- sp – space
- st(s) – stitch(es)
- RS / WS – right side / wrong side
Filet squares:
– O (open square): ch 2, skip the next 2 sts (or the ch-2 sp), dc in the next dc.
– B (block): over an open square, work 2 dc in the ch-2 sp and dc in the next dc. Over a block, dc in each of the next 3 dc.
– Turning chains: ch 5 counts as the first dc plus ch 2 (open start); ch 3 counts as the first dc (block start).
– Picot: ch 3, sl st in the 3rd ch from the hook.
Every row of the body has 193 stitches, counting each ch-2 as 2 stitches. That works out as 64 squares × 3 + 1 closing dc.
Gauge and Checkpoints
Gauge: 2 squares and 2 rows = 1 in (2.5 cm), which is 6 sts per inch in solid dc.
Test swatch: Ch 33. Dc in the 4th ch from the hook and in each ch across, for 31 sts (10 blocks). Work 9 more rows of open squares (10 squares each). The swatch should measure 5 in × 5 in (12.7 cm × 12.7 cm) after a light steam.
Checkpoints:
– Row 1 is 32 in (81.3 cm) wide.
– After Row 4, the piece is 2 in (5.1 cm) tall.
– After Row 14, it is 7 in (17.8 cm) tall.
– After Row 26, it is 13 in (33.0 cm) tall.
– After the points and edging, it is 15.25 in (38.7 cm) tall.
If your swatch is too big (over 5 in / 12.7 cm), go down 0.25 mm in hook size. If it is too small, go up 0.25 mm. If only the height is off, adjust how far you pull up each dc rather than changing hooks.
Body
Work in rows. Turn at the end of every row. Each 16-square repeat is mirror-symmetrical and all four repeats match, so the instructions read the same in both directions.
Place a marker in every 49th, 97th and 145th dc as you go. These mark the repeat boundaries.
Row 1 (solid base band): Ch 195. Dc in the 4th ch from the hook (the skipped ch count as the first dc) and in each ch across. 193 sts = 64 B.
Row 2: Ch 5, skip 2 dc, dc in the next dc. Work O across, ending with dc in the top of the turning ch. 64 O; 65 dc; 193 sts.
Rows 3–4: Ch 5, dc in the next dc. Work O across, ending with dc in the 3rd ch of the turning ch-5. 64 O per row. Leave these rows open; the sprigs are embroidered over them later.
Checkpoint: 2 in (5.1 cm) tall.
Rows 5–10 (all three candles): Ch 5, dc in the next dc (first O made). Work O 2 more times. Then work [B 2, O 2, B 2, O 2, B 2, O 6] 3 times. Finish with B 2, O 2, B 2, O 2, B 2, O 3.
Check: 3 + 48 + 13 = 64 squares, of which 24 are B and 40 are O; 193 sts per row. In each repeat, the side candles sit on squares 4–5 and 12–13, and the center candle sits on squares 8–9. Each candle is 1 in (2.5 cm) wide.
Rows 11–14 (center candle only): Ch 5, dc in the next dc. Work O 6 more times (7 O in all). Then work [B 2, O 14] 3 times, then B 2, O 7.
Check: 7 + 48 + 9 = 64 squares, of which 8 are B; 193 sts. The side candles are now 3 in (7.6 cm) tall. When you finish Row 14, the center candle is 5 in (12.7 cm) tall.
Checkpoint: 7 in (17.8 cm) tall.
Rows 15–25: Work as Row 3. 64 O per row.
Row 26 (solid top band): Ch 3, dc in each ch and in each dc across. 193 sts = 64 B. Do not fasten off.
Checkpoint: 32 in × 13 in (81.3 cm × 33.0 cm).
Border
The border is worked on two edges only, top and bottom. The side edges are left as clean filet row-ends, just as in the photos.
Border gauge: The same as the body: 0.5 in (1.3 cm) per square and per row.
Top Border (Hanging Loops)
Row T1: Ch 1. In the first dc work (sc, ch 10, sl st in the same sc) to make a loop. Sc in each of the next 23 sts. In the next st work (sc, ch 10, sl st in the same sc). Repeat from * 7 more times.
Count: 193 sc + 9 ch-10 loops. The loops sit on sts 1, 25, 49, 73, 97, 121, 145, 169 and 193, so they are 4 in (10.2 cm) apart.
Row T2 (conversion row): Ch 1, turn. Sl st in each sc across, and work 14 sc in each ch-10 loop as you reach it.
Count: 193 sl st (one per existing sc) + 126 sc (9 loops × 14). Fasten off.
The loops stand about 0.75 in (1.9 cm) tall.
Bottom Points
Turn the piece so the foundation chain is on top. You work into its 193 free loops: 8 points × 24 sts + 1 shared end st = 193.
Points share their base stitches. Point 1 uses loops 1–25, point 2 uses loops 25–49, and so on, until point 8 uses loops 169–193.
For each point:
– P1: Join cream in the first loop of the point. Ch 5, skip 2 loops, dc in the next loop. Work O 7 more times. 8 O; 9 dc; 25 sts. Turn.
– P2: Sl st in each of the next 2 ch and the next dc. Ch 5, dc in the next dc. Work O 4 more times. 6 O; 7 dc. Leave the last square unworked. Turn.
– P3: Sl st across 1 square as before. 4 O; 5 dc. Turn.
– P4: Sl st across 1 square. 2 O; 3 dc. Fasten off.
For the next point, join in the same loop that held the last dc of P1 of the point before.
Each point is 4 in (10.2 cm) wide at the base and 2 in (5.1 cm) deep. On each side it has 4 row-ends and 3 exposed steps (one open square each, left showing on the tops of P1, P2 and P3).
Edging Row
Join cream at the outer side of point 1, at the corner. Work along all 8 points as follows.
Each side of a point: work 3 sc around each row-end dc and 3 sc in each exposed step’s ch-2 sp. That is 4 × 3 + 3 × 3 = 21 sc, worked upward or downward as you go.
Tip: Work 3 sc in the first ch-2 sp of P4. In the center dc work (sc, picot, sc). Then work 3 sc in the next ch-2 sp. 8 sc + 1 picot.
Each valley between points: work 1 sc in the shared foundation loop.
Count: 8 × (21 + 8 + 21) = 400 sc, plus 7 valley sc = 407 sc and 8 picots. Fasten off.
The edging adds about 0.25 in (0.6 cm), so the border is 2.25 in (5.7 cm) deep.
Why the math works: Both long edges carry 193 sts, which is 8 × 24 + 1. Twenty-four stitches is exactly 8 squares, or 4 in (10.2 cm). That gives 8 points below, 9 loops above, and 2 points per 16-square candle repeat. The repeat boundaries (dc 49, 97 and 145) line up with a loop above and a valley below.
Embroidery and Divider Lines
Divider lines: With cream and the hook, work surface sl st up the dc columns at the three marked boundaries (dc 49, 97 and 145), from Row 1 to Row 26. Keep the tension relaxed so the mesh doesn’t pucker.
Flames: With golden mustard and the chenille needle, work a teardrop outline in chain stitch. Each flame is about 1 in (2.5 cm) wide and 1.25 in (3.2 cm) tall. Leave the center of each flame open to the cream mesh.
– Side flames are centered over the side candles in Rows 11–12.
– Center flames are centered over the center candle in Rows 15–16.
– Taper each flame to a point at its top.
Sprigs: Under each candle group, make a small French knot over the center dc column in Row 4, at the base of the center candle. From the knot, chain-stitch two stems angling outward and slightly upward across Rows 3–4. Each stem is about 3 in (7.6 cm) long and ends under square 2 on the left or square 15 on the right.
Add 7 lazy-daisy leaves along each stem: 3 pairs plus 1 tip leaf, all angled toward the candles.
Weave in all ends along solid blocks or dc posts.
Final Blocking
- Soak the valance in cool water with a little wool wash for 10 minutes. Press out the water; do not wring.
- Roll it in a towel to remove excess moisture.
- Lay it on mats and pin the top edge straight at 32 in (81.3 cm).
- Pin the side edges to 13 in (33.0 cm) at the base of the points, keeping the mesh squares square.
- Pin each point to its tip so the depth reaches 2.25 in (5.7 cm). Open each picot.
- Mist with spray starch, especially on the points and loops.
- Let it dry completely before you unpin it, usually 12–24 hours.
Final Quality-Control Checklist
- Every body row has 193 sts and 64 squares.
- There are 4 identical candle repeats; side candles are 6 rows tall and the center candle is 10 rows tall.
- The divider lines sit on dc 49, 97 and 145.
- There are 9 loops, 4 in (10.2 cm) apart.
- There are 8 points, each 4 in (10.2 cm) wide, with a picot at every tip.
- All flames match in size, and the sprigs mirror left to right.
- The blocked size is 32 in × 15.25 in (81.3 cm × 38.7 cm).
Troubleshooting
- Mesh squares are tall rectangles: Your dc are too tall. Pull up shorter loops, or try a dc worked with a looser yarn-over.
- Candles look slanted: You may have miscounted O squares at a row start. Remember the ch-5 already makes the first open square.
- Panel narrows toward the top: You are skipping the turning ch at the row ends. Always work the last dc into the turning chain.
- Points curl: The edging is too tight. Use a hook 0.25 mm larger for the edging row and starch the points well.
- Embroidery puckers the mesh: Loosen your chain stitches, and anchor each one over a dc post rather than pulling across open spaces.
Care
Hand wash in cool water, press out the moisture, and dry flat. Re-starch the points and loops after each wash to keep them crisp.

Final Notes
The measurement chain is simple. One square is 0.5 in (1.3 cm). Sixty-four squares give 32 in (81.3 cm) of width, and 26 rows give 13 in (33.0 cm) of body. Eight 4-row points add 2 in (5.1 cm), and the edging brings the border to 2.25 in (5.7 cm), for a finished height of 15.25 in (38.7 cm). The 193-stitch edges divide evenly into 8 points and 9 loops.
Check your gauge first and trust the counts. You’ll have a warm candlelit window for the season.
Happy crocheting!