
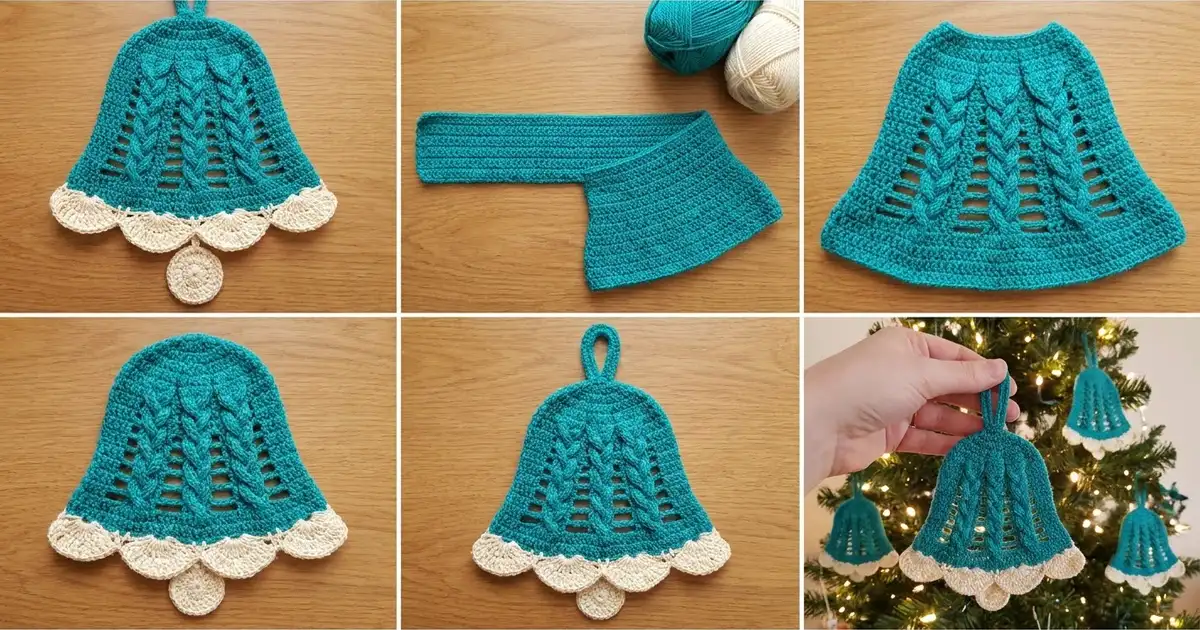
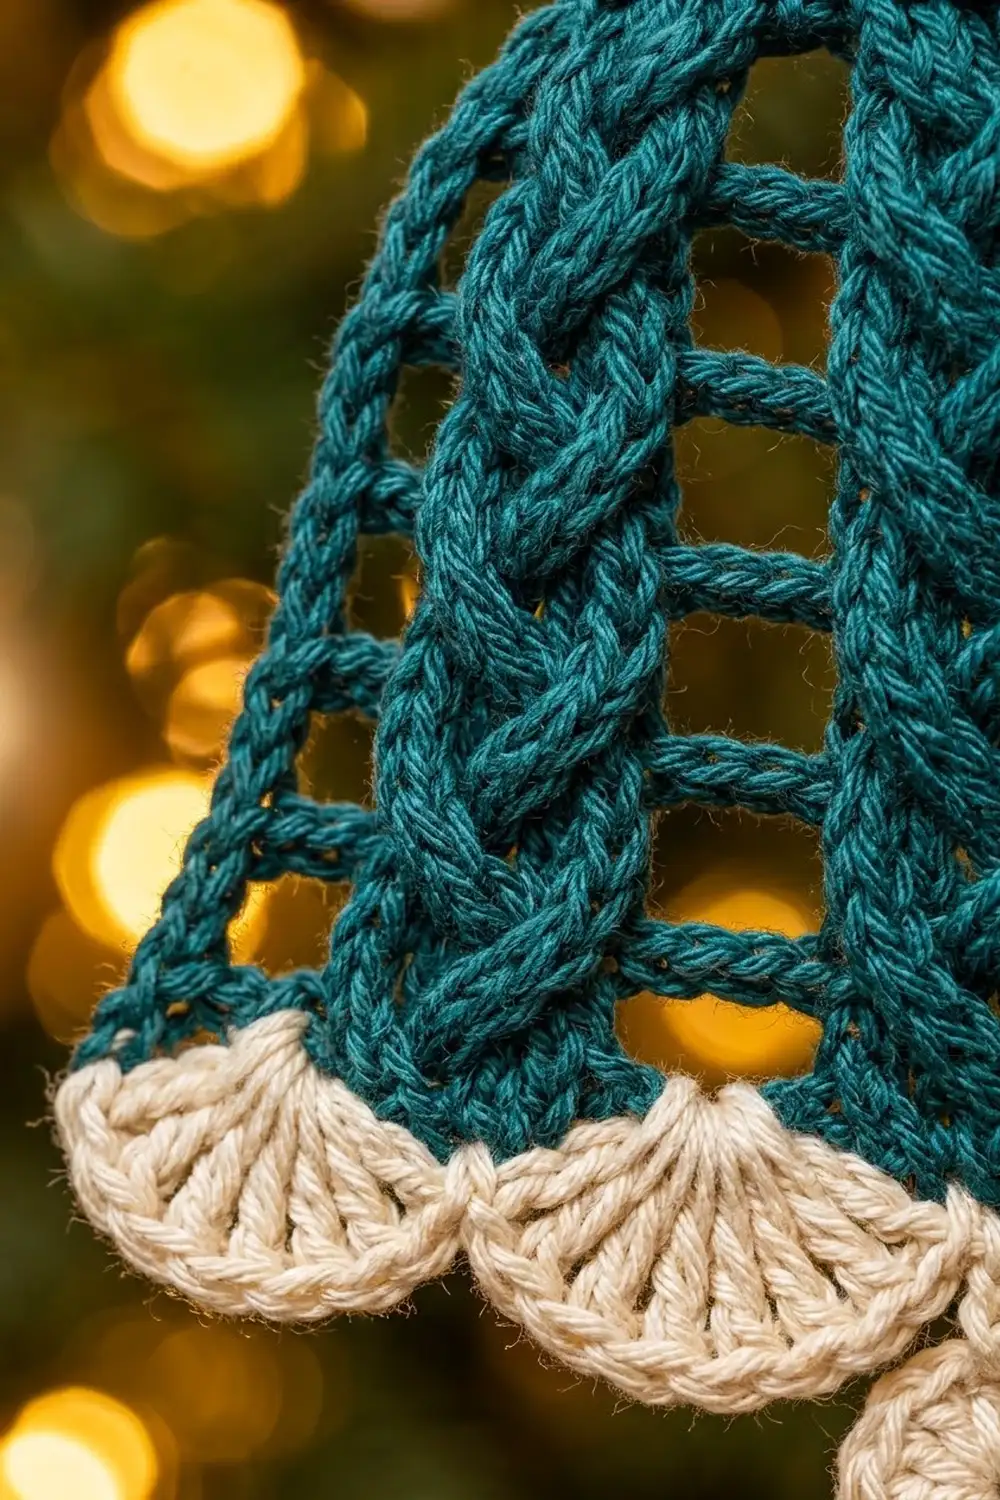
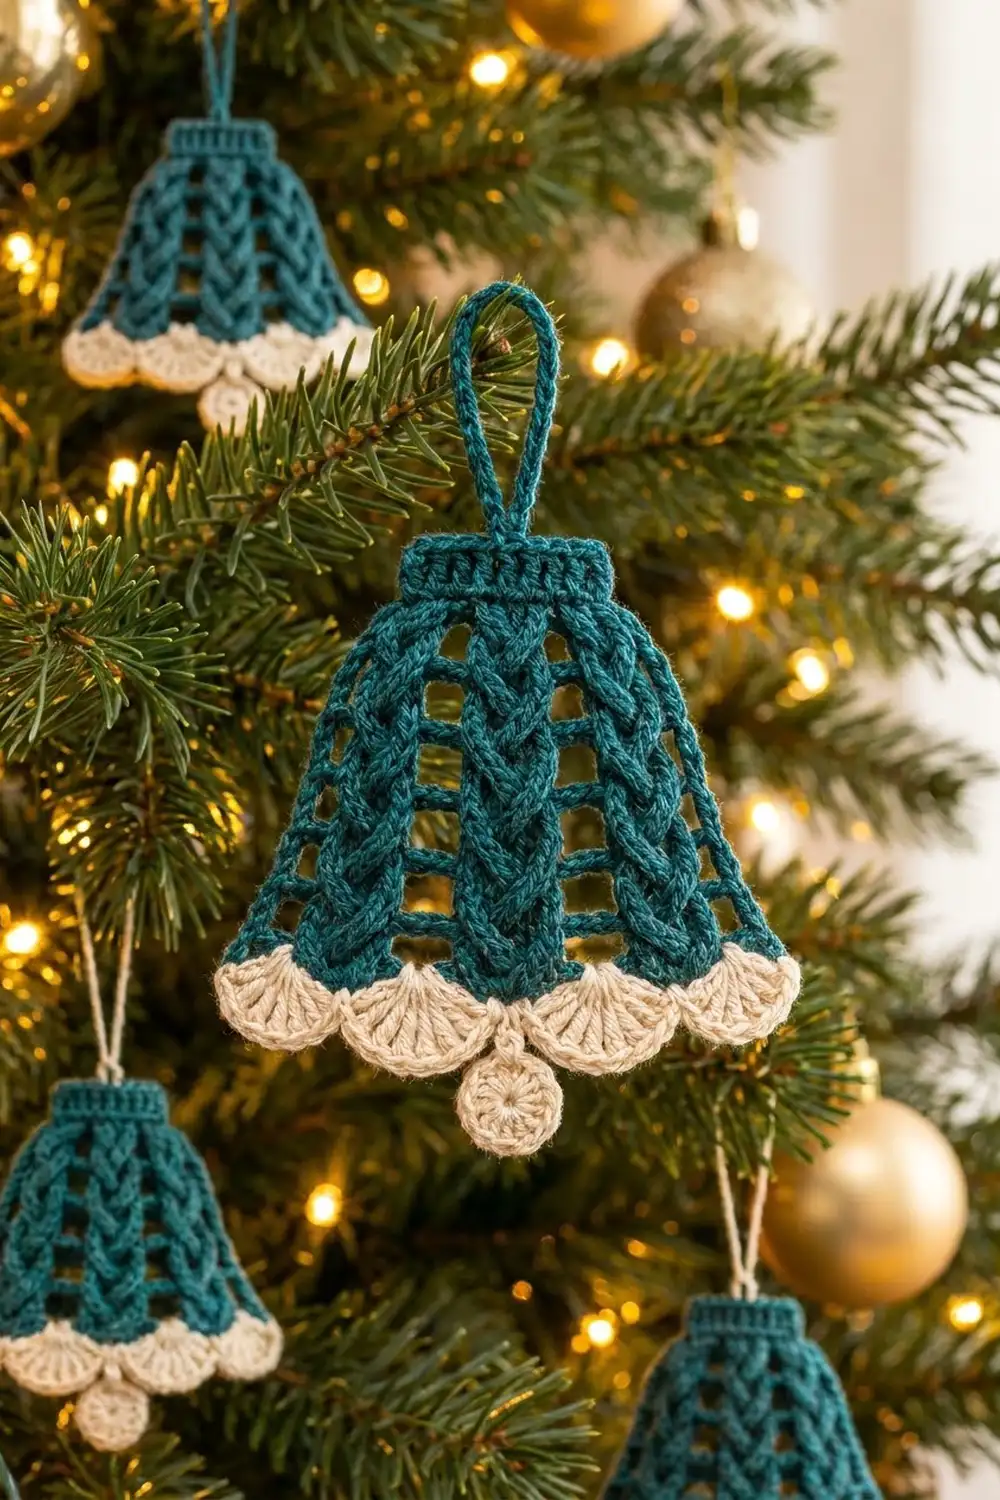
The Evergreen Plait Bell is a flat crochet thread ornament. It has the look of a cabled sweater, scaled down to hang on your tree. Three raised plaited cables run down a deep teal bell, and open ladder windows sit between them. A row of cream shells finishes the hem, and a small round clapper hangs from the center.
The colors are deep teal and soft cream. The teal reads like evergreen branches and the cream like snow. Hung in a group on the tree, the bells look calm and traditional.
This pattern uses US crochet terms. The finished ornament is 4 in (10.2 cm) wide at the shells and 3 in (7.6 cm) tall from the top of the band to the bottom of the clapper. With the hanging loop, it is 4.25 in (10.8 cm) tall.
The construction is simple. You crochet a short ribbed band, then work the body downward from the band in seven rows: post-stitch cables plus chain bars that widen each row. A cream shell edging finishes the hem. Last, you sew on a separately made clapper disc and add a teal hanging loop.
Finished Size and Construction
- Finished size: 4 in (10.2 cm) wide × 3 in (7.6 cm) tall, excluding the loop
- Height with loop: 4.25 in (10.8 cm)
- Skill level: Intermediate (post stitches and cable crosses)
- Terminology: US
- Yarn weight: Size 3 mercerized cotton crochet thread (fingering weight)
- Hook: 2.25 mm (US B-1)
- Number of pieces: 1 bell plus 1 small clapper disc sewn on, making one finished ornament
- Layout: Single ornament, worked flat in rows from the top down
- Band size: 2.25 in (5.7 cm) wide × 0.5 in (1.3 cm) tall
- Size before edging: 3.75 in (9.5 cm) wide at the hem × 2.25 in (5.7 cm) tall (band plus body)
- Edging depth: 0.5 in (1.3 cm) of cream shells
Materials
Use a smooth mercerized cotton thread of about 300 m per 100 g. Mercerized cotton shows the cable crosses clearly and holds its shape well after blocking. Avoid fuzzy or very soft yarns, because they blur the plaits and the ladder windows.
- Teal (Color A): about 5 g, roughly 15 m
- Cream (Color B): about 2 g, roughly 6 m
These amounts include a margin of about 25%, so you have enough for a gauge swatch and weaving in ends.
Tools:
- 2.25 mm (US B-1) crochet hook
- Tapestry needle
- Scissors
- Stitch markers (2–3)
- Rust-proof pins and a blocking board
- Light spray starch (optional)
- Ruler or tape measure
Abbreviations (US Terms)
- ch – chain
- sl st – slip stitch
- sc – single crochet
- dc – double crochet
- tr – treble crochet
- FPtr – front post treble crochet
- BPdc – back post double crochet
- MR – magic ring
- sp – space
- st(s) – stitch(es)
- RS / WS – right side / wrong side
Special stitches:
- Front Cross (FC): Skip the next 2 sts. FPtr around each of the next 2 sts. Then, working in front of the 2 sts you just made, FPtr around each of the 2 skipped sts. Uses 4 sts and makes 4 sts.
- Back Cross (BC): Skip the next 2 sts. FPtr around each of the next 2 sts. Then, working behind the 2 sts you just made, FPtr around each of the 2 skipped sts. Uses 4 sts and makes 4 sts.
When FC and BC alternate on the same 4 stitches, the strands weave over and under each other and make the plaited look.
Gauge and Checkpoints
Gauge: 16 dc and 8 rows = 2 in (5.1 cm) square, which is 8 dc and 4 rows per 1 in (2.5 cm).
Make one complete bell before you plan a batch. Small ornaments can drift in size, and one test bell tells you everything you need to know.
Checkpoints:
- After the band: 2.25 in (5.7 cm) wide × 0.5 in (1.3 cm) tall.
- After Body Row 3: 2.75 in (7.0 cm) wide at the lower edge.
- After Body Row 5: 3.25 in (8.3 cm) wide.
- After Body Row 7: 3.75 in (9.5 cm) wide. The body is 1.75 in (4.4 cm) deep below the band.
- After the edging: 4 in (10.2 cm) wide × 2.75 in (7.0 cm) tall.
- Clapper: 0.75 in (1.9 cm) across.
If your piece is too big, go down a hook size, to 2.0 mm. If it is too small, go up to 2.5 mm. Post-stitch cables tend to pull in, so check the width at Row 7 rather than at the band.
Pattern
Band (Color A)
Ch 19.
Row 1 (WS): Sc in 2nd ch from hook and in each ch across. Turn. (18 sc)
Row 2 (RS): Ch 3 (counts as dc), dc in each st across. Turn. (18 dc)
These upright dc posts make the vertical ribbing on the band.
Row 3 (WS): Ch 1, sc in each st across. Turn. (18 sc)
Checkpoint: 2.25 in (5.7 cm) × 0.5 in (1.3 cm). Do not fasten off.
Body (Color A)
The body uses a fixed layout: 1 edge dc, a window, 4 cable sts, a window, 4 cable sts, a window, 4 cable sts, a window, and 1 edge dc. That makes 14 sts in every row. Only the chains over the windows change, which is what makes the bell flare.
Each window chain sits over the window chain from the row before. Those chains are the ladder bars, and the gaps between them are the open windows.
Row 1 (RS): Ch 3 (counts as dc). Ch 1, skip next st, dc in each of next 4 sts. [Ch 1, skip next st, dc in each of next 4 sts] once more. Ch 1, skip next st, dc in each of next 4 sts. Ch 1, skip next st, dc in last st. Turn.
(14 dc + 4 ch-1 sps; width 18 = 2.25 in / 5.7 cm)
Check the stitch positions on the band: edge dc in st 1, cables in sts 3–6, 8–11 and 13–16, edge dc in st 18. The skipped sts are 2, 7, 12 and 17. The center cable sits on sts 8–11, so it is centered.
Row 2 (WS): Ch 3 (counts as dc). [Ch 1, BPdc around each of next 4 sts] 3 times. Ch 1, dc in top of turning ch. Turn.
(14 sts + 4 ch-1 sps; width 18)
Row 3 (RS): Ch 3. [Ch 2, FC] 3 times. Ch 2, dc in top of turning ch. Turn.
(14 sts + 4 ch-2 sps; width 22 = 2.75 in / 7.0 cm)
Row 4 (WS): Ch 3. [Ch 2, BPdc around each of next 4 sts] 3 times. Ch 2, dc in top of turning ch. Turn.
(14 sts + 4 ch-2 sps; width 22)
Row 5 (RS): Ch 3. [Ch 3, BC] 3 times. Ch 3, dc in top of turning ch. Turn.
(14 sts + 4 ch-3 sps; width 26 = 3.25 in / 8.3 cm)
Row 6 (WS): Ch 3. [Ch 3, BPdc around each of next 4 sts] 3 times. Ch 3, dc in top of turning ch. Turn.
(14 sts + 4 ch-3 sps; width 26)
Row 7 (RS): Ch 3. [Ch 4, FC] 3 times. Ch 4, dc in top of turning ch.
(14 sts + 4 ch-4 sps; width 30 = 3.75 in / 9.5 cm)
Fasten off Color A and weave in the end.
Each cable has three crosses: front, back, front. Because the WS rows are worked as BPdc, the cables stay raised on the RS and the plait stands out against the open windows. The single dc at each end of every row forms the diagonal edges of the bell.
Clapper Disc (Color B)
Rnd 1: Make a MR. Ch 3 (counts as dc), 11 dc in ring. Pull the ring closed and sl st to top of ch-3. (12 dc)
Rnd 2: Ch 1, 2 sc in each st around. Sl st to first sc. (24 sc)
Fasten off, leaving a 6 in (15.2 cm) tail for sewing. The dc spokes and the sc ring match the clapper in the photo. The disc measures 0.75 in (1.9 cm) across.
Hanging Loop (Color A)
With the RS facing and the band’s foundation chain at the top, join Color A with a sl st in the 9th foundation ch. Ch 24, then sl st in the 10th foundation ch to form the loop. Turn, and work 30 sc over the chain loop, covering it fully. Sl st into the 9th foundation ch. Fasten off.
The covered loop stands 1.25 in (3.2 cm) above the band.
Border: Cream Shell Edging
Border gauge: each 9-dc shell fans out to about 1 in (2.5 cm) wide and 0.5 in (1.3 cm) deep.
Edging Row (RS): With the RS facing, join Color B with a sc in the first st of Row 7, which is the turning ch at the right edge.
- 9 dc in the next ch-4 sp.
- [Skip next cable st, sc in each of next 2 cable sts, skip next cable st, 9 dc in next ch-4 sp] 3 times.
- Sc in the last dc.
Fasten off.
Count: 2 edge sc + 6 cable sc + 4 shells × 9 dc = 44 sts.
Why the math works: Row 7 has exactly 4 ch-4 spaces, so you get exactly 4 shells. Each shell sits under one window and is anchored on both sides by 2 sc in the cables. Skipping the outer st of each cable gives the shells room to fan out without ruffling. The hem’s base width is 3.75 in (9.5 cm). The shells overhang about 0.125 in (0.3 cm) at each end, which brings the finished width to 4 in (10.2 cm).
The middle sc pair sits under the center cable. That is where the clapper attaches.
Attaching the Clapper
Center the disc under the 2 middle sc of the edging, between shells 2 and 3. Using the tail, sew the top 2 sts of Rnd 2 to those 2 sc. Use 3–4 small stitches and keep them hidden behind the sts.
The disc hangs 0.75 in (1.9 cm) below the sc. That puts its bottom 0.25 in (0.6 cm) below the shell tips, for a total height of 3 in (7.6 cm).
Final Blocking
- Draw a bell template on paper: 2.25 in (5.7 cm) wide at the top, 3.75 in (9.5 cm) wide at 2.25 in (5.7 cm) down, and 4 in (10.2 cm) wide across the shells.
- Lightly spritz the ornament with water until it is damp, not wet.
- Pin the band corners first so the band is straight and 2.25 in (5.7 cm) wide.
- Pin the two hem corners to 3.75 in (9.5 cm). The side edges should run straight between the band and the hem.
- Pin the tip of each shell into an even curve.
- Open each ladder window gently with a pin so the bars lie horizontal.
- Pin the clapper round and centered.
- If you want a stiffer ornament, mist lightly with spray starch.
- Let it dry completely, at least 4 hours, before unpinning.
Final Quality-Control Checklist
- The band is 2.25 in (5.7 cm) wide with even vertical ribbing.
- Every body row has 14 sts and 4 window spaces.
- Each cable shows three crosses in the order front, back, front.
- The ladder bars are horizontal and the windows are symmetrical left to right.
- The hem measures 3.75 in (9.5 cm) before edging and 4 in (10.2 cm) after.
- There are 4 shells of 9 dc each, the same size, and they lie flat.
- The clapper is centered under the middle cable and is 0.75 in (1.9 cm) across.
- The loop is attached at the exact center of the band and is firmly secured.
- All ends are woven in invisibly on the WS.
Troubleshooting
The cables look flat. You may have worked a WS row in plain dc. Every WS cable st must be a BPdc.
The cross twists the wrong way. Check FC against BC. For FC, the second pair goes in front of the first pair; for BC, it goes behind. Alternate them as written.
The bell cups or curls. Your window chains are too tight. Loosen your tension on the chains or go up 1 hook size for the chains only.
The edges ripple. The chains are too loose. Count them carefully and block firmly.
The shells ruffle. Make sure you skipped the outer cable st on both sides of each shell.
The clapper hangs crooked. Re-sew it through exactly the 2 middle sc and center it under the cable.
The loop leans. Re-join it between foundation chs 9 and 10.
Care
Hand wash in cool water with mild soap, press out the water in a towel, and dry flat, reshaping it to the template. Store flat or hanging, away from direct sunlight, so the teal does not fade.
Final Notes
The measurement chain is short and easy to check at each stage:
- An 18-st band measures 2.25 in (5.7 cm).
- The body keeps 14 sts per row, and the windows grow from ch 1 to ch 4, widening the bell to 3.75 in (9.5 cm) over 1.75 in (4.4 cm) of depth.
- Four 9-dc shells bring the hem to 4 in (10.2 cm).
- A 0.75 in (1.9 cm) clapper brings the height to 3 in (7.6 cm).
If your band and Row 7 widths match, the rest will fall into place. Make one bell, check it against the checkpoints, then make a few more for the tree or to tie onto gifts.
Happy crocheting!