

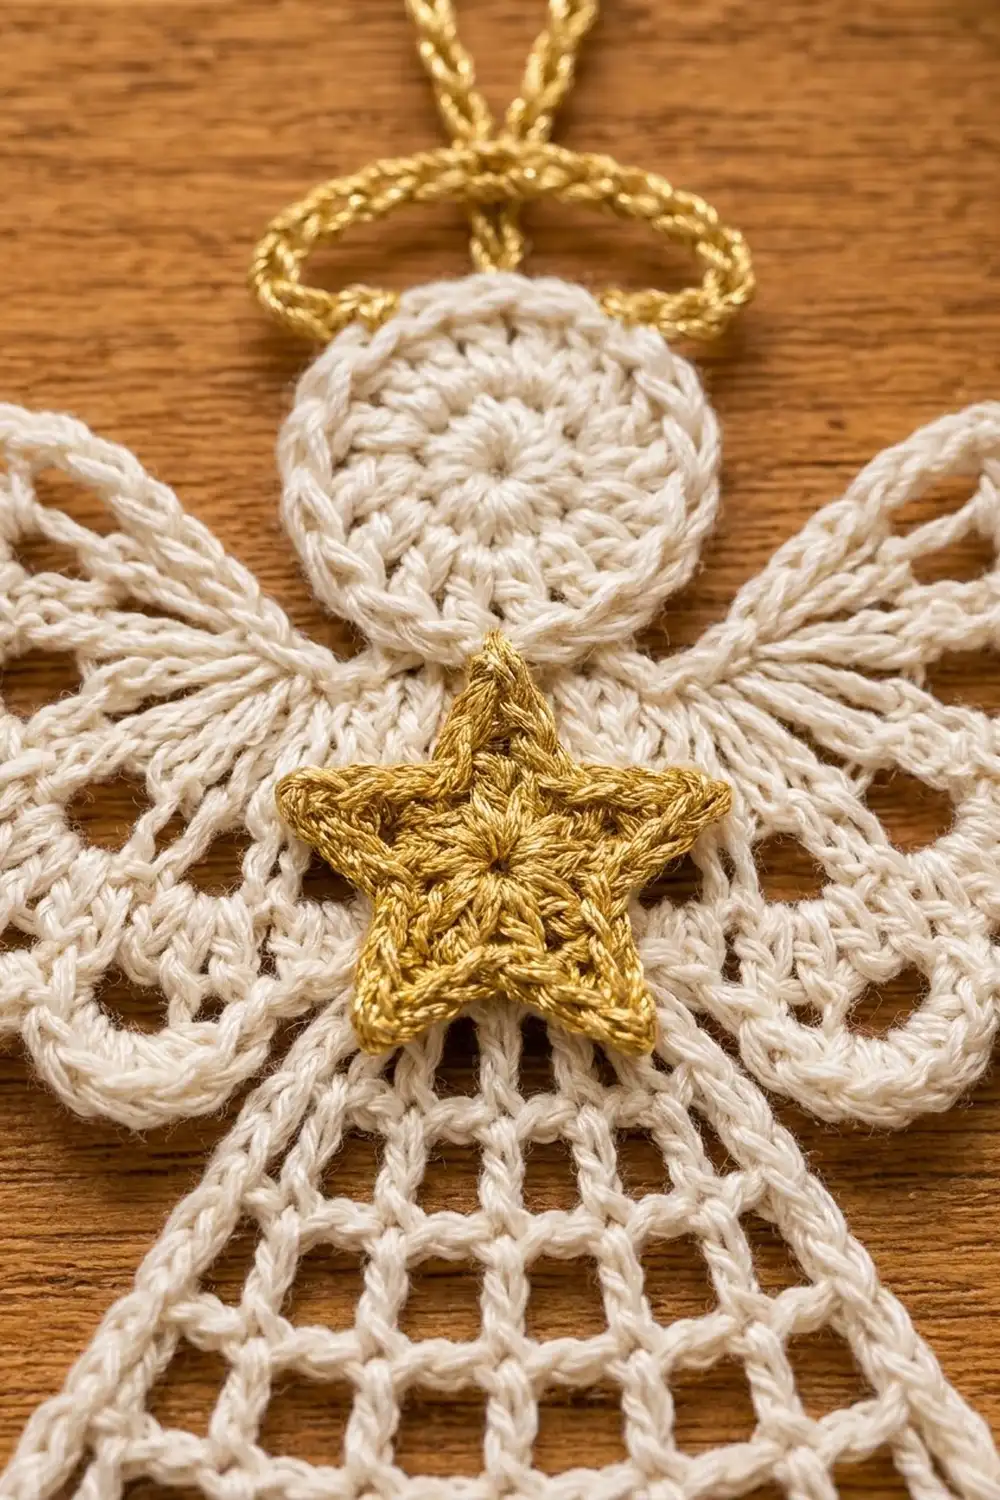
The Gilded Grace Angel is a small lace angel worked in fine cotton thread. She has:
- a round, solid head
- two fan-shaped wings with scalloped edges
- a bell-shaped skirt of open filet mesh
Gold accents finish her off: a five-point star at the neck, an oval halo, a covered hanging loop and a scalloped hem band.
The design uses just two colors, soft ivory for the body and metallic gold for the trims, for a classic heirloom look on the tree or a gift package.
This pattern uses US crochet terms. The finished angel is 4 in (10.2 cm) tall from the top of the head to the hem and 4 in (10.2 cm) across the wings. With the halo and hanging loop, the ornament hangs 5.5 in (14.0 cm) long.
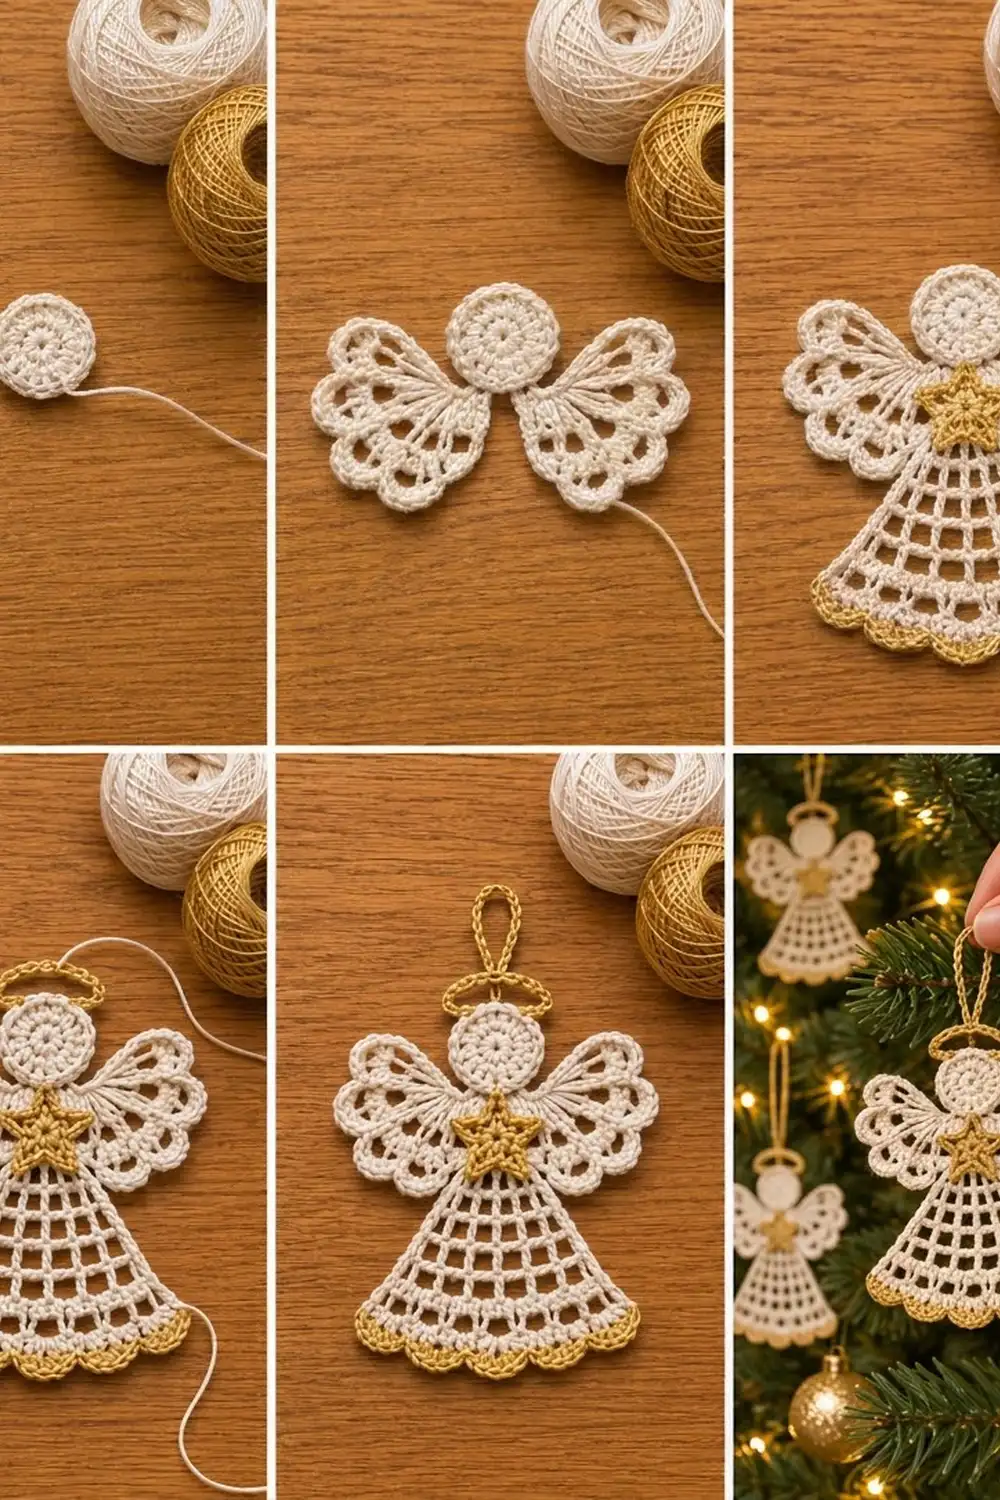
You work the head in the round first. Each wing is then worked directly into the head’s lower side stitches. The skirt is worked in rows from the head’s bottom neck stitches, and a gold border goes along the hem. Last, you make a small gold star and a gold halo with a loop, and sew them on after blocking.
Finished Size and Construction
- Finished size: 4 in (10.2 cm) tall x 4 in (10.2 cm) wide, not counting the halo and loop
- Total hanging length: 5.5 in (14.0 cm), with the halo and loop
- Skill level: Intermediate
- Terminology: US crochet terms
- Yarn weight: Size 10 crochet cotton thread (Lace, weight 0)
- Hook: 1.75 mm steel hook
- Number of pieces: 1 main angel body (head, wings and skirt worked as one piece), plus 2 small gold appliqués (the star, and the halo with its loop)
- Layout: One single ornament, not a set of joined motifs
- Head size: 1.25 in (3.2 cm) across
- Size before border: 3.7 in (9.4 cm) tall, with a hem 3.75 in (9.5 cm) wide
- Border depth: 0.3 in (0.8 cm), along the hem only
Materials
Use a mercerized cotton thread in size 10. It holds starch well and gives crisp lace. For the gold, choose a size 10 metallic thread or a cotton-metallic blend. Metallic thread can be slippery, so work it with slightly firmer tension.
- Ivory (Color A): 8 g, about 40 m
- Metallic gold (Color B): 3 g, about 15 m
These amounts include a margin of about 20 percent for checking gauge and weaving in ends. The number of meters per gram varies by brand, so check your ball band.
Tools:
- 1.75 mm steel crochet hook
- Fine tapestry needle (size 24 or 26)
- 4 locking stitch markers
- Small sharp scissors
- Ruler or tape measure
- Blocking board or foam mat
- Rust-proof pins
- Spray starch or fabric stiffener
Abbreviations (US Terms)
- ch: chain
- sl st: slip stitch
- sc: single crochet
- hdc: half double crochet
- dc: double crochet
- tr: treble crochet
- dtr: double treble crochet
- MR: magic ring
- sp(s): space(s)
- st(s): stitch(es)
- tch: turning chain
- RS / WS: right side / wrong side
Special stitches:
- dtr (double treble): Yarn over 3 times, insert the hook in the stitch and pull up a loop (5 loops on hook). Then [yarn over, pull through 2 loops] 4 times.
- Wing scallop: Work (sc, hdc, 3 dc, hdc, sc) all in the same ch-5 loop. This makes 7 sts.
- Shell: 5 dc in the same stitch.
Gauge and Checkpoints
A lace ornament doesn’t need a big swatch. The head is your gauge swatch, so make it first and measure it before you go on.
- Head Rounds 1-3: 1.15 in (2.9 cm) across
- Head Round 4: 1.25 in (3.2 cm) across
- Each wing, after blocking: 1.25 in (3.2 cm) from root to scallop edge
- Skirt after Row 1: 1.25 in (3.2 cm) wide
- Skirt after Row 3: 2.25 in (5.7 cm) wide
- Skirt after Row 5: 2.9 in (7.4 cm) wide
- Skirt after Row 7: 3.5 in (8.9 cm) wide and 2.2 in (5.6 cm) tall from the head
- Skirt after Row 8: 3.75 in (9.5 cm) wide and 2.45 in (6.2 cm) tall from the head
- Star: 1 in (2.5 cm) from point to point
If your head is bigger than 1.25 in (3.2 cm), change to a 1.5 mm hook. If it is smaller, change to a 2.0 mm hook. A head that is off by 0.1 in (0.3 cm) makes the finished angel off by about 0.3 in (0.8 cm).
Part 1: Head
Use Color A.
Rnd 1: MR, ch 3 (counts as dc), 11 dc in ring, sl st to top of ch-3. (12 dc)
Rnd 2: Ch 3 (counts as dc), dc in same st, 2 dc in each st around, sl st to top of ch-3. (24 dc)
Rnd 3: Ch 3 (counts as dc), 2 dc in next st, dc in next st, 2 dc in next st 11 times, sl st to top of ch-3. (36 dc)
Rnd 4: Ch 1, sc in each st around, sl st to first sc. (36 sc)
Fasten off and weave in the end. Check: the head should be 1.25 in (3.2 cm) across.
Mark the head. Number the Round 4 stitches from 1 to 36, where st 1 is the first sc. Lay the head RS up with the join (between st 36 and st 1) at the top center. The bottom center now falls between st 18 and st 19.
- Neck: sts 15-22 (8 sts). Put markers in st 15 and st 22.
- Wing 1: sts 11-13. Put a marker in st 11.
- Wing 2: sts 24-26. Put a marker in st 24.
- Gap stitches: Leave st 14 and st 23 unworked. They separate each wing from the skirt.
Part 2: Wings (Make 2)
Use Color A. Work both wings the same way, starting in the marked stitch with the RS facing you.
Row 1 (RS): Join with a sl st in st 11. Ch 5 (counts as dtr), ch 3, dtr in same st. Work (ch 3, dtr) 3 times in st 12, then (ch 3, dtr) 2 times in st 13. (7 dtr, 6 ch-3 sps)
These long stitches are the wing’s radiating spokes, with open spaces between them.
Row 2 (WS): Ch 1, turn. Sc in first dtr, ch 5, sc in next dtr 6 times. Work the last sc in the 5th ch of the beginning ch-5. (7 sc, 6 ch-5 loops)
Row 3 (RS): Ch 1, turn. Work 1 wing scallop in each ch-5 loop, then sl st in the last sc. (6 scallops, 42 sts)
Fasten off. Repeat Rows 1-3 for the second wing, joining in st 24 and working into sts 24, 25 and 26.
Checkpoint: each wing is about 1.1 in (2.8 cm) from root to edge before blocking, and 1.25 in (3.2 cm) after.
Part 3: Skirt
Use Color A. The skirt is filet mesh worked in rows. The posts stay lined up from row to row, and the chain spaces get longer so the skirt flares into a bell.
Row 1 (RS): Join with a sl st in st 15. Ch 4 (counts as dc + ch 1), dc in next st, ch 1 6 times, dc in st 22. (8 dc, 7 ch-1 sps)
Row 2 (WS): Ch 6 (counts as tr + ch 2), turn. Tr in next dc, ch 2 6 times, tr in 3rd ch of tch. (8 tr, 7 ch-2 sps)
Row 3 (RS, increase): Ch 6 (counts as tr + ch 2), turn. Tr in first tr (at the base of the tch). Ch 2, tr in next tr 6 times. Ch 2, tr in 4th ch of tch, ch 2, tr in same ch. (10 tr, 9 ch-2 sps)
This is the only increase row. It adds one mesh at each edge.
Row 4 (WS): Ch 7 (counts as tr + ch 3), turn. Tr in next tr, ch 3 8 times, tr in 4th ch of tch. (10 tr, 9 ch-3 sps)
Row 5 (RS): Repeat Row 4. (10 tr, 9 ch-3 sps)
Row 6 (WS): Ch 8 (counts as tr + ch 4), turn. Tr in next tr, ch 4 8 times, tr in 4th ch of tch. (10 tr, 9 ch-4 sps)
Row 7 (RS): Repeat Row 6. (10 tr, 9 ch-4 sps)
Check: the skirt should be 3.5 in (8.9 cm) wide and 2.2 in (5.6 cm) tall from the bottom of the head.
Row 8 (WS, conversion row): Ch 3 (counts as dc), turn. 3 dc in next ch-4 sp, dc in next tr 9 times, working the last dc in the 4th ch of tch. Count: 10 dc (1 in each post) + 27 dc (3 in each of the 9 spaces) = 37 dc.
This solid ivory band sits just above the gold hem. Fasten off. Check: the hem is 3.75 in (9.5 cm) wide and the whole angel is 3.7 in (9.4 cm) tall.
Part 4: Star Appliqué
Use Color B.
Rnd 1: MR, ch 3 (counts as dc), 9 dc in ring, sl st to top of ch-3. (10 dc)
Rnd 2: Ch 5, sc in 2nd ch from hook, hdc in next ch, dc in next ch, tr in next ch, skip next dc, sl st in next dc 5 times. Each point uses 2 dc from Round 1. (5 points)
Fasten off, leaving a 10 in (25.4 cm) tail for sewing. Check: the star is 1 in (2.5 cm) from point to point.
Part 5: Halo and Hanging Loop
Use Color B.
Halo: Ch 28, then sl st in the first ch to form a ring. Make sure the chain isn’t twisted.
Rnd 1: Ch 1, sc in each ch around, sl st to first sc. (28 sc)
Loop: Ch 36, then sl st in the same sc (st 1) to form a loop. Ch 1, work 40 sc over the ch-36 loop so the chain is fully covered, then sl st in st 1 of the halo.
Fasten off, leaving an 8 in (20.3 cm) tail. Flatten the halo into an oval about 1.25 in (3.2 cm) wide, with the loop at the center of the top edge. St 15 is now at the center of the bottom edge. The loop stands about 1.25 in (3.2 cm) tall.
Border
The border goes only along the hem, across Row 8 of the skirt. The head, wings and sides of the skirt have no border.
Border gauge: 10 sc = 1 in (2.5 cm). One scallop repeat (6 sts) = 0.6 in (1.5 cm).
Border Row 1 (RS): With the RS facing you, join Color B in the first dc of Row 8. Ch 1, sc in each st across. Count: 37 sc (1 in each stitch) + 0 added = 37 sc.
Border Row 2 (WS): Ch 1, turn. Sc in first sc, skip 2 sc, shell in next sc, skip 2 sc, sc in next sc 6 times. Count: 30 dc + 7 sc = 37 sts (6 shells).
Fasten off and weave in the ends.
Why the math works: Each shell repeat uses 6 stitches: 2 skipped, 1 shell, 2 skipped and 1 sc. You start with 1 sc, and 37 = 1 + (6 x 6), so the sixth repeat ends exactly in the last stitch. The row begins and ends with an sc, so the hem stays 3.75 in (9.5 cm) wide. The border adds 0.3 in (0.8 cm) of height, taking the angel from 3.7 in (9.4 cm) to 4 in (10.2 cm).
Final Blocking
- Weave in all the ends on the body. Leave the star and halo tails for sewing.
- Soak the body in cool water for 5 minutes, then roll it in a towel to remove the extra water.
- Pin the head into a circle 1.25 in (3.2 cm) across.
- Pin the hem straight and 3.75 in (9.5 cm) wide, with a pin in the tip of each gold scallop. The bottom of the scallops should sit 4 in (10.2 cm) below the top of the head.
- Open each wing into a fan 1.25 in (3.2 cm) long, angled slightly upward. Pin each scallop tip. The wing tips should be 4 in (10.2 cm) apart.
- Pin the skirt posts so the mesh boxes are open and evenly spaced. Spray with starch or brush on stiffener, then let it dry completely.
- Block the star and halo flat on their own. When everything is dry, sew the star over the neck, centered between the wings. Its upper points should overlap the bottom of the head, and its lower points should cover skirt Row 1.
- Sew the bottom edge of the halo (sts 13-17) to the back of the head at the top center, so about 0.25 in (0.6 cm) of halo shows above the head. Sew it securely, because the ornament hangs from this point.
Final Quality-Control Checklist
- The head is round, flat and 1.25 in (3.2 cm) across.
- Each wing has 7 spokes and 6 even scallops, and the two wings match.
- The skirt has 9 mesh columns from Row 3 down, and the posts stack in straight lines.
- Row 8 has 37 dc, and the gold hem has 6 shells.
- The angel is 4 in (10.2 cm) tall and 4 in (10.2 cm) wide.
- The star is centered at the neck, with all 5 points tacked down.
- The halo is secure, and the angel hangs straight from the loop.
Troubleshooting
Head cups or ruffles: If it cups, your increases are too tight; if it ruffles, they are too loose. Rework the round, keeping to 12 stitches added per round.
Wings curl forward: The dtr spokes are too tight. Pull each loop up to full height. Starch will also help flatten them.
Skirt pulls in at the sides: Your turning chains are probably too short. Make each one the full count given, and work the last tr into the correct chain.
Hem ruffles after Row 8: Rework Row 8 with a hook 0.25 mm smaller. Keep the count at 37 dc so the border still fits.
Metallic thread frays: Cut a fresh length and put a tiny dot of clear fabric glue on the end before weaving it in.
Angel tilts when hung: The halo is sewn off center. Re-center it over the head’s join.
Care
Hand wash in cool water with mild soap, press out the water in a towel, and re-block flat with fresh starch. Store the angel flat in tissue paper so the wings keep their shape.
Final Notes
Here is the measurement chain:
- Head: 1.25 in (3.2 cm) across.
- Wings: each 1.25 in (3.2 cm) long, for a 4 in (10.2 cm) wingspan.
- Skirt width: 1.25 in (3.2 cm), then 2.25 in (5.7 cm), 2.9 in (7.4 cm) and 3.5 in (8.9 cm). Row 8 brings the hem to 3.75 in (9.5 cm) and the angel to 3.7 in (9.4 cm) tall.
- Border: adds 0.3 in (0.8 cm), for a total of 4 in (10.2 cm).
- Halo and loop: add 1.5 in (3.8 cm), so the ornament hangs 5.5 in (14.0 cm) long.
Check each number as you go, and your angel will match the one in the photos.
Happy crocheting!