

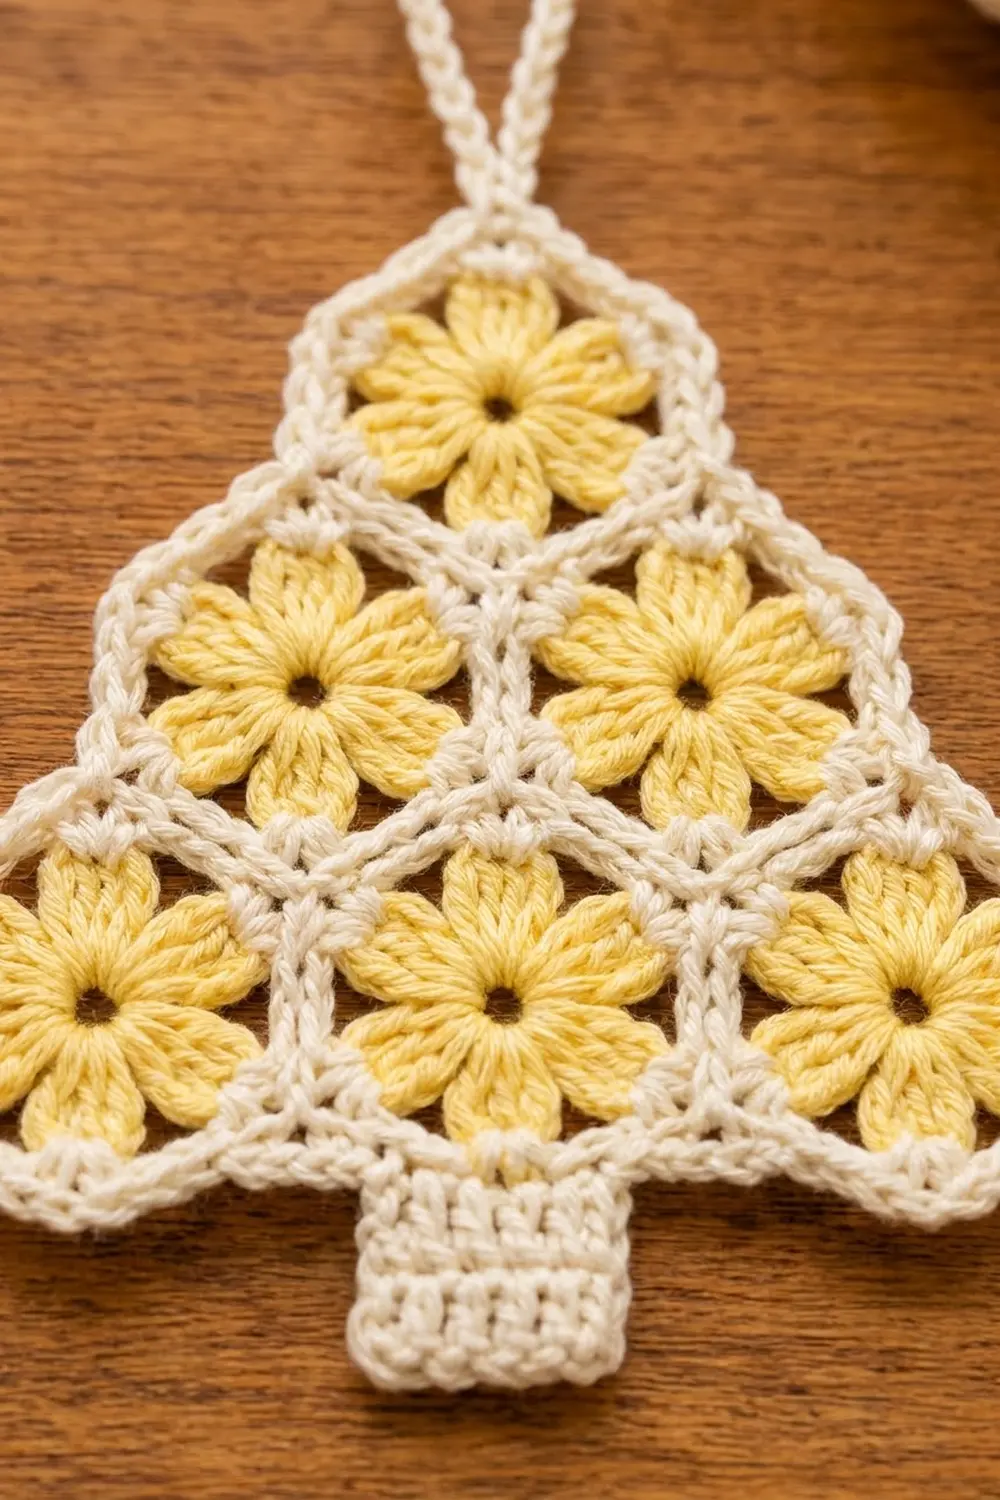
This little tree ornament is made from six flower hexagons. Each hexagon has a butter-yellow flower with six petals, an open center and a thin cream outline. The hexagons are joined into a tree with one at the top, two in the middle and three at the bottom. A cream border, a ridged trunk and a sturdy loop finish it off.
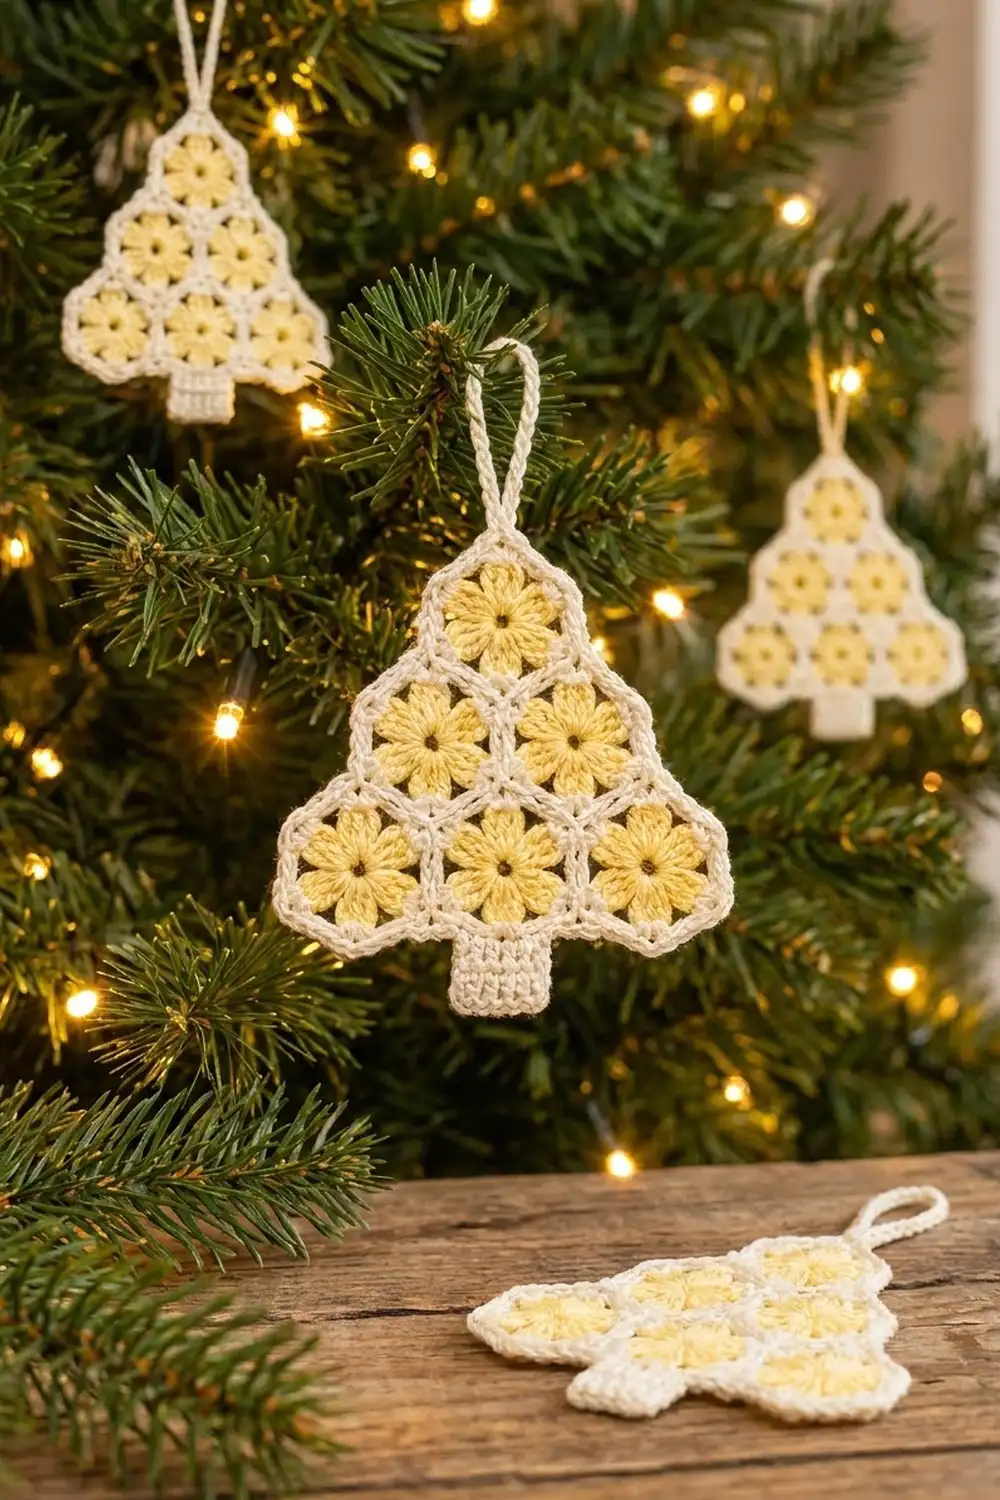
The look is light, lacy and a little vintage. The yellow and cream go well with gold lights, natural wood and white decorations. A set of these looks lovely on a tree, a gift tag or a window branch.
This pattern uses US crochet terms. The finished ornament is 5.1 in (13.0 cm) wide and 5.6 in (14.2 cm) tall from the top point to the bottom of the trunk. With the loop, the total height is 6.7 in (17.0 cm).
Here’s how it comes together. You make six hexagons, each worked in three rounds. You seam them with slip stitches on the wrong side, then add two border rounds around the whole tree. Last, you make the trunk, sew it on and work the hanging loop.
Finished Size and Construction
- Finished size: 5.1 in (13.0 cm) wide × 5.6 in (14.2 cm) tall, not counting the loop
- Height with loop: 6.7 in (17.0 cm)
- Skill level: Easy–Intermediate
- Terminology: US
- Yarn weight: Sport-weight cotton (#2 Fine)
- Hook: 2.75 mm (US C-2)
- Number of pieces: 6 hexagons + 1 trunk
- Layout: 3 rows of hexagons (1, 2, 3), pointed tops, joined in offset rows
- Hexagon size: 1.5 in (3.8 cm) flat side to flat side, 1.75 in (4.4 cm) point to point
- Size before border: 4.5 in (11.4 cm) wide × 4.4 in (11.2 cm) tall
- Border depth: 2 rounds, about 0.3 in (0.8 cm)
Materials
Use a smooth, mercerized sport-weight cotton. It gives crisp petals and clean edges, and it holds its shape after blocking. Avoid fuzzy yarn, because it hides the open center and the gaps between the petals.
- Color A – Butter Yellow: 10 g, about 28 m
- Color B – Cream: 15 g, about 42 m
These amounts include a safety margin of about 30%.
Tools:
– 2.75 mm (US C-2) crochet hook
– Tapestry needle
– Scissors
– Blocking mat and rust-proof pins
– Spray bottle with water
– Ruler or tape measure
Abbreviations (US Terms)
- ch – chain
- sl st – slip stitch
- sc – single crochet
- dc – double crochet
- sc2tog – single crochet 2 together
- sc3tog – single crochet 3 together
- BLO – back loop only
- sp – space
- st(s) – stitch(es)
- RS / WS – right side / wrong side
Special stitches
- 3-dc cluster (cl): Yarn over, insert hook in the stitch, pull up a loop, yarn over and pull through 2 loops. Repeat from * 2 more times in the same stitch (4 loops on hook). Yarn over and pull through all 4 loops.
- Beginning cluster (beg cl): Ch 2. Then work the cluster as above, but repeat only 2 times in total (3 loops on hook). Yarn over and pull through all 3 loops.
Gauge and Checkpoints
Gauge: 6 sc and 7 rows = 1 in (2.5 cm) in cream sc.
Make one complete hexagon before you make the rest. Check it at each stage:
- After Round 1: about 0.6 in (1.5 cm) across
- After Round 2: about 1.25 in (3.2 cm) across the petal tips
- After Round 3: 1.5 in (3.8 cm) flat side to flat side and 1.75 in (4.4 cm) point to point
If your hexagon is more than 1/8 in (0.3 cm) too big, go down a hook size or tighten your tension on the dc stitches. If it’s too small, go up half a hook size. Even a small error adds up across three hexagons, so check now.
Hexagon Motif (Make 6)
Round 1 (Color A)
Make a magic ring. Ch 3 (counts as dc). Work 11 dc into the ring. Pull the ring tight, but leave a small hole in the center. Sl st to the top of the beginning ch-3.
Stitch count: 12 dc
Round 2 (Color A) – Petals
Sl st into the first dc. Work a beg cl in the same st. Ch 3, skip the next st.
Work a cl in the next st, ch 3, skip the next st. Repeat from * 4 more times. Sl st to the top of the beg cl. Fasten off Color A.
Stitch count: 6 clusters and 6 ch-3 spaces
Each cluster is one petal. The ch-3 spaces leave open gaps between the petals.
Round 3 (Color B) – Hexagon Outline
Join Color B with a sc in the top of any cluster. Ch 2, sc in the same cluster (first corner made). Work 3 sc in the next ch-3 sp.
In the top of the next cluster, work (sc, ch 2, sc). Work 3 sc in the next ch-3 sp. Repeat from * 4 more times. Sl st to the first sc. Fasten off and leave an 8 in (20.3 cm) tail.
Stitch count: 30 sc and 6 ch-2 corner spaces
Per side: 5 sc, counted from the sc after one ch-2 corner to the sc before the next. That count already includes the corner sc at each end of the side. The ch-2 spaces are the hexagon’s points.
Each side measures about 0.87 in (2.2 cm) from point to point. That fits: 5 sc at 6 sc per inch is 0.83 in (2.1 cm), and the corner chains make up the rest.
Make All Pieces
- Hexagons: 6 in total. Work Rounds 1–2 in Color A and Round 3 in Color B.
- Trunk: 1 in Color B (instructions below).
Block all six hexagons lightly before you join them. Pin each one to 1.5 in (3.8 cm) flat side to flat side, mist with water and let it dry. When the hexagons match in size, the seams line up.
Layout (pointed tops, RS facing):
        [F]
      [D] [E]
    [A] [B] [C]
- Row 3 (bottom): A, B, C
- Row 2 (middle): D, E
- Row 1 (top): F
Joining
Method: Slip stitch seam on the WS, using Color B.
Hold two hexagons with their RS together and line up the edges to be joined. Work through both loops of both layers:
- Sl st in the matching ch-2 corner spaces.
- Sl st in each of the 5 matching sc pairs.
- Sl st in the next matching ch-2 corner spaces.
That’s 7 sl sts per seam. Each sc matches one sc on the other piece, so the seam doesn’t add or lose any width.
Seam order (9 seams in total):
- A’s right edge to B’s left edge. Then B’s right edge to C’s left edge.
- D’s right edge to E’s left edge.
- D’s lower-left edge to A’s upper-right edge, and D’s lower-right edge to B’s upper-left edge.
- E’s lower-left edge to B’s upper-right edge, and E’s lower-right edge to C’s upper-left edge.
- F’s lower-left edge to D’s upper-right edge, and F’s lower-right edge to E’s upper-left edge.
Tension: Keep your slip stitches as loose as the sc stitches. If you pull them tight, the seams pucker and the tree cups.
Size checkpoint: Lay the joined tree flat. It should measure 4.5 in (11.4 cm) across the bottom row and 4.4 in (11.2 cm) from the top point to the bottom points. Fix any problems now, before you start the border.
Border
Border gauge: Same as the main gauge, 6 sc = 1 in (2.5 cm).
The joined tree has 18 outer edges, and each edge has 5 sc. There are 18 corners around the outside:
- 12 outward corners: points where only one hexagon sits
- 6 inward corners: dips where two hexagons meet at a seam
As a check: 12 − 6 = 6, which matches the six 60° turns needed to go all the way around a closed shape.
Border Round 1 (Color B)
With RS facing, join Color B with a sc in the first sc after the top point of F.
Work 1 sc in each sc along every outer edge (5 sc per edge).
- At each outward corner: work 3 sc in the ch-2 sp.
- At each inward corner: work sc2tog. Pull up the first loop in the ch-2 sp on one side of the seam and the second loop in the ch-2 sp on the other side.
At the top point of F, work 3 sc in the ch-2 sp. Sl st to the first sc.
Count: (18 edges × 5 sc) + (12 outward corners × 3 sc) + (6 inward corners × 1 sc2tog) = 90 + 36 + 6 = 132 sts
Border Round 2 (Color B)
Ch 1. Work 1 sc in each st around, with these changes:
- At each outward corner: work 3 sc in the center sc of the 3-sc group.
- At each inward corner: work sc3tog over 3 sts: the st before the sc2tog, the sc2tog and the st after it.
Sl st to the first sc. Don’t fasten off yet.
Count: 132 sts worked one-to-one + 24 extra sts at the outward corners (12 × 2) − 12 sts absorbed at the inward corners (6 × 2) = 144 sts
Why the math works: The extra stitches at the outward corners let the border turn around the points without pulling. The decreases at the inward corners stop the dips from rippling. The straight edges stay at 1 sc per sc, so the border adds about 0.3 in (0.8 cm) on each side without changing the shape.
After the border, the tree measures 5.1 in (13.0 cm) wide × 5.0 in (12.7 cm) tall.
Hanging Loop
Sl st along the edge to the center sc of the top-point corner on F. Ch 16, then sl st in the same st.
Work 24 sc over the chain loop, then sl st to the base. Fasten off. The finished loop stands about 1.1 in (2.8 cm) tall.
Trunk (Color B)
Ch 6.
- Row 1: Sc in the 2nd ch from the hook and in each ch across. (5 sc)
- Rows 2–6: Ch 1, turn. Sc in the BLO of each st across. (5 sc)
Fasten off and leave a 10 in (25.4 cm) tail.
The trunk is 0.9 in (2.3 cm) wide × 0.8 in (2.0 cm) tall. Turn it so the ridges run up and down.
Center the trunk under the bottom point of hexagon B. Tuck the top 0.2 in (0.5 cm) behind the border, so that 0.6 in (1.5 cm) shows. Whipstitch it in place on the WS.
Final Blocking
- Weave in all ends on the WS, following the seams.
- Mist the ornament until it is evenly damp.
- Pin it RS up to 5.1 in (13.0 cm) wide × 5.0 in (12.7 cm) tall, not counting the trunk.
- Put a pin in each of the 12 outward points and each of the 6 inward dips.
- Open each petal gently with your fingertip and push the center hole round.
- Pin the trunk straight and square.
- Let it dry completely before you unpin it.
- For a crisp ornament, mist it lightly with fabric stiffener and dry it pinned again.
Final Quality-Control Checklist
- Each hexagon has 30 sc and 6 ch-2 corners.
- Each hexagon is 1.5 in (3.8 cm) flat side to flat side.
- There are 9 seams, each with 7 sl sts, and all are on the WS.
- Border Round 1 has 132 sts and Round 2 has 144 sts.
- The tree is 5.1 in (13.0 cm) wide and 5.6 in (14.2 cm) tall with the trunk.
- The trunk is centered and its ridges run up and down.
- The loop is firm and sits exactly at the top point.
- No ends show on the RS.
Troubleshooting
- Petals twist or curl: Your dc tension is tight. Loosen up, or block the hexagons before joining.
- Hexagon looks round, not angular: Make sure each corner (sc, ch 2, sc) is worked in the top of a cluster, not in a ch-3 space.
- Seams don’t line up: Recount the 5 sc on each side, then re-block the hexagons to the same size.
- Border ripples at the dips: You skipped the sc2tog or sc3tog. Work the decreases as written.
- Points look blunt: Work 3 sc into the center st of each corner group on Round 2.
- Ornament cups: Your seams are tight. Redo them more loosely, or block firmly.
Care
Hand wash in cool water with mild soap. Press out the water in a towel and dry flat, pinned to shape. If you used stiffener, re-stiffen after washing.
Final Notes
The measurements build on each other:
- Gauge is 6 sc per 1 in (2.5 cm).
- That gives 5 sc per hexagon side and a 1.5 in (3.8 cm) hexagon.
- Three hexagons across make 4.5 in (11.4 cm).
- The two border rounds bring it to 5.1 in (13.0 cm).
- With the trunk, the tree is 5.6 in (14.2 cm) tall.
If each hexagon matches its checkpoint, the rest of the measurements will come out right.
Happy crocheting!