

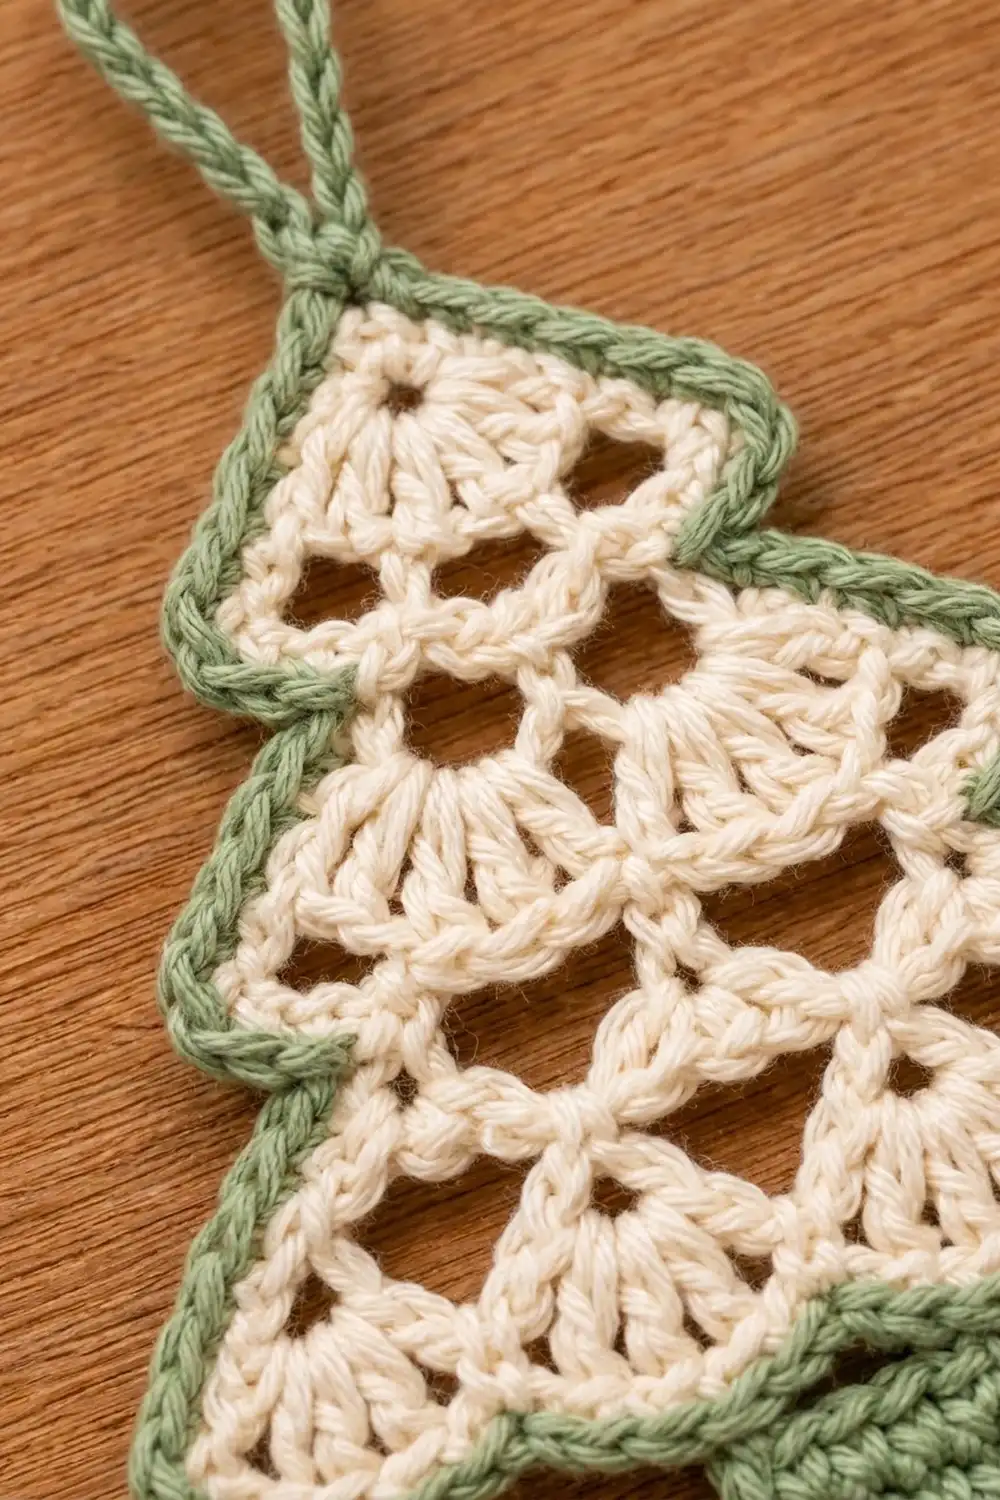
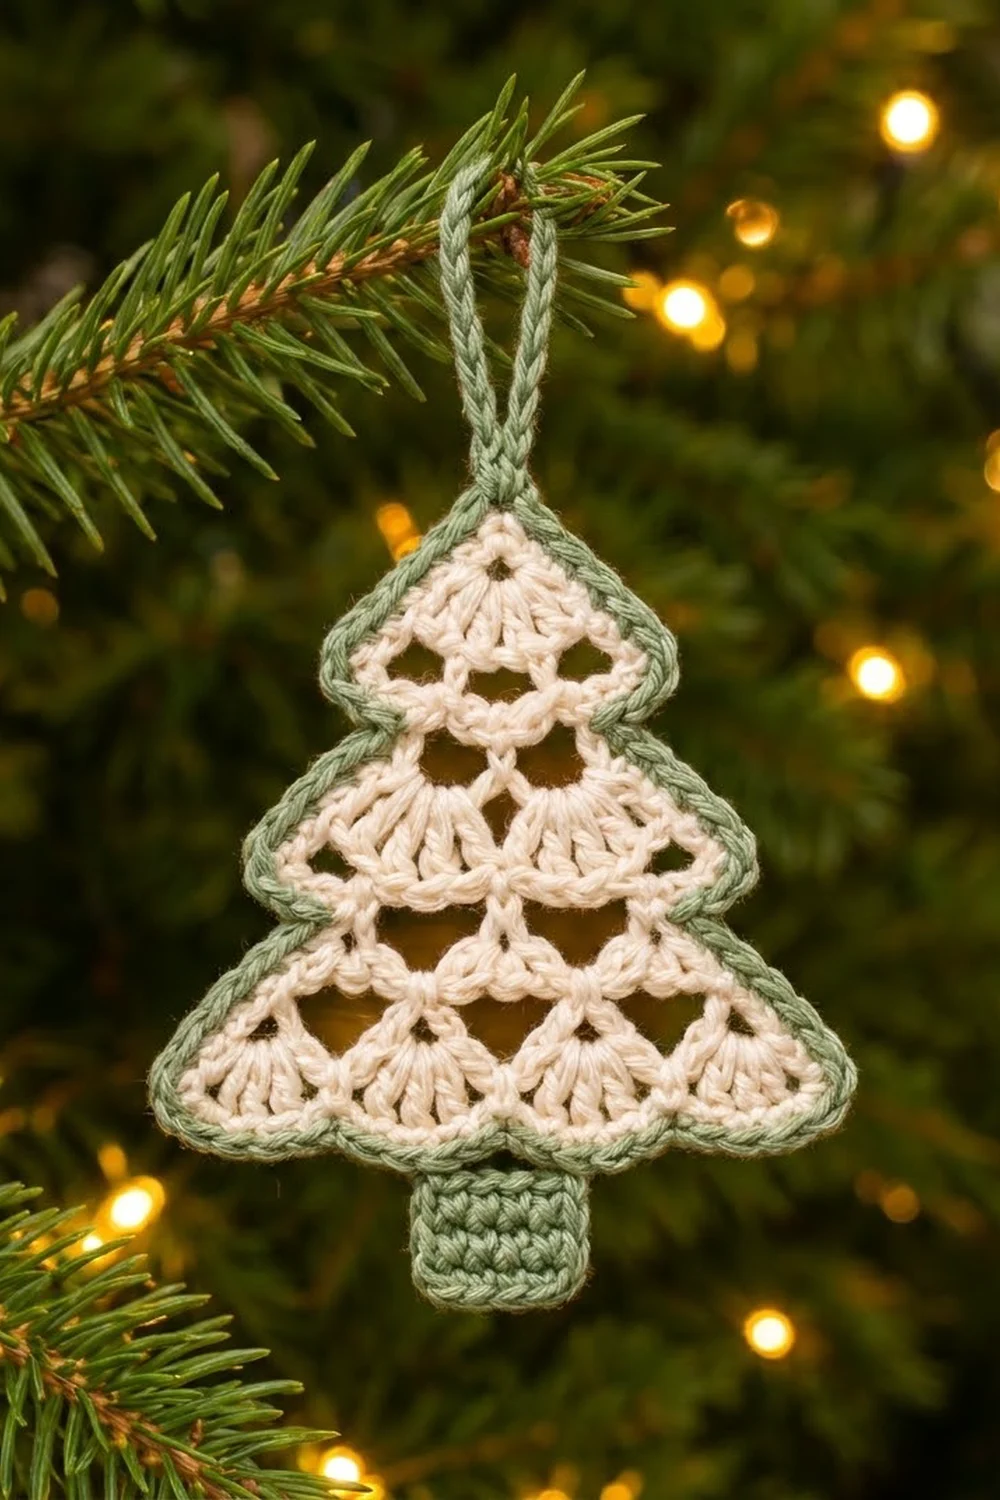
The Frosted Pine ornament is a small, lacy Christmas tree. Its body is made of soft cream shell fans that open up row by row into a stepped tree shape. One crisp round of sage green outlines it, and a solid green trunk and a twisted hanging loop finish it off.
The two colors give it a calm Scandinavian look. Cream gives a snowy, frosted feel, and sage green adds a natural touch of pine without being too bright. It looks lovely on a real tree, tied onto a gift, or hung in a row along a window.
This pattern uses US crochet terms. The finished ornament is 4.5 in (11.4 cm) wide and 4.75 in (12.1 cm) tall without the loop. With the loop it is 6.25 in (15.9 cm) tall.
The body is worked flat in rows from the top point down. Fan rows and mesh rows take turns, and each fan row has one more fan than the last. Next, one round of green single crochet goes around the whole edge. Then you work the trunk into the bottom of that border and add the loop at the top.
Finished Size and Construction
- Finished size: 4.5 in (11.4 cm) wide x 4.75 in (12.1 cm) tall, plus a 1.5 in (3.8 cm) loop
- Skill level: Easy
- Terminology: US crochet terms
- Yarn weight: DK / light worsted (#3), cotton or cotton blend
- Hook: 3.5 mm (US E-4)
- Number of pieces: 1 (single ornament, no joining)
- Layout: Tree body with trunk centered below and loop centered above
- Body size before border: 4 in (10.2 cm) wide x 3.5 in (8.9 cm) tall
- Border depth: 0.25 in (0.6 cm) on every edge
- Trunk: 1 in (2.5 cm) wide x 0.75 in (1.9 cm) tall
Materials
Use a smooth mercerized or combed cotton in DK weight. Cotton shows the fan stitches clearly, keeps its shape after blocking, and doesn’t shed onto branches. A cotton-acrylic blend also works, but the holes will look a little softer.
- Cream (Color A): 8 g / about 19 yd (18 m), for the tree body
- Sage green (Color B): 4 g / about 10 yd (9 m), for the border, trunk, and loop
These amounts include a safety margin of about 20 percent for your gauge swatch and weaving in ends. If you plan to make a set of ornaments, multiply by the number you want. One 50 g ball of each color makes about 6 cream bodies and 12 green finishes.
Tools:
– 3.5 mm (US E-4) crochet hook
– Tapestry needle
– Scissors
– 1 locking stitch marker
– Rust-proof pins and a foam blocking mat
– Spray bottle with clean water
Abbreviations (US Terms)
- ch – chain
- sl st – slip stitch
- sc – single crochet
- dc – double crochet
- sk – skip
- sp(s) – space(s)
- st(s) – stitch(es)
- tch – turning chain
- rep – repeat
- RS – right side
Special stitch – Fan: Work 7 dc in the same stitch or space. On fan rows, the first fan of the row starts with the ch-3, which counts as the first dc, so you only work 6 more dc into the base stitch.
Gauge and Checkpoints
Gauge matters here, because the ornament’s shape comes entirely from the fans. Make one tree body first and measure it at each checkpoint before you add the green.
- Single crochet gauge (trunk): 5 sc = 1 in (2.5 cm); 4 rows of sc = 0.75 in (1.9 cm)
- After Row 3 (2 fans): 2 in (5.1 cm) wide x 1.5 in (3.8 cm) tall
- After Row 5 (3 fans): 3 in (7.6 cm) wide x 2.5 in (6.4 cm) tall
- After Row 7 (4 fans): 4 in (10.2 cm) wide x 3.5 in (8.9 cm) tall
- After border: 4.5 in (11.4 cm) wide x 4 in (10.2 cm) tall
- After trunk: 4.5 in (11.4 cm) wide x 4.75 in (12.1 cm) tall
Each row is about 0.5 in (1.3 cm) tall, and each fan with its single crochet adds about 1 in (2.5 cm) of width.
Too big? Go down to a 3.25 mm hook, or pull the yarn snug as you finish each dc.
Too small? Go up to a 3.75 mm hook. Tight fans also make the holes close up, so a larger hook helps the lace open.
Tree Body
Use Color A. Leave a 6 in (15.2 cm) tail at the start.
Row 1: Make a magic ring, ch 3 (counts as dc), 6 dc in ring. Pull the ring tightly closed. Turn. (7 dc = 1 fan)
Row 2 (mesh): Ch 5 (counts as dc + ch-2 throughout), sk next 2 dc, sc in next dc (center dc of fan), ch 2, sk next 2 dc, dc in top of tch. Turn. (2 dc, 1 sc, 2 ch-2 sps)
Row 3 (fan): Ch 3 (counts as dc), 6 dc in same st as ch-3 (first fan made), sc in next sc, 7 dc in 3rd ch of tch. Turn. (2 fans + 1 sc = 15 sts)
Row 4 (mesh): Ch 5, sk next 2 dc, sc in next dc, ch 2, sk next 3 dc, dc in next sc, ch 2, sk next 3 dc, sc in next dc; rep from * once more, ch 2, sk next 2 dc, dc in top of tch. Turn. (3 dc, 2 sc, 4 ch-2 sps)*
Check your count for Row 4. You work one sc into the center of each fan and one dc on top of each sc between fans, and the two edge dc sit on the outer stitches. So 2 fans give 2 sc, and 1 sc + 2 edges gives 3 dc.
Row 5 (fan): Ch 3, 6 dc in same st as ch-3, sc in next sc, 7 dc in next dc; rep from * across, working the last fan into the 3rd ch of tch. Turn. (3 fans + 2 sc = 23 sts)*
Checkpoint: 3 in (7.6 cm) wide x 2.5 in (6.4 cm) tall.
Row 6 (mesh): Ch 5, sk next 2 dc, sc in next dc, ch 2, sk next 3 dc, dc in next sc, ch 2, sk next 3 dc, sc in next dc; rep from * 2 more times, ch 2, sk next 2 dc, dc in top of tch. Turn. (4 dc, 3 sc, 6 ch-2 sps)*
Row 7 (fan): Ch 3, 6 dc in same st as ch-3, sc in next sc, 7 dc in next dc; rep from * across, working the last fan into the 3rd ch of tch. (4 fans + 3 sc = 31 sts)* Fasten off and leave a short tail.
Each fan row’s total equals (7 x fans) + (fans − 1), which gives 7, 15, 23, and 31 stitches. The ch-2 spaces under each fan make the triangular holes. Each mesh row edge is a single dc or ch-5 post, so the outline steps in there and flares out again at the next row of edge fans. That is what gives the tree its tiers.
Checkpoint: 4 in (10.2 cm) wide x 3.5 in (8.9 cm) tall. Before you start the border, weave in the starting tail and pull the magic ring tight one more time.
Border
Use Color B. The border is one round of sc, worked with the RS facing (Row 7 facing you). Its gauge follows the edges themselves rather than a ruler. Row-end stitches are matched to row height, and the bottom matches Row 7 one stitch for one stitch.
Rnd 1: Join B at the top point. Ch 1, then work 3 sc into the closed magic ring point by inserting the hook through the ring center under the ring strands. This is the top corner. Place a marker in the center sc of these 3.
Left side: Work down the row-ends: 3 sc along Row 1, 2 sc around Row 2’s edge post, 3 sc along Row 3, 2 sc along Row 4, 3 sc along Row 5, 2 sc along Row 6, 3 sc along Row 7. (18 sc)
Bottom: 3 sc in the first st of Row 7 (corner), 1 sc in each of the next 29 sts, 3 sc in the last st (corner). (29 sc between corners)
Right side: Work up the row-ends in reverse: 3, 2, 3, 2, 3, 2, 3 sc. (18 sc)
Sl st to the first sc to join. Fasten off.
Round total: 3 (top corner) + 18 (left) + 3 (corner) + 29 (bottom) + 3 (corner) + 18 (right) = 74 sc.
Why the math works: Row 7 has 31 stitches. The two bottom corners use its first and last stitch, which leaves 29 stitches in between. Since the bottom gets exactly one sc per stitch, it follows the scallops without ruffling or pulling. On the sides, the 3/2 rhythm puts more stitches on the tall, flared fan rows and fewer on the narrow mesh rows. Working the 2-sc row-ends snugly keeps the steps clear.
Checkpoint: 4.5 in (11.4 cm) wide x 4 in (10.2 cm) tall.
Trunk
Use Color B. With the RS facing and the bottom edge on top, count the 29 bottom sc between the corner groups. The center is sc 15. The trunk is worked over sc 13 through 17, so it sits exactly under Row 7’s middle sc.
Row 1: Join B in sc 13, ch 1, sc in same st and in each of the next 4 sts. Turn. (5 sc)
Rows 2–4: Ch 1, sc in each st across. Turn. (5 sc)
Fasten off. The trunk is 1 in (2.5 cm) wide x 0.75 in (1.9 cm) tall.
Hanging Loop
Join B in the marked center sc of the top corner. Ch 20, then sl st in the same st to form a loop. To make it firmer, sl st in each of the 20 ch around the loop, then sl st in the base st. Fasten off. The finished loop stands about 1.5 in (3.8 cm) tall.
Final Blocking
- Weave in all ends along same-color stitches: cream ends into cream fans and green ends into the border.
- Lightly mist the ornament with water until it is damp but not dripping.
- Lay it RS up on the blocking mat.
- Pin the top point and the two bottom corners first, so the body is 4.5 in (11.4 cm) wide and 4 in (10.2 cm) from the top point to the bottom border.
- Pin the outer point of each side tier, so that each tier flares out evenly on both sides.
- Gently push open each ch-2 hole with a fingertip.
- Pin the trunk square, with its bottom 0.75 in (1.9 cm) below the border.
- Let it dry completely, then take out the pins.
Final Quality-Control Checklist
- Row stitch counts were 7, 15, 23, and 31 on the fan rows
- The tree body measured 4 in (10.2 cm) x 3.5 in (8.9 cm) before the border
- The border has 74 sc and lies flat without waving
- The tiers look the same on the left and right sides
- The trunk is centered under the middle fan gap and is 5 sts wide
- The loop is centered on the top point and is firm
- All ends are hidden and trimmed
- The finished size is 4.5 in (11.4 cm) x 4.75 in (12.1 cm), plus the loop
Troubleshooting
Fans look cupped or curled. The fans are too tight. Go up a hook size or make your dc slightly looser.
Bottom border ruffles. You worked extra stitches across Row 7. Recount: there should be 29 sc between the corner groups.
Sides pull in or pucker. Work the 3-sc row-ends more loosely, or check that you didn’t skip a row-end.
Tiers aren’t visible. Pull the 2-sc mesh row-ends a little tighter, then block the tier tips outward.
Trunk sits off-center. Count the bottom sc again, starting after the left corner group. The trunk should begin in sc 13.
Magic ring loosens. Weave the tail back through the ring in a circle, then pull it tight before you weave it in.
Care
Hand wash in cool water with a mild soap, press out the water in a towel, and dry flat. Reshape and pin if needed. Store flat in tissue so the loop and fans keep their shape.
Final Notes
The measurement chain is simple. Fans that are 1 in (2.5 cm) wide give a body of 4 in (10.2 cm) x 3.5 in (8.9 cm). The 0.25 in (0.6 cm) border brings it to 4.5 in (11.4 cm) x 4 in (10.2 cm). The 0.75 in (1.9 cm) trunk makes the ornament 4.75 in (12.1 cm) tall, and the 1.5 in (3.8 cm) loop brings the total height to 6.25 in (15.9 cm). Check your stitch counts on every fan row, and the rest of the ornament falls into place.
Happy crocheting!