

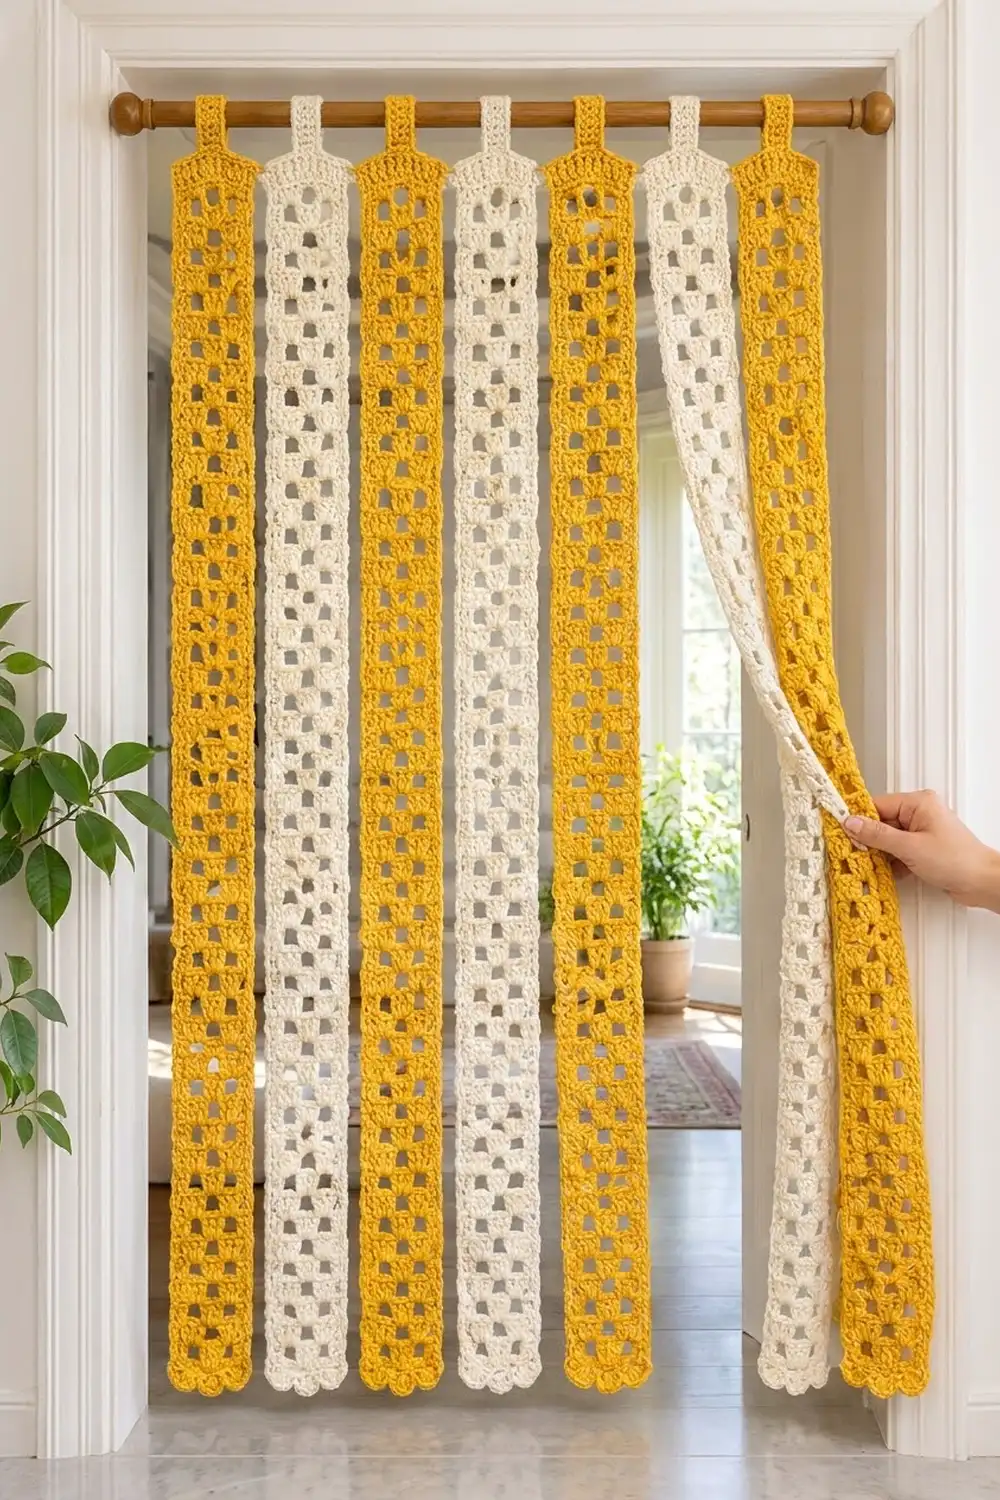
The Sunbeam Ladder Door Curtain is made of seven long openwork strips that hang side by side from a rod. Four strips are mustard yellow and three are cream, and they alternate across the doorway. Light comes through the square windows, and the strips move apart easily when you walk through.
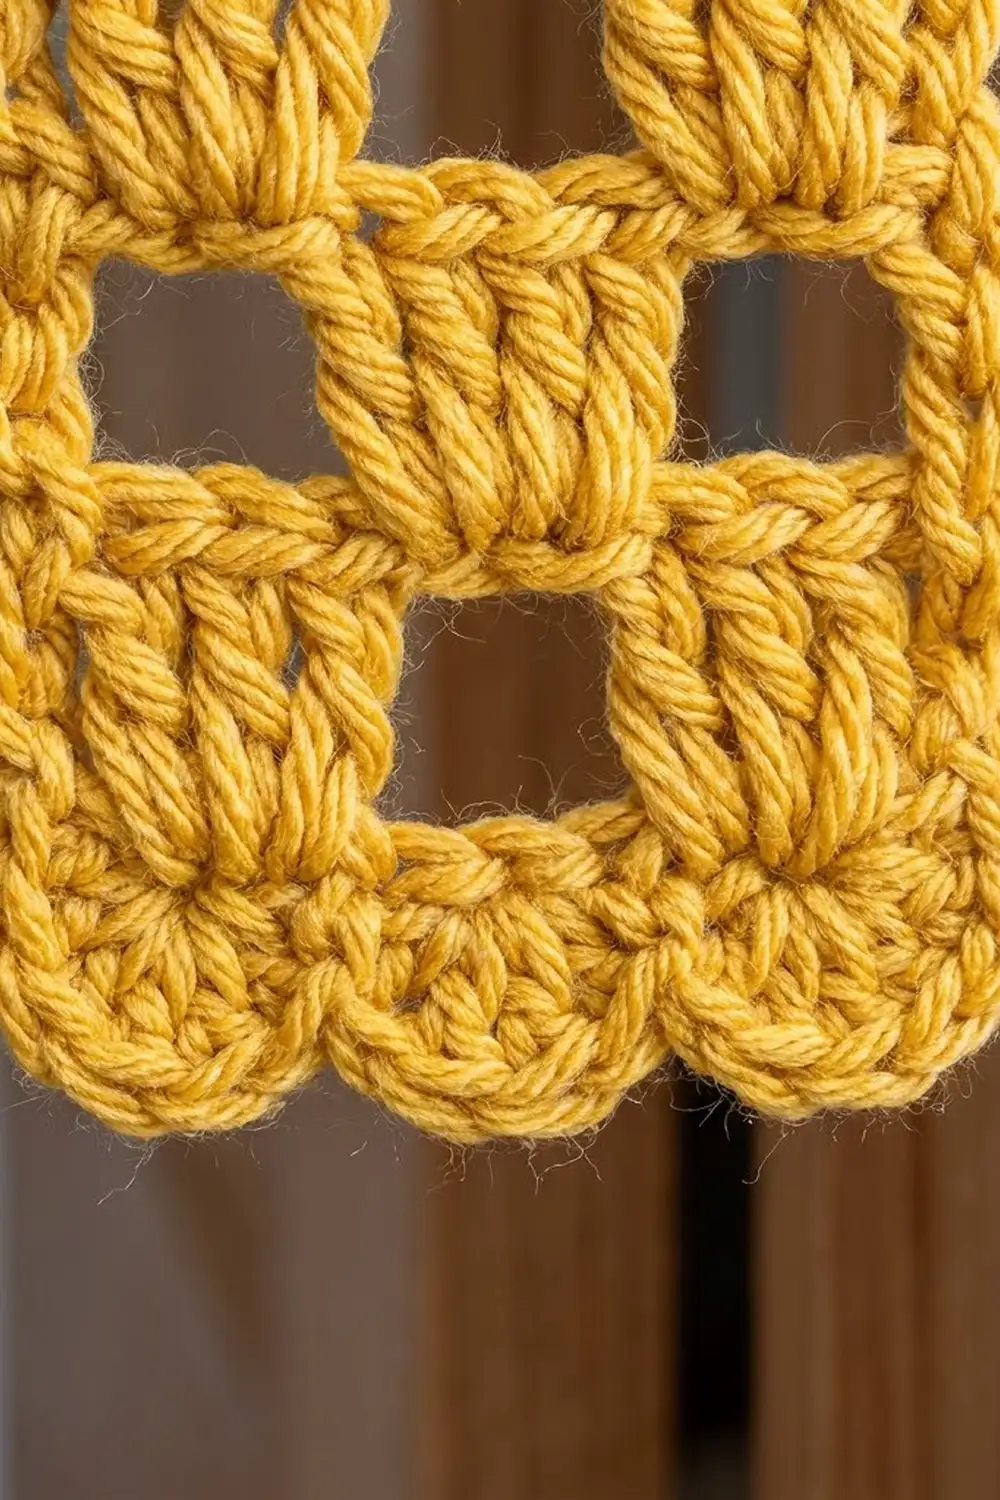
Each strip is a simple block-and-window mesh. Every row has a solid double crochet edge stitch on each side. In between, a 3-dc block sits in the window below it, which gives a checkerboard ladder that is easy to read as you go. The style is bright, relaxed and a little retro.
This pattern uses US crochet terms. The finished curtain is 34 in (86.4 cm) wide with 1 in (2.5 cm) gaps between strips. It hangs about 76 in (193.0 cm) from the top of the rod to the tips of the bottom shells.
Construction is straightforward. You work each strip flat in rows from a foundation chain, add one round of single crochet around it, and finish the bottom with three shells. Then you crochet a tab at the top, fold it over the rod, and sew it down. The strips are not joined to each other.
Finished Size and Construction
- Finished curtain: 34 in (86.4 cm) wide x about 76 in (193.0 cm) hanging length
- Skill level: Easy
- Terminology: US crochet terms
- Yarn weight: Worsted (#4)
- Hook: 5.5 mm (US I-9)
- Number of pieces: 7 strips (4 mustard, 3 cream)
- Layout: 1 row of 7 strips hung side by side, with 1 in (2.5 cm) gaps
- Strip size before border: 3.5 in x 72.75 in (8.9 cm x 184.8 cm)
- Border depth: 0.25 in (0.6 cm) on each edge
- Strip size after border: 4 in x 73.25 in (10.2 cm x 186.1 cm)
- Strip length including bottom shells: 74 in (188.0 cm)
- Tab: about 2 in (5.1 cm) wide, showing about 2 in (5.1 cm) above the strip when hung
Materials
Use a smooth worsted yarn that keeps its shape. A cotton-acrylic blend works well because it holds the square windows open and won’t stretch too much when hung. Pure cotton is heavy and grows more in length. Fuzzy yarn hides the mesh.
- Mustard yellow: 370 g, about 660 m (enough for 4 strips)
- Cream: 280 g, about 500 m (enough for 3 strips)
Each strip uses about 146 m. The quantities above include a margin of roughly 10% for your gauge swatch and small differences in tension.
Tools:
– 5.5 mm (US I-9) crochet hook
– Tapestry needle
– Scissors
– Stitch markers
– Measuring tape
– Curtain rod at least 36 in (91.4 cm) long, up to 1.25 in (3.2 cm) in diameter
– Spray bottle and rust-proof pins for blocking
Abbreviations (US Terms)
- ch – chain
- sl st – slip stitch
- sc – single crochet
- dc – double crochet
- sk – skip
- sp – space
- st(s) – stitch(es)
- tch – turning chain
- rep – repeat
- RS / WS – right side / wrong side
Special stitch – Shell: Work 5 dc into the same stitch.
Turning chain: In the strip body, the ch 3 at the start of a row counts as 1 dc.
Gauge and Checkpoints
Gauge: 11 sts and 8 rows of the body pattern = 3.5 in (8.9 cm) wide x 6 in (15.2 cm) tall. Each row is 0.75 in (1.9 cm) tall.
Border gauge: 10 sc = 3 in (7.6 cm).
Test one strip before making the others. Work Rows 1–8 of your first strip, lay it flat without stretching, and measure it.
- After Row 8: 3.5 in (8.9 cm) wide x 6 in (15.2 cm) tall
- After Row 49: 36.75 in (93.3 cm) long
- After Row 97: 72.75 in (184.8 cm) long
- After border: 4 in x 73.25 in (10.2 cm x 186.1 cm)
- After bottom shells: 74 in (188.0 cm) long
If your piece is too big: go down to a 5.0 mm hook. If it’s too small: go up to a 6.0 mm hook. Width matters most. Height can be adjusted by adding or removing rows, as long as you remove them in pairs (see the main pattern).
Strip Pattern (Make 7)
Foundation: Ch 13.
Row 1 (RS): Dc in 4th ch from hook and in next 2 ch, ch 3, sk next 3 ch, dc in next 3 ch, dc in last ch, turn. (8 dc and 1 ch-3 sp; the skipped ch 3 count as the first dc. 11 sts in total.)
This is a two-block row: an edge stitch, a block, a center window, a block, and an edge stitch.
Row 2 (WS): Ch 3 (counts as dc), ch 3, sk next 3 dc, 3 dc in ch-3 sp, ch 3, sk next 3 dc, dc in top of tch, turn. (5 dc and 2 ch-3 sps = 11 sts.)
This is a one-block row: an edge stitch, a window, a center block, a window, and an edge stitch.
Row 3: Ch 3 (counts as dc), 3 dc in next ch-3 sp, ch 3, sk next 3 dc, 3 dc in next ch-3 sp, dc in 3rd ch of tch, turn. (8 dc and 1 ch-3 sp = 11 sts.)
Rows 4–97: Rep Rows 2–3 another 47 times. Do not fasten off.
You now have 97 rows. Every odd row is a two-block row and every even row is a one-block row, so the strip starts and ends with matching two-block rows. Each block is worked into the window below it, which makes the blocks fan out a little and keeps the checkerboard lined up.
Checkpoint: 3.5 in x 72.75 in (8.9 cm x 184.8 cm).
To change the length: add or remove rows in pairs (Rows 2–3) so the last row is still a two-block row. Each pair changes the length by 1.5 in (3.8 cm).
Make All Pieces
- Mustard yellow: 4 strips
- Cream: 3 strips
All seven strips have the same stitches and the same 97 rows. Lay them out in this order, left to right:
[M] [C] [M] [C] [M] [C] [M]
M = mustard, C = cream. The outer strips on both sides are mustard.
Joining: Hanging Tabs
The strips aren’t sewn to each other. Each one hangs from the rod by its own tab, so you can push them apart as you walk through. You’ll make the tab after the border (see below).
Method: With RS facing, sk the first 2 sc of the border’s top edge. Join yarn in the 3rd sc.
Tab Row 1: Ch 1, sc in same st and in next 6 sc, turn. (7 sc.) There are 2 sc left free on each side, so the tab is centered.
Tab Rows 2–20: Ch 1, sc in each st across, turn. (7 sc.)
The tab measures about 2 in (5.1 cm) wide x 6 in (15.2 cm) long. Fasten off, leaving a 12 in (30.5 cm) tail.
Stitch-to-stitch logic: Fold the tab toward the WS. Line up each of the 7 sc of Tab Row 20 with one of the 7 tab base stitches on the back of the strip. Whipstitch them together one to one, catching only the back loops of the border so nothing shows on the RS.
Tension: Sew firmly but without pulling, so the strip doesn’t pucker at the top. Before you sew, check that the loop fits your rod with a little room to slide.
Size checkpoint: Once sewn, the folded tab sits about 2 in (5.1 cm) above the top border. Slide all 7 tabs onto the rod and space them 1 in (2.5 cm) apart. The curtain should measure 34 in (86.4 cm) across: 7 strips x 4 in (10.2 cm) = 28 in (71.1 cm), plus 6 gaps x 1 in (2.5 cm) = 6 in (15.2 cm).
Border
The border is worked on each strip separately, right after Row 97.
Border gauge: 10 sc = 3 in (7.6 cm).
Rnd 1 (RS): Ch 1. Now work along the top edge (Row 97): sc in first dc and in next 3 dc, 3 sc in ch-3 sp, sc in next 3 dc and in top of tch. That’s 11 sc on the top edge. Ch 2 for the corner.
Long side: Work down the row ends, from Row 97 to Row 1. Work 2 sc around each odd-numbered row end and 3 sc around each even-numbered row end. That’s 242 sc. Ch 2 for the corner.
Bottom edge: Work in the free loops of the foundation chain. Sc in the base of each of the 8 dc, and 3 sc in the ch-3 gap. That’s 11 sc. Ch 2 for the corner.
Second long side: Work up the row ends the same way, with 242 sc. Ch 2, and join with a sl st to the first sc.
Count: 11 + 242 + 11 + 242 = 506 sc, plus 4 ch-2 corner sps. The corner chains are not counted in the side totals.
Why the math works: There are 49 odd rows x 2 sc = 98 sc and 48 even rows x 3 sc = 144 sc, which gives 242 sc per long side. At 10 sc = 3 in (7.6 cm), 242 sc covers about 72.6 in (184.4 cm). That matches the 72.75 in (184.8 cm) body, so the edge lies flat without ruffling or pulling in. On the short ends, 11 sc covers the 11-st row exactly, one for one.
Rnd 2 (bottom shells only): Sl st across to the bottom-right corner ch-2 sp (the one before the bottom edge). *Sk next sc, Shell in next sc, sk next sc, sl st in next sc; rep from * once more. Sk next sc, Shell in next sc, sk next sc, sl st in corner ch-2 sp. Fasten off.
Count: 3 shells across the 11 bottom sc (4 + 4 + 3 sc). The shells add about 0.75 in (1.9 cm), so the strip now measures 74 in (188.0 cm).
Now go back to Joining: Hanging Tabs and make the tab on the top edge.
Final Blocking
- Weave in all ends along the solid edge columns, not across the windows.
- Lay each strip flat on a clean towel or blocking mats, RS up.
- Pin it to 4 in (10.2 cm) wide. Line up the long edges with a straight edge or tape.
- Open each window into a square and pin out the 3 bottom shells.
- Mist evenly until damp, but not soaked.
- Leave to dry completely before removing the pins.
- Hang all strips on the rod and leave them for 24 hours. Long mesh strips can grow 1–2 in (2.5–5.1 cm) under their own weight. If one strip ends up longer than the others, re-mist it and pat it shorter while it lies flat.
Final Quality-Control Checklist
- Every strip has 97 rows and starts and ends with a two-block row.
- Every row has 11 sts.
- Each long border side has 242 sc and each short end has 11 sc.
- Each strip has exactly 3 shells along the bottom.
- Tabs are centered, 7 sc wide, and sewn one to one.
- All strips measure 4 in (10.2 cm) wide and within 0.5 in (1.3 cm) of each other in length.
- Colors alternate M-C-M-C-M-C-M.
- No ends are visible on the RS.
Troubleshooting
Strip is narrower at the top than the bottom: Your tension tightened as you went. Relax your grip, or switch to a larger hook halfway up.
Blocks lean to one side: You placed the 3 dc in a stitch instead of in the ch-3 space. Every block goes into a window.
Wrong stitch count: On even rows, check that you skipped all 3 dc of each block. Count to 11 at the end of every row for the first few rows.
Border waves: Go down to a 5.0 mm hook for the border, or use 2 sc in every row end for 10 rows spread along each side.
Border pulls in: Make sure the even rows really have 3 sc each.
Tab won’t slide: Add 2 more tab rows and sew it again.
Strips have different lengths: Block them again on one surface, side by side, and match them to the shortest strip.
Care
Hand wash in cool water, or machine wash on a gentle cycle in a mesh bag. Lay flat to dry and reshape. Don’t tumble dry, because the long strips can stretch and twist.
Final Notes
The measurement chain is simple. Each strip is 11 sts and 3.5 in (8.9 cm) wide. 97 rows at 0.75 in (1.9 cm) each make 72.75 in (184.8 cm). The border brings each strip to 4 in x 73.25 in (10.2 cm x 186.1 cm), and the shells bring the length to 74 in (188.0 cm). Seven strips with six 1 in (2.5 cm) gaps make a 34 in (86.4 cm) curtain about 76 in (193.0 cm) tall. Check the first strip carefully and the other six will follow.
Happy crocheting!