

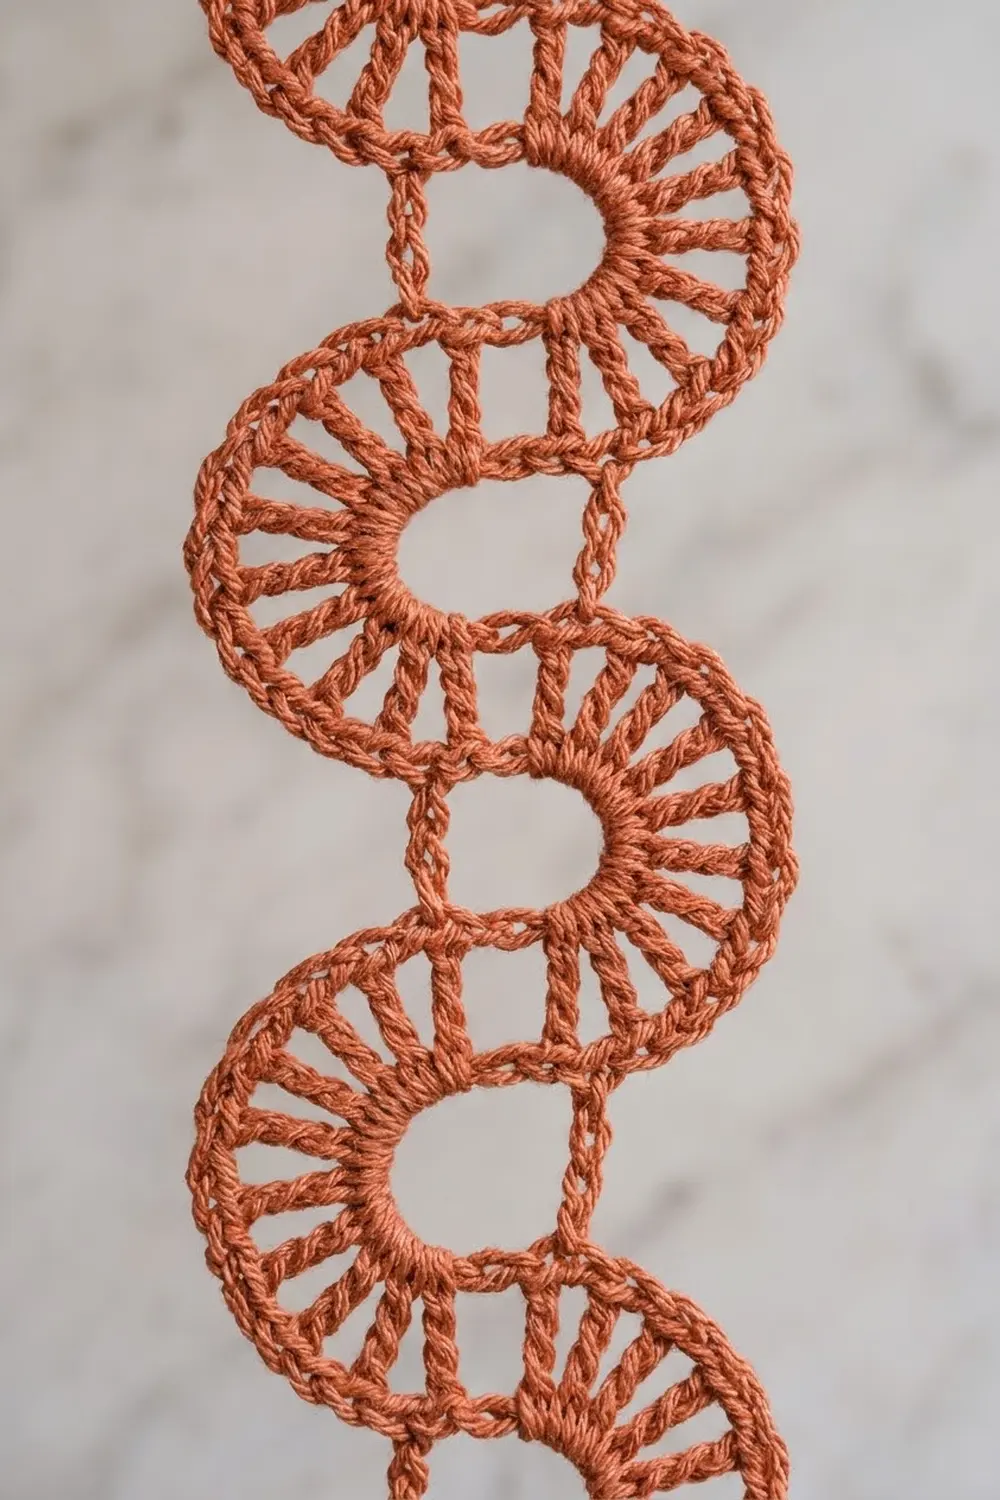
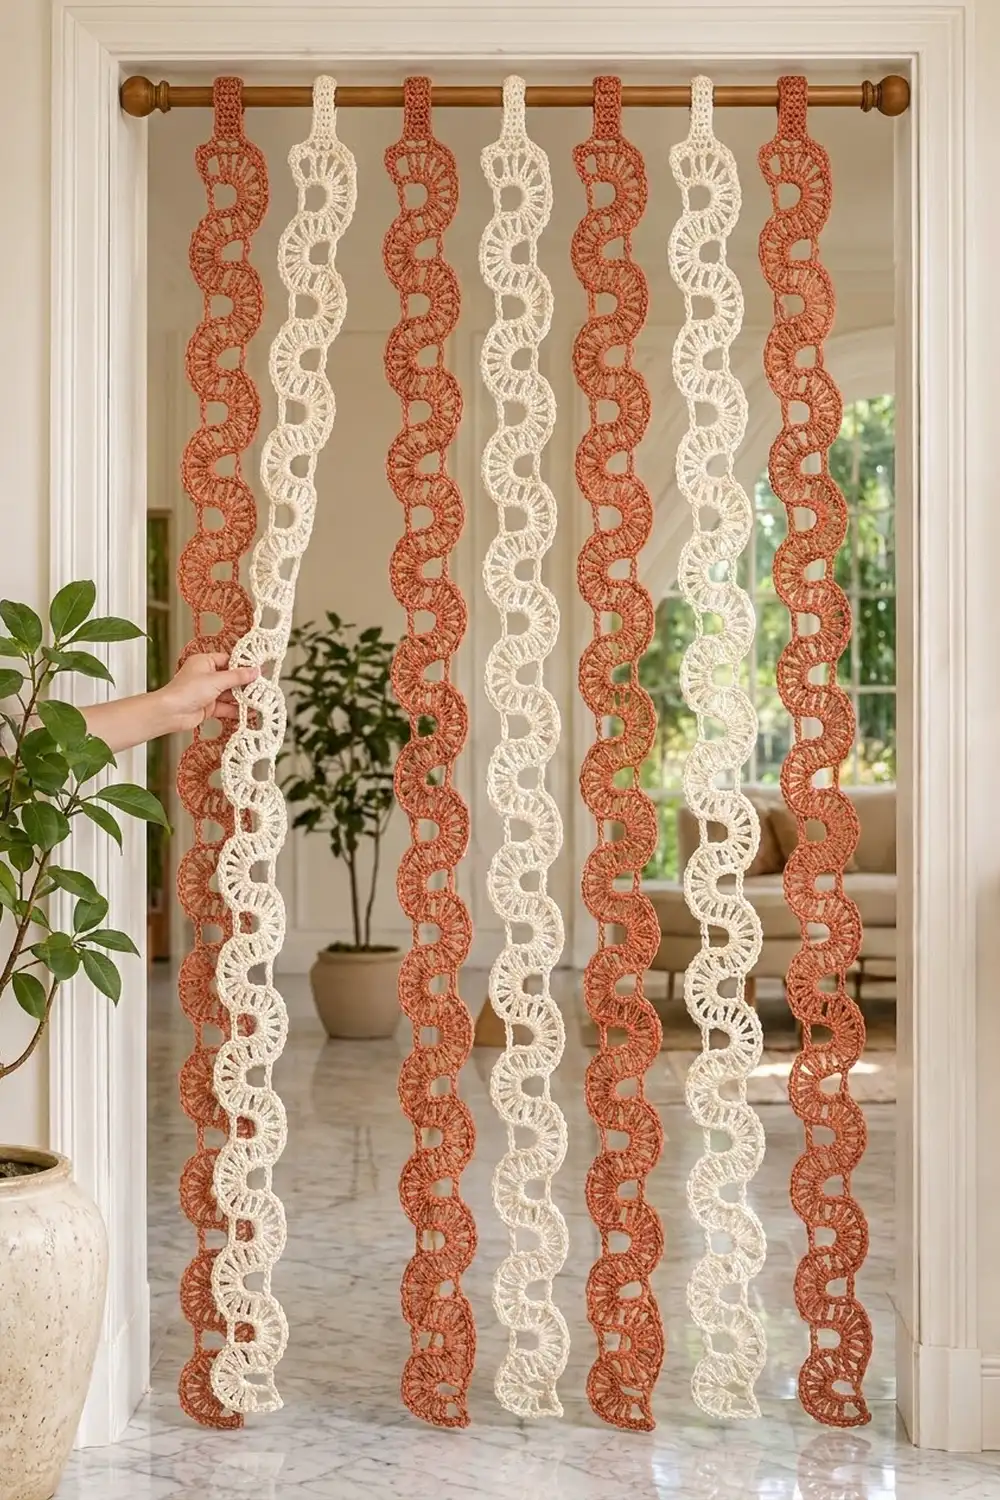
The Sandstone Ripple Door Curtain is seven narrow crocheted strips that hang side by side from a curtain rod. Each strip is a wavy chain of half-circle fans. Treble-crochet spokes spread out from small open rings, and the fans swing left and right down the strip like a ribbon of shells.
The curtain shown alternates warm terracotta and soft cream. There are four terracotta strips and three cream strips, and the row starts and ends with terracotta. The look is relaxed and boho. The open spokes let light and air through while still marking the doorway.
This pattern uses US crochet terms. Each strip is 3.5 in (8.9 cm) wide and 79 in (200.7 cm) long including the hanging tab. With 1.5 in (3.8 cm) gaps between strips, the curtain covers 33.5 in (85.1 cm) of rod.
Construction is simple and repetitive. You work each strip from the bottom up as one continuous chain of 28 identical units. Each unit is a ring, padding stitches, a spoke row, an edge row and a connector. A short tab of double crochet rows at the top folds over the rod. The strips are never sewn together.
Finished Size and Construction
- Finished size (curtain): 33.5 in (85.1 cm) wide x 79 in (200.7 cm) long
- Skill level: Easy-Intermediate
- Terminology: US crochet terms
- Yarn weight: Worsted (#4), cotton or cotton blend
- Hook: 5 mm (US H-8)
- Number of pieces: 7 strips (4 terracotta, 3 cream)
- Layout: 7 strips in a single row on the rod, colors alternating
- Piece size: 3.5 in (8.9 cm) wide x 79 in (200.7 cm) long
- Size before border: strip body 3.5 in (8.9 cm) x 77 in (195.6 cm)
- Border depth: the folded top tab adds 2 in (5.1 cm)
Materials
Choose a smooth cotton in worsted weight, either mercerized or matte, at about 170 m per 100 g. Cotton keeps the spokes crisp and hangs straight without stretching much. Avoid fuzzy or very stretchy acrylics, which blur the open spokes and get longer as they hang.
- Terracotta: 250 g (425 m), for 4 strips
- Cream: 200 g (340 m), for 3 strips
Each strip uses about 51 g (86 m). The amounts above include a margin of about 15% for swatching and differences in tension.
Tools:
- 5 mm (US H-8) crochet hook
- Tapestry needle
- Scissors
- Stitch markers
- Measuring tape
- Rust-proof pins and a blocking surface
- Spray bottle
- Curtain rod up to 1.25 in (3.2 cm) in diameter
Abbreviations (US Terms)
- ch – chain
- sl st – slip stitch
- sc – single crochet
- dc – double crochet
- tr – treble crochet
- sp – space
- st(s) – stitch(es)
- beg – beginning
Special stitch: treble crochet (tr). Yarn over twice, insert hook in the ring, yarn over and pull up a loop (4 loops on hook). [Yarn over and pull through 2 loops] 3 times.
Terms used for each unit:
- Entry point: the spot on the ring where the connector chain meets it.
- Exit point: the spot directly opposite the entry point, on the center line of the strip.
Gauge and Checkpoints
Make one complete unit first (Unit 1 below) and measure it before you commit to a whole strip. Pin it flat with the fan open.
- Ring: once the 10-ch ring is padded and has its spokes, the open hole is about 1.1 in (2.8 cm) across.
- After the spoke row: the spoke tips sit 1.4 in (3.6 cm) from the ring center.
- After the edge row: the fan measures 3.5 in (8.9 cm) tip to tip along the straight side, and 1.75 in (4.4 cm) from the ring center to the top of the curve.
- Pitch: the distance from one ring center to the next is 2.75 in (7.0 cm).
- Double crochet (tab): 6 dc = 1.5 in (3.8 cm) wide; 2 rows = 1 in (2.5 cm).
If your fan is too big, go down to a 4.5 mm hook. If it is too small, go up to a 5.5 mm hook. Change the hook size, not the stitch counts, so that all the units stay identical.
Strip Pattern
Each strip is worked from the bottom to the top in one continuous piece. Leave a 6 in (15.2 cm) tail at the start.
Unit 1 (Bottom Unit)
Ring: Ch 10, sl st in first ch to form a ring. The sl st is the entry point.
Padding: Working into the ring, work 8 sc around the left half of the ring, from the entry point to the exit point. (8 sc)
Spoke row: Working into the right half of the ring, ch 5 (counts as tr + ch 1), [tr in ring, ch 1] 7 times, tr in ring, ending next to the entry point. (9 tr, 8 ch-1 sps)
Push the spokes snugly together around the right half of the ring so they open into a half circle. The bare chain of the ring should be fully covered, with padding on the left and spokes on the right.
Edge row: Turn. Ch 1, sc in first tr, [2 sc in next ch-1 sp, sc in next tr] 8 times, working the last sc in the 4th ch of the beg ch-5. (25 sc)
This is a conversion row: 9 sc worked 1-per-tr + 16 sc added in the 8 ch-1 sps = 25 sc. You finish at the far tip of the fan, which sits on the center line beyond the exit point.
Checkpoint: The fan measures 3.5 in (8.9 cm) tip to tip. Do not fasten off.
Units 2–28
Connector and ring: Ch 12, sl st in 10th ch from hook to form a ring. The first 2 ch are the connector, and the sl st is the entry point of the new ring.
Padding: Working into the new ring, work 8 sc around the half of the ring on the same side as the previous fan, from the entry point to the exit point. (8 sc)
Spoke row: Working into the other half of the ring (the side opposite the previous fan), ch 5 (counts as tr + ch 1), [tr in ring, ch 1] 7 times, tr in ring, ending next to the entry point. (9 tr, 8 ch-1 sps)
Edge row: Turn. Ch 1, sc in first tr, [2 sc in next ch-1 sp, sc in next tr] 8 times, working the last sc in the 4th ch of the beg ch-5. (25 sc: 9 sc 1-per-tr + 16 sc in sps)
Repeat this unit until you have 28 units in total. The spokes always go on the side away from the previous fan, so the fans alternate right, left, right, left and the strip forms its wave.
Stitch count per unit: 12 ch (2 connector + 10 ring), 8 sc padding, 9 tr with 8 ch-1 sps, 25 sc edge. Unit 1 has only the 10 ring ch.
Length checkpoints (laid flat, relaxed):
- After 4 units: 11 in (27.9 cm)
- After 14 units: 38.5 in (97.8 cm)
- After 28 units: 77 in (195.6 cm)
The strip stays 3.5 in (8.9 cm) wide the whole way. Each fan reaches 1.75 in (4.4 cm) to one side of the center line, and the fans alternate sides. Do not fasten off after Unit 28, because the top tab is worked next.
Make All Pieces
Make 7 strips, each with 28 units and one top tab:
- Terracotta: 4 strips
- Cream: 3 strips
Layout on the rod (left to right, viewed from the room):
| T |   | C |   | T |   | C |   | T |   | C |   | T |
  1       2       3       4       5       6       7
T = terracotta strip   C = cream strip
gap between strips = 1.5 in (3.8 cm)
Start Unit 1 of every strip with the fan on the right. That way all the waves line up across the doorway.
Joining
The strips are not joined to each other. Each strip attaches to the rod by its own folded tab, which you close with sl sts once the tab is finished (see the Border section).
Method: Fold the tab over the rod, or close it first and slide the rod through. Work sl sts through both layers, one sl st per dc, so the 6 sts of the last row match the 6 sts at the base of the tab exactly.
Tension: Keep the sl sts loose enough that the join is as wide as the tab. A tight join pinches the tab into a point and makes the strip twist.
Spacing: Slide the strips along the rod so that each gap is 1.5 in (3.8 cm). Seven strips at 3.5 in (8.9 cm) = 24.5 in (62.2 cm). Six gaps at 1.5 in (3.8 cm) = 9 in (22.9 cm). Together that makes 33.5 in (85.1 cm).
Size checkpoint: Measure from the outer edge of strip 1 to the outer edge of strip 7. It should be 33.5 in (85.1 cm). For a wider doorway, make the gaps bigger rather than adding strips.
Border: Top Hanging Tab
The tab is the border of each strip. You work it straight off the last unit.
Border gauge: 6 dc = 1.5 in (3.8 cm) wide; each dc row = 0.5 in (1.3 cm) tall.
Row 1: At the end of the Unit 28 edge row, ch 5. Work 5 dc in the 4th ch from hook (the 3 skipped ch count as the first dc). (6 dc)
Rows 2–8: Ch 3 (counts as dc), turn, dc in each st across. (6 dc per row)
After Row 8 the tab measures 1.5 in (3.8 cm) wide x 4 in (10.2 cm) long.
Close the tab: Fold the tab in half toward the back of the strip so that Row 8 meets the base of Row 1. Sl st through both layers in each of the 6 sts. (6 sl sts) Fasten off and weave in the ends.
Counts for each face of the folded tab:
- Front face: Rows 1–4, 6 sts each
- Back face: Rows 5–8, 6 sts each
- Join: 6 sl sts, matching 6 sts to 6 sts
Why the math works: Eight rows at 0.5 in (1.3 cm) give 4 in (10.2 cm). Folded in half, this makes a loop 2 in (5.1 cm) tall with an inner circumference of about 4 in (10.2 cm). That slides freely over a rod up to 1.25 in (3.2 cm) in diameter. The tab is 6 sts wide and all 6 sts are joined, so the loop stays rectangular. The strip body of 77 in (195.6 cm) plus the 2 in (5.1 cm) folded tab gives 79 in (200.7 cm). For a thicker rod, add 2 rows, which adds 1 in (2.5 cm) to the loop circumference, and keep the row count even.
Final Blocking
- Weave in all ends along the padding stitches or the edge rows, never across the open spokes.
- Lay one strip flat on a long blocking surface. Work in sections if needed.
- Spray it evenly until it is damp but not soaked.
- Open each fan into a clean half circle and pin both fan tips on the center line.
- Check each fan: 3.5 in (8.9 cm) tip to tip and 1.75 in (4.4 cm) from the ring center to the curve.
- Pin the ring centers 2.75 in (7.0 cm) apart along a straight line.
- Pin the tab flat and square at 1.5 in (3.8 cm) wide.
- Let the strip dry completely before you unpin it. Repeat for all 7 strips.
Final Quality-Control Checklist
- Every strip has exactly 28 units.
- Every fan has 9 tr spokes and a 25-sc edge.
- The fans alternate sides along the whole strip, and no two fans in a row are on the same side.
- Every strip starts with the fan on the right.
- Every strip measures 3.5 in (8.9 cm) wide and 79 in (200.7 cm) long.
- Every tab has 8 rows of 6 dc and a 6-sl-st join.
- All ends are hidden and secure.
- The gaps on the rod are an even 1.5 in (3.8 cm).
Troubleshooting
Fans cup or ruffle: The edge row is too tight or too loose. Recheck the 25-sc count, then change your hook size by 0.5 mm.
Strip twists when hanging: The padding sc or the tab join is usually too tight. Block the strip again and redo the join with looser sl sts.
Two fans on the same side: The spokes went on the wrong half of the ring. Rip back to that ring and put the spokes on the side away from the previous fan.
Strips differ in length: Compare them after 4 units, when each should measure 11 in (27.9 cm). Change the hook size for whichever yarn color runs long or short.
Ring hole closes up: Hold the 10-ch ring loosely and do not pull the sl st tight.
Care
Hand wash in cool water with mild soap, press the water out in a towel, and dry flat, re-pinning the fans if needed. Do not hang the strips to dry while they are wet, because they will stretch.
Final Notes
The measurement chain is short and reliable. One unit gives a 3.5 in (8.9 cm) fan and a 2.75 in (7.0 cm) pitch. Twenty-eight units make a 77 in (195.6 cm) strip body, and the 8-row tab adds 2 in (5.1 cm), for a 79 in (200.7 cm) strip. Seven strips with six 1.5 in (3.8 cm) gaps cover 33.5 in (85.1 cm) of rod. Check your first unit and keep every unit identical, and the curtain will hang evenly and wave neatly from top to bottom.
Happy crocheting!