

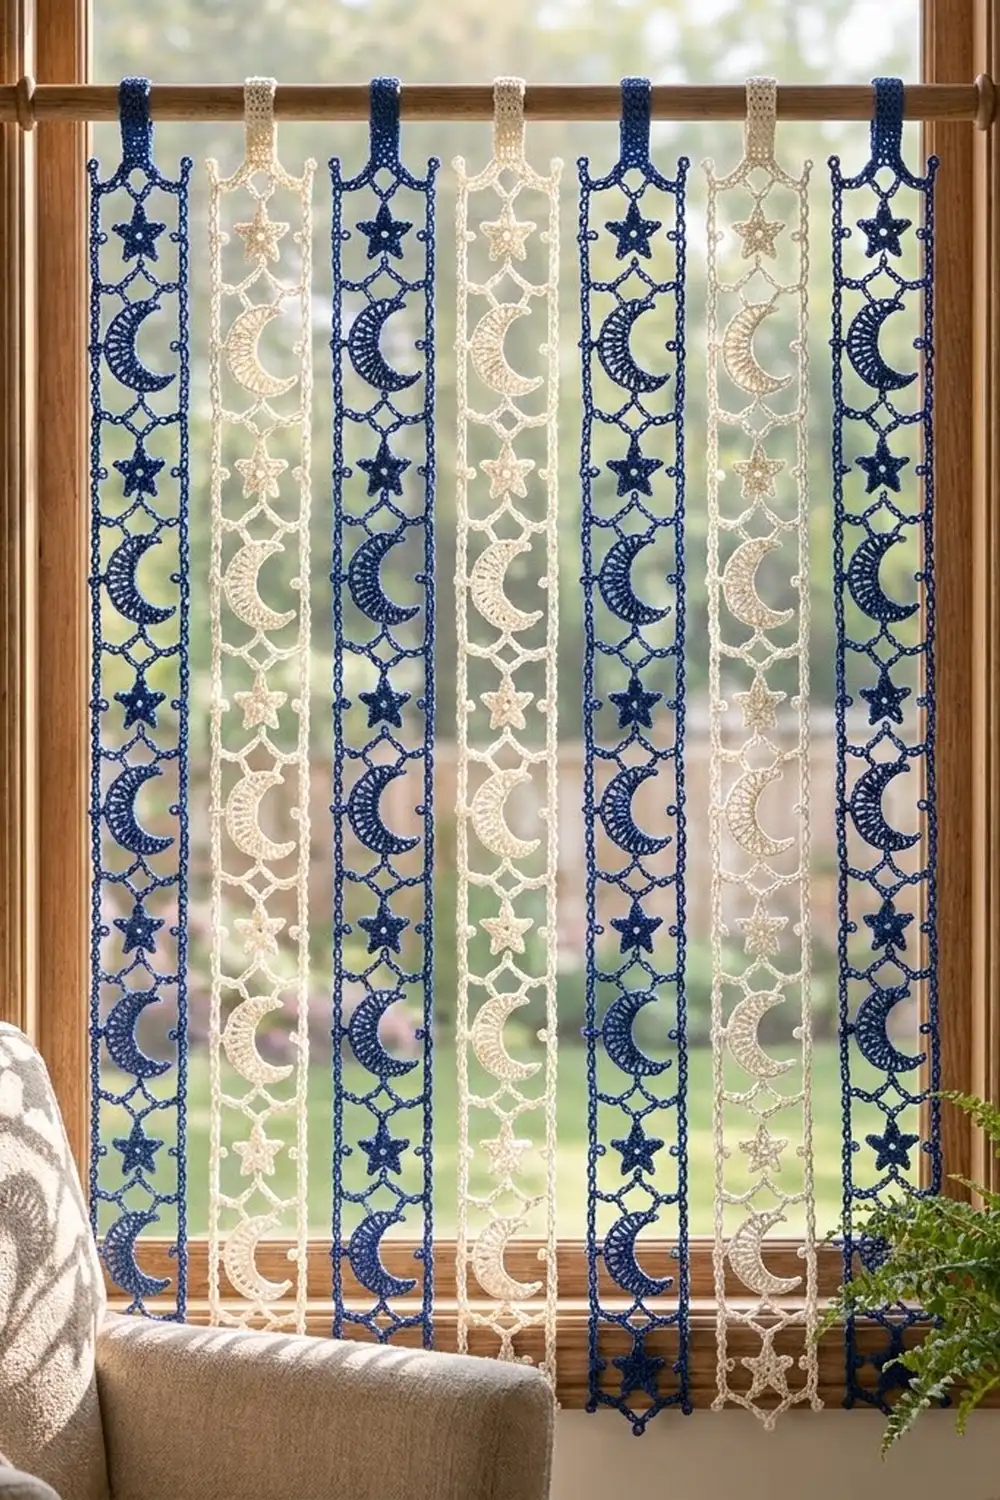
This curtain is made of slim, openwork lace strips that hang side by side from a rod. Each strip has a chain-lace frame with straight side rails, V-shaped scalloped rungs and small picot bumps. Inside the frame, solid five-point stars alternate with ribbed crescent moons down the full length.
The sample uses two colors, cobalt blue and cream, hung in alternating order: four blue strips and three cream strips. Light passes through the open frame, and the stars and moons stand out against the window. The look is calm, airy and a little celestial.
This pattern uses US crochet terms. Each finished strip measures 5 1/4 in (13.3 cm) wide by 56 3/4 in (144.1 cm) long, plus a 2 in (5.1 cm) hanging tab. Seven strips spaced 1 1/2 in (3.8 cm) apart cover a rod span of 45 3/4 in (116.2 cm).
Construction is simple and modular. You make the star and moon motifs first. Then you work one continuous frame round around the column of motifs, joining them as you go. Two border rounds finish the edges, and a tab is worked onto the top end.
Finished Size and Construction
- Finished strip size: 5 1/4 x 56 3/4 in (13.3 x 144.1 cm), not including the tab
- Skill level: Intermediate
- Terminology: US crochet terms
- Yarn weight: DK (light worsted, 3) mercerized cotton
- Hook: 3.5 mm (E-4)
- Number of pieces: 7 separate strips (4 blue, 3 cream), not joined to each other
- Layout: blue, cream, blue, cream, blue, cream, blue, hung from one rod
- Motifs per strip: 8 stars and 7 moons, alternating, starting and ending with a star
- Strip size before border: 4 1/4 x 55 3/4 in (10.8 x 141.6 cm)
- Border depth: 1/2 in (1.3 cm) on every edge
Materials
Choose a smooth, mercerized DK cotton. It shows stitch definition clearly, keeps the picots crisp and does not stretch much when hanging. Avoid fuzzy or very stretchy yarns, because they make long strips grow.
- Color A, cobalt blue: 200 g / 480 m (4 strips)
- Color B, cream: 150 g / 360 m (3 strips)
Each strip uses about 40 g / 95 m. The quantities above include a margin of about 25 percent for swatching and differences in tension.
Tools: 3.5 mm (E-4) hook, tapestry needle, 4 stitch markers, measuring tape, rust-proof pins, a long blocking surface, a spray bottle and a curtain rod up to 1 1/4 in (3.2 cm) in diameter.
Abbreviations (US Terms)
- ch = chain
- sl st = slip stitch
- sc = single crochet
- hdc = half double crochet
- dc = double crochet
- tr = treble crochet
- st(s) = stitch(es)
- sk = skip
- rnd = round
Picot: ch 3, sl st in 3rd ch from hook.
Spoke: a short V that ties a motif to a rail or rung. Ch the stated number, sl st in the named motif point, ch the same number again, then sl st in the last rail (or rung) ch made before the spoke. Spoke chains never count as rail chains.
Gauge and Checkpoints
Gauge: 24 sc and 20 rows = 4 in (10.2 cm). Chain gauge: 6 ch = 1 in (2.5 cm), measured relaxed.
Test one star and one moon first:
- Star: 2 in (5.1 cm) from the top point to the line between the lower points.
- Moon: 3 in (7.6 cm) tall from tip to tip, 1 3/4 in (4.4 cm) wide.
- Frame after 3 sections (star, moon, star): 63 rail ch = 10 1/2 in (26.7 cm).
- Frame complete: 4 1/4 x 55 3/4 in (10.8 x 141.6 cm).
- After border: 5 1/4 x 56 3/4 in (13.3 x 144.1 cm).
If your motifs are too big, go down a hook size. If they are too small, go up a hook size. Chain gauge matters most, because the rails set the strip length. If your chains are tight, use a larger hook for the frame round only.
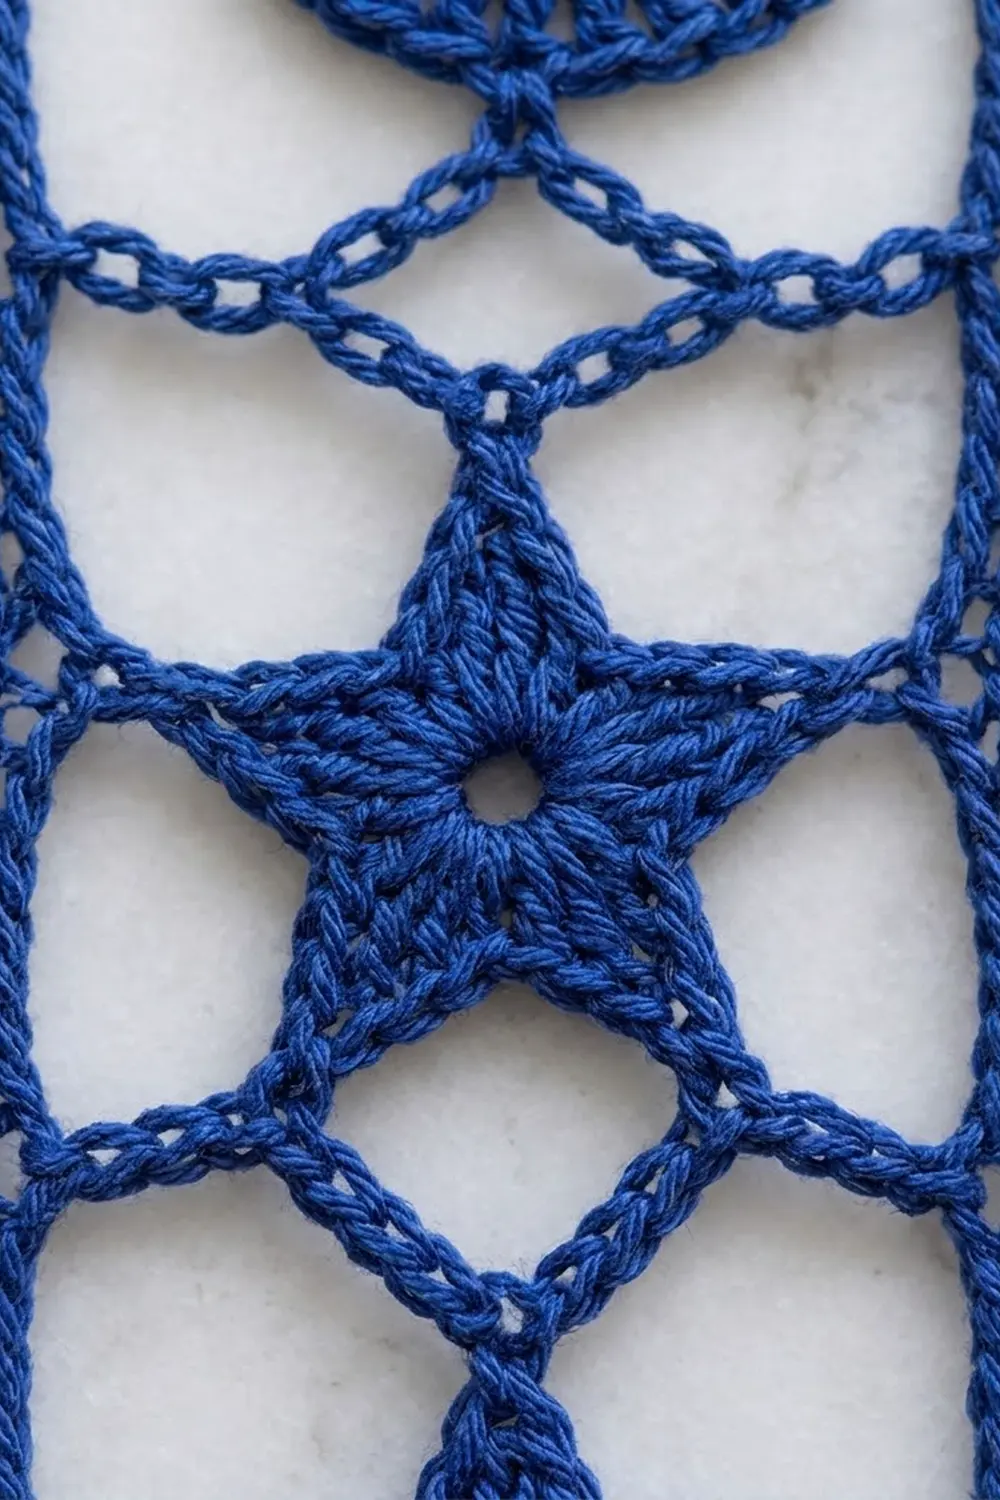
Star Motif (make 8 per strip)
Rnd 1: Magic ring, ch 1, 10 sc in ring, sl st in first sc. Pull the ring closed. (10 sc)
Rnd 2: Sl st in first sc. Ch 4, sl st in 2nd ch from hook, sc in next ch, hdc in next ch, sk next sc, sl st in next sc. Repeat from * 5 times in total. The last sl st lands in the first sl st. (5 points)
Each point uses 2 sc from Rnd 1, so the 5 points use all 10 sc. Fasten off and weave in the ends.
Lay the star with one point straight up. The points are top, upper-left, upper-right, lower-left and lower-right. Each tip is the sl st worked in the 2nd ch from hook.
Crescent Moon Motif (make 7 per strip)
Row 1 (inner curve): Ch 14. Sl st in 2nd ch from hook, sc in next ch, hdc in next ch, dc in next ch, 2 tr in each of next 6 ch, dc in next ch, hdc in next ch, sc in next ch, sl st in last ch. (20 sts: 4 + 12 + 4)
The 6 chains with 2 tr each make the outer edge longer than the inner edge, so the piece curls into a crescent. The trebles form the ribbed, fan-like lines across the moon.
Row 2 (outer edge): Ch 1, turn. Sc in first 4 sts, 2 sc in each of next 12 tr, sc in last 4 sts. (32 sc: 4 + 24 + 4)
Fasten off. Lay the moon with its opening facing right. The upper tip is the first sc of Row 2 and the lower tip is the last sc. The back center is sc 16, on the left.
Frame Round (one per strip)
Lay out the motifs in one column: star, moon, star, moon, ending with a star. That makes 15 sections: 8 star sections with 18 rail ch each and 7 moon sections with 27 rail ch each.
Each side rail: 8 x 18 + 7 x 27 = 144 + 189 = 333 rail ch.
There are 14 boundaries between sections. Boundary A has a star above a moon (7 in total). Boundary B has a moon above a star (7 in total).
Start: Slip knot, ch 1. This is the top-left corner ch; mark it.
Left rail, working down:
- Star section: Ch 6, spoke (ch 4, sl st in upper-left point, ch 4, sl st in last rail ch), ch 12. (18 rail ch)
- Boundary A, left half: Ch 6, sl st in lower-left point of star above, ch 6, picot (center node), sl st in upper tip of moon below, ch 12, sl st in the rail ch where this loop began.
- Moon section: Ch 13, spoke (ch 2, sl st in back center of moon, ch 2, sl st in last rail ch), ch 14. (27 rail ch)
- Boundary B, left half: Ch 12, sl st in lower tip of moon above, picot (center node), sl st in top point of star below, ch 12, sl st in the rail ch where this loop began.
Repeat these steps down the column. After the 8th star section, go straight to the corner.
Bottom-left corner: Ch 1; mark it.
Bottom rung: Ch 9, spoke (ch 3, sl st in lower-left point of last star, ch 3, sl st in last rung ch), ch 6, spoke (ch 3, sl st in lower-right point, ch 3, sl st in last rung ch), ch 9. (24 rung ch)
Bottom-right corner: Ch 1; mark it.
Right rail, working up, starting with the 8th star:
- Star section: Ch 12, spoke (ch 4, sl st in upper-right point, ch 4, sl st in last rail ch), ch 6. (18 rail ch)
- Boundary B, right half: Ch 12, sl st in center node picot, ch 12, sl st in the rail ch where this loop began.
- Moon section: Ch 27. The right rail does not attach to the open side of the moon. (27 rail ch)
- Boundary A, right half: Ch 6, sl st in lower-right point of star above, ch 6, sl st in center node picot, ch 12, sl st in the rail ch where this loop began.
After the 1st star section, continue to the corner.
Top-right corner: Ch 1; mark it.
Top rung: Ch 12, spoke (ch 3, sl st in top point of first star, ch 3, sl st in last rung ch), ch 12, sl st in the top-left corner ch. (24 rung ch)
Frame count: 2 x 333 rail ch + 2 x 24 rung ch + 4 corner ch = 718 frame ch. Fasten off.
Every star is now joined at all 5 points, and every moon is joined at 3 points. The frame is 26 ch wide and 335 ch long including corners. At 6 ch per inch, it measures 4 1/4 x 55 3/4 in (10.8 x 141.6 cm).
Make All Pieces
Each strip needs 8 stars, 7 moons, 1 frame round, the border and 1 tab, all in one color.
- Color A (blue), 4 strips: 32 stars, 28 moons, 4 frames
- Color B (cream), 3 strips: 24 stars, 21 moons, 3 frames
Layout across the rod, left to right:
[ A ] [ B ] [ A ] [ B ] [ A ] [ B ] [ A ]
  1     2     3     4     5     6     7
Joining
The motifs are joined into each strip during the frame round, so there is no separate seaming. The 7 strips are not joined to each other. Each one hangs from its own tab, so the curtain parts easily and moves in a breeze.
Work every spoke and boundary loop with relaxed tension. A tight spoke pulls a motif off center and puckers the rail. Keep each sl st join snug but not pinched.
Because the strips are separate, each border goes around one strip only. Its starting count comes from that strip’s own rail and rung chains, with nothing added for seams.
Size checkpoint: Lay the frame flat before the border. It should measure 4 1/4 x 55 3/4 in (10.8 x 141.6 cm), with the motifs centered and both rails straight. On the rod, space the tabs so the gaps between strips are 1 1/2 in (3.8 cm).
Border
Border gauge: 6 sc = 1 in (2.5 cm), worked one sc per frame ch. This matches the chain gauge, so the edge lies flat without ruffling.
Rnd 1: Join yarn in the top-left corner ch. Ch 1, 3 sc in corner ch. Sc in each of the 333 left rail ch, working into the chain and ignoring the spokes and loops. 3 sc in bottom-left corner ch, sc in each of the 24 bottom rung ch, 3 sc in bottom-right corner ch. Sc in each of the 333 right rail ch, 3 sc in top-right corner ch, sc in each of the 24 top rung ch. Sl st in first sc.
Rnd 1 count: 666 + 48 + (4 x 3) = 726 sc. Each long side has 333 sc between corner groups, and each end has 24.
If you include the corner stitches, a long side has 337 sc: middle corner + 3rd corner + 333 + 1st corner + next middle corner. An end has 28 sc: 1 + 1 + 24 + 1 + 1. The 4 middle corner sc are shared, so 2 x 337 + 2 x 28 – 4 = 726. The math matches.
Rnd 2: Sl st in middle sc of top-left corner group. Ch 1, 3 sc in same sc.
- Left side: Sc in next 3 sc, picot, sc in next 6 sc. Repeat from * 55 times in total, then sc in next 2 sc. (335 sc: 3 + 330 + 2, plus 55 picots)
- Bottom-left corner: 3 sc in middle corner sc.
- Bottom end: Sc in next 26 sc.
- Bottom-right corner: 3 sc in middle corner sc.
- Right side: Work as for the left side. (335 sc, plus 55 picots)
- Top-right corner: 3 sc in middle corner sc.
- Top end: Sc in next 26 sc.
Sl st in first sc. Fasten off.
Rnd 2 count: 2 x 335 + 2 x 26 + (4 x 3) = 734 sc and 110 picots.
Why it works: Each long side gains 2 sc (335 instead of 333) because the 1st and 3rd sc of each Rnd 1 corner group now count as side stitches. A picot falls every 6 sc, which is every 1 in (2.5 cm). Two rounds plus picots add 1/2 in (1.3 cm) on every edge, so the strip grows to 5 1/4 x 56 3/4 in (13.3 x 144.1 cm).
Tab: With the right side facing, sk the first 7 sc of the top end and join yarn in the next sc.
Row 1: Ch 1, sc in same sc and next 11 sc. Leave the last 7 sc unworked. (12 sc)
Rows 2-20: Ch 1, turn, sc in each sc. (12 sc)
The tab measures 2 x 4 in (5.1 x 10.2 cm). Fold it to the back and sew the last row to the base of Row 1 to form a 2 in (5.1 cm) loop.
Final Blocking
- Weave in all ends along the rails, never across open loops.
- Pin both long edges first to 56 3/4 in (144.1 cm), keeping the rails perfectly straight.
- Pin the width to 5 1/4 in (13.3 cm) at every section boundary.
- Pin each center node so the V-shaped rungs open evenly.
- Shape each moon into a smooth crescent and pin out every star point.
- Mist until damp but not soaked.
- Let it dry completely before unpinning, usually 12 to 24 hours.
- Hang the strip for a day to check whether it stretches before you make final adjustments.
Final Quality-Control Checklist
- 8 stars and 7 moons per strip, alternating, with a star at each end
- Every star joined at 5 points; every moon joined at 3 points, with its opening facing right
- 333 rail ch per side and 24 rung ch per end
- Border Rnd 1: 726 sc
- Border Rnd 2: 734 sc and 110 picots
- Tab: 12 sc wide, 20 rows, sewn securely
- Strip measures 5 1/4 x 56 3/4 in (13.3 x 144.1 cm)
- 4 blue and 3 cream strips, all within 1/4 in (0.6 cm) of each other in length
Troubleshooting
Moon does not curl: Check that you worked 2 tr in each of the 6 middle chains, and work Row 2 more tightly.
Moon ruffles: The outer edge is too long. Use a smaller hook for Row 2.
Star points curl: Check that you skipped 1 sc between points, then pin every tip when blocking.
Rails wave: Your chains are looser than your sc. Use a smaller hook for the border.
Strip is too long: Your chains are too loose. Rework the frame with a smaller hook; every 6 extra chains add 1 in (2.5 cm).
Motif hangs off center: A spoke is too tight or too loose. Remove it and rework it at the stated count.
Strips differ in length: Measure each frame before the border and match them within 1/4 in (0.6 cm).
Care
Hand wash in cool water with mild soap, roll in a towel and dry flat. Re-pin the rails straight while the strip is still damp.
Final Notes
Each measurement builds on the one before it. A 2 in (5.1 cm) star and a 3 in (7.6 cm) moon sit in sections of 18 and 27 rail chains, giving 333 chains per side. At 6 ch per inch, the frame measures 4 1/4 x 55 3/4 in (10.8 x 141.6 cm). Two border rounds add 1/2 in (1.3 cm) all around, so each strip finishes at 5 1/4 x 56 3/4 in (13.3 x 144.1 cm). Seven strips with 1 1/2 in (3.8 cm) gaps fill a 45 3/4 in (116.2 cm) rod span.
Check your gauge early and keep your spokes relaxed, and your strips will hang straight and even.
Happy crocheting!