

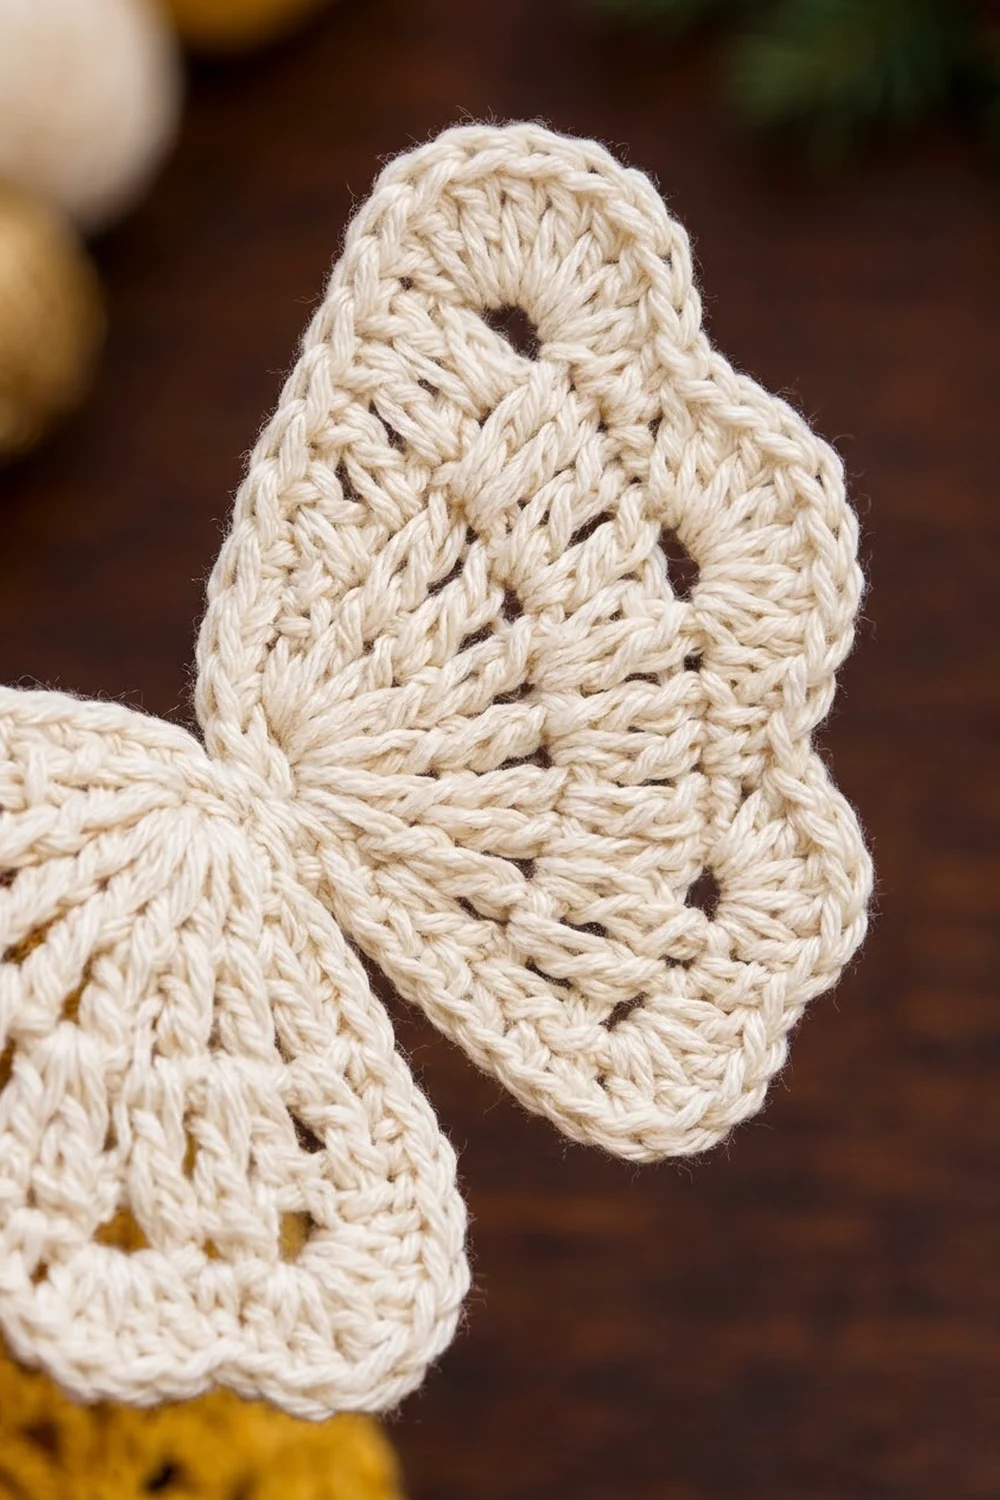
This angel solves the problem of plastic bags piling up in your kitchen. Her body is a tall, lacy cone of mustard-gold fans. You push bags in through the top and pull them out one at a time through a firm band at the hem. A cream ball head, two scalloped wings, a gold halo and a sturdy hanging ring finish the look.
The color scheme is warm and festive: mustard gold for the body and ring, soft cream for the head and wings, and metallic gold for the halo. Light blue is a lovely alternative body color. The cream and gold parts stay the same.
This pattern uses US crochet terms. The finished body is 10.5 in (26.7 cm) tall and 8 in (20.3 cm) wide across the hem when laid flat. The whole angel hangs about 14 in (35.6 cm) from the top of the ring to the hem.
The body is worked bottom-up in joined rounds. It starts with a single crochet band, flares into the first round of fans, and narrows by shrinking the fans and chain loops tier by tier. The head, halo, ring and wings are made separately and sewn on.
Finished Size and Construction
- Finished size: 14 in (35.6 cm) total hanging length; body 10.5 in (26.7 cm) tall
- Skill level: Intermediate
- Terminology: US terms
- Yarn weight: DK (#3) cotton, plus fine metallic yarn
- Hook: 3.5 mm (E-4)
- Number of pieces: 6 finished parts (body, ring, head, halo, 2 wings). Each wing is made of 2 lobes.
- Layout: ring at the top, head on the top rim, halo behind the head, wings at the shoulders
- Body size: hem 8 in (20.3 cm) flat width; top 4 in (10.2 cm) flat width
- Size before border: 9.75 in (24.8 cm) tall after Round 17
- Border depth: top rim 0.75 in (1.9 cm)
Materials
Choose a smooth, firm cotton or cotton blend. It holds the lace open, keeps its shape when stuffed with bags and washes well. Avoid fuzzy acrylic, because the fans lose their definition.
- Mustard gold (body, ring): 100 g, about 230 m
- Cream (head, wings): 25 g, about 58 m
- Gold metallic (halo): 5 g, about 20 m
- 3.5 mm (E-4) hook
- A metal or plastic ring with a 3 in (7.6 cm) inside diameter
- Polyester fiberfill
- Tapestry needle
- 4 stitch markers
- Scissors, pins, blocking mat
All quantities include a margin of about 15% for gauge differences and swatching.
Abbreviations (US Terms)
- ch – chain
- sl st – slip stitch
- sc – single crochet
- dc – double crochet
- sc2tog – single crochet 2 together
- sp(s) – space(s)
- MR – magic ring
- rnd – round
- st(s) – stitch(es)
Special stitches
– V-st: (dc, ch 1, dc) in the same stitch. Where the pattern says ch 2, work (dc, ch 2, dc).
– Fan: the stated number of dc worked into one V-st space.
Gauge and Checkpoints
Gauge: 20 sc and 22 rnds = 4 in (10.2 cm) in sc worked in the round.
Make the body first and check it as you go. Every other part is sized to fit it.
- After Rnd 4: band circumference 12 in (30.5 cm); 6 in (15.2 cm) flat width; 0.75 in (1.9 cm) tall
- After Rnd 6: hem flat width about 8 in (20.3 cm)
- After Rnd 9: total height 4 in (10.2 cm)
- After Rnd 13: total height 7 in (17.8 cm); flat width about 5 in (12.7 cm)
- After Rnd 17: total height 9.75 in (24.8 cm)
If your band is more than 0.25 in (0.6 cm) too wide, go down one hook size. If it is too narrow, go up one size. If the lace grows too tall but the width is correct, shorten your chain loops by working them more tightly rather than changing hooks.
Body
With mustard gold, ch 60 and join with a sl st to the first ch, taking care not to twist.
Rnd 1: Ch 1, sc in each ch around, join. (60 sc)
Rnds 2–4: Ch 1, sc in each sc around, join. (60 sc)
This band is the bottom opening that the bags are pulled through.
Rnd 5 (flare): Ch 4 (counts as dc + ch 1), dc in the same st (first V-st made).
– Ch 5, sk 2 sts, sc in next st, ch 5, sk 2 sts, V-st in next st.
– Repeat from * 8 more times.
– Finish with ch 5, sk 2, sc in next, ch 5, sk 2, and join to the 3rd ch of the beginning ch-4.
(10 V-sts, 10 sc, 20 ch-5 sps; each repeat uses 6 band sts, and 10 × 6 = 60)
Rnd 6 (fan tier 1): Sl st into the first V-st sp. Ch 3 (counts as dc), 8 dc in the same sp.
– Ch 3, sc in next ch-5 sp, ch 3, sc in next ch-5 sp, ch 3, 9 dc in next V-st sp.
– Repeat from * 8 more times.
– Finish with ch 3, sc, ch 3, sc, ch 3, and join to the top of the beginning ch-3.
(10 fans of 9 dc = 90 dc; 20 sc; 30 ch-3 sps)
Rnd 7: Sl st in the next 4 dc, so you are at the 5th (center) dc of the fan. Ch 5 (counts as dc + ch 2), dc in the same st.
– Ch 4, sc in the middle ch-3 sp (the one between the 2 sc), ch 4, (dc, ch 2, dc) in the 5th dc of the next fan.
– Repeat around and join.
(10 V-sts, 10 sc, 20 ch-4 sps)
Rnd 8 (fan tier 2): Sl st into the V-st sp. Ch 3, 8 dc in the same sp.
– Ch 2, sc in next ch-4 sp, ch 2, sc in next ch-4 sp, ch 2, 9 dc in next V-st sp.
– Repeat around and join.
(90 dc, 20 sc, 30 ch-2 sps)
Rnd 9: Sl st in the next 4 dc. Ch 5, dc in the same st.
– Ch 3, sc in the middle ch-2 sp, ch 3, (dc, ch 2, dc) in the 5th dc of the next fan.
– Repeat around and join.
(10 V-sts, 10 sc, 20 ch-3 sps)
Rnd 10 (fan tier 3): Sl st into the V-st sp. Ch 3, 6 dc in the same sp.
– Ch 2, sc in next ch-3 sp, ch 2, sc in next ch-3 sp, ch 2, 7 dc in next V-st sp.
– Repeat around and join.
(10 fans of 7 dc = 70 dc; 20 sc; 30 ch-2 sps; flat width about 6.5 in / 16.5 cm)
Rnd 11: Sl st in the next 3 dc, so you are at the 4th dc. Ch 4, dc in the same st.
– Ch 3, sc in the middle ch-2 sp, ch 3, V-st in the 4th dc of the next fan.
– Repeat around and join.
(10 V-sts, 10 sc, 20 ch-3 sps)
Rnd 12 (fan tier 4): Sl st into the V-st sp. Ch 3, 6 dc in the same sp.
– Ch 1, sc in next ch-3 sp, ch 1, sc in next ch-3 sp, ch 1, 7 dc in next V-st sp.
– Repeat around and join.
(70 dc, 20 sc, 30 ch-1 sps)
Rnd 13: Sl st in the next 3 dc. Ch 4, dc in the same st.
– Ch 2, sc in the middle ch-1 sp, ch 2, V-st in the 4th dc of the next fan.
– Repeat around and join.
(10 V-sts, 10 sc, 20 ch-2 sps)
Rnd 14 (fan tier 5): Sl st into the V-st sp. Ch 3, 4 dc in the same sp.
– Ch 1, sc in next ch-2 sp, ch 1, sc in next ch-2 sp, ch 1, 5 dc in next V-st sp.
– Repeat around and join.
(10 fans of 5 dc = 50 dc; 20 sc; 30 ch-1 sps)
Rnd 15: Sl st in the next 2 dc, so you are at the 3rd dc. Ch 4, dc in the same st.
– Ch 2, sc in the middle ch-1 sp, ch 2, V-st in the 3rd dc of the next fan.
– Repeat around and join.
(10 V-sts, 10 sc, 20 ch-2 sps)
Rnd 16 (fan tier 6): Repeat Rnd 14. (50 dc, 20 sc, 30 ch-1 sps)
Rnd 17: Repeat Rnd 15. (10 V-sts, 10 sc, 20 ch-2 sps)
Do not fasten off. Continue straight into the top rim in the Border section.
Hanging Ring
With mustard gold, work sc tightly over the 3 in (7.6 cm) ring until it is fully covered, about 66 sc. Push the stitches together as you go. Join and fasten off, leaving a 12 in (30.5 cm) tail. The covered ring measures about 3.75 in (9.5 cm) across the outside.
Head
With cream, work in continuous spirals and mark the first stitch of each round.
- Rnd 1: 6 sc in MR. (6)
- Rnd 2: 2 sc in each st. (12)
- Rnd 3: Sc, 2 sc in next around. (18)
- Rnd 4: Sc in next 2, 2 sc in next around. (24)
- Rnd 5: Sc in next 3, 2 sc in next around. (30)
- Rnds 6–11: Sc in each st around. (30)
- Rnd 12: Sc in next 3, sc2tog around. (24)
- Rnd 13: Sc in next 2, sc2tog around. (18)
Stuff the head firmly.
- Rnd 14: Sc, sc2tog around. (12)
- Rnd 15: Sc2tog around. (6)
Close the hole and leave a long tail for sewing. The head is about 6 in (15.2 cm) around and 1.9 in (4.8 cm) across.
Halo
With gold metallic, ch 28 and join into a ring.
- Rnd 1: Ch 1, sc in each ch around, join. (28 sc)
- Rnd 2: Sl st in each sc around. (28 sl st)
Fasten off. The halo is 5.6 in (14.2 cm) around and about 1.8 in (4.6 cm) across.
Wings
Upper lobe (make 2)
Row 1: In cream, MR, ch 3 (counts as dc), 6 dc in ring. Pull the ring partly closed so it forms a half circle. Turn. (7 dc)
Row 2: Ch 4 (counts as dc + ch 1), dc in the same st, ch 1, dc in next dc 6 times. Turn. (8 dc, 7 ch-1 sps)
Row 3: Ch 3 (counts as dc), dc in the same st, 2 dc in each ch-1 sp, dc in the 3rd ch of the turning ch. Turn. (17 dc = 2 + 14 + 1)
Row 4 (scallops): Ch 1, sc in the first dc.
– Sk 1, 5 dc in next st, sk 1, sc in next st.
– Repeat from * 4 times in total.
(4 scallops; 17 sts used = 1 + 4 × 4)
Lower lobe (make 2)
Row 1: MR, ch 3, 4 dc in ring. Turn. (5 dc)
Row 2: Ch 4, dc in the same st, ch 1, dc in next 4 times. Turn. (6 dc, 5 ch-1 sps)
Row 3: Ch 1, sc in the first dc, 3 dc in next ch-1 sp, sc in next dc 5 times. (5 small scallops)
To assemble each wing: Place a lower lobe beneath an upper lobe so their ring centers touch, with the straight edges facing the same way. Sew the centers and about 0.5 in (1.3 cm) of the straight edges together. Each wing measures about 3.5 in (8.9 cm) wide and 3 in (7.6 cm) tall. Make the second wing as a mirror image by flipping the lobes.
Make All Pieces
| Color | Parts |
|---|---|
| Mustard gold | 1 body, 1 hanging ring |
| Cream | 1 head, 2 upper lobes, 2 lower lobes |
| Gold metallic | 1 halo |
The finished parts are arranged like this, from top to bottom:
        [ RING ]
        [ HALO ]
[WING]  [ HEAD ]  [WING]
        [ BODY ]
     (bottom opening)
Joining
All the parts are joined with a whipstitch through matching stitches, using a tapestry needle and yarn tails.
- Ring: Lay the body flat with the top rim seam at the center back. Whipstitch the bottom 8 sts of the covered ring to the inside of the back 8 sts of Rnd 21. The ring overlaps the rim by about 0.25 in (0.6 cm).
- Head: Center the head on the front half of the rim. Sew Rnd 13 or 14 of the head to the front 12 rim sts, one stitch at a time. Leave the back of the opening free for loading bags.
- Halo: Tilt the halo behind the head and tack it at 3 points to the back of Rnds 8–10 of the head.
- Wings: Sew each wing’s center to the side of the body at Rnds 16–17, slightly toward the back, so the upper lobes rise level with the head.
Keep your stitches snug but not tight. Pulling too hard puckers the lace. Once assembled, the angel should hang 14 in (35.6 cm) long.
Border
The border is the solid top rim, plus a firm edge on the bottom band. Border gauge is 5 sc per 1 in (2.5 cm).
Rnd 18 (conversion): Ch 1. Work 1 sc in each dc, plus 1 sc in each ch-2 sp. Skip the V-st ch-1 sps and the sc. Join. (40 sc = 20 worked 1 per dc + 20 extra worked into ch-2 sps)
Rnds 19–21: Ch 1, sc in each sc around, join. (40 sc)
Fasten off. Laid flat, the rim has 20 sc across the front and 20 across the back. 40 sc ÷ 5 = 8 in (20.3 cm) around, which is 4 in (10.2 cm) flat. The rim is 4 rnds deep, about 0.75 in (1.9 cm).
Bottom edge: Join mustard gold to the foundation ch. Work 1 sl st in each ch around. (60 sl st; 30 per side when laid flat)
Why the math works: Each of the 10 pattern repeats contains exactly 2 dc and 2 ch-2 sps in Rnd 17. That gives 4 rim stitches per repeat, and 10 × 4 = 40. At the bottom, 60 ÷ 5 = 12 in (30.5 cm) around, or 6 in (15.2 cm) flat. That is narrow enough to hold the bags in and wide enough to pull one out.
Final Blocking
- Before assembly, soak the body and wings in cool water and press out the excess in a towel.
- Stuff the body with a towel or plastic bags shaped into a cone 8 in (20.3 cm) wide at the hem.
- Pin each fan open and point it upward.
- Pin the wing scallops flat to 3.5 in (8.9 cm) wide.
- Let everything dry completely, then assemble.
Final Quality-Control Checklist
- The body has 6 fan tiers, all pointing up and lined up in vertical columns.
- The hem measures 8 in (20.3 cm) and the top 4 in (10.2 cm) when laid flat.
- The bottom band is 6 in (15.2 cm) wide flat.
- The head is firm, with no fiberfill showing.
- The ring is fully covered, with no gaps.
- The wings are symmetrical, with 4 upper scallops and 5 lower scallops each.
- The back of the top opening is open for loading bags.
Troubleshooting
- The cone ruffles: your chains are too loose. Work them tighter or drop a hook size.
- The fans lean: you missed the center dc. Count the slip stitches again.
- The bottom band is too stretchy: add a second round of sl sts.
- The wings curl: block them flat and add a little starch.
- The ring slips: add sc stitches until it is fully covered.
Care
Hand wash in cool water and dry flat while reshaping the cone. Do not tumble dry the metallic halo.

Final Notes
The measurement chain is:
– a 12 in (30.5 cm) band
– flaring to an 8 in (20.3 cm) hem
– six tiers narrowing to a 4 in (10.2 cm) top rim
– a 10.5 in (26.7 cm) body
– a 14 in (35.6 cm) hanging angel
If you check gauge at each checkpoint, every part will fit together.
Happy crocheting!