

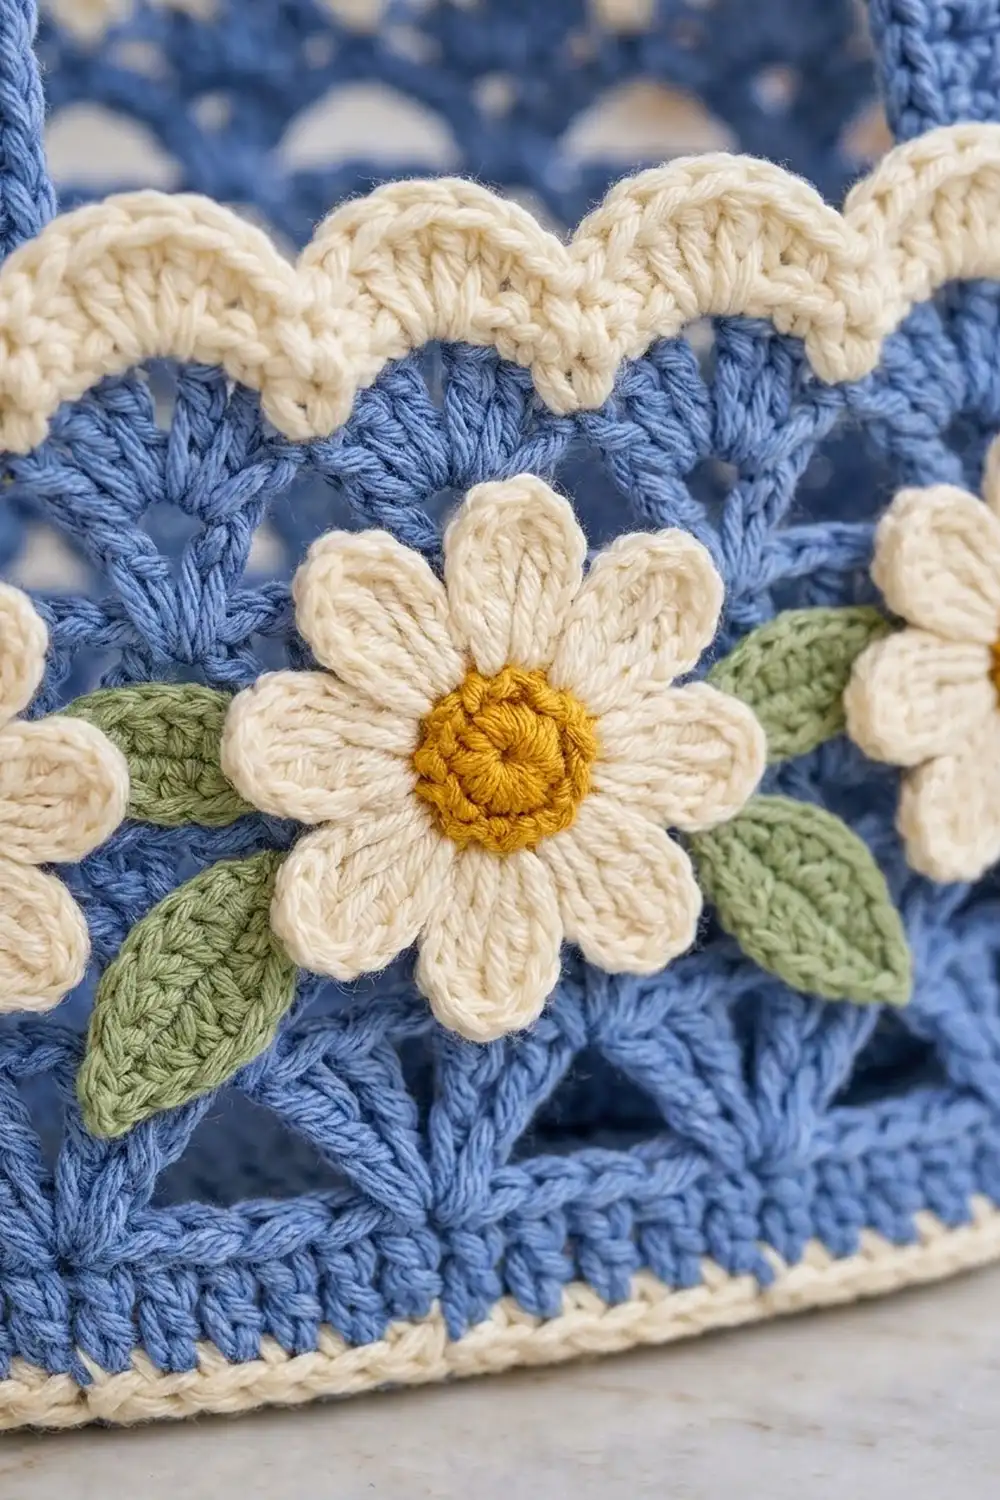
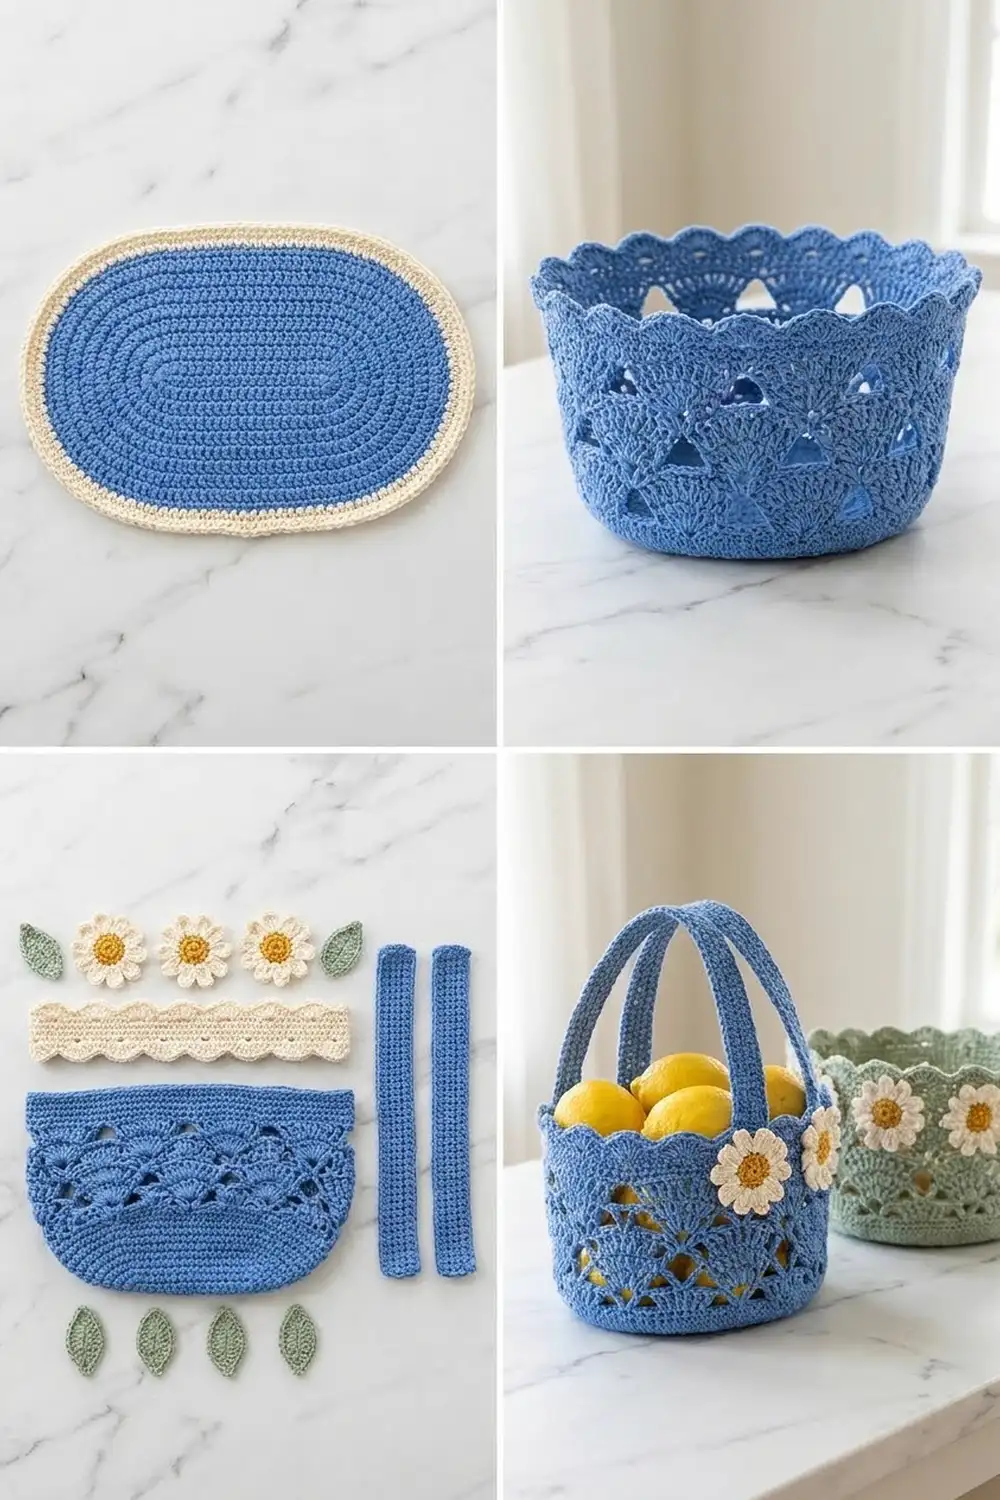
This oval basket tote has a solid, sturdy base and openwork shell-stitch walls. A cream scalloped band runs around the top, and three cream daisies with golden centers and sage-green leaves sit across the front. Two blue handles rise from the long sides, so you can use it as a small market tote, a fruit basket or a gift basket.
The main color is cornflower blue, used for the base, walls and handles. Cream is used for the base edge, the scalloped band and the daisy petals. The daisy centers are golden yellow and the leaves are sage green. The overall style is cottage-garden: practical, with a little decoration on top.
This pattern uses US crochet terms. The finished basket is about 10.5 in (26.7 cm) long, 6.25 in (15.9 cm) wide and 6.25 in (15.9 cm) tall at the rim. The handles rise 5.5 in (14.0 cm) above the rim, so the total height is about 11.75 in (29.8 cm).
The base and walls are worked as one seamless piece: first in rounds around a foundation chain, then straight up. Next you make two flat handles, one cream band, three daisies and four leaves, and sew them on.
Finished Size and Construction
- Finished size: 10.5 in x 6.25 in x 6.25 in tall (26.7 cm x 15.9 cm x 15.9 cm), plus 5.5 in (14.0 cm) handle height
- Skill level: Intermediate
- Terminology: US
- Yarn weight: Worsted (#4) cotton
- Hooks: 5 mm (H-8) for the body, handles and band; 4 mm (G-6) for the daisies and leaves
- Number of pieces: 11 (1 body, 2 handles, 1 band, 3 daisies, 4 leaves)
- Layout: Oval basket with 3 daisies and 4 leaves in one row across the front
- Base size: 10.5 in x 6.25 in (26.7 cm x 15.9 cm)
- Wall height before rim trim: 6 in (15.2 cm)
- Rim trim depth: 0.25 in (0.6 cm)
Materials
Use a smooth, firmly twisted worsted-weight cotton or cotton blend. Cotton holds a basket’s shape better than acrylic, and it shows the shell texture clearly.
- Blue: 180 g (about 340 m)
- Cream: 50 g (about 95 m)
- Golden yellow: 10 g (about 19 m)
- Sage green: 10 g (about 19 m)
These amounts include a margin of about 10–15% for your gauge swatch and differences in tension.
Tools:
- 5 mm (H-8) and 4 mm (G-6) crochet hooks
- Tapestry needle
- At least 4 stitch markers
- Rustproof pins
- Measuring tape
- Scissors
- Optional: an oval of plastic canvas cut to 10 in x 5.75 in (25.4 cm x 14.6 cm) to stiffen the base
Abbreviations (US Terms)
- ch: chain
- sl st: slip stitch
- sc: single crochet
- hdc: half double crochet
- dc: double crochet
- BLO: back loop only
- st(s): stitch(es)
- sp: space
- beg: beginning
Shell: 5 dc in the same stitch.
Scallop (band only): 7 dc in the same stitch.
Gauge and Checkpoints
Gauge: 14 dc and 7 dc rounds = 4 in (10.2 cm) with the 5 mm hook. To check it, crochet a swatch 16 dc wide and 8 rows tall.
Make the base first and use it as your test piece. Every later measurement depends on it.
Checkpoints:
- After Rnd 3: 7.75 in x 3.5 in (19.7 cm x 8.9 cm)
- After Rnd 5: 10 in x 5.75 in (25.4 cm x 14.6 cm)
- After Rnd 6: 10.5 in x 6.25 in (26.7 cm x 15.9 cm)
- Wall circumference after Rnd 9: about 27.5 in (69.9 cm)
- Wall height after Rnd 16: 6 in (15.2 cm)
Too big? Use a hook 0.5 mm smaller. Too small? Use a hook 0.5 mm larger. If the ends ruffle but the sides lie flat, your tension is looser on the curves. Tighten your hand on the end increases.
Body: Base and Walls
Work in joined rounds with the right side always facing you. A beginning ch-2 does not count as a stitch. Every base round is worked in this order: end, side, end, side.
Base
With blue and the 5 mm hook, ch 20.
Rnd 1: 6 dc in 4th ch from hook (the 3 skipped ch do not count as a stitch), dc in each of next 15 ch, 6 dc in last ch. Rotate the piece and work along the other side of the foundation chain: dc in each of next 15 ch. Sl st to first dc. (42 dc: 6 at each end, 15 on each side)
Rnd 2: Ch 2, 2 dc in each of next 6 sts, dc in each of next 15 sts, 2 dc in each of next 6 sts, dc in each of next 15 sts. Sl st to first dc. (54 dc)
Rnd 3: Ch 2, (dc in next st, 2 dc in next st) 6 times, dc in each of next 15 sts, (dc in next st, 2 dc in next st) 6 times, dc in each of next 15 sts. Sl st to first dc. (66 dc)
Rnd 4: Ch 2, (dc in each of next 2 sts, 2 dc in next st) 6 times, dc in each of next 15 sts, repeat ( ) 6 times, dc in each of next 15 sts. Sl st to first dc. (78 dc)
Rnd 5: Ch 2, (dc in each of next 3 sts, 2 dc in next st) 6 times, dc in each of next 15 sts, repeat ( ) 6 times, dc in each of next 15 sts. Sl st to first dc. Fasten off blue. (90 dc)
Rnd 6: Join cream. Ch 1, (sc in each of next 9 sts, 2 sc in next st) 3 times, sc in each of next 15 sts, repeat ( ) 3 times, sc in each of next 15 sts. Sl st to first sc. (96 sc: 33 at each end, 15 on each side)
The base should lie flat. Check it against the Rnd 6 measurement before you start the walls.
Walls
Rnd 7: With cream, ch 1, sc in BLO of each st around. Sl st to first sc. Fasten off cream. (96 sc) The unused front loops make a crisp cream ridge at the bottom edge, and the walls turn upward from here.
Rnds 8–9: Join blue. Ch 2, dc in each st around. Sl st to first dc. (96 dc)
Rnd 10 (shell round): Ch 1, sc in first st, skip 2 sts, shell in next st, skip 2 sts, sc in next st, skip 2 sts, shell in next st, skip 2 sts; repeat from * 14 more times. Sl st to first sc. (16 shells + 16 sc = 96 sts)*
Rnd 11 (mesh round): Ch 6 (counts as dc + ch 3), sc in center dc of next shell, ch 3, dc in next sc, ch 3, sc in center dc of next shell, ch 3; repeat from * 14 more times. Sl st to 3rd ch of beg ch-6. (16 dc, 16 sc, 32 ch-3 sps)*
Rnd 12 (shell round): Ch 3 (counts as dc), 4 dc in same st, skip ch-3 sp, sc in next sc, skip ch-3 sp, shell in next dc, skip ch-3 sp, sc in next sc, skip ch-3 sp; repeat from * 14 more times. Sl st to top of beg ch-3. (16 shells + 16 sc = 96 sts)* These shells are offset from the shells in Rnd 10, which opens up the triangular windows.
Rnd 13 (mesh round): Sl st in each of next 2 dc to reach the center dc of the first shell. Ch 1, sc in same dc, ch 3, dc in next sc, ch 3, sc in center dc of next shell, ch 3, dc in next sc, ch 3; repeat from * 14 more times. Sl st to first sc. (16 sc, 16 dc, 32 ch-3 sps)*
Rnd 14 (shell round): Ch 1, sc in first sc, skip ch-3 sp, shell in next dc, skip ch-3 sp, sc in next sc, skip ch-3 sp, shell in next dc, skip ch-3 sp; repeat from * 14 more times. Sl st to first sc. (16 shells + 16 sc = 96 sts)*
Rnd 15: Repeat Rnd 11.
Rnd 16: Repeat Rnd 12. (96 sts)
Checkpoint: the wall should measure 6 in (15.2 cm) from the cream ridge.
Rnd 17 (rim trim): Ch 1, sc in same st as join, sc in next dc, 3 sc in center dc, sc in each of next 2 dc, sl st in next sc, sc in each of next 2 dc, 3 sc in center dc, sc in each of next 2 dc, sl st in next sc; repeat from * 14 more times. Sl st to first sc. Fasten off. (96 sts worked 1-per-stitch + 32 extra = 128 sts)*
This round makes each blue shell a firm scallop and adds 0.25 in (0.6 cm), so the finished wall is 6.25 in (15.9 cm) tall.
Handles (Make 2)
With blue and the 5 mm hook, ch 56.
Row 1: Hdc in 3rd ch from hook and in each ch across. Turn. (54 hdc)
Rows 2–4: Ch 2, hdc in each st across. Turn. (54 hdc)
Fasten off, leaving a 16 in (40.6 cm) tail for sewing. Each handle measures 15.5 in x 1.25 in (39.4 cm x 3.2 cm).
Daisies (Make 3)
With golden yellow and the 4 mm hook, make a magic ring.
Rnd 1: Ch 1, 6 sc in ring. Sl st to first sc. (6 sc)
Rnd 2: Ch 1, 2 sc in each st around. Sl st to first sc. Fasten off yellow. (12 sc) The center measures about 1 in (2.5 cm) across.
Rnd 3 (petals): Join cream in any sc. Ch 5, sc in 2nd ch from hook, hdc in next ch, dc in next ch, hdc in next ch, sl st in same sc, sl st in next sc; repeat from * 11 more times, working the last sl st into the joining sc. (12 petals)* Fasten off, leaving a 12 in (30.5 cm) tail.
Each daisy measures about 3 in (7.6 cm) across.
Leaves (Make 4)
With sage green and the 4 mm hook, ch 8.
Rnd 1: Sc in 2nd ch from hook, hdc in next ch, dc in each of next 3 ch, hdc in next ch, (sc, ch 2, sc) in last ch for the tip. Then work along the other side of the chain: hdc in next ch, dc in each of next 3 ch, hdc in next ch, sc in last ch. Sl st to first sc. (14 sts + 1 ch-2 tip)
Fasten off, leaving a 10 in (25.4 cm) tail. Each leaf measures 2 in x 0.75 in (5.1 cm x 1.9 cm).
Make All Pieces
Before you start assembly, check that you have every piece:
- Blue: 1 body, 2 handles
- Cream: 1 scalloped band (pattern below) and petals on 3 daisies
- Golden yellow: 3 daisy centers
- Sage green: 4 leaves
Front layout, left to right:
[Leaf] [Daisy] [Leaf] [Daisy] [Leaf] [Daisy] [Leaf]
Only the front long side gets flowers. The back and the curved ends show the plain shell pattern and the band.
Border: Cream Scalloped Band
The band is a separate strip. It wraps around the upper wall with the scallops pointing up.
Border gauge: 14 sc = 4 in (10.2 cm) with the 5 mm hook.
With cream and the 5 mm hook, ch 98.
Row 1: Sc in 2nd ch from hook and in each ch across. Turn. (97 sc)
Row 2: Ch 1, sc in first st, skip 2 sts, scallop in next st, skip 2 sts, sc in next st; repeat from * 15 more times. (16 scallops + 17 sc)*
Fasten off, leaving a 30 in (76.2 cm) tail. The strip measures about 27.75 in x 1.25 in (70.5 cm x 3.2 cm).
Why the math works: Each scallop uses a 6-stitch repeat. 1 + (16 x 6) = 97, so the row starts and ends with an sc. Rnd 14 of the body also has 16 repeats of 6 sts, so each band scallop matches one body repeat. Around the oval, that puts about 5 scallops on each long side and 3 on each curved end (5 + 5 + 3 + 3 = 16). The 1 extra sc is eased in at the seam.
Assembly
Sew with the yarn tails and a tapestry needle, using a small whipstitch. Keep the stitches snug but not tight, because pulling hard puckers the openwork.
Band: Sew the short ends of the band together to make a ring. Slide it over the basket and line the straight sc edge up with the base of Rnd 14. Sew 1 band sc to each Rnd 14 st (5 dc + 1 sc per repeat). That uses 96 band sc. At the seam, sew the last 2 band sc into one Rnd 14 st. Tack each scallop tip lightly to the wall. The blue Rnd 16 shells should show above the cream.
Handles: On each long side, place the 2 handle ends inside the basket, centered and 4 in (10.2 cm) apart. Overlap each end 1.25 in (3.2 cm) below the rim. Sew around all four edges of each overlap, going around twice for strength.
Appliqués: Pin the daisies across the front so their centers are about 2.75 in (7.0 cm) above the cream ridge, just below the band. Tuck the leaves partly behind the petals: one at each end and one in each gap. Sew each daisy around its center and at each petal tip. Sew each leaf along its center line.
Size checkpoint: The basket should still measure 10.5 in x 6.25 in x 6.25 in (26.7 cm x 15.9 cm x 15.9 cm). If the rim pulls in, your band stitches are too tight.
Final Blocking
- Mist the basket until it’s damp but not wet.
- Stuff it firmly with a towel to shape the walls into an even oval.
- Set it on a flat surface and press the base flat.
- Pin the blue and cream scallops into even curves.
- Smooth the petals and leaves flat with your fingers.
- Shape the handles into matching arches.
- Let it dry completely for about 24 hours.
- If you’re using the plastic canvas insert, set it in the base now.
Final Quality-Control Checklist
- The base lies flat and measures 10.5 in x 6.25 in (26.7 cm x 15.9 cm)
- The cream ridge shows all the way around the bottom
- Every shell round has 16 shells
- The triangular openings are even all around
- The rim trim has 16 firm scallops
- The band has 16 scallops and all of them are tacked down
- The handles are the same length, centered and sewn securely
- The 3 daisies and 4 leaves are evenly spaced across the front
- All yarn ends are woven in on the inside
Troubleshooting
Base ruffles: You’re working too loosely on the curves. Use a smaller hook for Rnds 3–5.
Base cups: An increase is missing. Recount each end against the stitch count for that round.
Walls flare out: Keep the ch-3 spaces in Rnds 11 and 15 snug.
Walls lean in: Your chains are too tight. Loosen them a little.
Band too long: Ease in 2 more band sc at evenly spaced points.
Petals curl: Pin them flat while blocking.
Handles stretch: Sew a cotton ribbon along the inside of each handle.
Care
Hand wash in cool water with mild soap. Roll it in a towel to remove water, then let it dry stuffed with a towel so it keeps its shape.
Final Notes
Every measurement depends on the base. At a gauge of 14 dc = 4 in (10.2 cm), the 96-stitch base edge measures 10.5 in x 6.25 in (26.7 cm x 15.9 cm). Those same 96 stitches go straight up the wall as 16 shell repeats, ending at 6.25 in (15.9 cm) tall. The 97-sc band matches those 16 repeats, with 1 sc eased in at the seam. If the base and walls measure correctly, the rest will fit.
Happy crocheting!