

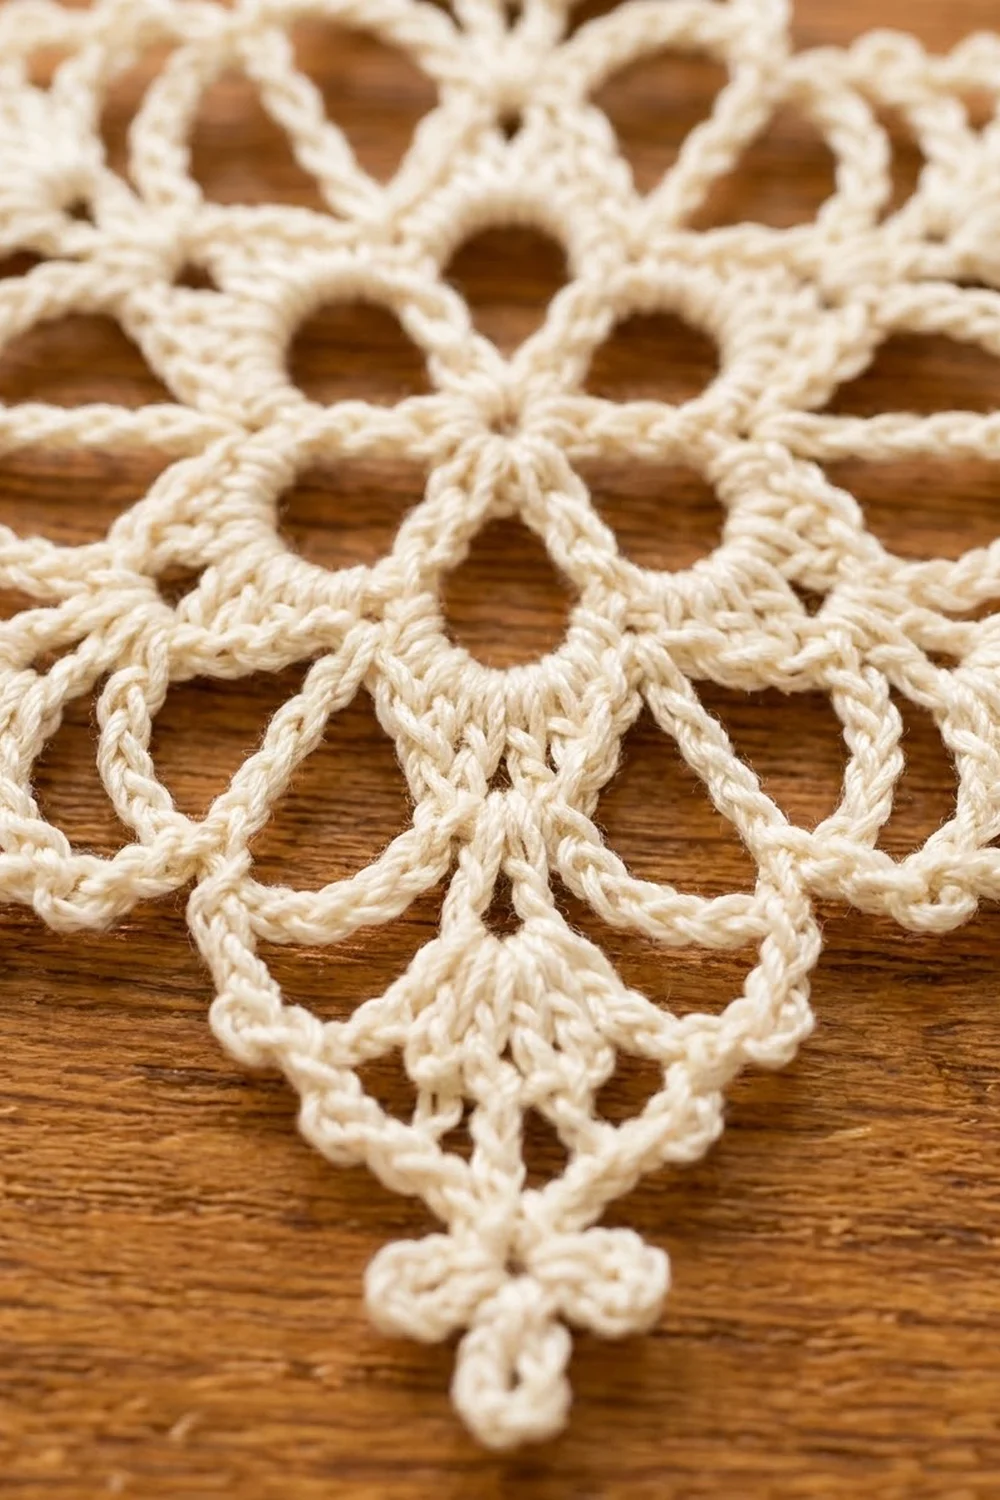
The Frost Lantern Snowflake is a single six-pointed lace star worked in cream cotton thread. It has an open flower ring at the center, light chain arches, a small fan inside each point, and a trefoil picot cluster at every tip. A chain loop at one tip lets it hang from a tree branch, a window hook, or a gift tag.
The finished ornament measures 4.5 in (11.4 cm) from tip to tip, including the picots. One soft ivory shade gives it a classic, wintry look that suits any palette, but you could also try bright white, pale silver-gray, or icy blue.
This pattern uses US crochet terms. Everything is worked in the round, right side facing, with no turning. You will make one center ring, cover its loops to form petals, add a round of arches, build scalloped fans, open up the point lace, and finish with an edging round that shapes the star and adds the trefoil tips. The hanging loop is chained at the very end.
Because the piece is small, the whole snowflake is a quick evening project. Stitch counts are given after every round so you can check your work as you go.
Finished Size and Construction
- Finished size: 4.5 in (11.4 cm) tip to tip, after blocking
- Skill level: Intermediate (thread work, picots, working into chain spaces)
- Terminology: US crochet terms
- Yarn weight: Size 10 cotton crochet thread (Lace / 0)
- Hook: 1.75 mm (US steel 6)
- Number of pieces: 1 (single motif)
- Layout: one six-pointed star, worked in the round
- Piece size: 4.5 in (11.4 cm) tip to tip
- Size before edging (after Round 6): 3.75 in (9.5 cm) tip to tip
- Edging depth: about 0.375 in (1.0 cm) added at each tip
- Hanging loop: about 1.5 in (3.8 cm) tall
Materials
Yarn: Choose a mercerized size 10 cotton crochet thread. Mercerized cotton has a soft sheen, holds starch well, and keeps the picots crisp. Avoid fuzzy or very stretchy fibers, because they blur the lace and don’t block as sharply.
- Cream / ivory: 4 g, about 20 m (22 yd)
These quantities include a margin of roughly 30 percent. That covers your gauge test, joins, tails, and the hanging loop.
Tools:
- 1.75 mm (US steel 6) crochet hook
- Fine tapestry needle or small-eye beading needle
- Small, sharp scissors
- Blocking board or foam mat, plus rustproof pins
- Fabric stiffener or starch solution (optional but recommended)
- Plastic wrap to protect the board (optional)
Abbreviations (US Terms)
- ch – chain
- sl st – slip stitch
- sc – single crochet
- hdc – half double crochet
- dc – double crochet
- sp – space
- st(s) – stitch(es)
- rep – repeat
- beg – beginning
Special stitch – Trefoil picot (TP): Ch 4, sl st in 4th ch from hook (first lobe), ch 5, sl st in 5th ch from hook (center lobe), ch 4, sl st in 4th ch from hook (third lobe). The three lobes sit side by side and fan out to form the three-lobed tip. The center lobe is slightly larger, so the tip points outward.
Gauge and Checkpoints
Gauge isn’t critical for an ornament, but it does set the final size and affects how well the points block. Work Rounds 1–3 as a test piece first, then measure.
Gauge: Rounds 1–3 measure 1.25 in (3.2 cm) across, unblocked.
Measurement checkpoints (laid flat, unblocked):
- After Round 1: 0.5 in (1.3 cm) across
- After Round 3: 1.25 in (3.2 cm) across
- After Round 5: 2.25 in (5.7 cm) across
- After Round 6: 3.75 in (9.5 cm) tip to tip
- After Round 7 and blocking: 4.5 in (11.4 cm) tip to tip
If your piece is too big: Go down to a 1.5 mm (US steel 7) hook, or work the chain arches a little tighter. Loose chains are the most common cause of oversizing.
If your piece is too small: Go up to a 2.0 mm (US steel 4) hook. If the center is tight and starts to cup, the ring is usually the cause, so loosen your sc in Round 1.
If your test piece matches the gauge, just keep going and use it for the real snowflake.
Snowflake Pattern
Leave a 6 in (15.2 cm) starting tail. Work with the right side facing throughout. The beg ch 1 does not count as a stitch. The beg ch 3 counts as a dc.
Round 1 – Center Ring
Ch 6, sl st in first ch to form a ring.
Ch 1, 12 sc in ring, sl st in first sc to join.
Stitch count: 12 sc.
Pull the starting tail gently to close the center slightly. You should still see a small open hole in the middle.
Round 2 – Petal Loops
Ch 1, sc in same st as join, ch 5, skip next sc, *sc in next sc, ch 5, skip next sc; rep from * 4 more times, sl st in first sc to join.
Stitch count: 6 sc and 6 ch-5 sps.
Round 3 – Covered Petals
Sl st into the first ch-5 sp. Ch 1, 7 sc in same sp, *7 sc in next ch-5 sp; rep from * 4 more times, sl st in first sc to join.
Stitch count: 42 sc (7 per petal).
The six covered loops form the open flower ring around the center hole. The 4th sc of each group of 7 is the petal’s center stitch.
Round 4 – Arches
Sl st in next 3 sc, so you are in the 4th (center) sc of the first petal.
Ch 1, sc in same st, ch 7, *sc in center sc of next petal, ch 7; rep from * 4 more times, sl st in first sc to join.
Stitch count: 6 sc and 6 ch-7 sps.
Each arch runs from one petal tip to the next and becomes the base of one star point.
Round 5 – Fan Scallops
Sl st into the first ch-7 sp.
Ch 1, *(sc, hdc, 3 dc, ch 3, 3 dc, hdc, sc) in ch-7 sp; rep from * in each of the next 5 ch-7 sps, sl st in first sc to join.
Stitch count: 60 sts (10 per scallop: 2 sc, 2 hdc, 6 dc) and 6 ch-3 sps.
These scallops are the solid fans inside each point. The ch-3 sp at the top of each scallop marks where the point will rise. The spot where two scallops meet, between the last sc of one and the first sc of the next, is a valley.
Round 6 – Point Lace
Sl st in next hdc, sl st in next 3 dc, sl st into the ch-3 sp.
Ch 3 (counts as dc), (2 dc, ch 3, 3 dc) in same ch-3 sp. This is the first shell.
*Ch 6, sc in the next valley (insert hook between the 2 sc where the scallops meet), ch 6, (3 dc, ch 3, 3 dc) in next ch-3 sp; rep from * 4 more times.
Ch 6, sc in the last valley, ch 6, sl st in top of beg ch-3 to join.
Stitch count: 6 shells (36 dc and 6 ch-3 sps), 6 valley sc, and 12 ch-6 sps. That’s 42 sts plus 18 ch sps.
The ch-6 arches run diagonally from each shell down into the valley and back up to the next shell. They create the open lace along both sides of every point and the inward curve between points.
Checkpoint: 3.75 in (9.5 cm) tip to tip, measured across opposite shells.
Round 7 – Edging and Trefoil Tips
Round 7 is the snowflake’s edging. Its instructions are in the Border section below, where the math is laid out step by step.
Border
The border is Round 7. It covers every chain arch with sc, outlines each shell, and places one trefoil picot at each of the six tips.
Border gauge: 7 sc per ch-6 sp, which is one sc more than the chain count. About 10 sc measure 0.75 in (1.9 cm).
Round 7: Ch 1, sc in same st as join (top of beg ch-3), sc in next 2 dc.
In the ch-3 sp, work (sc, TP, sc). Sc in next 3 dc, 7 sc in next ch-6 sp, sc in valley sc, 7 sc in next ch-6 sp*, sc in next 3 dc; rep from * 4 more times, then rep from * to ** once more. Sl st in first sc to join.
Exact counts per point:
- 3 sc over the first half of the shell
- 1 sc + TP + 1 sc in the tip sp
- 3 sc over the second half of the shell
- 7 sc down the first ch-6 arch
- 1 sc in the valley
- 7 sc up the second ch-6 arch
That’s 3 + 2 + 3 + 7 + 1 + 7 = 23 sc and 1 TP per point.
Round total: 6 × 23 = 138 sc and 6 TP.
Your first 3 sc (into the beg ch-3 and next 2 dc) are the first-half shell stitches for point one. That’s why the final repeat stops at ** instead of working them again. Fasten off, leaving a 6 in (15.2 cm) tail.
Why the math works: Each point in Round 6 has 6 dc, 2 ch-6 arches, and 1 valley sc. Round 7 places exactly 1 sc on each dc (6), 7 sc in each ch-6 arch (14), and 1 sc in the valley (1). That’s 21 sc, plus the 2 sc on either side of the TP, for 23. Working 7 sc into a 6-chain arch makes the edge just long enough to lie flat without ruffling. Placing only one sc at the valley keeps the inward curve sharp. The stitch counts create the point shape, and blocking only refines it.
Hanging loop: Rejoin thread with a sl st in the TP center lobe of any one point. Ch 30, sl st in the same st. Fasten off. The loop stands about 1.5 in (3.8 cm) tall. You can also chain the loop straight from the final TP before fastening off.
Final Blocking
Blocking makes a big difference to lace snowflakes, so don’t skip it.
- Weave in ends loosely along the back of the sc, then trim to 0.25 in (0.6 cm). For extra security, you can wait to trim until after starching.
- Wet the piece in cool water, or soak it in fabric stiffener for 5 minutes. Press out the excess gently in a towel; don’t wring it.
- Mark a guide. On your board, draw or pin a 4.5 in (11.4 cm) circle with six evenly spaced lines, 60 degrees apart.
- Pin the center flat, then pin the center lobe of each tip’s TP on its guide line at the circle’s edge.
- Pin each valley so it curves inward evenly. Each valley sc should sit about 1.25 in (3.2 cm) from the center.
- Open the picots by pinning the outer lobes of every TP slightly outward.
- Shape the petal ring with a pin or a pencil point so each covered loop is round.
- Dry fully, 12 to 24 hours, before unpinning.
Final Quality-Control Checklist
- Six points, all equal in length (within 0.125 in / 0.3 cm)
- Tip-to-tip size is 4.5 in (11.4 cm) on all three axes
- Center hole is open, and all six petal loops are round
- Each point has 23 sc and one fully opened TP
- Valleys curve inward evenly, with no puckers
- Fans lie flat inside each point
- All ends are woven in and invisible from the front
- Hanging loop is secure and centered on one tip
- The piece holds its shape when lifted by the loop
Troubleshooting
The center cups or bowls. Round 1 is too tight. Rework it with looser sc.
Points are uneven lengths. Count the sc in each arch. An arch with 6 or 8 sc will pull the point sideways. Fix the arch and block again.
The edges ruffle. Your chains are tighter than your sc. Work 6 sc into each ch-6 sp instead of 7 and use the same count on every arch: 21 sc per point, 126 sc in total.
Valleys look flat instead of curved. Check that the Round 6 valley sc goes between the scallops, not into a scallop stitch. Pin the valley inward when blocking.
Picots flop or close up. Use a firmer starch and pin each lobe open. Mercerized thread holds picots better than matte cotton.
Hanging loop twists. Chain a little more loosely, and let the ornament hang freely while the stiffener dries.
Care
Hand wash in cool water with a mild soap, press dry in a towel, and re-block if needed. Store flat in tissue paper to protect the points.

Final Notes
Here is the measurement chain. The center ring measures 0.5 in (1.3 cm). The covered petals bring it to 1.25 in (3.2 cm). The fan scallops reach 2.25 in (5.7 cm). The point lace opens it to 3.75 in (9.5 cm). The edging with trefoil tips finishes it at 4.5 in (11.4 cm) after blocking.
If each checkpoint matches, the final size will come out right. Count 23 sc per point in the last round and block on a guide, and your Frost Lantern Snowflake will hang straight on the tree. Make one as a gift topper, or keep a few for a winter window.
Happy crocheting!