

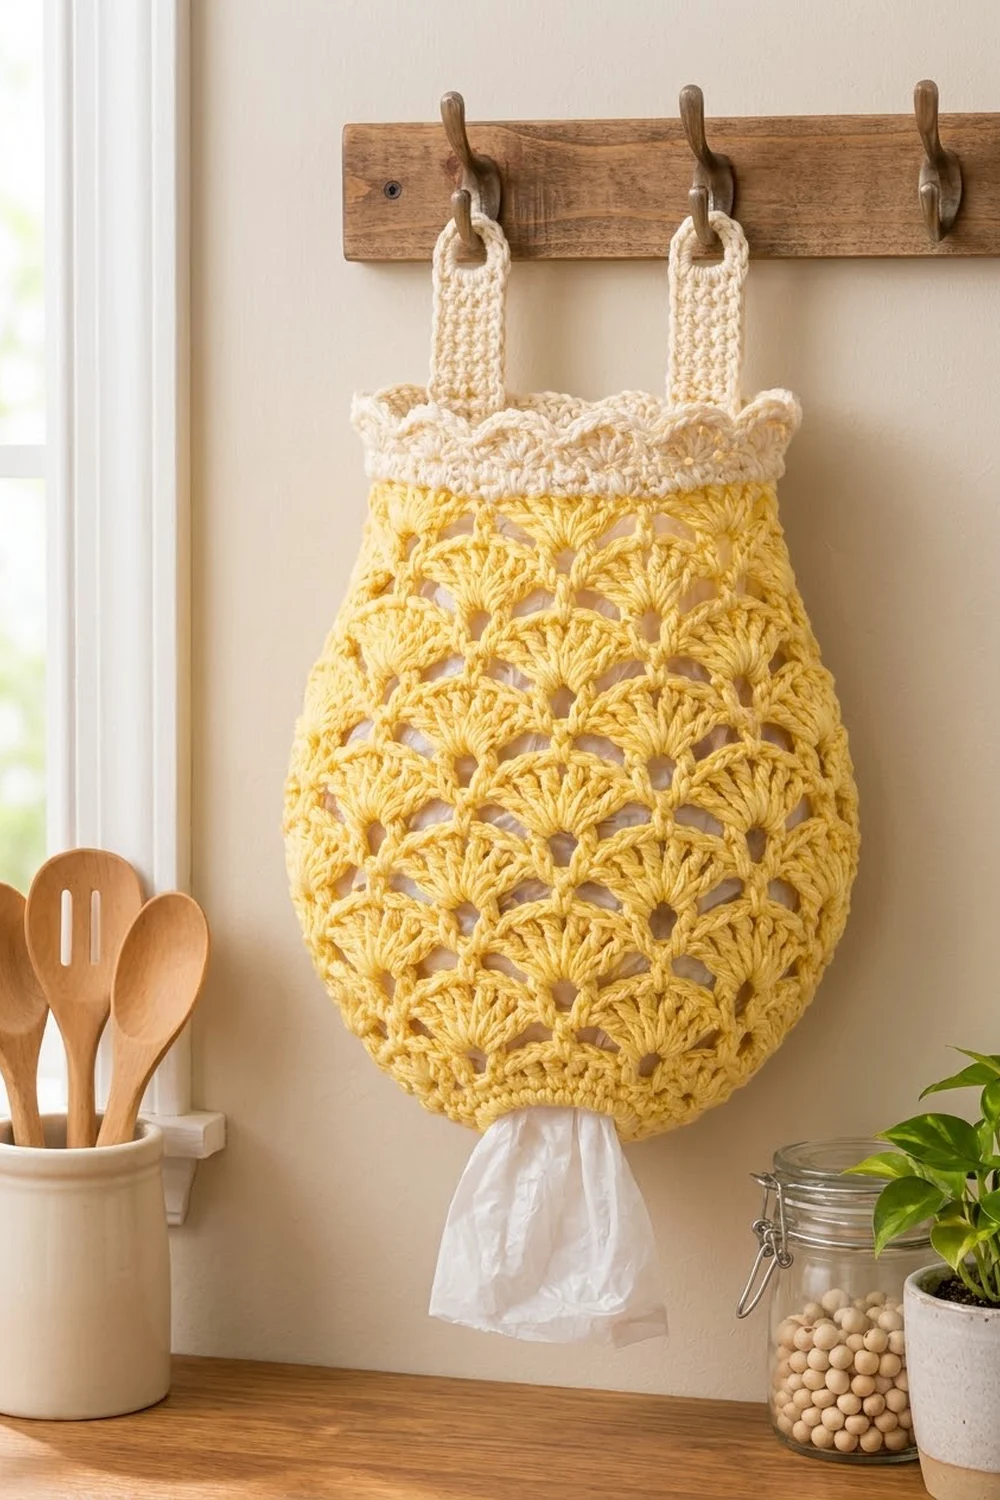
This bag holder keeps a pile of plastic grocery bags tidy in a soft, open shell texture. Stuff bags in through the top and pull them out one at a time through the slot at the bottom. It hangs from two cream tabs, so it works on a pair of hooks, a cabinet door, or a pantry rail.
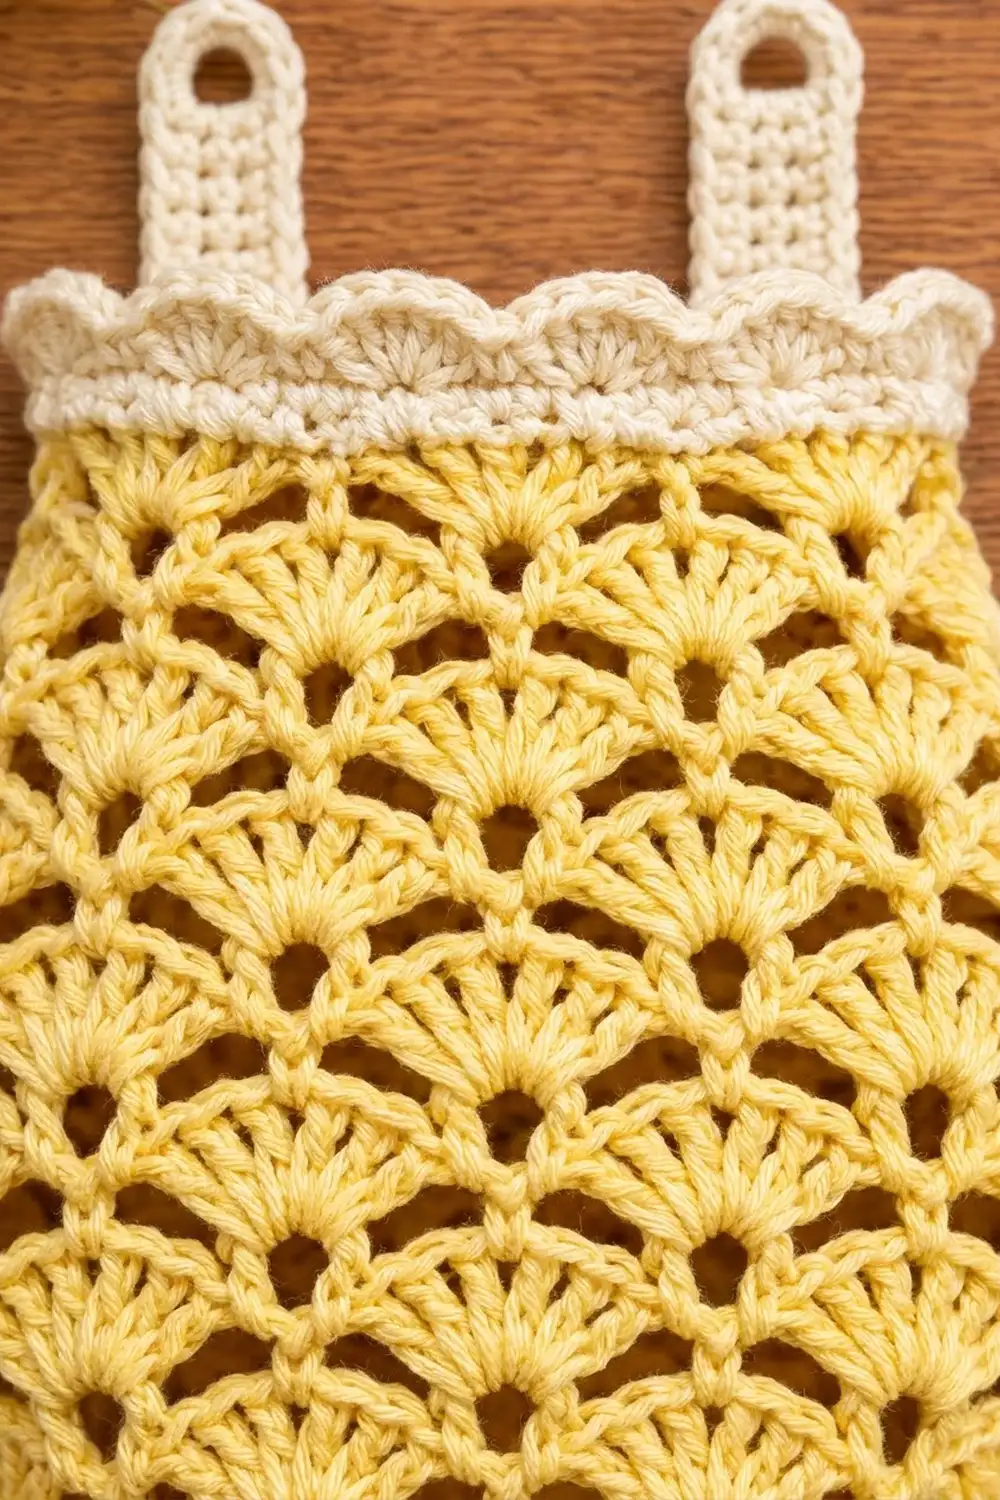
The body is worked in a pale buttery yellow, and a cream rim and tabs frame the top. The fan shells sit in staggered rows like roof tiles, with a small eyelet under each fan. The look is light and a little vintage, and it suits a farmhouse or cottage kitchen.
The pattern uses US crochet terms. The finished holder measures 9 in (22.9 cm) wide at the widest point and 10.5 in (26.7 cm) tall without the tabs. With the tabs, it is 12.5 in (31.8 cm) tall.
You crochet the body in joined rounds as one seamless tube. It starts with a chain ring, which becomes the dispensing slot. Three solid rounds shape the bottom. The shell rounds then widen the body, keep it at full width through the middle, and ease it back in for the top. You sew two tabs to the inside of the back, and then a cream border finishes the rim.
Finished Size and Construction
- Finished size: 9 in (22.9 cm) wide × 10.5 in (26.7 cm) tall; 12.5 in (31.8 cm) tall including tabs
- Skill level: Easy intermediate
- Terminology: US crochet terms
- Yarn weight: Worsted (#4), cotton or cotton blend
- Hook: 5.0 mm (H-8)
- Number of pieces: 3 (1 body, 2 tabs)
- Layout: Tube body, flattened, with the tabs sewn inside the back layer
- Piece sizes: Body 9 in (22.9 cm) wide; tabs 1 in × 4 in (2.5 × 10.2 cm)
- Size before border: 9 in (22.9 cm) wide × 9.5 in (24.1 cm) tall
- Border depth: 1 in (2.5 cm)
Materials
Choose a smooth worsted-weight cotton or cotton blend. Cotton holds the shell shapes crisply and doesn’t stretch out under the weight of the bags. Avoid fuzzy yarns, because they hide the eyelets.
- Pale yellow (body): 90 g / 155 m (170 yd)
- Cream (border and tabs): 20 g / 35 m (38 yd)
Both quantities include a margin of about 15 percent for your gauge swatch and for tension differences.
Tools:
– 5.0 mm (H-8) crochet hook
– Locking stitch marker
– Tapestry needle
– Scissors
– Measuring tape
– Rust-proof pins and a blocking mat or folded towel
Abbreviations (US Terms)
- ch – chain
- sl st – slip stitch
- sc – single crochet
- dc – double crochet
- sk – skip
- sp – space
- st(s) – stitch(es)
- rnd(s) – round(s)
Special stitches:
– 5-dc shell: work 5 dc in the same stitch.
– 7-dc shell: work 7 dc in the same stitch.
– Center dc: the middle dc of a shell, which is the 3rd dc of a 5-dc shell or the 4th dc of a 7-dc shell.
Gauge and Checkpoints
- Single crochet: 16 sc and 16 rnds = 4 in (10.2 cm)
- 5-dc shell repeat (shell plus sc): 1.5 in (3.8 cm) wide
- 7-dc shell repeat with ch-1s: 2.25 in (5.7 cm) wide
- Shell rounds: 4 rnds = 2.5 in (6.4 cm) tall
Treat the start of the body as your swatch. After Rnd 3, flatten the tube and measure it. If it measures correctly, the rest of the gauge will usually follow.
Checkpoints (measured flat, so width is one layer):
– After Rnd 1: ring 3 in (7.6 cm) wide
– After Rnd 3: 6 in (15.2 cm) wide, 0.75 in (1.9 cm) tall
– After Rnd 5: 6 in (15.2 cm) wide, 2 in (5.1 cm) tall
– After Rnd 7: 7.5 in (19.1 cm) wide, 3.25 in (8.3 cm) tall
– After Rnd 13: 9 in (22.9 cm) wide, 7 in (17.8 cm) tall
– After Rnd 17: 7.5 in (19.1 cm) wide, 9.5 in (24.1 cm) tall
If your piece measures more than 0.25 in (0.6 cm) too wide at Rnd 3, go down half a hook size. If it is too narrow, go up half a size. Before you move on, rip back and restart so the slot and the base match.
Body
The body is worked in joined rounds with the right side always facing you. Don’t turn between rounds. Place a marker in the first stitch of each round.
Rnd 1: With yellow, ch 24 and join with a sl st to the first ch to form a ring, taking care not to twist the chain. Ch 1, sc in each ch around, then join with a sl st to the first sc. (24 sc)
This ring is the dispensing slot. Flattened, it measures 3 in (7.6 cm) across.
Rnd 2: Ch 1, sc in next st, 2 sc in next st, repeat 12 times, join. (36 sc)
Rnd 3: Ch 1, sc in next 2 sts, 2 sc in next st, repeat 12 times, join. (48 sc)
These three rounds form the solid, rounded bottom around the slot.
Rnd 4 (shell set-up): Ch 1, sc in first st, sk 2, 5-dc shell in next st, sk 2, sc in next st, repeat 7 times, sk 2, 5-dc shell in next st, sk 2, join to the first sc. (8 shells, 8 sc = 48 sts)
Each repeat uses 6 stitches, and 8 × 6 = 48. The skipped stitches open the eyelets under the fans.
Rnd 5: Sl st in next 3 dc so you are in the center dc. Ch 1, sc in the same dc, 5-dc shell in next sc, sc in center dc of next shell, repeat 7 times, 5-dc shell in last sc, join. (8 shells, 8 sc = 48 sts)
This round staggers the shells: each new fan sits on the sc between two fans below it.
Rnd 6: Sl st in next 3 dc, ch 1, sc in the same dc, 7-dc shell in next sc, sc in center dc of next shell, repeat 7 times, 7-dc shell in last sc, join. (8 shells, 8 sc = 64 sts)
Rnd 7: Sl st in next 4 dc, ch 1, sc in the same dc, 7-dc shell in next sc, sc in center dc of next shell, repeat 7 times, 7-dc shell in last sc, join. (8 shells, 8 sc = 64 sts)
Rnd 8: Sl st in next 4 dc, ch 1, sc in the same dc, ch 1, 7-dc shell in next sc, ch 1, sc in center dc of next shell, ch 1, repeat 7 times, 7-dc shell in last sc, ch 1, join. (56 dc + 8 sc + 16 ch = 80 sts)
The ch-1s widen each repeat to 2.25 in (5.7 cm), which gives the body its full width.
Rnds 9–13: Sl st in next ch-1 sp and next 4 dc, ch 1, sc in the same dc, ch 1, 7-dc shell in next sc, ch 1, sc in center dc of next shell, ch 1, repeat 7 times, 7-dc shell in last sc, ch 1, join. (80 sts each round)
At the Rnd 13 checkpoint, the body should be at its widest: 9 in (22.9 cm).
Rnd 14 (narrowing): Sl st in next ch-1 sp and next 4 dc, ch 1, sc in the same dc, 7-dc shell in next sc, sc in center dc of next shell, repeat 7 times, 7-dc shell in last sc, join. Skip all ch-1 sps. (8 shells, 8 sc = 64 sts)
Rnds 15–17: Work as for Rnd 7. (64 sts each round) Fasten off the yellow.
Dropping the chains takes the top back to 7.5 in (19.1 cm) wide. This gives the rounded, egg-like shoulders.
Flatten the body so the slot sits centered at the bottom. Shells 1–4 are on the front face and shells 5–8 are on the back.
Make All Pieces
You need 1 body (yellow) and 2 tabs (cream).
Tab (make 2):
Row 1: With cream, ch 5, sc in 2nd ch from hook and in each ch across. (4 sc)
Rows 2–12: Ch 1, turn, sc in each st across. (4 sc)
Row 13 (eyelet): Ch 1, turn, sc in first st, ch 2, sk 2, sc in last st. (2 sc, 1 ch-2 sp)
Row 14: Ch 1, turn, sc in first st, 2 sc in ch-2 sp, sc in last st. (4 sc)
Rows 15–16: Ch 1, turn, sc in each st across. (4 sc)
Fasten off and leave a 12 in (30.5 cm) tail. Each tab measures 1 in × 4 in (2.5 × 10.2 cm), and the eyelet is about 0.5 in (1.3 cm) across.
Layout (back face, viewed from the inside):
   [TAB]            [TAB]
     |                |
 ----+----------------+----   top of Rnd 17
 |<1.5 in>|<-4.5 in->|<1.5 in>|
          BACK LAYER
Joining
Sew the tabs on before you work the border, so that the border covers their lower ends.
- Turn the body so the inside of the back layer faces you.
- Place each tab so its center is 1.5 in (3.8 cm) in from a side fold. This leaves the tab centers 4.5 in (11.4 cm) apart.
- Overlap Rows 1–4 of each tab, 1 in (2.5 cm), onto the inside of Rnds 16–17. Three inches (7.6 cm) of each tab should stand above the yellow edge.
- Using the tail, whipstitch the sides and bottom of the overlap through the back loops of the yellow stitches. Go through the back layer only.
Keep the tension firm but flat. Each stitch should pull the tab snug without puckering the shells on the front. The tabs carry the full load of bags, so take a second pass around the overlap.
Checkpoint: From the slot to the top of a tab, the holder should measure 12.5 in (31.8 cm).
Border
Border gauge: 16 sc = 4 in (10.2 cm), the same as the body sc.
Border Rnd 1: Join cream with a sc in the first dc of any shell at a side fold. Work 1 sc in each dc and skip each sc between shells. Join. (56 sc = 56 worked 1-per-dc + 0 added)
The top of Rnd 17 has 64 stitches. You work into the 56 dc only, skipping the 8 sc. The result is 28 sc per face, which measures 7 in (17.8 cm) flat and gives a gentle gather at the opening.
Border Rnd 2: Ch 1, sc in each st around, join. (56 sc)
Border Rnd 3 (scallops): Ch 1, sc in first st, sk 1, 5 dc in next st, sk 1, sc in next st, repeat 13 times, sk 1, 5 dc in next st, sk 1, join. (14 scallops: 70 dc + 14 sc = 84 sts)
Fasten off and weave in the ends.
Why the math works: Each scallop uses 4 stitches, and 14 × 4 = 56, so the pattern closes without a partial repeat. With 28 stitches per face, you get exactly 7 scallops on the front and 7 on the back. The two sc rounds add 0.5 in (1.3 cm) and the scallops add 0.5 in (1.3 cm), for a border depth of 1 in (2.5 cm). That brings the body from 9.5 in (24.1 cm) to 10.5 in (26.7 cm) tall.
Final Blocking
- Soak the holder in cool water for 10 minutes, then press out the water gently. Don’t wring it.
- Roll it in a towel to remove the excess moisture.
- Lay it flat with the slot centered at the bottom and the side folds straight.
- Ease it to 9 in (22.9 cm) wide at the Rnd 13 level and 10.5 in (26.7 cm) tall without the tabs.
- Pin each fan along its outer edge so the shells open evenly and the eyelets show.
- Pin the points of the 7 front scallops in a straight line.
- Straighten the tabs and pin them flat.
- Let it dry completely, which takes 24 hours for cotton.
Final Quality-Control Checklist
- 8 shells in every shell round, with staggered fans
- The slot measures 3 in (7.6 cm) flat and is centered at the bottom
- Widest point is 9 in (22.9 cm)
- Top edge of the yellow measures 7.5 in (19.1 cm)
- 7 scallops on each face of the rim
- Tabs are 4.5 in (11.4 cm) apart center to center and stand 2 in (5.1 cm) above the scallops
- Tab stitching doesn’t show on the front
- All ends are woven in securely
Troubleshooting
Shells stack instead of staggering: You started a round in the wrong place. Check that every round begins with the sl sts to the center dc.
The bottom cups or ruffles: Your increases are too tight or too loose against your gauge. Re-check Rnd 3 against the 6 in (15.2 cm) checkpoint.
The eyelets are uneven: Count the skipped stitches in Rnd 4. Every repeat must skip exactly 2 stitches on each side of the shell.
The body is too wide at the middle: Work the ch-1s more tightly, or drop to a 4.5 mm hook for Rnds 8–13 only.
The rim flares: Work Border Rnd 1 more firmly. Don’t add stitches.
The tabs sag: Sew the overlap again with a second pass, and stitch across the middle of the overlap as well.
The slot is too tight for bags: Work Rnd 1 with a hook one size larger, then switch back for Rnd 2. The stitch counts stay the same.
Care
Hand wash or machine wash on a gentle cycle in cool water, then lay flat to dry. Reshape the shells and scallops while the piece is still damp.
Final Notes
Each stage builds on the one before it. The 24-stitch ring makes a 3 in (7.6 cm) slot. Three solid rounds widen the bottom to 6 in (15.2 cm). The shell rounds grow the body to 9 in (22.9 cm), then ease it back to 7.5 in (19.1 cm) at 9.5 in (24.1 cm) tall. The cream border gathers the rim to 7 in (17.8 cm) and adds 1 in (2.5 cm), for a body height of 10.5 in (26.7 cm). The tabs bring the total height to 12.5 in (31.8 cm). If you check each measurement as you go, the finished holder will hang straight and dispense bags smoothly.
Happy crocheting!