

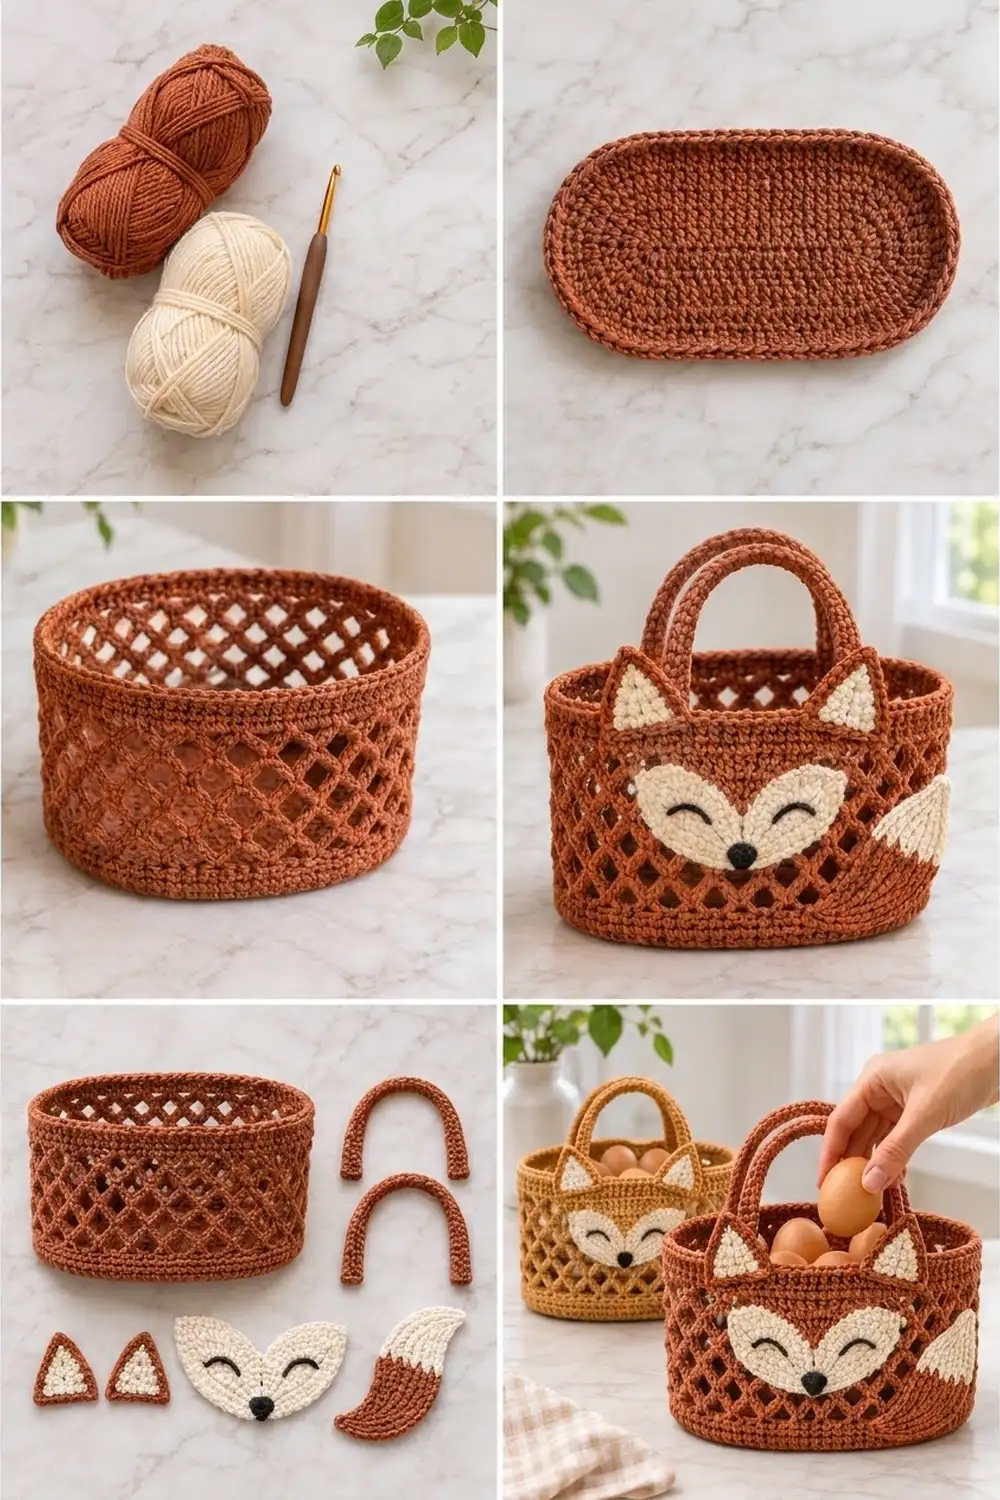
This fox basket is an oval carry basket with an open diamond lattice wall. A smiling fox face, two pointed ears and a curled tail are sewn onto the front, and two arched handles are stitched inside the rim. It looks sweet on a kitchen counter holding eggs, and it works just as well for yarn, small toys or spring treats.
The main color is a warm rust, close to terracotta. The face, the inner ears and the tail tip are cream. The closed “happy” eyes and the button nose are black. The base and the bands at the top and bottom of the wall are tight single crochet. The middle of the wall is a ch-5 diamond mesh, which keeps the basket light.
The pattern uses US crochet terms. The finished basket measures about 10.5 in (26.7 cm) long, 5.5 in (14.0 cm) wide and 6 in (15.2 cm) tall. With the handles it is about 10 in (25.4 cm) tall.
You crochet the oval base in joined rounds, then work the wall straight up from it without a seam. Then you make two handle strips, two ears, a face, a nose and a tail as separate pieces and sew them on.
Finished Size and Construction
- Finished size: 10.5 in (26.7 cm) long x 5.5 in (14.0 cm) wide x 6 in (15.2 cm) tall; 10 in (25.4 cm) tall at the top of the handles
- Skill level: Easy-intermediate
- Terminology: US
- Yarn weight: Medium #4 (aran) cotton
- Hook: 5.0 mm (H-8)
- Number of pieces: 1 basket body plus 7 small pieces (2 handles, 2 ears, 1 face, 1 nose, 1 tail)
- Layout: Face centered on one long side, ears on the rim above it, tail at the lower right of the front, one handle on each long side
- Base size: 10.5 x 5.5 in (26.7 x 14.0 cm), 96 sts around
- Wall height before the top border: 4.75 in (12.1 cm)
- Top border depth: 1.25 in (3.2 cm)
Materials
Use a smooth, firm cotton or cotton-blend aran yarn. Cotton holds the basket’s shape better than acrylic and keeps the lattice crisp. The amounts below are for a yarn of about 170 m per 100 g.
- Rust (main color): 150 g, about 255 m
- Cream: 25 g, about 43 m
- Black: 5 g, about 9 m
All amounts include a safety margin of about 20%.
Tools: 5.0 mm (H-8) hook, 4 locking stitch markers, tapestry needle, scissors, rustproof pins, spray bottle, and a box or rolled towel for blocking.
Abbreviations (US Terms)
- ch – chain
- sl st – slip stitch
- sc – single crochet
- hdc – half double crochet
- dc – double crochet
- tr – treble crochet
- sc2tog / sc3tog – single crochet 2 / 3 together
- BLO – back loop only
- sp – space
- st(s) – stitch(es)
- inc – 2 sc in the same st
Special stitch – closing loop (ch 2, dc): At the end of a mesh round, ch 2, then dc in the first sc of the round. Together the ch 2 and dc are the same length as a ch-5 loop, and they leave your hook at the center of that loop, ready for the next round.
Gauge and Checkpoints
Gauge: 14 sc and 16 rounds = 4 in (10.2 cm) in joined sc rounds with a 5.0 mm hook.
Use the base as your test piece. Measure it after Rnd 5 and again after Rnd 10, before you start the wall.
- After Rnd 5 (66 sts): about 8 x 3 in (20.3 x 7.6 cm)
- After Rnd 10 (96 sts): 10.5 x 5.5 in (26.7 x 14.0 cm)
- After Rnd 14: the wall is 1 in (2.5 cm) tall
- After Rnd 20: the wall is 4.5 in (11.4 cm) tall
- After Rnd 21: the wall is 4.75 in (12.1 cm) tall
- After Rnd 26: the wall is 6 in (15.2 cm) tall
If the base is more than 0.25 in (0.6 cm) too big, change to a 4.5 mm hook. If it is too small, change to a 5.5 mm hook. A basket needs firm fabric, so if you’re between two sizes, use the smaller hook.
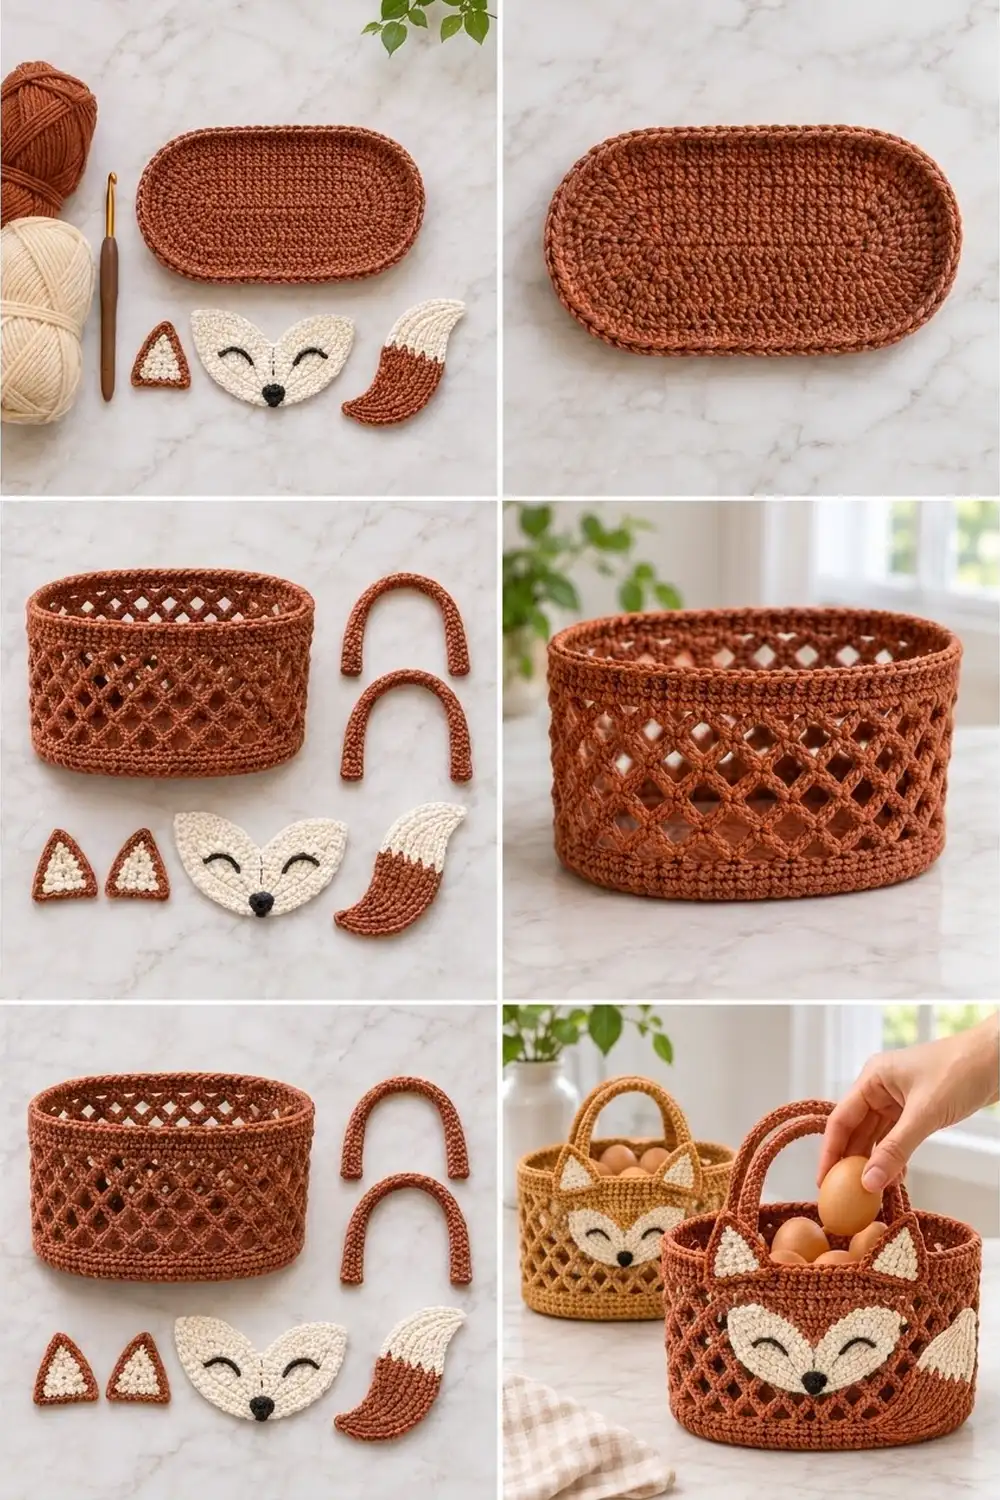
Basket Base
Use Rust. Work in joined rounds. The ch 1 at the start of a round does not count as a stitch. Join each round with a sl st in the first sc.
Each round has two end groups (the curved ends) and two side groups of 18 sts (the straight sides). Every round starts at the first stitch of an end group.
Rnd 1: Ch 21. Work 3 sc in the 2nd ch from the hook, then sc in the next 18 ch. Work 3 sc in the last ch. Rotate the piece and sc in the next 18 ch along the underside of the chain. Join. (42 sts: ends 3 + 3, sides 18 + 18)
Rnd 2: Ch 1, [2 sc in each of next 3 sts, sc in next 18 sts] twice. Join. (48 sts)
Rnd 3: Ch 1, [(sc in next st, inc) 3 times, sc in next 18 sts] twice. Join. (54 sts)
Rnd 4: Ch 1, [(sc in next 2 sts, inc) 3 times, sc in next 18 sts] twice. Join. (60 sts)
Rnd 5: Ch 1, [(sc in next 3 sts, inc) 3 times, sc in next 18 sts] twice. Join. (66 sts)
Rnds 6–10: Keep the same pattern. Each round adds 1 more plain sc before each inc in the end groups. The sides stay at 18 sts.
- Rnd 6: (sc 4, inc) (72 sts)
- Rnd 7: (sc 5, inc) (78 sts)
- Rnd 8: (sc 6, inc) (84 sts)
- Rnd 9: (sc 7, inc) (90 sts)
- Rnd 10: (sc 8, inc) (96 sts: ends 30 + 30, sides 18 + 18)
The base should lie flat. If it cups, your increases are too tight. If it ruffles, make sure you work exactly 3 increases in each end group.
Basket Wall
Rnd 11 (turning round): Ch 1, sc in BLO of each st around. Join. (96 sts) The unused front loops form a neat ridge around the base, and the wall starts to stand up.
Rnds 12–14: Ch 1, sc in each st around. Join. (96 sts)
Checkpoint: The solid lower band is 1 in (2.5 cm) tall.
Lattice Mesh
The 96 sts divide into 24 repeats of 4 sts, so the diamonds repeat evenly all the way around.
Rnd 15 (set-up): Ch 1, sc in first st, ch 5, skip 3 sts, sc in next st; repeat from * 22 more times. Ch 2, skip the last 3 sts, and dc in the first sc. (24 loops)
Rnds 16–19: Ch 1, sc around the post of the closing dc, ch 5, sc in next ch-5 sp; repeat from * 22 more times. Ch 2, dc in the first sc. (24 loops)
Rnd 20: Ch 1, sc around the post of the closing dc, ch 5, sc in next ch-5 sp; repeat from * 22 more times. Ch 5, sl st in the first sc. (24 full ch-5 loops)
Checkpoint: The wall is 4.5 in (11.4 cm) tall. Each mesh round adds about 0.58 in (1.5 cm). If your loops look loose, use ch 4 instead of ch 5 and add one more mesh round.
Rnd 21 (conversion round): Ch 1, sc in the same sc, 3 sc in next ch-5 sp, sc in next sc, 3 sc in next ch-5 sp; repeat from * 22 more times. Join. (24 sc in sc + 72 sc in spaces = 96 sts)
The wall is now 4.75 in (12.1 cm) tall. Don’t fasten off. Go straight on to the Top Border.
Top Border
Border gauge: The same as the base: 14 sc = 4 in (10.2 cm), and 4 rounds = 1 in (2.5 cm).
The mesh rounds move the start of each round a little to the side, so check your markers before you begin. Flatten the basket. Place 4 markers so that each long side has 18 sts centered over the straight edges of the base, and each end has 30 sts.
Rnds 22–25: Ch 1, sc in each st around. Join. (96 sts: 18 per long side, 30 per end)
Rnd 26: Sl st loosely in BLO of each st around. (96 sts) Fasten off.
Why the math works: The wall is straight, so the border needs no increases. Because 96 = (2 x 18) + (2 x 30), the side and end groups from the base line up exactly with the rim. Because 96 = 24 x 4, the conversion round brings you back to exactly 96 sts. The border adds 1.25 in (3.2 cm), so the wall finishes at 6 in (15.2 cm).
Make All Pieces
Work these pieces flat in rows. The ch 1 at the start of a row does not count as a stitch.
Handles (make 2, Rust)
Row 1: Ch 41, sc in 2nd ch from the hook and in each ch across. (40 sts)
Rows 2–5: Ch 1, turn, sc in each st across. (40 sts)
Edging: Ch 1, then sl st loosely around the whole strip. Fasten off, leaving a 16 in (40.6 cm) tail.
Each handle measures 11.4 x 1.25 in (29.0 x 3.2 cm).
Ears (make 2)
Inner ear (Cream):
- Row 1: Ch 8, sc in 2nd ch from the hook and in each ch across. (7 sts)
- Row 2: Ch 1, turn, sc2tog, sc 3, sc2tog. (5 sts)
- Row 3: Ch 1, turn, sc 5. (5 sts)
- Row 4: Ch 1, turn, sc2tog, sc 1, sc2tog. (3 sts)
- Row 5: Ch 1, turn, sc 3. (3 sts)
- Row 6: Ch 1, turn, sc3tog. (1 st)
Fasten off.
Edging (Rust): Join Rust in the bottom right corner. Work 3 sc in that corner, sc in the next 5 foundation ch, and 3 sc in the left corner. Then work 6 sc up the left side (1 per row end), 3 sc in the tip, and 6 sc down the right side. Join. (26 sts)
Fasten off, leaving a long tail. Each ear is about 2.5 in (6.4 cm) wide and 2 in (5.1 cm) tall.
Face (Cream)
Start at the nose point and work upward.
- Row 1: Ch 2, 3 sc in 2nd ch from the hook. (3 sts)
- Row 2: Ch 1, turn, inc, sc 1, inc. (5 sts)
- Rows 3–9: Ch 1, turn, inc, sc to the last st, inc. The rows have 7, 9, 11, 13, 15, 17 and 19 sts.
- Row 10: Ch 1, turn, sc 19. (19 sts)
- Row 11 (cheek lobes): Turn. Ch 3 (counts as dc) and work a tr in the first st. Dc in next 2 sts, hdc in next 2, sc in next 2, and sl st in next 5. Then sc in next 2, hdc in next 2, dc in next 2, and (tr, dc) in the last st. (19 sts worked + 2 extra = 21 sts)
The tall stitches at each edge make the pointed cheek lobes. The sl sts make the dip in the middle. Fasten off.
The face is about 5.5 in (14.0 cm) wide and 3.25 in (8.3 cm) tall at the lobe tips.
Eyes (Black): On Rows 7–8, backstitch two upward-curving arcs. Make each one 0.75 in (1.9 cm) wide and space them 1.5 in (3.8 cm) apart.
Nose (Black): Make a magic ring, work 6 sc into it, pull the ring tight and join. (6 sts) The nose is about 0.5 in (1.3 cm) across. Sew it over the point at Row 1.
Tail
- Row 1 (Cream): Ch 2, 2 sc in 2nd ch from the hook. (2 sts)
- Row 2: Ch 1, turn, 2 sc in each st. (4 sts)
- Row 3: Ch 1, turn, inc, sc 2, inc. (6 sts)
- Row 4: Ch 1, turn, inc, sc 4, inc. (8 sts)
- Rows 5–6: Ch 1, turn, sc 8. Change to Rust in the last st of Row 6. (8 sts)
- Rows 7–8 (Rust): Ch 1, turn, sc 8. (8 sts)
- Rows 9–14: Ch 1, turn, inc, sc 5, sc2tog. (8 sts) These rows lean to one side, which curves the tail.
- Row 15: Ch 1, turn, sc2tog, sc 4, sc2tog. (6 sts)
- Row 16: Ch 1, turn, sc 6. (6 sts)
- Row 17: Ch 1, turn, sc2tog, sc 2, sc2tog. (4 sts)
- Row 18: Ch 1, turn, sc 4. (4 sts)
- Row 19: Ch 1, turn, sc2tog twice. (2 sts)
- Row 20: Ch 1, turn, sc2tog. (1 st)
Fasten off. The tail is about 5 in (12.7 cm) long and 2.25 in (5.7 cm) wide.
Pieces by color:
- Rust: basket body, 2 handles, 2 ear edgings, tail body
- Cream: 2 inner ears, face, tail tip
- Black: nose, eye embroidery
Front layout (long side):
      [Ear]            [Ear]
  ======== top border ========
  ////     [ Face ]     ////
  ////      (nose)    [Tail]
  ======= lower band =========
Joining
Handles: On each long side, pin one handle end inside the wall over side sts 1–4, and the other end over side sts 15–18. Each end should overlap the top border by 1 in (2.5 cm). That leaves 10 sts, or 2.9 in (7.4 cm), between the two ends. The visible arch is 9.4 in (23.9 cm) long and rises about 4 in (10.2 cm) above the rim. Whipstitch around each overlap.
Appliqués: Whipstitch through the outer loops of each piece, matching one appliqué stitch to one basket stitch or mesh bar.
- Face: Center it on the front, with the nose point 1 in (2.5 cm) above the lower band.
- Ears: Sew them to the outside of the top border, 3.5 in (8.9 cm) apart, so that they stand above the rim.
- Tail: Sew it at the lower right, with the cream tip pointing up.
Tension: Keep your stitches snug, but don’t pull so hard that the mesh pinches.
Size checkpoint: When you’re done, the front should still measure 10.5 in (26.7 cm) across.
Final Blocking
- Spray the basket lightly until it is damp.
- Fill it with a box or rolled towel that measures 10.5 x 5.5 in (26.7 x 14.0 cm).
- Ease the diamonds into even, upright shapes with your fingers.
- Press the base flat against the table.
- Pin the ears so they stand straight.
- Let the basket dry completely before you take the form out.
Final Quality-Control Checklist
- The base lies flat and measures 10.5 x 5.5 in (26.7 x 14.0 cm).
- Each mesh round has 24 loops.
- Each solid round has 96 sts.
- The wall is 6 in (15.2 cm) tall.
- The two handles match and are centered on the long sides.
- The face is centered and the eyes are level.
- The two ears match.
- All yarn ends are woven in on the inside.
Troubleshooting
- Base cups: Use a hook one size larger for the base only.
- Base ruffles: Recount the stitches in each end group.
- Mesh twists: Start each mesh round around the closing dc post.
- Wall flares: Use a smaller hook for Rnds 22–26.
- Handles stretch: Add one more row of sc.
- Face lobes curl: Pin them flat and steam them before you sew the face on.
Care
Hand wash in cool water and reshape the basket while it is damp. Dry it over a rolled towel.
Final Notes
Each measurement depends on the one before it. A gauge of 14 sc = 4 in (10.2 cm) gives a 96-st base of 10.5 x 5.5 in (26.7 x 14.0 cm). The 24-loop mesh brings the wall to 4.75 in (12.1 cm), and the border finishes it at 6 in (15.2 cm). Check your size at each checkpoint, and your fox basket will stand square and smile back at you.
Happy crocheting!