

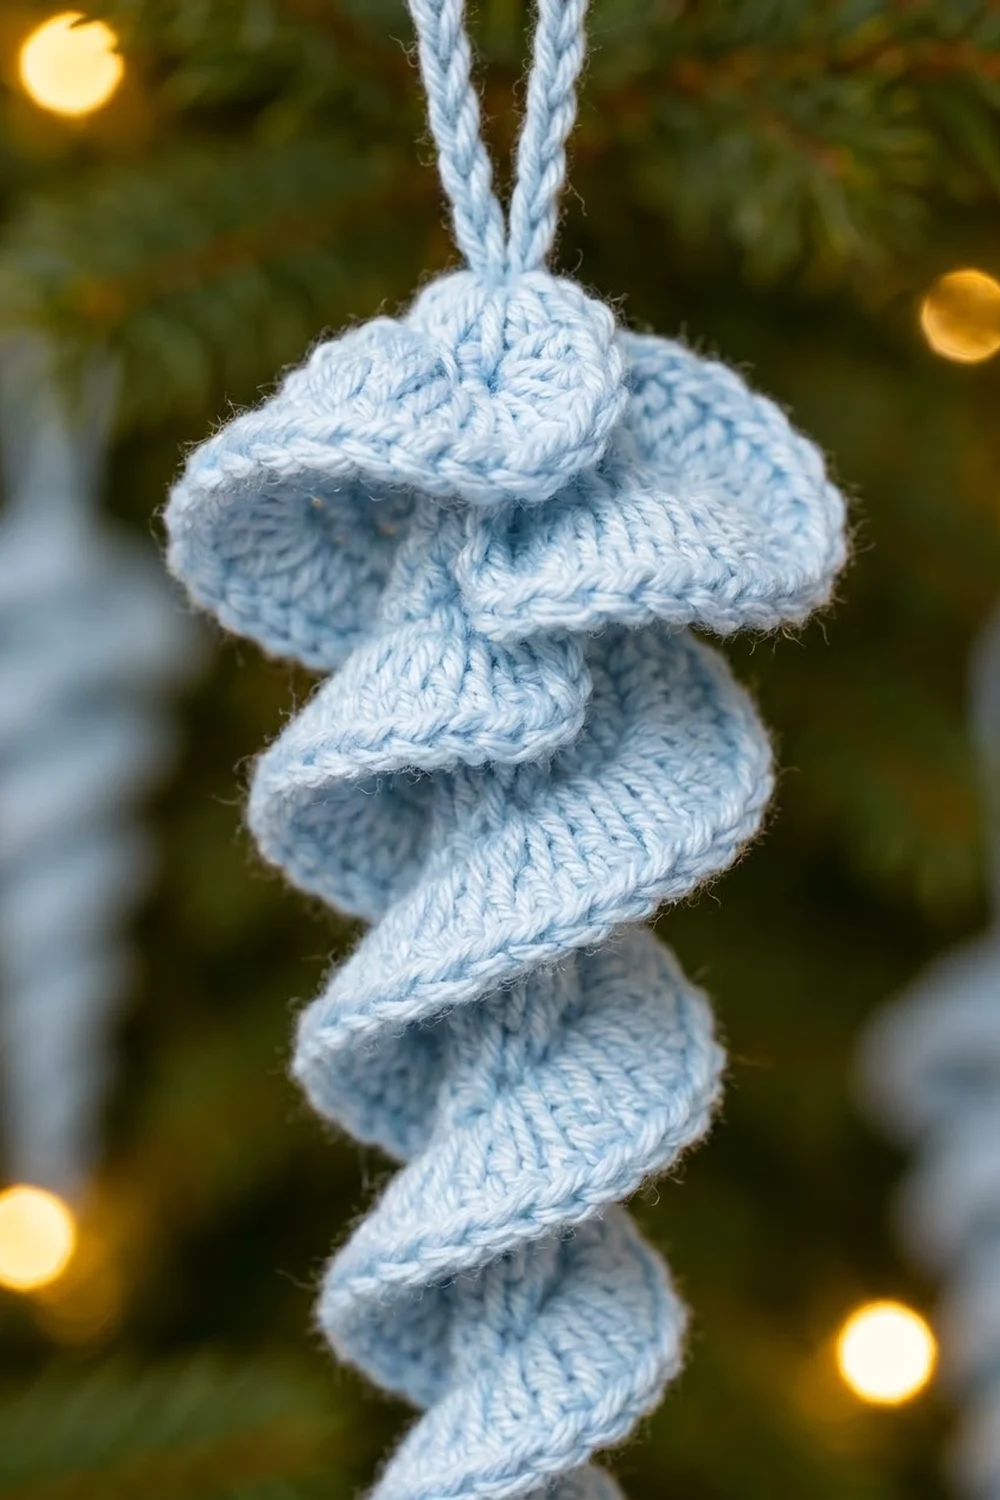
This little icicle is one of the quickest Christmas ornaments you can make. It’s one long ruffled strip that twists into a tight corkscrew. The spiral starts at a fine point at the bottom and flares into a soft, wavy cap at the top, with a round knob and a hanging loop finishing it off.
The sample uses a single pale ice-blue yarn, which gives it a frosty, wintry look. White, silver-grey, or soft lilac would work just as well. A tree hung with several of these, in one color or a mix, looks lovely under warm lights.
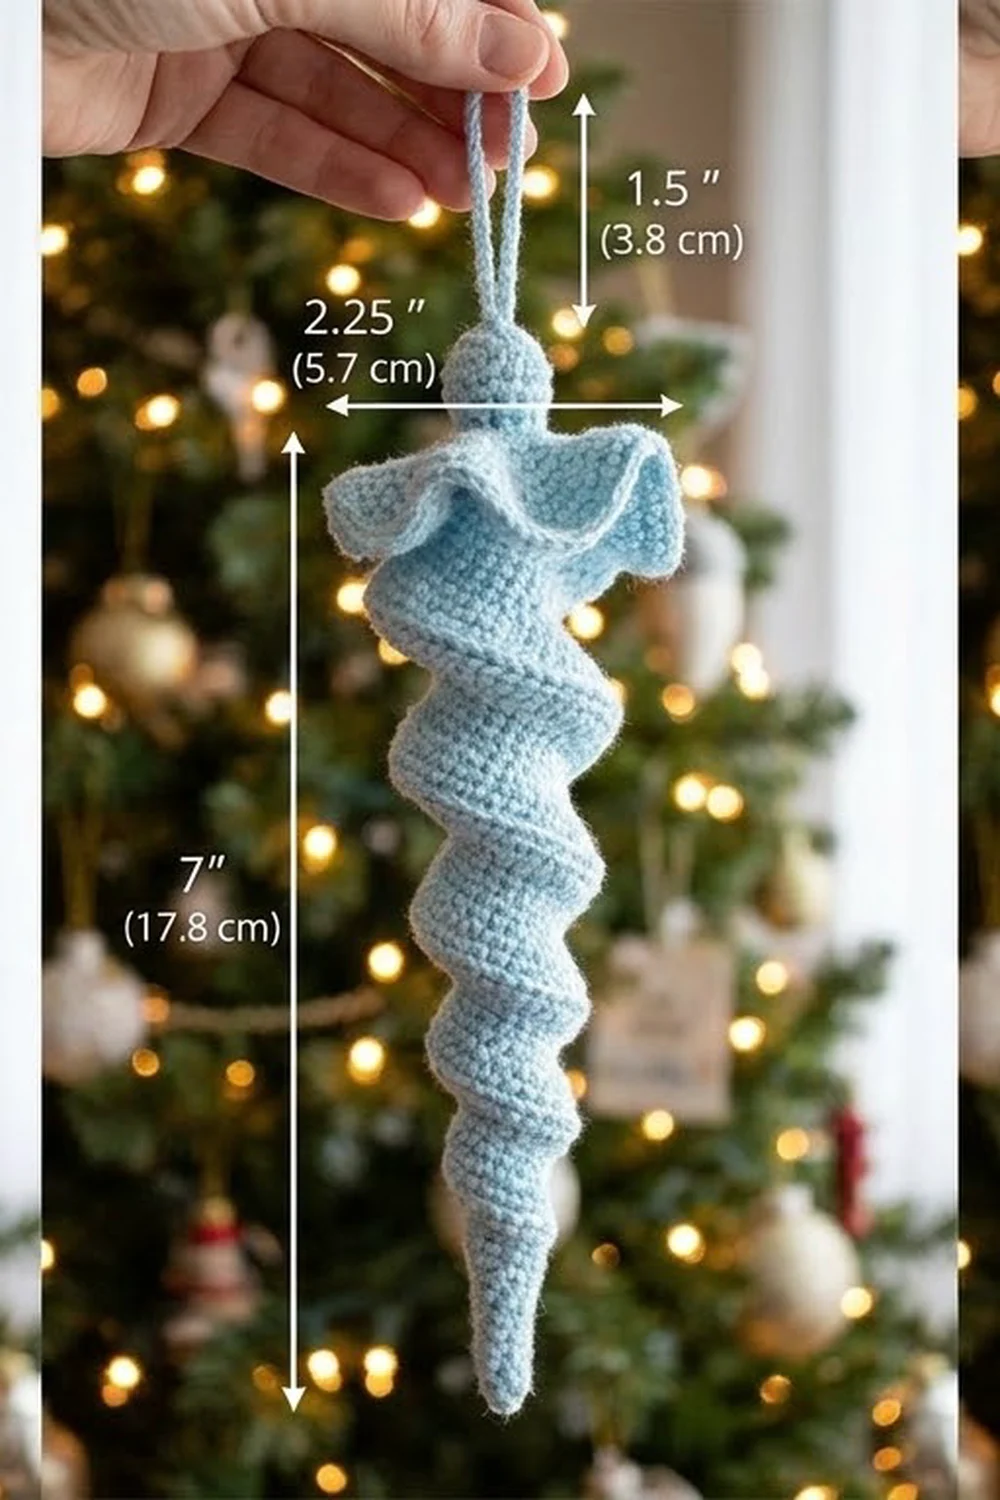
This pattern uses US crochet terms. The finished ornament is about 7 in (17.8 cm) tall without the loop and 2.25 in (5.7 cm) wide at the top. The hanging loop adds about 1.5 in (3.8 cm).
Construction is continuous. You first crochet a small knob in the round. You chain the foundation straight off the knob, then work back along the chain with taller and taller stitch groups. The extra stitches make the strip curl into a spiral by itself. A slip-stitch trim smooths the edge, and a chain loop is added to the knob. Light blocking sets the twist.
Finished Size and Construction
- Finished size: 2.25 in (5.7 cm) wide at the top × 7 in (17.8 cm) tall, plus a 1.5 in (3.8 cm) loop
- Skill level: Easy
- Terminology: US crochet terms
- Yarn weight: DK (#3, light)
- Hook: 3.5 mm (E-4)
- Number of pieces: 1 (knob, spiral, and loop are worked as one piece)
- Layout: a single vertical spiral, with the knob at the top and the tip at the bottom
- Piece size: the foundation chain is 8 in (20.3 cm) long laid straight; after spiraling, the body is 6.5 in (16.5 cm) long
- Size before border: 2.25 in × 7 in (5.7 cm × 17.8 cm)
- Border depth: the slip-stitch trim adds about 0.125 in (0.3 cm) to the edge thickness and does not change the overall size
Materials
Yarn: Use a smooth DK cotton, cotton blend, or acrylic of about 230 m per 100 g. Smooth, tightly plied yarn shows the spiral clearly and holds its shape after blocking. Avoid fuzzy or brushed yarn, because the halo hides the twist.
- Ice blue: 10 g (about 23 m)
This amount includes a margin of about 30% for your gauge swatch and tails. One ornament actually uses around 7 g.
Tools:
- 3.5 mm (E-4) crochet hook
- Tapestry needle
- Scissors
- A small scrap of matching yarn to stuff the knob
- Rustproof pins and a foam blocking mat
- Spray starch or a fabric stiffener diluted 1:1 with water (optional, but it helps the twist hold)
- A drinking straw or thin dowel, about 0.25 in (0.6 cm) across (optional, for shaping)
Abbreviations (US Terms)
- MR – magic ring
- ch – chain
- sl st – slip stitch
- sc – single crochet
- hdc – half double crochet
- dc – double crochet
- tr – treble crochet (yarn over twice, insert hook, pull up a loop, then [yarn over, pull through 2 loops] 3 times)
- sc2tog – single crochet 2 together
- st(s) – stitch(es)
- sk – skip
- rep – repeat
Special technique, working into the back bump: Turn the foundation chain over. Each chain has a small horizontal bar on the back. Insert your hook under that bar only. This keeps the V’s of the chain free and gives the spiral a neat inner edge.
Gauge and Checkpoints
Make one test icicle before you start a batch. It takes about 30 minutes and tells you whether your tension matches.
Foundation gauge: 10 ch = 2 in (5.1 cm).
Checkpoints:
- Knob after Round 3: a flat-topped cup about 0.75 in (1.9 cm) across.
- Foundation chain: 41 ch measuring 8.2 in (20.8 cm). The 40 chains you actually work into measure 8 in (20.3 cm).
- After the sc section: the tip should already curl into a tight spiral about 0.5 in (1.3 cm) across.
- After Row 1: the strip twists by itself. With light tension it measures about 6.5 in (16.5 cm) from tip to knob and 2.25 in (5.7 cm) across the top flare.
If your work is too big: change to a 3.25 mm (D-3) hook, or chain more tightly. A long foundation makes a loose, floppy spiral.
If your work is too small: change to a 3.75 mm (F-5) hook. If the spiral is so tight that it bunches into a ball, your chain is too short for the stitch groups. Loosen the chain only, not the stitches.
Pattern
Part 1: Top Knob
The knob is worked in continuous rounds. Do not join at the end of a round. Mark the first stitch of each round.
Rnd 1: MR, 6 sc in the ring. Pull the ring closed. (6 sts)
Rnd 2: 2 sc in each st around. (12 sts)
Rnd 3: sc in each st around. (12 sts)
The knob is now a shallow cup. Check it against Checkpoint 1.
Rnd 4: sc2tog 6 times. (6 sts)
Push a small scrap of yarn into the knob so it stays round. Don’t overstuff it; the knob should look soft and slightly domed. Don’t fasten off.
Part 2: Foundation Chain
Foundation: ch 41 directly from the last st of Rnd 4. Keep the chain even and avoid twisting it.
The chain end next to the knob becomes the top of the icicle. The end at your hook becomes the tip. Check the chain against Checkpoint 2.
Part 3: Spiral Body (Row 1)
Work into the back bumps of the chain, moving from the tip toward the knob. Each section crowds more stitches, with taller stitches, into each chain. That growth is what forces the strip to spiral, and the spiral gets wider as it climbs toward the top.
Row 1:
- Tip section: sk the first ch from the hook. Work 2 sc in each of the next 10 ch. (20 sc in this section)
- Lower section: work 2 hdc in each of the next 10 ch. (20 hdc in this section)
- Middle section: work 3 dc in each of the next 10 ch. (30 dc in this section)
- Top flare: work 4 tr in each of the next 10 ch. (40 tr in this section)
Stitch count for Row 1: 20 + 20 + 30 + 40 = 110 sts worked into 40 chains.
Check the running totals as you go: 20 sts at the end of the tip section, 40 after the lower section, 70 after the middle section, and 110 after the top flare.
Sl st into the first st of Rnd 4 of the knob. This joins the body firmly to the knob.
The strip should now twist into a corkscrew by itself. Check it against Checkpoint 4.
Part 4: Edge Trim
This trim works as the border for this piece, as explained in the next section.
Part 5: Hanging Loop
Join yarn with a sl st in the center top of the knob, beside the magic ring.
Loop: ch 18, then sl st in the same st to close the loop. Fasten off.
The loop measures about 1.5 in (3.8 cm) tall. Weave the tail down into the knob and pull it gently so the base of the loop sits upright.
Border (Edge Trim)
Border gauge: the slip stitches should be no tighter than the stitches beneath them. Hold your working loop a little looser than usual. If you can’t easily insert your hook into the trim afterward, it’s too tight and it will pull the spiral straight.
Trim row: After the joining sl st into the knob, ch 1. Don’t turn. Work along the outer, ruffled edge of Row 1, going from the top back down to the tip. Sl st in each of the 110 sts.
Count: 110 sts worked 1 per existing st, plus 0 extra = 110 sl st.
Fasten off at the tip, leaving a 6 in (15.2 cm) tail.
Why the math works: The trim adds no stitches, so it doesn’t change how much the edge flares. The spiral shape comes only from the stitch-to-chain ratio in Row 1:
- Tip: 20 sts on 10 ch, a 2:1 ratio
- Lower section: 20 sts on 10 ch, a 2:1 ratio
- Middle section: 30 sts on 10 ch, a 3:1 ratio
- Top flare: 40 sts on 10 ch, a 4:1 ratio
The trim simply rolls the outer edge into the smooth rim you see in the photo. Because the sl sts sit on the outer edge only, they slightly tighten the edge and make each turn a little sharper.
Use the tail to weave a few stitches up into the tip. This firms up the point. Trim the excess.
Final Blocking
- Twist. Hold the knob in one hand and the tip in the other. Twist gently in the direction the strip already curls until the turns sit close together.
- Shape. Optionally, slide a straw or thin dowel, about 0.25 in (0.6 cm) across, through the center of the lower half. This keeps the lower turns even.
- Measure. Adjust the spiral until the body measures 6.5 in (16.5 cm) from knob to tip and the top flare measures 2.25 in (5.7 cm) across.
- Stiffen. Lightly mist the ornament with spray starch, or dab on the diluted stiffener. Squeeze out any excess with a towel.
- Pin. Lay the ornament on the blocking mat. Pin through the knob and through the tip only, so the spiral is held at its finished length.
- Fluff the flare. Open the top ruffle with your fingers so it forms a rounded cap around the knob.
- Dry. Let it dry completely, at least 8 hours. If you used a straw, remove it once the ornament is dry.
- Check the loop. Make sure the hanging loop stands straight above the knob.
Final Quality-Control Checklist
- The knob is round, softly stuffed, and about 0.75 in (1.9 cm) across.
- Row 1 has 110 sts: 20 sc, 20 hdc, 30 dc, and 40 tr.
- The trim has exactly 110 sl st and runs smoothly from the top to the tip.
- The body is 6.5 in (16.5 cm) long and the overall height is 7 in (17.8 cm).
- The top flare is 2.25 in (5.7 cm) wide.
- The tip comes to a firm, neat point.
- The hanging loop is 1.5 in (3.8 cm) tall and firmly anchored.
- All tails are woven in and none can be seen.
- The ornament hangs straight without leaning.
Troubleshooting
The strip lies flat instead of spiraling. Your chain is too loose compared with your stitches. Use a smaller hook for the chain only, or make sure you have the right number of stitches in each chain.
The spiral bunches into a ball. Your chain is too tight. Chain with a hook one size larger, then switch back to the 3.5 mm hook for Row 1.
The top flare looks flat or droops. Check that you worked 4 tr per chain in the last 10 chains. Starch the flare again and shape it over a fingertip while it dries.
The trim pulls the spiral straight. Your slip stitches are too tight. Rip back the trim and work it again more loosely.
The ornament leans to one side. Re-center the hanging loop on the knob, then block again with the loop pinned straight up.
The knob is lumpy. Remove some of the stuffing, or add a little, before you add the loop.
Care
Spot clean with cool water and mild soap. Reshape the ornament and let it dry flat; starch it again if the twist relaxes. Store it flat in tissue paper so the spiral doesn’t get crushed.
Final Notes
Here is the measurement chain to keep in mind. A knob 0.75 in (1.9 cm) across sits on a foundation of 40 working chains, which measures 8 in (20.3 cm) laid straight. Row 1 adds 110 stitches in four sections of increasing height, and the strip twists into a body 6.5 in (16.5 cm) long. The 110-stitch trim rolls the edge without changing the size. Together with the knob, the finished icicle is 7 in (17.8 cm) tall and 2.25 in (5.7 cm) wide, with a 1.5 in (3.8 cm) loop on top.
Once your test icicle matches these checkpoints, you can make a whole set in an evening.
Happy crocheting!