

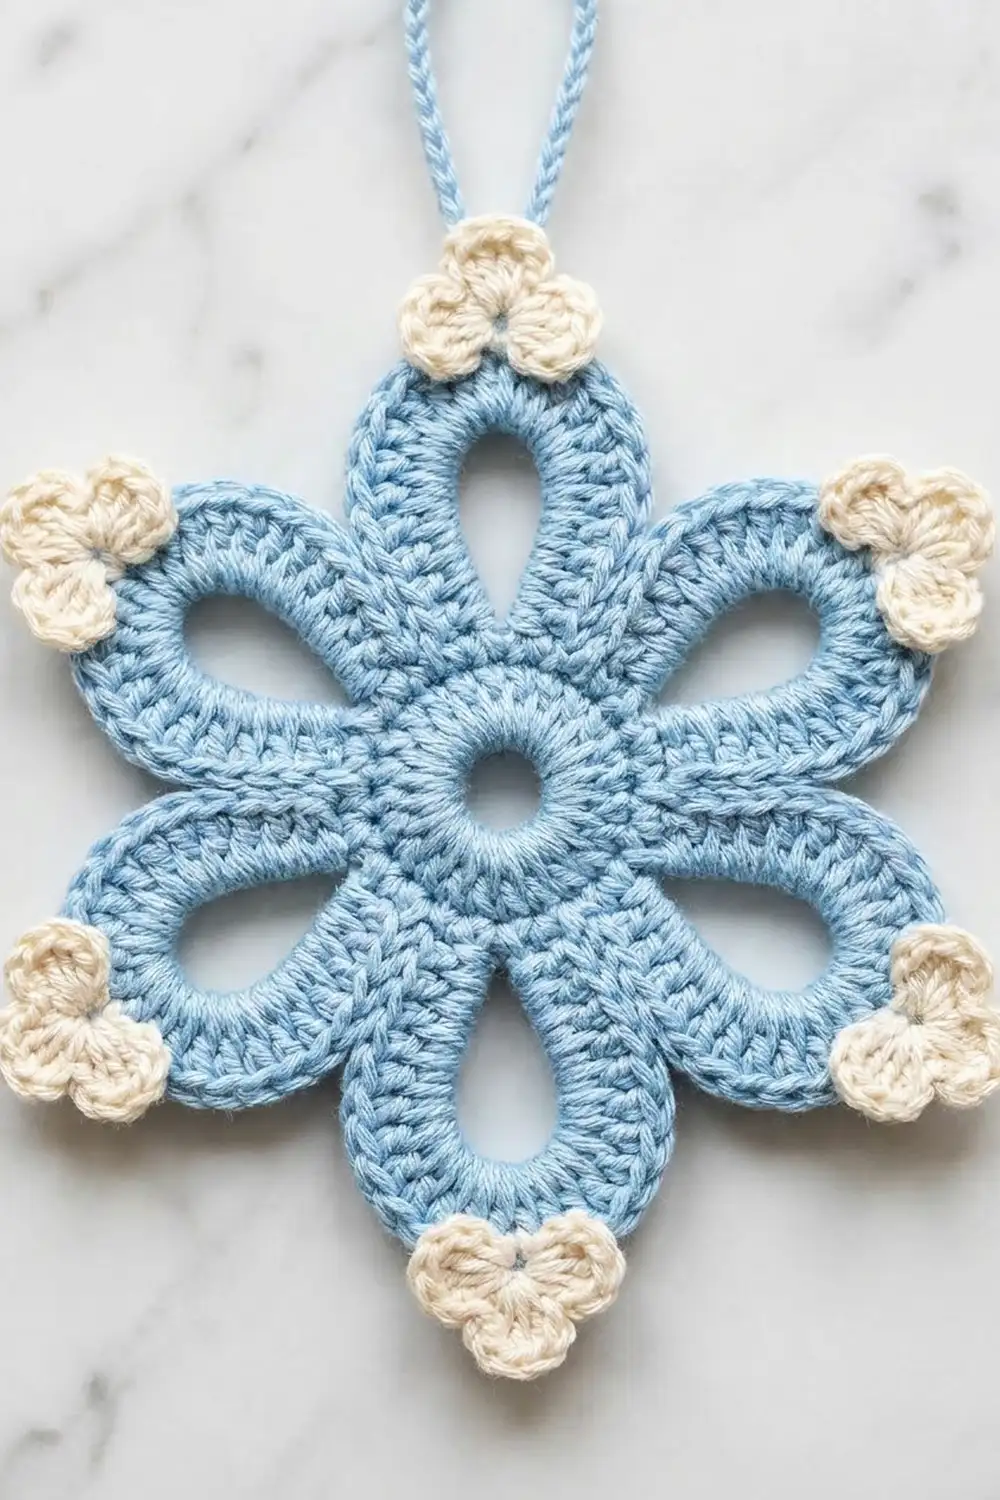
The Frosted Clover Snowflake is a light, airy ornament built from six open petals around a small solid ring. Each petal is a chain loop wrapped in snug single crochet, which gives it a smooth, corded outline and leaves the inside open. A tiny cream clover cluster sits at the tip of each petal, so the ornament reads clearly as a snowflake on the tree.
The colors are soft and wintry: a pale icy blue for the body and a warm cream for the clover tips. A blue corded hanging loop finishes the top. The style is clean, slightly vintage, and quick to make, so you can easily work up a set for gifts.
This pattern uses US crochet terms. The finished ornament measures 5 in (12.7 cm) across from opposite petal tips, including the clovers. The hanging loop adds 1.5 in (3.8 cm) at the top.
Construction is simple. You crochet a ring, then work six petals in one continuous round. Each petal is a chain loop that you cover with single crochet before moving on. Then you add the cream clovers one petal at a time and finish with the hanging loop. The whole ornament is one piece and needs no sewing or joining.
Finished Size and Construction
- Finished size: 5 in (12.7 cm) across from tip to tip, including the clovers
- Total height with hanging loop: 6.5 in (16.5 cm)
- Skill level: Easy / advanced beginner
- Terminology: US crochet terms
- Yarn weight: DK / light (#3), mercerized cotton recommended
- Hook: 3.5 mm (E-4)
- Number of pieces: 1 (one single motif)
- Layout: 1 center ring, 6 radiating petals, 6 clover tips, 1 hanging loop
- Piece size before the clover trim: 4.5 in (11.4 cm) across from tip to tip
- Clover trim depth: 0.25 in (0.6 cm) beyond each petal tip
Materials
Yarn: Use a smooth DK-weight mercerized cotton, about 105 m per 50 g. Cotton holds the petal shapes well and blocks crisply. Avoid fuzzy or very stretchy yarns, because they blur the corded outline and let the petals droop.
- Light blue: 7 g (15 m) for the ring, the petals, and the hanging loop
- Cream: 3 g (6 m) for the six clover tips
These amounts include a safety margin of about 30%. One standard ball of each color makes many ornaments.
Tools:
- 3.5 mm (E-4) crochet hook
- Tapestry needle
- Scissors
- Stitch marker
- Blocking mat and rust-proof pins
- Spray bottle with water, plus fabric stiffener or starch spray if you want extra firmness
Abbreviations (US Terms)
- ch – chain
- sl st – slip stitch
- sc – single crochet
- dc – double crochet
- yo – yarn over
- st(s) – stitch(es)
- rep – repeat
Special stitch – Clover lobe (lobe): Ch 2. Yo, insert hook in the indicated st, yo and pull up a loop, yo and pull through 2 loops. Rep from * to * once more in the same st, then yo and pull through all 3 loops on the hook. That is a 2-dc cluster. Ch 2, then sl st in the same st. Each lobe is one small, plump, rounded bump.
Gauge and Checkpoints
Gauge: 20 sc and 24 rows = 4 in (10.2 cm), which works out to 5 sc per 1 in (2.5 cm). The exact gauge matters less than tight, even stitches. The petals need firm fabric so they hold their teardrop shape.
Test first: Work the ring and one petal, then measure before you continue.
- After Round 1: The ring measures 1 in (2.5 cm) across the outside, and the center hole is about 0.4 in (1.0 cm) across.
- After the first petal: The petal measures 1.75 in (4.4 cm) long from the ring edge to the tip and about 0.8 in (2.0 cm) across at its widest point.
- After Round 2: The motif measures 4.5 in (11.4 cm) from tip to tip.
- After the clover trim: The motif measures 5 in (12.7 cm) from tip to tip.
If your piece is too big: Change to a 3.25 mm hook, or work the petal chain with 18 ch and cover it with 27 sc. Keep the stitch count odd or even to match the change, so that the tip still falls between two center stitches. The 30-sc version used in this pattern puts the tip between sc 15 and sc 16.
If your piece is too small, or the petals curl: Change to a 3.75 mm hook. Curling usually means the sc are packed too tightly onto the chain, so loosen your tension slightly rather than adding stitches.
Center Ring
Use light blue.
Foundation: Ch 8 and sl st in the first ch to form a ring.
Round 1: Ch 1 (does not count as a st). Work 24 sc into the ring, then sl st in the first sc to join. (24 sc)
Slide the stitches evenly around the ring so they cover the chain completely and the center hole stays round. Do not fasten off.
Checkpoint: The ring measures 1 in (2.5 cm) across.
Petal Round
In this round, each petal is anchored in a single ring stitch, and 4 ring stitches lie between the starts of neighboring petals. With 24 sts and 6 petals, that gives 24 ÷ 6 = 4 sts per repeat, so the petals are spaced exactly 60 degrees apart.
Round 2: Your hook is in the joining sl st, which sits on the first sc of Round 1. Use a stitch marker to mark this sc as the anchor of Petal 1.
Ch 20, then sl st in the same sc you started from. This makes a closed chain loop anchored in one stitch. Working into the loop itself (around the chain, not into individual chains), work 30 sc, spacing them evenly from one side of the loop, around the tip, and down the other side. Sl st in the same anchor sc again to close the petal. Then sl st in each of the next 4 sc of the ring. The fourth sl st lands on the anchor for the next petal.
Rep from * to * 4 more times, for 5 petals in total.
Petal 6: Ch 20 and sl st in the same anchor sc. Work 30 sc in the loop, then sl st in the anchor sc. Sl st in each of the next 3 sc, then sl st in the marked first sc to finish. Fasten off and weave in the end along the back of the ring.
Stitch count for Round 2:
– 6 petals × 30 sc = 180 sc in the petals
– 6 anchor sl sts + 18 traveling sl sts = 24 sl sts along the ring, with exactly one in each of the 24 ring sts
Shaping notes: The 30 sc on each 20-ch loop are 1.5 sc per chain. That is enough to cover the chain fully and give the dense, corded look without ruffling. Because each petal grows from a single stitch, its base pinches narrow at the ring and opens into a teardrop, just like the photo. Sc 15 and sc 16 sit at the very tip of each petal, with 15 sc on each side.
Checkpoint: Six evenly spaced petals, each 1.75 in (4.4 cm) long, with a tip-to-tip size of 4.5 in (11.4 cm).
Clover Tip Border
The cream clovers are this ornament’s border. Each one is worked separately at a petal tip, because the petals touch each other only at the ring.
Border gauge: Each clover is about 0.5 in (1.3 cm) wide and adds 0.25 in (0.6 cm) beyond the petal tip.
Before you start: Pinch each petal flat and count its sc. Place a stitch marker in sc 15, counting from the right-hand side of the petal base with the right side facing you.
Clover round (repeat on each of the 6 petals): With the right side facing, join cream with a sl st in sc 15 of the petal. Ch 1, then work 1 sc in the same st. Into this new sc, work 3 lobes in a row. The first lobe leans to one side, the second points straight out, and the third leans to the other side. Sl st in sc 16 of the petal. Fasten off and leave a 4 in (10.2 cm) tail.
Count for each petal: 1 sc + 3 lobes + 1 sl st.
Count for the whole ornament: 6 sc + 18 lobes + 6 sl sts.
Why the math works: The clover sc goes into sc 15 and the closing sl st goes into sc 16. That puts the trim exactly over the midpoint of the 30-sc petal, with 15 sc on each side. All six petals are identical and evenly spaced, so the clovers form a perfect six-point pattern around the snowflake. Nothing is added along the sides of the petals, so they keep their smooth blue outline.
Weave each cream tail back into the cream stitches first, then a short way into the blue petal sc. This keeps the ends from showing as cream lines on the blue.
Hanging Loop
Choose any petal to be the top of the snowflake.
With light blue, join with a sl st in the top of the middle lobe of that petal’s clover. Ch 20, then sl st in the same st to form a loop. Turn the loop over and work 1 sl st into the back bump of each of the 20 ch, ending at the base. That gives you 20 sl sts. Sl st once more into the top of the middle lobe and fasten off.
Covering the chain with slip stitches makes a firm, thin cord that is slimmer than the petals, just like the photo. The loop stands about 1.5 in (3.8 cm) tall. Weave in the end through the clover and into the petal.
Final Blocking
- Weave in all the ends before you block.
- Lightly mist the ornament with water until it is damp, not soaking. For a stiffer ornament, use diluted fabric stiffener or starch spray instead.
- Lay it right side up on the blocking mat.
- Pin the center ring into a circle 1 in (2.5 cm) across, with the hole round and open.
- Pin each petal tip so that opposite tips are 4.5 in (11.4 cm) apart and all six petals are evenly spaced.
- Put one pin inside each petal at its widest point to open the teardrop to about 0.8 in (2.0 cm).
- Use a pin tip to arrange each clover’s three lobes into a neat fan: left, straight out, and right.
- Pin the hanging loop into a straight, narrow oval 1.5 in (3.8 cm) tall.
- Leave it to dry completely, at least 6 hours or overnight with stiffener, before you unpin it.
Final Quality-Control Checklist
- The ring is 1 in (2.5 cm) across with a round center hole.
- There are 6 petals, each with exactly 30 sc.
- The petals are evenly spaced, with 4 ring sts between neighboring petal anchors.
- Each petal is 1.75 in (4.4 cm) long, open in the middle, and has no gaps in its sc covering.
- Each clover sits centered between sc 15 and sc 16, with 3 lobes.
- Opposite tips measure 5 in (12.7 cm) apart, including the clovers.
- The hanging loop is 1.5 in (3.8 cm) tall and is attached above the top clover.
- All ends are woven in invisibly, and no cream shows on the blue.
- The ornament lies flat after blocking.
Troubleshooting
The petals twist or flip over. You may be working the sc into the chain stitches instead of around the loop. Work around the whole chain loop, and keep the loop flat and untwisted before you start covering it.
The chain shows through the sc. Add 2 sc to each petal for a total of 32, keeping the tip centered between sc 16 and sc 17. Or slide the stitches closer together as you go.
The petals ruffle or wave. Your sc are too crowded. Work 28 sc per petal and put the clover between sc 14 and sc 15.
The petals are uneven in size. Count the chains again. Even one extra chain on a 20-ch loop makes a noticeably longer petal.
The ring cups or puckers. Make sure Round 1 has exactly 24 sc, and keep the traveling sl sts in Round 2 loose.
The clovers look lopsided. Check that the clover sc went into sc 15 and the sl st into sc 16, then reshape the lobes with pins during blocking.
The ornament droops on the tree. Block it again with fabric stiffener.
Care
Hand wash in cool water with mild soap and press out the water gently without wringing. Reshape the ornament, pin it flat, and let it dry. Re-stiffen it if needed and store it flat between seasons.

Final Notes
Each stage of this ornament builds on the one before it. The 24-sc ring measures 1 in (2.5 cm). Six 30-sc petals, each 1.75 in (4.4 cm) long, bring the motif to 4.5 in (11.4 cm) across. The cream clovers add 0.25 in (0.6 cm) at each tip, for a finished size of 5 in (12.7 cm). The 1.5 in (3.8 cm) hanging loop brings the total height to 6.5 in (16.5 cm). If you check each measurement as you go, the final size will take care of itself. Make one in blue and cream, try a few in other wintry colors, and fill your tree with snowflakes.
Happy crocheting!