

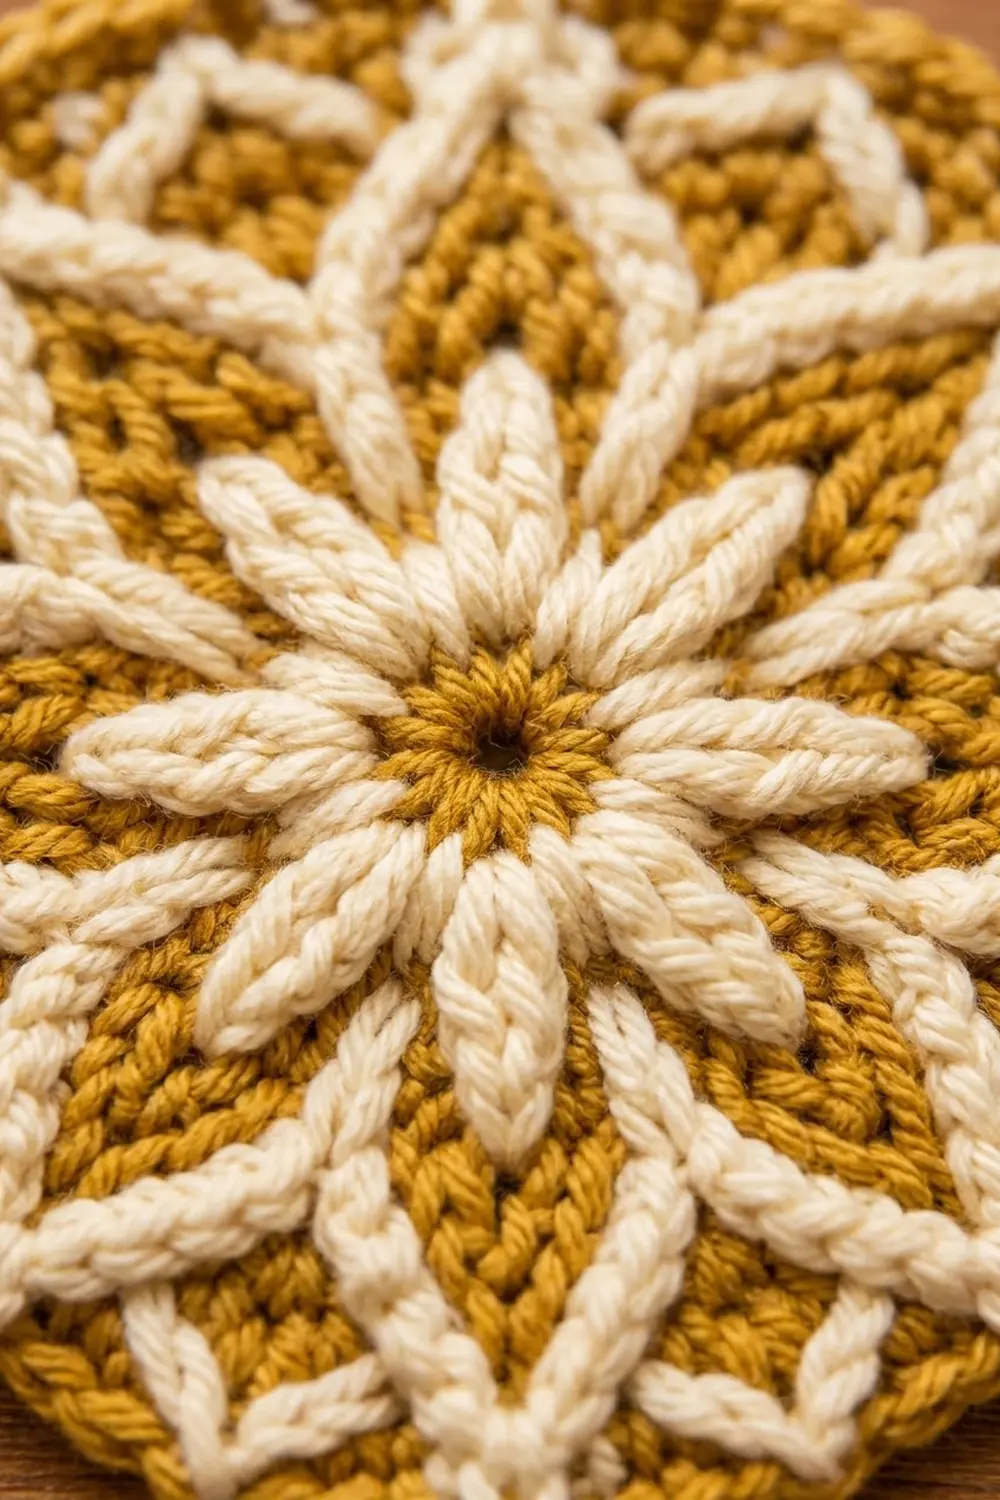
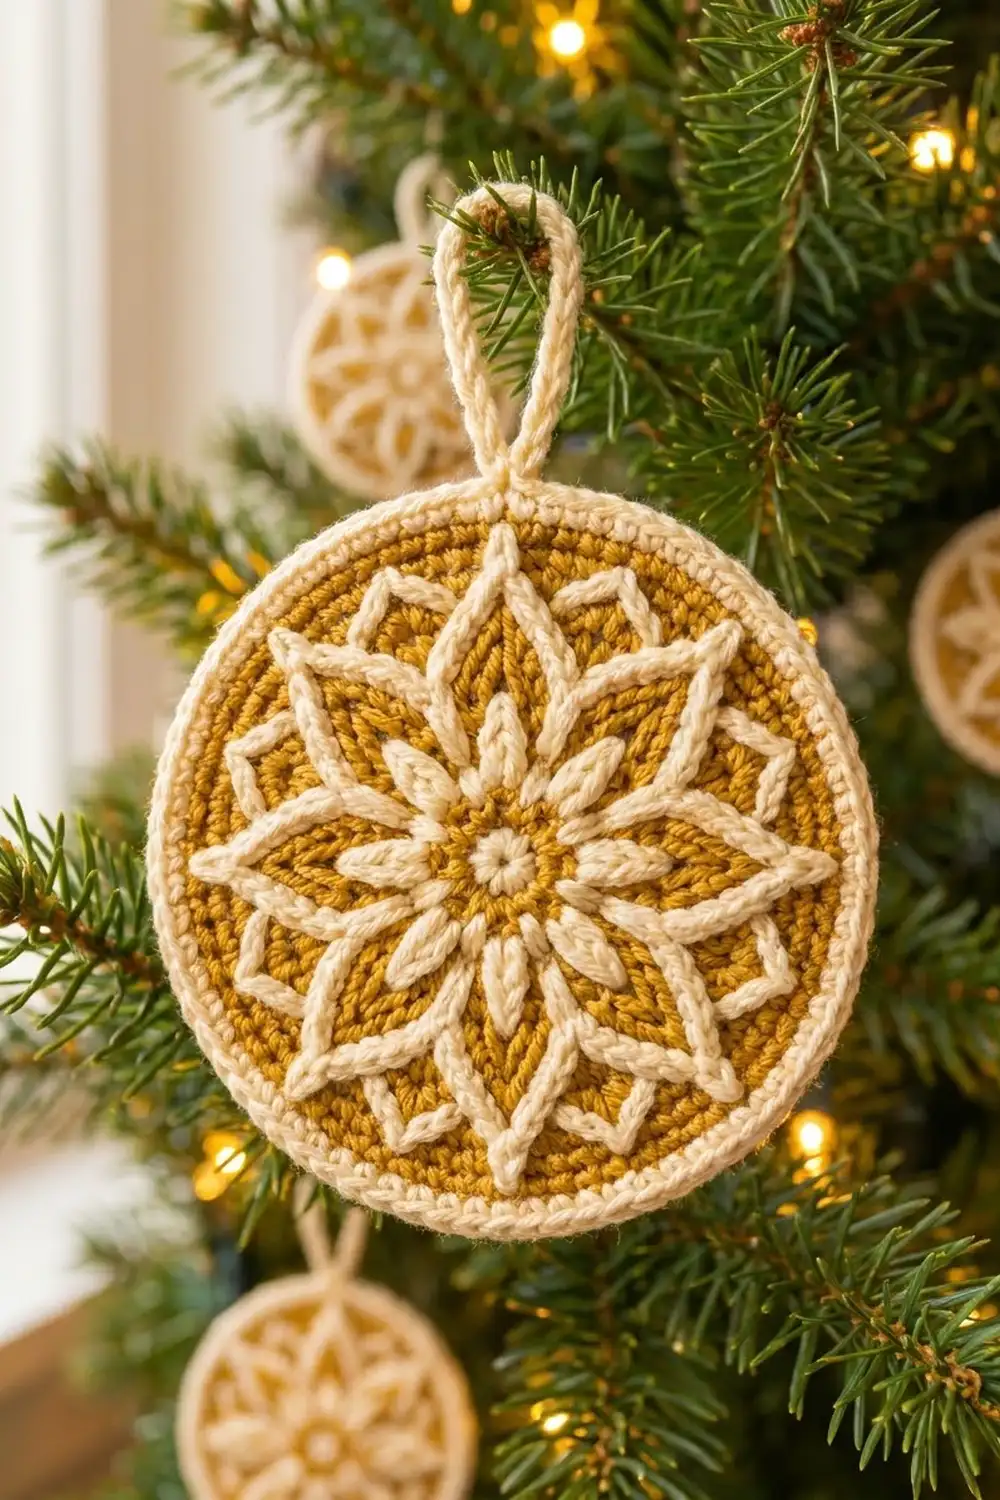
This ornament is a flat crochet disc with an eight-point star worked in cream on a warm mustard-gold background. It looks a little like embroidery, but all of the color is crocheted in using tapestry crochet. A raised cream edge and a sturdy loop finish it, so it’s ready for the tree.
There are only two colors. Gold fills the background and center, and cream draws the ring, the petals, the small chevrons near the edge, and the border. The look is traditional and calm, and a set of these ornaments works well in gold-and-ivory tree decor.
The pattern uses US crochet terms. The finished ornament is 4.5 inches (11.4 cm) across, and the loop adds about 1.5 inches (3.8 cm), for a total height of about 6 inches (15.2 cm).
You start with a magic ring and work 12 rounds of tapestry half double crochet, increasing 8 stitches in every round so the circle stays flat. You then add a cream border of single crochet and crab stitch, and finish with a doubled loop at the top.
Finished Size and Construction
- Finished size: 4.5 in (11.4 cm) diameter, not counting the loop
- Skill level: Intermediate, because you need to be comfortable with tapestry color changes
- Terminology: US
- Yarn weight: DK (#3) cotton or cotton blend
- Hook: 3.25 mm (US D/3)
- Number of pieces: 1
- Layout: One round motif worked continuously from the center out
- Size before border: 4 in (10.2 cm) diameter after Round 12
- Border depth: 0.25 in (0.6 cm) all around, which adds 0.5 in (1.3 cm) to the diameter
- Loop: about 1.5 in (3.8 cm) tall
Materials
Choose a smooth, mercerized DK cotton. It shows the colorwork clearly and holds a flat shape well. Fuzzy or very splitty yarns blur the petal edges.
- Color A (Mustard Gold): 10 g, about 23 m
- Color B (Cream): 10 g, about 23 m
These amounts are based on a DK cotton of about 115 m per 50 g and include a margin of roughly 25%. One ornament actually uses about 8 g of each color.
Tools:
– 3.25 mm (US D/3) crochet hook
– Locking stitch marker
– Tapestry needle
– Scissors
– Blocking mat and rust-proof pins
– Spray bottle with water
Abbreviations (US Terms)
- ch – chain
- sl st – slip stitch
- sc – single crochet
- hdc – half double crochet
- rev sc – reverse single crochet (crab stitch)
- inc – 2 hdc in the same stitch
- st(s) – stitch(es)
- Rnd – round
- A / B – Color A (gold) / Color B (cream)
Tapestry hdc color change: Work the stitch before the color change normally until 3 loops are on the hook. Drop the old color, yarn over with the new color, and pull through all 3 loops. The stitch you finish this way still shows the old color, and the next stitch starts in the new color.
Carrying yarn: Lay the color you’re not using along the top of the previous round and work every stitch over it, so it stays hidden inside the stitches. Carry both colors all the way around every round, even rounds worked in one color.
Color notation: In the instructions, “A hdc” means 1 hdc worked in gold. “(B, A) in next” means you work 2 hdc into the same stitch, the first in cream and the second in gold, changing color between them.
Gauge and Checkpoints
Gauge: 8 hdc and 6 rounds = 1 in (2.5 cm), measured in tapestry hdc with the second yarn carried.
Before you make a whole ornament, work Rounds 1–6 as a test. The finished size depends completely on this gauge.
Diameter checkpoints (measured flat):
– After Rnd 3: 1 in (2.5 cm)
– After Rnd 6: 2 in (5.1 cm)
– After Rnd 9: 3 in (7.6 cm)
– After Rnd 12: 4 in (10.2 cm)
– After the border: 4.5 in (11.4 cm)
Too big? Go down to a 3.0 mm hook. Too small? Go up to a 3.5 mm (US E/4) hook.
Cupping (the edge curls up into a bowl) means your stitches are too tight around compared with their height. Loosen your tension or go up a hook size. Ruffling means the reverse, so tighten up or go down a hook size.
Pattern
Work in continuous rounds with no slip-stitch joins and no turning chains. Place the marker in the first stitch of each round and move it up as you go.
Each round has 8 identical repeats, and every repeat ends with an increase. Round n therefore has n stitches per repeat and 8 × n stitches in total.
Rnd 1: With A, make a magic ring. Work 8 hdc into the ring, carrying B inside the ring. Pull the ring closed. (8 sts: 8 A)
Rnd 2: Change to B. Work 2 hdc in each st around. (16 sts: 16 B)
This round makes the cream ring around the gold center.
Rnd 3: A hdc in next st, (B, A) in next st; repeat from * 7 more times. (24 sts: 16 A, 8 B)
The single cream stitches are the bases of the 8 inner petals.
Rnd 4: A hdc in next st, B hdc in next st, (B, A) in next st; repeat from * 7 more times. (32 sts: 16 A, 16 B)
Rnd 5: A hdc in next st, B hdc in each of next 2 sts, (B, A) in next st; repeat from * 7 more times. (40 sts: 16 A, 24 B)
At this point the inner petals are at their widest, 3 stitches each.
Rnd 6: B hdc in next st, A hdc in next st, B hdc in each of next 2 sts, (A, B) in next st; repeat from * 7 more times. (48 sts: 16 A, 32 B)
The inner petals start to narrow. The cream stitch at the end of one repeat and the cream stitch at the start of the next one together make 2 cream stitches between the inner petals. These are the bases of the outer star points.
Rnd 7: B hdc in next st, A hdc in each of next 2 sts, B hdc in next st, A hdc in next st, (A, B) in next st; repeat from * 7 more times. (56 sts: 32 A, 24 B)
Each inner petal ends in a single cream tip, and each outer point is now 2 stitches wide.
Rnd 8: B hdc in each of next 2 sts, A hdc in each of next 4 sts, (B, B) in next st; repeat from * 7 more times. (64 sts: 32 A, 32 B)
The inner petals are complete. Each outer point is now 4 stitches wide: the last 2 stitches of one repeat plus the first 2 of the next.
Rnd 9: B hdc in each of next 2 sts, A hdc in each of next 2 sts, B hdc in next st, A hdc in each of next 2 sts, (B, B) in next st; repeat from * 7 more times. (72 sts: 32 A, 40 B)
The single cream stitch in the middle of each repeat is the bottom of a chevron. It sits in the gold space above an inner petal tip.
Rnd 10: B hdc in next st, A hdc in each of next 2 sts, B hdc in next st, A hdc in next st, B hdc in next st, A hdc in each of next 2 sts, (B, B) in next st; repeat from * 7 more times. (80 sts: 40 A, 40 B)
The chevron opens into a V, with 1 gold stitch between its arms. Each outer point narrows to 3 stitches.
Rnd 11: A hdc in each of next 2 sts, B hdc in next st, A hdc in each of next 3 sts, B hdc in next st, A hdc in each of next 2 sts, (A, B) in next st; repeat from * 7 more times. (88 sts: 64 A, 24 B)
The arms of the V move apart, and each outer point narrows to a single cream stitch.
Rnd 12: A hdc in next st, B hdc in next st, A hdc in each of next 6 sts, B hdc in next st, A hdc in next st, (A, B) in next st; repeat from * 7 more times. (96 sts: 72 A, 24 B)
The chevron arms reach out toward the edge, and the point tips line up with the last stitch of each repeat.
Fasten off A, leaving a 6 in (15.2 cm) tail. Keep B attached.
Checkpoint: The disc should measure 4 in (10.2 cm) across and lie flat. Check that all 8 outer points are evenly spaced before you start the border.
Border
Border gauge: The border uses sc, which is shorter than hdc. Two border rounds together add about 0.25 in (0.6 cm) on every side.
Rnd 13 (trim round): With B only, ch 1. Sc in each of next 11 sts, 2 sc in next st; repeat from * 7 more times. Sl st to the first sc to join.
(96 sts worked 1-per-stitch + 8 extra = 104 sc)
Rnd 14: Ch 1. Working from left to right (right to left if you crochet left-handed), work rev sc in each st around. Sl st to the first st to join. (104 rev sc)
This makes the raised, rope-textured cream edge.
Why the math works: Round 12 has 96 stitches around a 4 in (10.2 cm) disc, which is a circumference of about 12.6 in (31.9 cm). The border sits further out, at about 4.25 in (10.8 cm) across, so its circumference grows to about 13.4 in (33.9 cm). At 8 stitches per inch, that needs about 104 stitches. The 8 increases in Round 13 (one per repeat, lined up with the star points) supply that extra length, so the edge stays flat without pulling in or ruffling. Crab stitch works 1-to-1 and stretches a little on its own, so Round 14 needs no further increases.
Hanging loop: Do not fasten off. Put the work on the table with one outer point at the top, and sl st along the edge until you reach the rev sc directly above that point. Ch 24, skip the next 3 sts, and sl st into the 4th st. Turn. Work 1 sc in each ch back along the loop (24 sc), then sl st into the stitch where the loop started. Fasten off and weave the tail through the base of the loop twice to make it secure.
The loop stands about 1.5 in (3.8 cm) tall and ends up as a thick, rounded cord like the one in the photo.
Final Blocking
- Weave in all the tails. Run each one through stitches of the same color on the back for at least 1 in (2.5 cm).
- Mist the ornament with water until it is evenly damp, but not soaked.
- Lay it face up on the blocking mat.
- Pin the 8 outer star points out to a 4.5 in (11.4 cm) circle, then pin the edge between them.
- Smooth the loop straight up and pin it flat.
- Leave it to dry completely, which takes 6–12 hours.
- Take out the pins. For extra stiffness, you can lightly spray the dry ornament with fabric starch and let it dry again.
Final Quality-Control Checklist
- The ornament measures 4.5 in (11.4 cm) across in every direction.
- It lies flat with no cupping or rippling.
- There are 8 inner petals and 8 outer points, evenly spaced.
- There are 8 chevrons, each between two outer points.
- No carried yarn shows through from the back.
- The crab-stitch edge is even all the way around.
- The loop is centered above an outer point and firmly attached.
- All tails are woven in and trimmed.
Troubleshooting
Gold shows through the cream sections: Tighten up on the carried strand, and make sure it lies right on top of the stitches you’re working into. A slightly smaller hook also helps.
Petals look slanted or twisted: Continuous hdc rounds naturally drift a little. Hold the work the same way every round and don’t add any extra stitches. Blocking corrects mild slanting.
Stitch count is off: Count each repeat against the per-repeat total, which is the same as the round number. Most mistakes come from leaving out the increase at the end of a repeat.
Yarns are tangled: Turn the work one way, then the other, in alternate rounds, or keep the two balls on opposite sides of you.
Edge flutters after the border: Redo Round 13 with only 4 increases (100 sc), and work Round 14 into those 100 stitches.
Loop flops sideways: Make sure the sc back along the chain are firm, and pin the loop upright while you block.
Care
Hand wash in cool water with mild soap, press out the water in a towel, and dry flat in shape. Store flat or hanging so the loop doesn’t get crushed.
Final Notes
The size of the ornament comes from a simple chain of measurements. A gauge of 8 hdc and 6 rounds per inch (2.5 cm) gives a 1 in (2.5 cm) disc at Round 3, 2 in (5.1 cm) at Round 6, 3 in (7.6 cm) at Round 9, and 4 in (10.2 cm) at Round 12 with 96 stitches. The 104-stitch border adds 0.25 in (0.6 cm) on every side, for a finished diameter of 4.5 in (11.4 cm). The 1.5 in (3.8 cm) loop brings the full height to about 6 in (15.2 cm).
If your gauge is right, everything after it will come out right too. Make one, check it against the checkpoints, and then make enough for the whole tree.
Happy crocheting!