

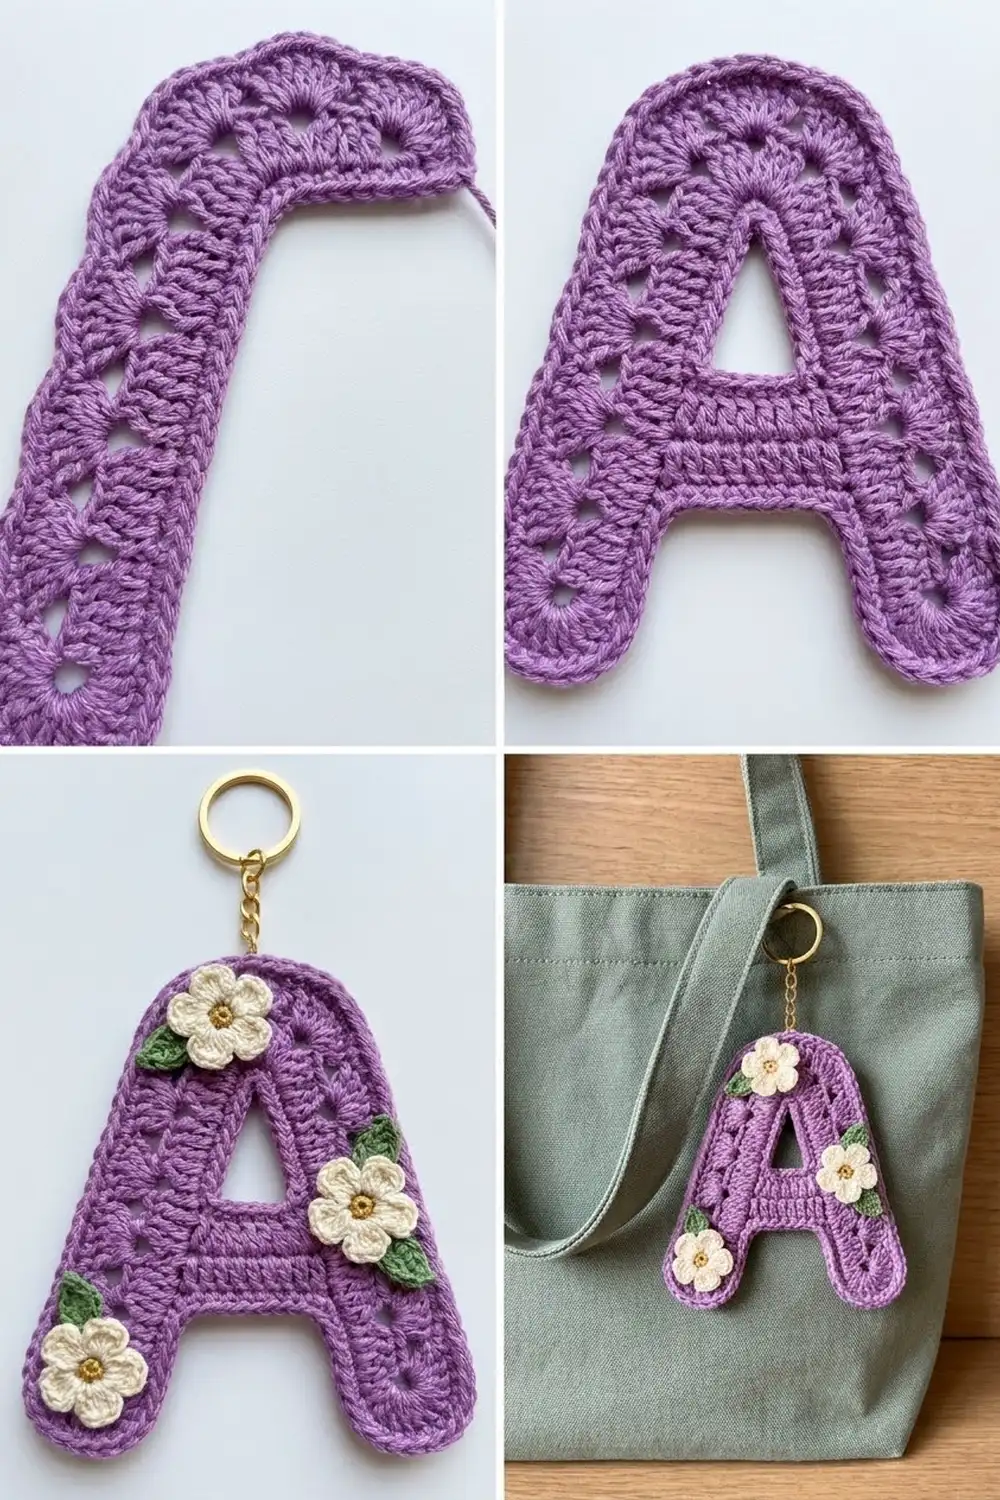
This lacy letter A is a small, quick project with a lot of charm. Each leg is a column of open fan stitches. The legs meet in a rounded peak with one more fan, and a dense crossbar ties them together. A raised, rope-style border outlines every edge, inside and out, so the letter is easy to read even from across a room.
The letter is worked in soft lavender cotton. It’s finished with three tiny cream flowers with golden-yellow centers, each paired with a small green leaf. A gold split ring and a short chain turn it into a bag charm or keychain. The style is sweet and cottage-garden, and it makes a lovely personalized gift.
The pattern uses US crochet terms. The finished letter measures 4 in (10.2 cm) tall and 3.75 in (9.5 cm) wide at the feet, not counting the hardware.
Construction is simple:
– Crochet two straight leg strips from the bottom up.
– Join their tops with two apex rows.
– Add the crossbar between the legs.
– Work a two-round border around the outside and around the small inner triangle.
The result is one finished letter piece. The flowers and leaves are made separately and sewn on, and the hardware goes on last.
Finished Size and Construction
- Finished size: 4 in (10.2 cm) tall x 3.75 in (9.5 cm) wide
- Skill level: Advanced beginner to intermediate
- Terminology: US crochet terms
- Yarn weight: Sport weight (#2) cotton
- Hook: US C-2 (2.75 mm)
- Number of pieces: 1 letter (one finished piece), plus 3 flowers and 3 leaves sewn on as appliqués
- Layout: Two angled legs, rounded apex, one crossbar, open inner triangle
- Leg strip size: 1 in (2.5 cm) wide x 3 in (7.6 cm) long
- Size before border: 3.5 in (8.9 cm) tall x 3.25 in (8.3 cm) wide
- Border depth: 0.25 in (0.6 cm) on every edge
Materials
Choose a smooth, mercerized cotton or cotton blend in sport weight. It shows the fan texture clearly, holds its shape, and survives life on a bag strap or key ring. Avoid fuzzy or very splitty yarns. They blur the lace and make the row ends hard to see when you work the border.
- Lavender (letter): 10 g, about 30 m
- Cream (petals): 3 g, about 9 m
- Golden yellow (flower centers): 1 g, about 3 m
- Leaf green (leaves): 2 g, about 6 m
All quantities include a margin for a test leg, sewing tails, and weaving in ends. Scraps left over from other projects work perfectly here.
Tools:
- US C-2 (2.75 mm) crochet hook
- Tapestry needle
- Scissors
- 1 gold split ring, 1 in (2.5 cm) diameter
- 2 gold jump rings, 0.25 in (0.6 cm)
- 1 short gold chain section, about 0.75 in (1.9 cm)
- 2 pairs of flat-nose pliers
- Rust-proof pins and a blocking mat
- Spray bottle
- Stitch markers (optional, helpful for the crossbar)
Abbreviations (US Terms)
- ch = chain
- sl st = slip stitch
- sc = single crochet
- hdc = half double crochet
- dc = double crochet
- sc2tog = single crochet 2 together
- sp = space
- st(s) = stitch(es)
- RS = right side
Fan: 7 dc worked into the same stitch.
Reverse sc (crab stitch):
1. Working from left to right (right-handed), insert the hook into the next stitch to the right.
2. Yarn over and pull up a loop.
3. Yarn over and pull through both loops.
This creates the twisted, rope-like edge on the letter.
Gauge and Checkpoints
Gauge: 7 sc = 1 in (2.5 cm) across the strip. One fan row plus one bar row = 0.55 in (1.4 cm) tall.
Make the left leg first and treat it as your test piece. It’s small, so it’s quicker than a separate swatch. If it measures correctly, you simply keep it.
- After Row 1: strip is 1 in (2.5 cm) wide.
- After Row 5: strip is 1.25 in (3.2 cm) long.
- After Row 12: strip is 3 in (7.6 cm) long.
- After the apex (Row 14): letter is 3.5 in (8.9 cm) tall and 3.25 in (8.3 cm) wide at the feet.
- After the border: 4 in (10.2 cm) x 3.75 in (9.5 cm).
Too big? Go down to a US B-1 (2.25 mm) hook. Too small? Go up to a US D-3 (3.25 mm) hook. Small size differences are fine for a keychain, but the two legs must match each other exactly. Make the right leg with the same hook, in the same sitting if you can.

Left Leg
With lavender, ch 8.
Row 1 (RS): Sc in 2nd ch from hook and in each ch across, turn. (7 sc)
Row 2 (fan row): Ch 1, sc in first sc, skip 2 sc, fan (7 dc) in next sc, skip 2 sc, sc in last sc, turn. (9 sts: 2 sc + 7 dc)
Row 3 (bar row): Ch 1, sc in first sc, ch 3, skip 3 dc, sc in 4th (center) dc, ch 3, skip 3 dc, sc in last sc, turn. (3 sc and 2 ch-3 sps)
Row 4 (fan row): Ch 1, sc in first sc, skip ch-3 sp, fan in center sc, skip ch-3 sp, sc in last sc, turn. (9 sts)
Rows 5–11: Repeat Rows 3 and 4 three more times, then work Row 3 once more. You now have 5 fans in total (Rows 2, 4, 6, 8, 10), each sitting in its own pair of open arches.
Row 12 (conversion row): Ch 1, sc in first sc, 2 sc in ch-3 sp, sc in center sc, 2 sc in ch-3 sp, sc in last sc. (3 sc worked 1-per-existing-sc + 4 sc worked into the 2 spaces = 7 sc)
Fasten off. The strip should measure 1 in (2.5 cm) x 3 in (7.6 cm).
Right Leg
Work Rows 1–12 exactly as for the left leg, but don’t fasten off. Your yarn is now at the right edge of Row 12, ready to work the next row with the RS facing.
Apex
Lay both legs RS up, right leg on the right, with their inner top corners touching.
Row 13 (RS, joining row): Ch 1, sc in first 6 sc of right leg, sc2tog over the last sc of right leg and the first sc of left leg, sc in remaining 6 sc of left leg, turn. (12 sc + 1 sc2tog = 13 sts)
The sc2tog is the center stitch (stitch 7) and becomes the peak of the letter.
Row 14 (apex fan): Ch 1, sc in first st, ch 2, skip 5 sts, 9 dc in the sc2tog, ch 2, skip 5 sts, sc in last st. (2 sc + 9 dc = 11 sts, plus 2 ch-2 sps)
Fasten off. The 9-dc fan and the two ch-2 arches form the rounded top.
Checkpoint: Lay the letter flat and spread the legs until the feet measure 3.25 in (8.3 cm) across, outside edge to outside edge. The gap between the inner foot corners is about 1.25 in (3.2 cm), and the letter is 3.5 in (8.9 cm) tall. Pin it in this position before the next section.
Crossbar
Keep the legs pinned at the checkpoint angle while you work this section. Place a marker in the inner row-end of Row 7 on each leg so the bar sits level.
Row A: With RS facing, join lavender with sl st into the inner row-end of Row 7 on the left leg. Ch 4, sl st into the inner row-end of Row 7 on the right leg, turn. (4 ch)
Row B: Ch 2 (does not count as a st), dc in each of the 4 ch, sl st into the inner row-end of Row 8 on the left leg, turn. (4 dc)
Row C: Ch 1, sc in each dc, sl st into the inner row-end of Row 9 on the right leg. (4 sc)
Fasten off. The crossbar spans about 0.55 in (1.4 cm). It should lie flat without pulling the legs inward. If it puckers, redo Row A with a slightly looser chain.
Border
The border is two rounds on the outside edge and two rounds around the inner triangle. Border gauge is the same 7 sc per 1 in (2.5 cm). Along the leg sides, work 1 sc per sc-height row end and 2 sc per fan row end.
Outer Border
Round 1: With RS facing, join lavender in the outer row-end of Row 1 on the left leg. Work sc around as follows:
- Left leg outer side: 1 sc in Row 1, (2 sc in fan row, 1 sc in bar row) 5 times, 1 sc in Row 12. (17 sc)
- Apex: 1 sc in Row 13 end, 2 sc in Row 14 end, 2 sc in ch-2 sp, 1 sc in each of 9 dc, 2 sc in ch-2 sp, 2 sc in Row 14 end, 1 sc in Row 13 end. (19 sc)
- Right leg outer side: same as left, worked downward. (17 sc)
- Right foot: working in the free loops of the foundation ch, 2 sc in first ch, 1 sc in next 5 ch, 2 sc in last ch. (9 sc)
- Right leg inner side, Rows 1–6: 1 sc in Row 1, then 2-1-2-1-2 for Rows 2–6. (9 sc)
- Crossbar underside: 1 sc in the free loop of each Row A ch. (4 sc)
- Left leg inner side, Rows 6–1: 2-1-2-1-2, then 1 sc in Row 1. (9 sc)
- Left foot: 2 sc in first ch, 1 sc in next 5 ch, 2 sc in last ch. (9 sc)
Sl st to first sc. (17 + 19 + 17 + 9 + 9 + 4 + 9 + 9 = 93 sc)
Round 2: Ch 1, reverse sc in each sc around, sl st to first st. (93 reverse sc)
Fasten off.
Inner Triangle Border
Round 1: With RS facing, join lavender in the first sc of crossbar Row C, then work:
– 1 sc in each of the 4 sc of Row C. (4 sc)
– Up the right leg, sc in the inner row-ends of Rows 10, 11, and 12: 2-1-1. (4 sc)
– 1 sc at the peak where the legs meet. (1 sc)
– Down the left leg, sc in the inner row-ends of Rows 12, 11, and 10: 1-1-2. (4 sc)
Sl st to first sc. (4 + 4 + 1 + 4 = 13 sc)
Round 2: Ch 1, reverse sc in each sc around, sl st to first st. (13 reverse sc)
Fasten off.
Why the math works: Every row end gets a stitch count matched to its height, so the edge neither ruffles nor pulls. Each leg side has 17 sc: 2 sc-height end rows at 1 sc each, 5 fan rows at 2 sc each, and 5 bar rows at 1 sc each (1 + 10 + 5 + 1 = 17). The 2-sc corners on each foot round them softly. Each border round adds 0.125 in (0.3 cm), so the border adds 0.25 in (0.6 cm) per edge:
– Height: 3.5 in + 0.5 in = 4 in (10.2 cm)
– Width: 3.25 in + 0.5 in = 3.75 in (9.5 cm)
Flowers (Make 3)
With golden yellow, make a magic ring.
Round 1: Ch 1, 5 sc in ring, sl st to first sc. Pull the ring closed. (5 sc) Fasten off.
Round 2: Join cream in any sc. *(Sl st, ch 2, 2 dc, ch 2, sl st) in same sc, move to next sc; repeat from * 4 more times. (5 petals)
Fasten off, leaving a 6 in (15.2 cm) tail for sewing. Each flower is about 0.75 in (1.9 cm) across.
Leaves (Make 3)
With green, ch 6.
Round 1:
1. First side: sc in 2nd ch from hook, hdc in next ch, dc in next ch, hdc in next ch.
2. Tip: (sc, ch 2, sc) in last ch.
3. Rotate and work along the other side of the chain: hdc in next ch, dc in next ch, hdc in next ch, sc in last ch.
4. Sl st to first sc. (10 sts + 1 ch-2 tip)
Fasten off, leaving a 6 in (15.2 cm) tail. Each leaf is about 0.75 in (1.9 cm) long.
Assembly
Pin each flower so it overlaps the base of its leaf. Sew both on through the back of the letter’s stitches so nothing shows on the front.
- Flower 1: upper left leg near the apex, leaf pointing outward to the left.
- Flower 2: right leg just above the crossbar on the outer edge, leaf pointing down and to the right.
- Flower 3: left foot, leaf pointing to the right.
Open a jump ring with two pliers by twisting the ends sideways; never pull them apart. Thread it through the center stitches of the apex border, add the chain, and close it. Use the second jump ring to connect the chain to the split ring.
Final Blocking
- Weave in all ends before blocking, except any you may need to adjust.
- Mist the letter evenly until damp, not soaked.
- Pin it RS up on the mat to 4 in (10.2 cm) tall and 3.75 in (9.5 cm) wide.
- Pin each foot square and check that both legs lean at the same angle.
- Gently open each fan with a pin so the arches show.
- Let it dry completely, about 2 hours.
- If you’d rather not pin through the flowers, sew them on after blocking.
Final Quality-Control Checklist
- Letter measures 4 in (10.2 cm) x 3.75 in (9.5 cm).
- Both legs have 5 fans and match in length.
- Apex fan is centered over the sc2tog.
- Crossbar is flat and level.
- Outer border has 93 stitches; inner border has 13.
- Reverse sc edge is even all around.
- Flowers and leaves are secure and lie flat.
- Jump rings are fully closed with no gap.
Troubleshooting
Fans lean to one side: Check that each fan goes into the center sc of the bar row, not into a ch-3 space.
Leg is too wide: Your dc are loose. Tighten your dc tension or go down a hook size.
Edge ruffles: You added extra sc on the row ends. Recount against the per-side numbers.
Edge cups or pulls: There are too few stitches, or the reverse sc is too tight. Loosen your tension on Round 2.
Inner triangle closes up: Work the inner Round 2 a little looser, or replace it with sl sts.
Crossbar puckers: Redo Row A with a looser chain.
Legs are different lengths: Count the fans. Each leg needs exactly 5 fans and 12 rows.
Care
Hand wash in cool water with mild soap, press the water out in a towel, and dry flat. Remove the hardware first if possible.
Final Notes
The measurement chain is simple:
– Two leg strips, each 1 in x 3 in (2.5 cm x 7.6 cm).
– Joined at the apex into a 3.5 in x 3.25 in (8.9 cm x 8.3 cm) letter.
– Bordered by 0.25 in (0.6 cm) on every edge for a finished 4 in x 3.75 in (10.2 cm x 9.5 cm) keychain.
Check your gauge on the first leg and the rest follows.
Happy crocheting!