

The Holly Hearth Valance is a short, festive curtain for a kitchen or front window. A cream filet mesh header holds a row of green holly sprigs with deep-red berries. Below it, a dark-green scalloped edge forms six soft arches, and seven cords hang from the points, decorated in turn with bobble wreaths and openwork stars and finished with chunky cream tassels.
The palette is three colors: cream, forest green and cranberry red. The style is cottage Christmas: clean grid lines, raised texture and a lot of movement in the hanging drops. This pattern uses US crochet terms throughout.
The finished valance measures 24.25 in (61.6 cm) wide. The body is 7.25 in (18.4 cm) deep at the arch points, and the full length from tab tops to tassel ends is about 24.75 in (62.9 cm).
Construction is simple. You crochet the body in rows from the top edge down, finishing with a sc row. A two-row green border shapes the arches with graduated stitches. Next you work the tabs into the foundation chain. Finally you make the small pieces (leaves, berries, wreaths, bows, stars, cords and tassels) and sew them in place.
Finished Size and Construction
- Finished size: 24.25 in (61.6 cm) wide × 7.25 in (18.4 cm) deep at the arch points; about 24.75 in (62.9 cm) total length
- Skill level: Intermediate
- Terminology: US crochet terms
- Yarn weight: Worsted (#4) cotton
- Hook: 4.5 mm (US 7)
- Number of pieces: 1 main valance body (tabs worked on), plus sewn-on pieces: 14 leaves, 21 berries, 4 wreaths, 4 bows, 3 stars, 7 tassel caps; cords are worked directly onto the border
- Layout: 1 panel with 6 arches and 7 drops; drops alternate wreath, star, wreath, star, wreath, star, wreath
- Body size before border: 24.25 in (61.6 cm) × 5.75 in (14.6 cm)
- Border depth: 1.5 in (3.8 cm) at the arch points, 0.5 in (1.3 cm) at arch centers
- Tab loop height: 2 in (5.1 cm) above the top edge
Materials
Use a smooth, mercerized or combed cotton in worsted weight. Cotton gives crisp mesh, holds its shape against a window, and blocks flat. Acrylic will work, but the arches won’t sit as sharply.
- Cream: 200 g / approx. 380 m (body, tabs, stars, tassels, caps)
- Forest green: 110 g / approx. 209 m (border, leaves, wreaths, cords)
- Cranberry red: 25 g / approx. 48 m (berries, bows)
All quantities include a margin of about 10–15% for gauge swatches and tassel trimming.
Tools:
– 4.5 mm (US 7) crochet hook
– Tapestry needle
– Stitch markers (at least 10)
– Sturdy card, 4 in (10.2 cm) wide, for the tassels
– Small amount of fiberfill or yarn scraps for the tassel caps (optional)
– Rust-proof pins and a blocking board
– Measuring tape and scissors
Abbreviations (US Terms)
- ch – chain
- sl st – slip stitch
- sc – single crochet
- hdc – half double crochet
- dc – double crochet
- tr – treble crochet
- dtr – double treble crochet (yo 3 times, insert, pull up loop, [yo, pull through 2] 4 times)
- sk – skip
- sp – space
- st(s) – stitch(es)
- sc2tog – single crochet 2 together
- RS – right side
Special stitches
- V-st: (dc, ch 1, dc) in the same stitch or space.
- Picot: ch 3, sl st in 3rd ch from hook.
- Bobble: [yo, insert, pull up loop, yo, pull through 2] 3 times in the same st, yo, pull through all 4 loops.
- Popcorn berry: 5 dc in the same st, drop loop, insert hook front to back in the first dc, pick up the dropped loop and pull it through.
Gauge and Checkpoints
Gauge: 16 dc and 8 rows = 4 in (10.2 cm). One filet mesh square (dc, ch 1) measures 0.5 in (1.3 cm) wide and 0.5 in (1.3 cm) tall.
Before starting the full valance, test one piece first: crochet one holly leaf and a 6-in-wide mesh swatch. If the leaf comes out close to 2.25 in (5.7 cm) long and the mesh squares measure 0.5 in (1.3 cm), you’re on gauge.
Measurement checkpoints:
– After Row 1: 24.25 in (61.6 cm) wide
– After Row 7: 3.5 in (8.9 cm) deep
– After Row 9: 4.5 in (11.4 cm) deep
– After Row 11: 5.5 in (14.0 cm) deep
– After Row 12: 5.75 in (14.6 cm) deep
– After Border: 7.25 in (18.4 cm) at the points
If your work is too big, go down a hook size, to 4 mm. If it is too small, go up to 5 mm. Don’t change the stitch counts: the arch math depends on them.
Valance Body
Use cream. Work in rows and turn at the end of every row. On every dc row the turning chain counts as a stitch.
Row 1: Ch 99. Dc in 4th ch from hook and in each ch across. Turn. (97 dc, counting the skipped 3 ch as 1 dc)
Row 2 (mesh): Ch 4 (counts as dc + ch 1), sk next st, dc in next st, ch 1, sk next st, dc in next st across, working the last dc in the top of the turning ch. Turn. (48 mesh squares: 49 dc + 48 ch-1 sps = 97 sts)
Rows 3–7: Repeat Row 2, working each dc into a dc of the row below. (48 mesh squares, 97 sts each row)
Checkpoint: 3.5 in (8.9 cm) deep.
Row 8 (solid holly band): Ch 3 (counts as dc), dc in each dc and each ch-1 sp across, ending in 3rd ch of turning ch. Turn. (49 dc worked into dc + 48 dc worked into ch-1 sps = 97 dc)
Row 9: Ch 3, dc in each st across. Turn. (97 dc)
Checkpoint: 4.5 in (11.4 cm) deep.
Row 10 (lattice): Ch 3 (counts as dc), V-st in next st, sk next st 47 times, V-st in next st, dc in last st. Turn. (48 V-sts + 2 edge dc)
Check the placement: the V-sts land on sts 2, 4, 6 … 96, and the final dc goes in st 97.
Row 11: Ch 3, V-st in the ch-1 sp of each V-st across, dc in top of turning ch. Turn. (48 V-sts + 2 edge dc)
Checkpoint: 5.5 in (14.0 cm) deep.
Row 12 (conversion row): Ch 1, sc in first dc, 2 sc in each V-st ch-1 sp across, sc in top of turning ch. Fasten off. (1 + 96 + 1 = 98 sc)
The 96 center sc split into 6 arch sections of 16 sc each. Place a marker after sc 1, 17, 33, 49, 65, 81 and 97 to mark the section boundaries.
Checkpoint: 24.25 in (61.6 cm) × 5.75 in (14.6 cm).
Tabs
Turn the body so the foundation chain is at the top, RS facing. Each tab is worked over 5 free loops of the foundation chain. Work 7 tabs over these chain loops:
- Tab 1: loops 1–5
- Tab 2: loops 15–19
- Tab 3: loops 31–35
- Tab 4: loops 47–51
- Tab 5: loops 63–67
- Tab 6: loops 79–83
- Tab 7: loops 93–97
Tab 4 sits on the exact center, and the layout is mirror-symmetric.
Row 1: Join cream with sl st in the first loop. Ch 3 (counts as dc), dc in next 4 loops. Turn. (5 dc)
Row 2: Ch 4 (counts as dc + ch 1), sk 1, dc in next st, ch 1, sk 1, dc in top of turning ch. Turn. (2 mesh squares, 5 sts)
Row 3: Ch 3, dc in each st and ch-1 sp across. Turn. (5 dc)
Rows 4–9: Repeat Rows 2–3 three times. (5 sts per row)
Fasten off, leaving a 10 in (25.4 cm) tail. Fold the tab to the back so it forms a 2 in (5.1 cm) loop. Sew the last row flat against the back of Row 1 of the body.
Holly Appliqués
Leaf (make 14 in green):
Ch 10.
Side 1: Sl st in 2nd ch from hook, then work in the next chains: sc, hdc, dc, picot, dc, dc, picot, hdc, sc, sl st in last ch. (9 sts + 2 picots)
Tip and side 2: Rotate and work along the free loops: ch 1, sc in next ch, hdc, dc, picot, dc, dc, picot, hdc, then (sc, picot, sl st) in the final ch for the leaf tip. (8 sts + 3 picots)
Fasten off. Each leaf measures about 2.25 in (5.7 cm) × 1 in (2.5 cm) and has 4 side points and 1 tip point.
Berry (make 21 in red): Ch 3. Work a popcorn berry in the 3rd ch from hook. Fasten off, leaving a 6 in (15.2 cm) tail. Use the tail to sew the berry flat into a round 0.5 in (1.3 cm) bead.
Assembly: Each sprig uses 2 leaves and 3 berries. Lay the leaves in a shallow V, both tips angled up and outward, so their stem ends overlap at the center. Stack the 3 berries in a tight triangle over the overlap, with 2 berries below and 1 above.
Center the sprigs over Rows 8–10. Space them 3.4 in (8.6 cm) apart center-to-center; the first and last sprigs sit 1.7 in (4.3 cm) from the side edges. Sew the leaves down along their center lines so the points stay free. Sew the berries through their centers.
Border (Scalloped Edge)
Border gauge: dtr stands about 1.25 in (3.2 cm) tall and sc about 0.25 in (0.6 cm). The height difference between them is what draws the arches.
Starting count: 98 sc along the bottom edge (Row 12). The border runs along the bottom edge only. The side edges stay as clean dc columns.
Arch sequence (16 sts): dtr, tr in next 2, dc in next 2, hdc, sc in next 4, hdc, dc in next 2, tr in next 2, dtr.
Border Row 1: With RS facing, join green with sl st in the first sc of Row 12. Ch 5 (counts as dtr). Work the arch sequence 6 times across sc 2–97, then dtr in the last sc. Turn.
The count is 1 + (6 × 16) + 1 = 98 sts. Wherever two dtr sit side by side you get a deep point, which gives 7 points in total: 1 at each end and 5 between the arches.
Border Row 2: Ch 1, then work:
- Sc in next st, ch 3, sc in next st (point), sc in next 14 sts 6 times.
- Over the last 2 sts: sc in next st, ch 3, sc in top of turning ch.
Fasten off. Count: 6 × 16 + 2 = 98 sc, plus 7 ch-3 point loops.
Why the math works: 48 V-sts × 2 sc = 96. Add 2 edge sc and you get 98, the border count exactly. Each arch uses 16 stitches, and 6 arches use 96, which leaves 1 edge stitch on each side to pair with the outer dtr and form the end points. No stitches are added at the points except the ch-3 loops, and those are counted separately.
Cords
Make one cord on each of the 7 ch-3 point loops, in green.
- Join green with sl st in the ch-3 loop.
- Ch 49.
- Sl st in the back bump of the 2nd ch from hook and in each ch back up. (48 sl sts)
- Sl st in the ch-3 loop and fasten off.
Each cord measures about 12 in (30.5 cm) long. Leave a 6 in (15.2 cm) tail at the bottom end for attaching the tassel.
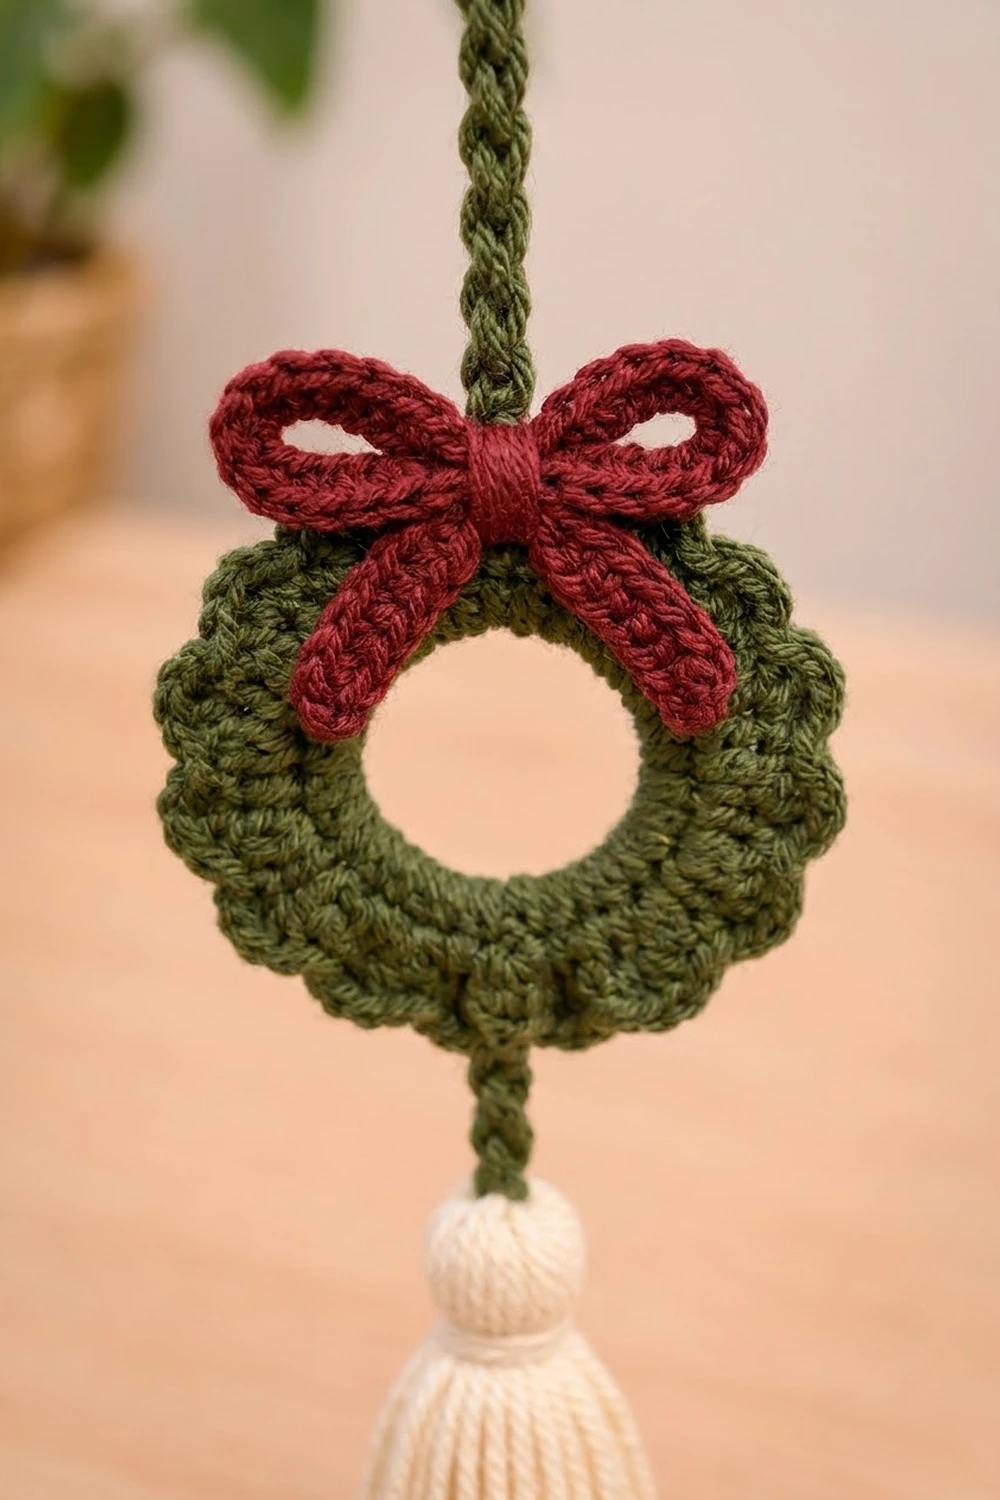
Wreaths (Make 4)
With green, ch 12 and join with sl st to form a ring.
Rnd 1: Ch 1, 20 sc into the ring. Sl st to first sc. (20 sc)
Rnd 2: Ch 1, bobble in next st, sl st in next st 10 times. Sl st to join. (10 bobbles + 10 sl sts = 20 sts)
Fasten off. Diameter: 2.25 in (5.7 cm).
Bow (make 4 in red):
- Ch 13. Sc in 2nd ch from hook and across. (12 sc)
- Ch 1, turn, sc across. (12 sc) Fasten off.
- Fold both ends to the center so they overlap, forming 2 loops.
- Separately, ch 9 and fasten off. Fold this chain into an upside-down V behind the loops to make the tails.
- Wrap the center 6 times with red yarn.
- Sew the bow to the top of the wreath.
Stars (Make 3)
Use cream.
Rnd 1: Magic ring. Ch 4 (counts as dc + ch 1), [dc, ch 1] 9 times in the ring. Sl st to 3rd ch of starting ch. (10 dc + 10 ch-1 sps = 20 sts)
Rnd 2:
- Sl st into the first ch-1 sp.
- Sc in ch-1 sp, ch 5. Starting in the 2nd ch from hook, work sl st, sc, hdc, dc down the chain. Sk next dc, ch-1 sp and dc.
- Repeat from * 5 times in total.
- Sl st to the first sc.
Each point uses 4 sts of Rnd 1, and 5 × 4 = 20. Fasten off. The star measures 2.5 in (6.4 cm) point to point, with a center hole and 5 small eyelets.
Attaching Drops
Center each motif 4 in (10.2 cm) below its border point, with the cord running behind it. Sew the motif to the cord at its top and its bottom.
Work from left to right: wreath, star, wreath, star, wreath, star, wreath. Before sewing, check that all 7 motifs hang at the same height.
Tassels (Make 7)
- Wrap cream 25 times around the 4 in (10.2 cm) card.
- Slip a 10 in (25.4 cm) strand under the wraps at the top edge and tie it tightly.
- Cut the wraps open at the bottom edge.
- Wrap a second strand 6 times around the bundle, 0.5 in (1.3 cm) below the top tie.
- Trim the tassel to 3.5 in (8.9 cm).
Cap (make 7 in cream):
- Rnd 1: Magic ring, 6 sc. (6)
- Rnd 2: 2 sc in each st. (12)
- Rnds 3–4: Sc in each st. (12)
- Rnd 5: (Sc, sc2tog) 4 times. (8)
Slip the cap over the tassel head, adding a pinch of stuffing if needed, and sew it closed around the neck. Thread the cord’s bottom tail through the cap and tie the tassel on securely.
Final Blocking
- Weave in all ends before blocking.
- Lightly mist the valance body and border with water until damp.
- Lay it face down on a blocking board.
- Pin the top edge straight at 24.25 in (61.6 cm).
- Pin each of the 7 border points straight down so the body is 7.25 in (18.4 cm) deep at the points.
- Pin each arch center at 6.25 in (15.9 cm) deep, curving the scallops evenly.
- Square up the mesh grid with your fingers so the lines are straight.
- Let it dry completely. Don’t press the berries or bobbles flat.
- Hang the cords and give the tassels a light steam to straighten them.
Final Quality-Control Checklist
- [ ] Body is 24.25 in (61.6 cm) wide
- [ ] 48 mesh squares and 48 V-sts across
- [ ] 7 tabs, mirror-symmetric, each a 2 in (5.1 cm) loop
- [ ] 7 holly sprigs, evenly spaced
- [ ] 6 even arches and 7 sharp points
- [ ] 7 cords, each 12 in (30.5 cm)
- [ ] 4 wreaths and 3 stars hung at the same height
- [ ] Tassels trimmed to 3.5 in (8.9 cm)
- [ ] All ends secured on the back
Troubleshooting
The mesh slants: Make sure each dc goes into a dc and not into a ch-1 sp, and that you skip exactly 1 st per square.
Arches are uneven: Count each 16-st sequence again. One extra dc pushes the points out of line.
Points curl up: Block firmly. If they still curl, work dtr more loosely.
Leaves cup: Your picots are too tight. Chain more loosely.
Cords twist: Steam them while hanging and weight the ends with the tassels.
Wreath ruffles: Use 18 sc in Rnd 1, with 9 bobbles in Rnd 2.
Care
Hand wash in cool water with mild soap, roll in a towel and dry flat, re-pinning the arches. Don’t tumble dry, because the tassels will fray.

Final Notes
The measurement chain is:
- 97 sts gives a 24.25 in (61.6 cm) width.
- 12 rows build 5.75 in (14.6 cm) of body.
- 98 sc divide into 6 arches of 16 plus 2 edge stitches.
- The border adds 1.5 in (3.8 cm) at the 7 points.
- 12 in (30.5 cm) cords and 3.5 in (8.9 cm) tassels bring the total length to 24.75 in (62.9 cm).
If you keep each link in that chain accurate, the valance will hang straight and even.
Happy crocheting!