

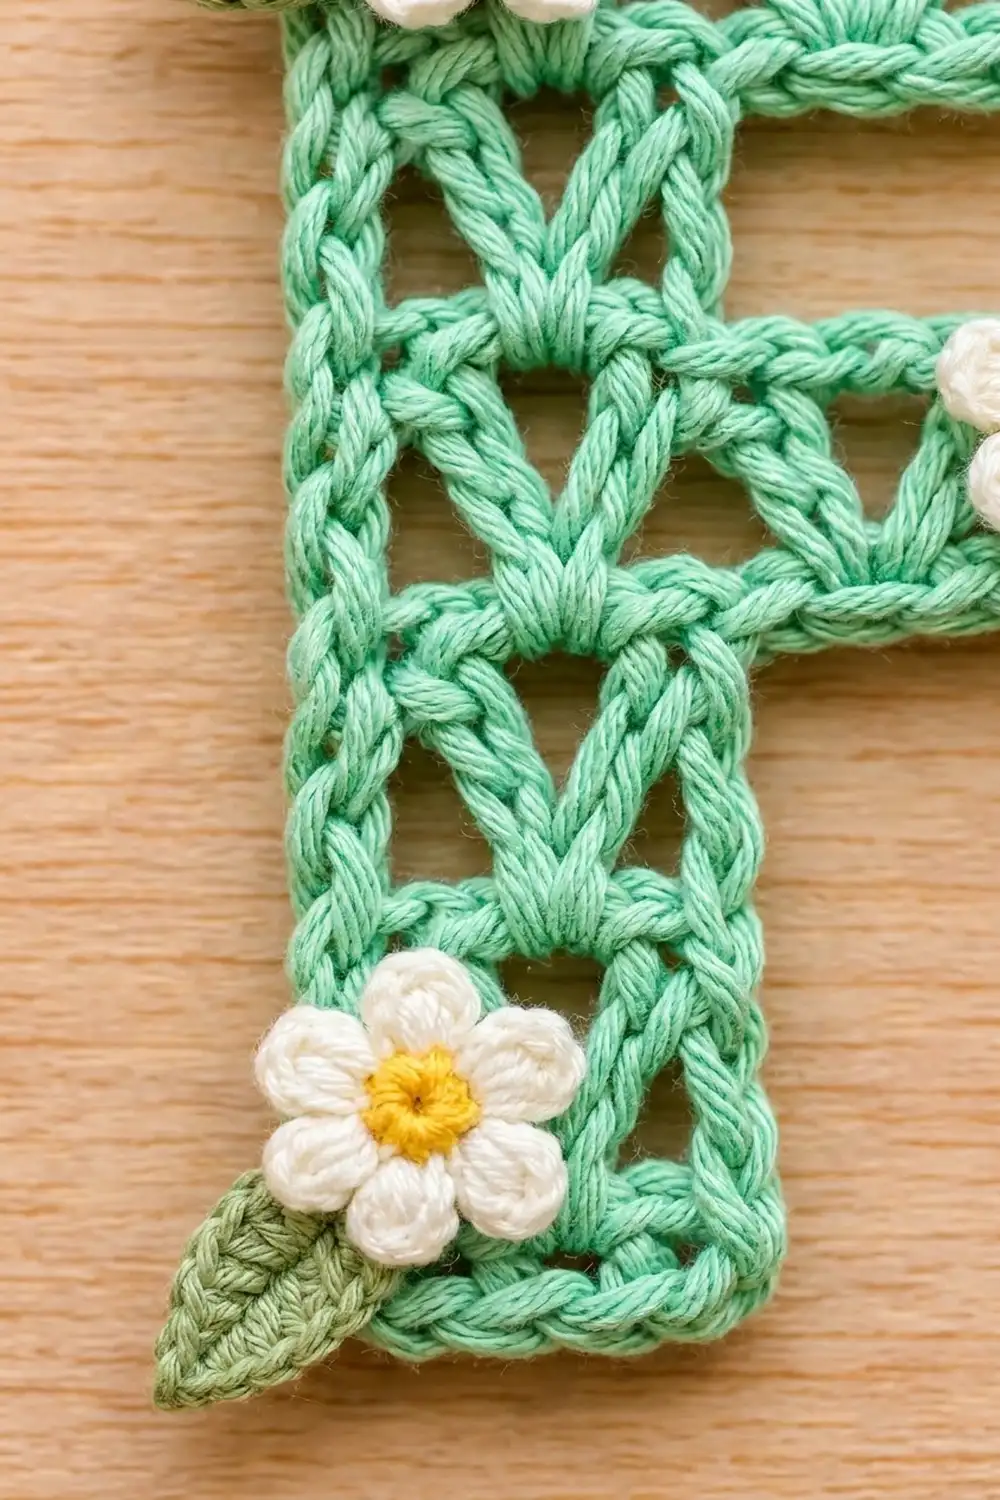
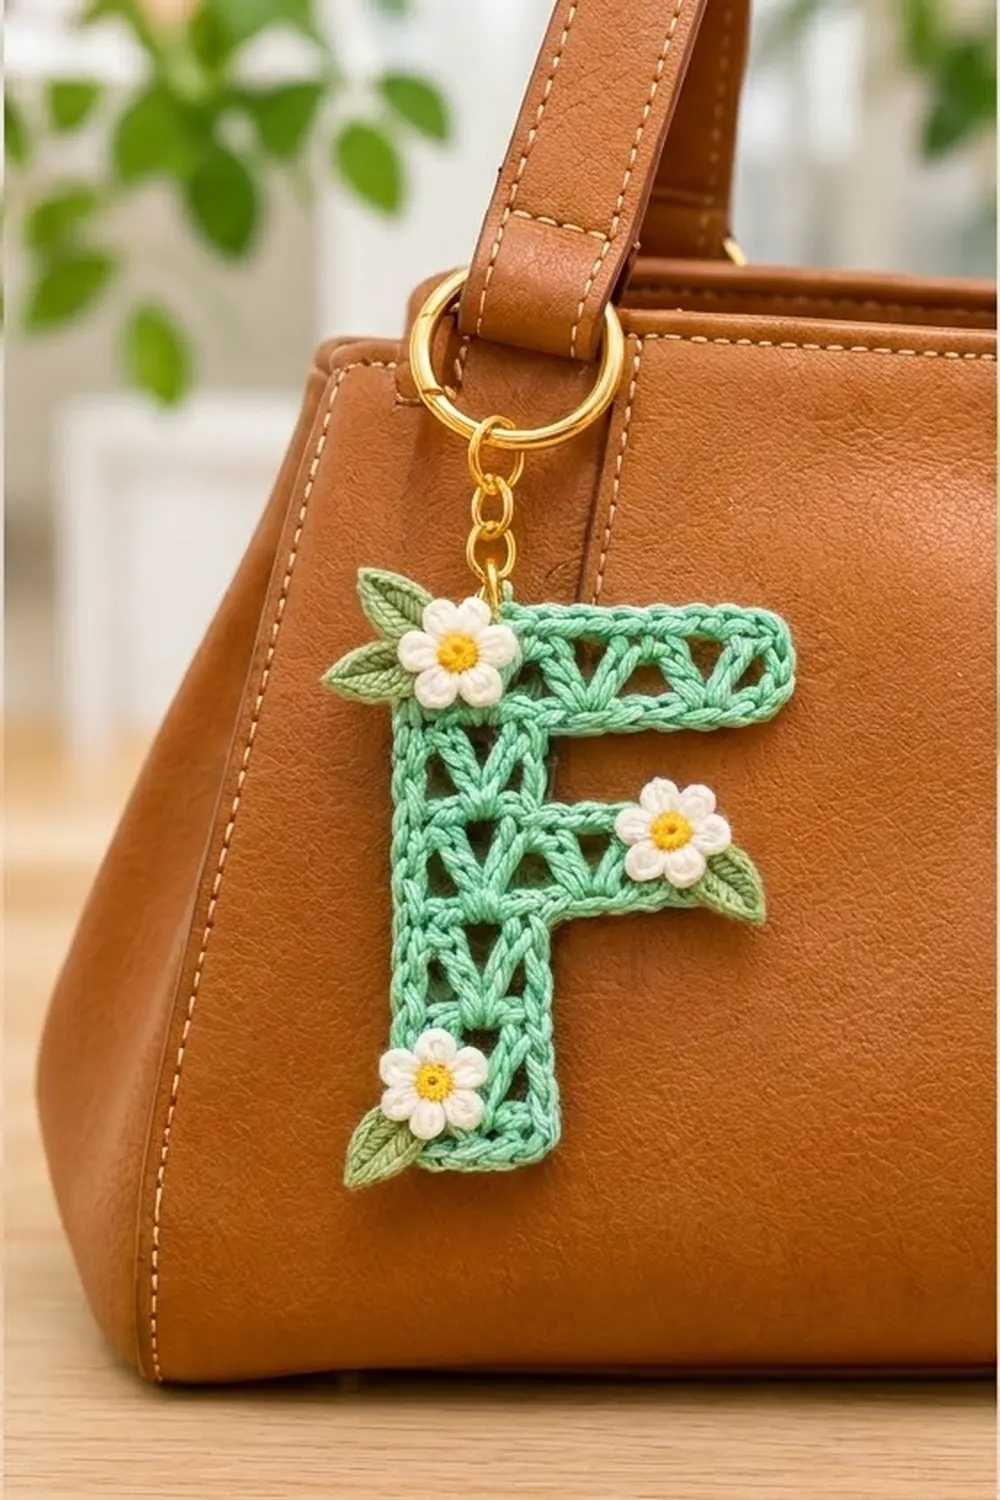
The Mint Meadow Letter F is a small, airy initial charm worked in soft mint green cotton. Upright posts and V-stitches make rows of little open triangles, and each open row is separated by a solid band of single crochet. One smooth round of single crochet frames the whole letter so the outline looks neat and rounded.
Three tiny daisies with yellow centers and sage-green leaves are sewn on top: one at the top-left corner, one at the tip of the middle arm and one at the bottom of the stem. A gold split ring on a short chain turns the letter into a keychain or bag charm.
This pattern uses US crochet terms. The finished letter measures 3 in (7.6 cm) wide by 3.6 in (9.1 cm) tall.
The letter is one single piece worked flat in rows from the bottom of the stem up. You add each arm by chaining extra stitches at the end of a row. After that you work one border round, make the flowers and leaves separately, sew them on and attach the hardware.
Finished Size and Construction
- Finished size: 3 in (7.6 cm) wide x 3.6 in (9.1 cm) tall, not including hardware
- Skill level: Easy / advanced beginner
- Terminology: US crochet terms
- Yarn weight: DK (light worsted, #3) cotton
- Hook: 3.5 mm (E-4)
- Number of pieces: 1 letter + 3 flowers + 4 leaves (appliqués)
- Layout: Single letter “F,” stem on the left, both arms pointing right
- Piece size before border: 2.6 in (6.6 cm) wide x 3.2 in (8.1 cm) tall
- Border depth: 0.2 in (0.5 cm) on every edge
- Stem width after border: 1.4 in (3.6 cm)
- Middle arm reach after border: 2.2 in (5.6 cm)
Materials
Use a smooth, mercerized or combed DK cotton, about 115 m per 50 g. Cotton shows the open triangles clearly and holds its shape on a keychain that gets handled every day. Avoid fuzzy or very stretchy yarns, because they blur the lattice.
- Mint green (letter): 10 g / 23 m
- White (petals): 3 g / 7 m
- Yellow (flower centers): 2 g / 5 m
- Sage green (leaves): 3 g / 7 m
Tools:
– 3.5 mm (E-4) crochet hook
– Tapestry needle
– Scissors
– 1 in (2.5 cm) gold split ring
– Short gold chain, about 0.75 in (1.9 cm), with 2 jump rings
– Flat-nose pliers
– Rust-proof pins and a blocking mat
Yarn quantities include a margin for a gauge swatch and sewing tails.
Abbreviations (US Terms)
- ch – chain
- sl st – slip stitch
- sc – single crochet
- sc2tog – single crochet 2 together
- hdc – half double crochet
- dc – double crochet
- sk – skip
- sp – space
- st(s) – stitch(es)
- RS – right side
Special stitch – V-stitch (V-st): (dc, ch 1, dc) all in the same stitch. It opens upward and forms the “V” in the middle of each open triangle.
Post (pattern term): a single dc standing upright between V-stitches. Posts form the vertical bars of the lattice.
Gauge and Checkpoints
Gauge: 5 sc = 1 in (2.5 cm) wide. One sc row is 0.2 in (0.5 cm) tall and one dc row is 0.4 in (1.0 cm) tall.
The stem itself works as your test piece. Work Rows 1–5 and measure before you continue.
- After Row 5: 1.0 in (2.5 cm) wide x 1.4 in (3.6 cm) tall
- After Row 7: middle arm row is 1.8 in (4.6 cm) wide; letter is 2.0 in (5.1 cm) tall
- After Row 11: 2.6 in (6.6 cm) wide x 3.2 in (8.1 cm) tall
- After border: 3 in (7.6 cm) wide x 3.6 in (9.1 cm) tall
Too big? Go down to a 3.25 mm hook. Too small? Go up to a 3.75 mm hook. If only the height is off, look at your dc rows first. Tall, loose dc are the usual cause, so pull each loop snugly to the hook.
Letter Pattern
Arm side: Both faces of this fabric look nearly the same. Whichever edge Row 1 ends on becomes the arm side. Place a marker on that edge. You will turn the letter at the end so the arms point right.
Stem
Foundation: With mint, ch 6.
Row 1: Sc in 2nd ch from hook and in each ch across. (5 sc) Row 1 ends on the arm side.
Row 2 (V row): Ch 3 (counts as a post dc), turn. Sk next sc, V-st in next sc, sk next sc, dc in last sc. (2 posts + 1 V-st = 4 dc, 1 ch-1 sp)
Row 3 (sc row): Ch 1, turn. Sc in each dc and each ch-1 sp across, working the last sc in the top of the turning ch-3. (5 sc)
Rows 4–5: Repeat Rows 2–3. (5 sc) Row 5 ends on the arm side.
Checkpoint: 1.0 in (2.5 cm) x 1.4 in (3.6 cm).
Middle Arm
Row 6 (V row, extended): Ch 7. Dc in 4th ch from hook. This is the arm-tip post; the 3 skipped ch do not count. Sk next ch, V-st in next ch, sk last ch. Dc in first sc of Row 5. Sk next sc, V-st in next sc, sk next sc, dc in last sc. (3 posts + 2 V-sts = 7 dc, 2 ch-1 sps)
The 4 new chains add one full lattice cell. The stem’s right-hand post sits directly on the stem’s edge stitch, so the arm cell and stem cell share that post.
Row 7 (sc row): Ch 1, turn. Sc in each dc and ch-1 sp across. (9 sc) This row ends at the arm tip.
Checkpoint: 1.8 in (4.6 cm) wide, 2.0 in (5.1 cm) tall.
Upper Stem
Row 8 (V row): Turn. Sl st in each of the first 5 sc. Ch 3 (counts as a post dc, rising from the 5th sc). Sk next sc, V-st in next sc, sk next sc, dc in last sc. (4 dc, 1 ch-1 sp; 5 sl sts on the arm)
The slip stitches carry the yarn back to the stem without adding height to the arm. The border covers them later.
Row 9 (sc row): Ch 1, turn. Sc in each dc and ch-1 sp across. (5 sc) Row 9 ends on the arm side.
Top Arm
Row 10 (V row, extended): Ch 11. Dc in 4th ch from hook (arm-tip post). Then:
– Sk next ch, V-st in next ch, sk next ch, dc in next ch (post).
– Sk next ch, V-st in next ch, sk last ch.
– Dc in first sc of Row 9, sk next sc, V-st in next sc, sk next sc, dc in last sc.
(4 posts + 3 V-sts = 10 dc, 3 ch-1 sps)
Row 11 (sc row): Ch 1, turn. Sc in each dc and ch-1 sp across. (4 + 6 + 3 = 13 sc)
Fasten off and weave in the ends.
Checkpoint: 2.6 in (6.6 cm) wide x 3.2 in (8.1 cm) tall.
Border
Border gauge: 1 sc per sc-row end, 2 sc per dc-row end, and 1 sc per stitch or chain along the top and bottom edges. Outer corners get 3 sc in one stitch. Inner corners get sc2tog.
Hold the letter with the arm side on the right. Join mint in the first foundation ch at the bottom-left corner. Work counterclockwise:
- Bottom-left corner: 3 sc in first foundation ch. (3)
- Bottom edge: Sc in next 3 ch. (3)
- Bottom-right corner: 3 sc in last ch. (3)
- Lower stem, right edge: Work into the row ends of Rows 2–5: 2 + 1 + 2 + 1. (6)
- Inner corner: Sc2tog over the end of Row 5 and the free loop of the arm ch next to the stem. (1)
- Middle arm underside: Sc in next 2 free loops. (2)
- Arm-tip bottom corner: 3 sc in the last free loop. (3)
- Arm-tip side: 2 sc around the end of Row 6. (2)
- Arm-tip top corner: 3 sc in the last sc of Row 7, working through the sl st as well. (3)
- Middle arm top: Sc in next 2 sts. (2)
- Inner corner: Sc2tog over the next st and the lower half of the Row 8 end. Then work 1 sc in the upper half of the Row 8 end. (2)
- Inner corner: Sc2tog over the end of Row 9 and the free loop of the top-arm ch next to the stem. (1)
- Top arm underside: Sc in next 6 free loops. (6)
- Top-arm bottom corner: 3 sc in last free loop. (3)
- Top-arm tip side: 2 sc around the end of Row 10. (2)
- Top-right corner: 3 sc in last sc of Row 11. (3)
- Top edge: Sc in next 11 sc. (11)
- Top-left corner: 3 sc in last sc. (3)
- Left edge: Work into the row ends of Rows 10 down to 2: 2 + 1 + 2 + 1 + 2 + 1 + 2 + 1 + 2. (14)
Sl st to the first sc. Total: 73 sts. Fasten off.
Why the math works: At 5 sc per inch, one sc is 0.2 in (0.5 cm) wide. That matches the height of one sc row, and a dc row is twice as tall, so it gets 2 sc. The top edge has 11 + 2 corner groups over 13 stitches, which equals one border stitch per stitch. That keeps the edges flat. The 3-sc corners turn outward cleanly, and the sc2tog corners stop the inside angles from rippling. The border adds 0.2 in (0.5 cm) on each side, so 2.6 in becomes 3 in (7.6 cm) and 3.2 in becomes 3.6 in (9.1 cm).
Flowers and Leaves (Appliqués)
Flower (make 3):
– Center: With yellow, make a magic ring. Ch 1, 5 sc in ring, sl st to first sc. (5 sc) Fasten off.
– Petals: Join white in any sc. (Sl st, ch 2, 3 dc, ch 2, sl st) in the same sc, then move to the next sc. Repeat 4 more times. (5 petals) Fasten off, leaving an 8 in (20.3 cm) tail.
– Size: about 0.75 in (1.9 cm) across.
Leaf (make 4): With sage, ch 5. Then:
– Sc in 2nd ch from hook, hdc in next ch, dc in next ch, sc in last ch.
– Ch 1, then work along the other side of the chain: sc, dc, hdc, sc.
– Sl st to the tip.
Fasten off, leaving a tail. Size: about 0.6 in (1.5 cm) long.
Placement:
– Top-left corner: 1 flower, with one leaf pointing up-left and one pointing left.
– Middle arm tip: 1 flower, with its leaf pointing down-right.
– Bottom of stem: 1 flower centered low on the stem, with its leaf pointing down-left.
Tuck each leaf base under its flower. Sew the leaves first, then the flowers, with small stitches around the yellow center. Make sure nothing shows on the back.
Hardware: Open a jump ring and pass it through the border at the center of the top edge. Attach the chain, then add the second jump ring and the split ring.
Final Blocking
- Wet the letter before sewing on the appliqués, or mist it if they are already attached. Press out the excess water in a towel.
- Pin it to 3 in (7.6 cm) x 3.6 in (9.1 cm) on a blocking mat.
- Pin each outer corner sharply and push the inner corners into crisp right angles.
- Use a pin tip to open each triangle evenly.
- Let it dry completely, at least 6 hours.
- Remove the pins, then add or straighten the appliqués.
Final Quality-Control Checklist
- Letter measures 3 in (7.6 cm) x 3.6 in (9.1 cm)
- Stem is 1.4 in (3.6 cm) wide and the middle arm reaches 2.2 in (5.6 cm)
- Every V-stitch opens upward and every triangle is clear
- Border has 73 stitches with no puckers at the corners
- Row 8 slip stitches are hidden under the border
- Flowers and leaves are firmly sewn and lie flat
- Jump rings are fully closed with no gaps
- All tails are woven in and trimmed
Troubleshooting
- The arm curls upward: The extension chain is too tight. Redo it with a looser chain or one hook size up.
- The triangles look closed: Check that you skip a stitch on each side of every V-st.
- The border ruffles: You have too many stitches on the side edges. Use exactly 1 sc per sc row and 2 per dc row.
- The inner corners gap: Use the sc2tog as written instead of a plain sc.
- The petals flop: Tighten your tension or use 2 dc per petal.
- The letter is too tall: Your dc are too loose. Snug them up or change hook size.
Care
Hand wash in cool water with a mild soap and reshape while damp. Let it dry flat, away from direct sun, to protect the hardware and the white petals.
Final Notes
The measurement chain is:
– Stem Rows 1–5: 1.0 in (2.5 cm) x 1.4 in (3.6 cm)
– Middle arm: 1.8 in (4.6 cm)
– Top arm: 2.6 in (6.6 cm) wide at 3.2 in (8.1 cm) tall
– 73-stitch border: final 3 in (7.6 cm) x 3.6 in (9.1 cm)
If each checkpoint matches, the finished letter will match as well. Then add your daisies and leaves and clip the charm to a bag, keys or zipper pull.
Happy crocheting!