

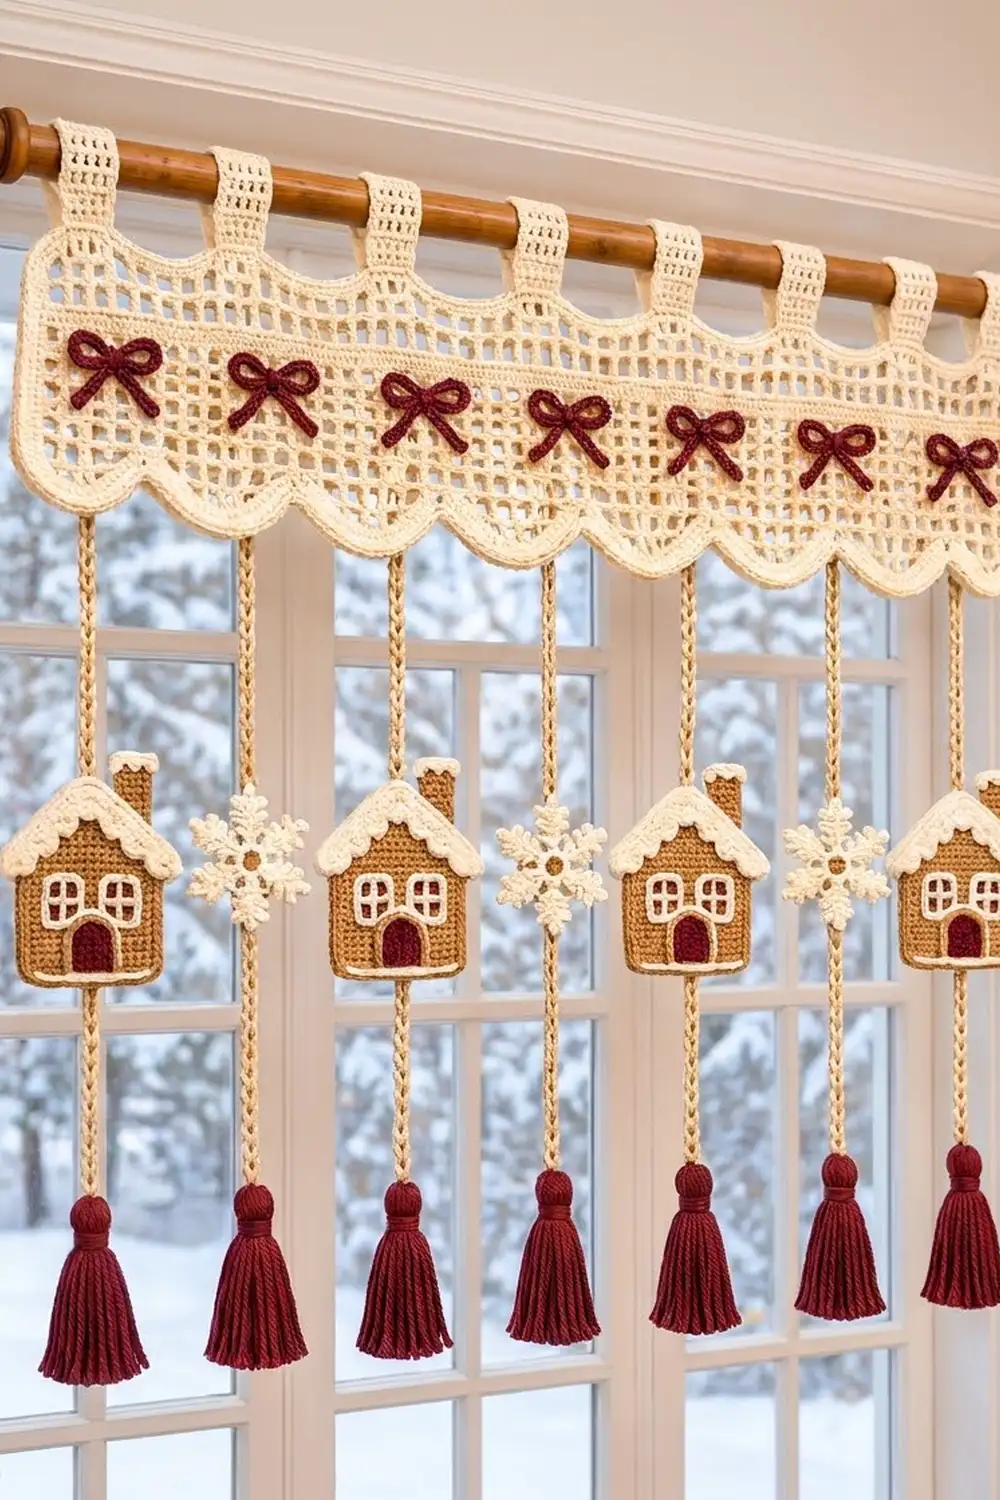
This cozy holiday valance turns a window into a tiny gingerbread village. A cream filet-mesh panel with a scalloped lower edge has six burgundy bows sewn on it. It hangs from seven mesh tabs and has seven cream cords below it. Each cord holds a gingerbread house or a lacy snowflake and ends in a full burgundy tassel.
The panel, tabs, cords, snowflakes and roof icing are cream. The houses are gingerbread brown, and the bows, doors and tassels are deep burgundy. The open mesh keeps the look light and lets winter daylight through.
The pattern uses US terms. The bordered panel measures 29.5 in (74.9 cm) wide and 10 in (25.4 cm) tall at the scallop peaks. The whole valance hangs about 30.75 in (78.1 cm) from the tops of the tabs to the tips of the tassels.
First you crochet the mesh panel in rows and add a three-round scalloped border. Then you make the small parts separately and attach them at marked positions.
Finished Size and Construction
- Finished panel: 29.5 in x 10 in (74.9 cm x 25.4 cm) at scallop peaks
- Total drop: about 30.75 in (78.1 cm)
- Skill level: Intermediate
- Terminology: US
- Yarn weight: DK (#3) cotton
- Hook: 3.5 mm (E-4)
- Number of pieces: 1 panel, 7 tabs, 6 bows, 4 houses, 3 snowflakes, 7 cords, 7 tassels
- Layout: 7 tabs and 7 cords centered over 7 scallops; 6 bows over the valleys between them
- Panel before border: 28 in x 8 in (71.1 cm x 20.3 cm), 56 meshes x 16 rows
- Border depth: 0.75 in (1.9 cm) on top and sides; 1.25 in (3.2 cm) at scallop peaks
Materials
Use a smooth DK cotton, about 113 m per 50 g. Cotton keeps the mesh crisp, takes starch well, and won’t stretch under the weight of the cords.
- Cream: 200 g (452 m)
- Gingerbread brown: 30 g (68 m)
- Burgundy: 40 g (90 m)
These amounts include extra yarn for swatching and trimming the tassels.
Tools: 3.5 mm (E-4) hook, tapestry needle, 13 locking stitch markers, cardboard cut 3.5 in (8.9 cm) tall, blocking mats, rust-proof pins, spray starch, measuring tape, scissors.
Abbreviations (US Terms)
ch (chain), sl st (slip stitch), sc (single crochet), hdc (half double crochet), dc (double crochet), tr (treble crochet), sc2tog (single crochet 2 together), rev sc (reverse single crochet), fdc (foundation double crochet), st(s) (stitch[es]), sp (space), RS/WS (right side/wrong side).
Foundation double crochet (fdc): Ch 3, yarn over, insert hook in 3rd ch from hook, pull up a loop, yarn over and draw through 1 loop (this is the “chain”), [yarn over, draw through 2 loops] twice. For each following fdc, insert the hook under the 2 loops of the previous “chain” and repeat. The starting ch-3 does not count as a stitch.
Gauge and Checkpoints
- Mesh: 8 meshes and 8 rows = 4 in (10.2 cm)
- Single crochet: 16 sc and 18 rows = 4 in (10.2 cm)
- Chain: 5 ch = 1 in (2.5 cm)
Make one test piece first: one gingerbread house plus a mesh swatch of fdc 21 and 9 mesh rows. The center 8 meshes of the swatch should measure 4 in (10.2 cm). The house body should be 2.5 in (6.4 cm) wide.
Checkpoints:
- After Row 2: the panel is 28 in (71.1 cm) wide.
- After Row 16: the panel is 8 in (20.3 cm) tall.
- After the border: the panel is 29.5 in x 10 in (74.9 cm x 25.4 cm).
- Each house is 2.5 in (6.4 cm) wide and about 3.5 in (8.9 cm) tall. Each snowflake is 2 in (5.1 cm) across.
- Each cord is 15 in (38.1 cm) long.
If your work is too big, go down 0.25 mm in hook size. If it’s too small, go up 0.25 mm. Width matters most, because all the spacing depends on it.
Main Panel
The fdc row is the top edge. Row 16 becomes the scalloped bottom edge.
Row 1 (RS): Fdc 113. Turn. (113 sts)
Row 2: Ch 4 (counts as dc and ch 1), skip next st, dc in next st, ch 1, skip next st, dc in next st; repeat from * across. Turn. (57 dc + 56 ch-1 sps = 113 sts; 56 meshes)
Rows 3–16: Ch 4 (counts as dc and ch 1), dc in next dc, ch 1, dc in next dc; repeat from * across, ending with a dc in the 3rd ch of the turning ch-4. Turn. (113 sts; 56 meshes)
Don’t fasten off. Continue straight into the Border. Checkpoint: 28 in x 8 in (71.1 cm x 20.3 cm).
Tabs (make 7)
With cream:
Row 1: Fdc 7. Turn. (7 sts)
Rows 2–12: Ch 4 (counts as dc and ch 1), skip next st, dc in next st, ch 1, skip next st, dc in last st. Turn. (7 sts; 3 meshes)
Fasten off. Each tab is 1.5 in x 6 in (3.8 cm x 15.2 cm).
Bows (make 6)
With burgundy, ch 18 and sl st in the first ch to form a ring. Don’t let the chain twist.
Rnd 1: Ch 1, sc in each ch around, join. (18 sc) Fasten off, leaving a 12 in (30.5 cm) tail.
Flatten the ring into a band with the join at the center back.
Tails (make 2 per bow): Ch 9, sl st in 2nd ch from hook and in each of the next 7 ch. (8 sl sts)
Place both tails behind the center of the band in an upside-down V. Wrap the long tail 6 times around the center to pinch the loops. Each bow is 2.25 in (5.7 cm) wide.
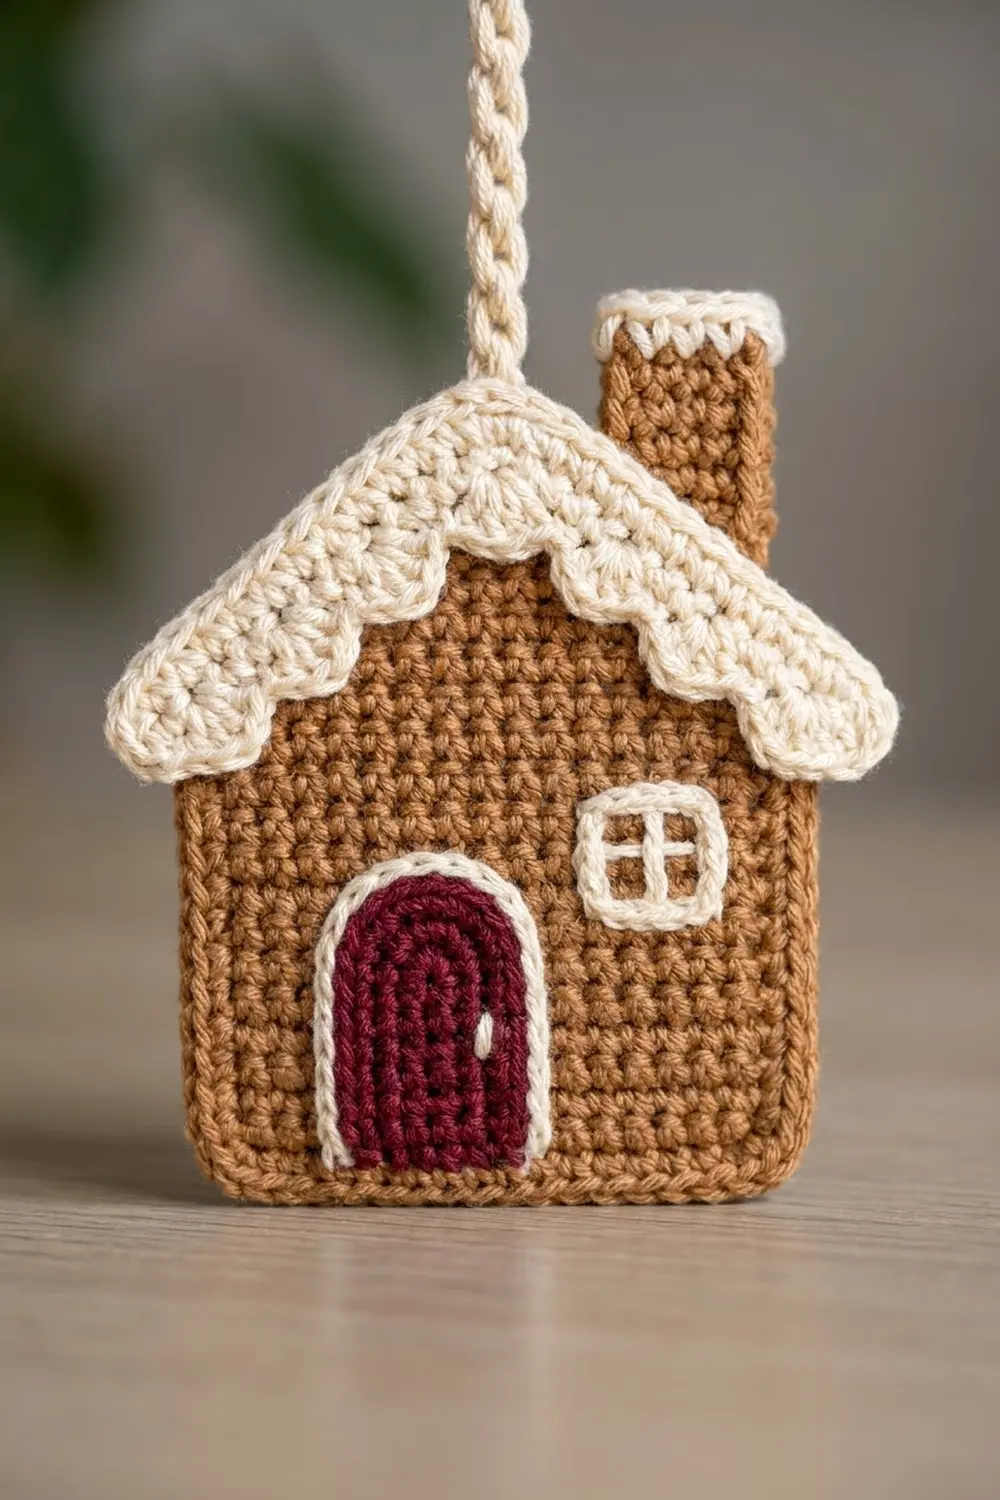
Gingerbread Houses (make 4)
Body and roof (brown):
Row 1: Ch 11, sc in 2nd ch from hook and in each ch across. Turn. (10 sc)
Rows 2–10: Ch 1, sc in each st. Turn. (10 sc)
Row 11: Ch 1, sc2tog, sc in next 6 sts, sc2tog. Turn. (8 sc)
Row 12: Ch 1, sc2tog, sc in next 4 sts, sc2tog. Turn. (6 sc)
Row 13: Ch 1, sc2tog, sc in next 2 sts, sc2tog. Turn. (4 sc)
Row 14: Ch 1, [sc2tog] twice. Turn. (2 sc)
Row 15: Ch 1, sc2tog. (1 sc) Fasten off.
Icing (cream): With RS facing, join at one end of Row 10. Ch 1, then work into the row ends along the roof:
- 2 sc in the end of Row 10
- 3 hdc in Row 11
- sc in Row 12
- 3 hdc in Row 13
- sc in Row 14
- 3 sc in the Row 15 point
- sc in Row 14
- 3 hdc in Row 13
- sc in Row 12
- 3 hdc in Row 11
- 2 sc in the end of Row 10
(23 sts) Fasten off.
Door (burgundy, outlined in cream):
- Ch 4.
- Row 1: Sc in 2nd ch from hook and in next 2 ch. Turn. (3 sc)
- Rows 2–4: Ch 1, sc in each st. Turn. (3 sc) Fasten off.
- Outline: With cream, join at the bottom of one side. Work 4 sc up the row ends, 2 sc in the first top st, sc in the next st, 2 sc in the last top st, then 4 sc down the other side. (13 sc) Fasten off.
Window (cream): Magic ring, 6 sc in ring, join. (6 sc)
Chimney (brown, with a cream top):
- Ch 4.
- Row 1: Sc in 2nd ch from hook and in next 2 ch. Turn. (3 sc)
- Rows 2–3: Ch 1, sc in each st. Turn. (3 sc)
- Row 4: Change to cream, ch 1, sc in each st. (3 sc) Fasten off.
Assembly: Sew the door at the bottom center of the body, with its lower edge on Row 1. Sew the window above the door, on Rows 8–9. Sew the chimney behind one roof slope so that 0.5 in (1.3 cm) shows. Each finished house is 2.5 in (6.4 cm) wide and about 3.5 in (8.9 cm) tall.
Snowflakes (make 3)
With cream:
Rnd 1: Magic ring, ch 3 (counts as dc), 11 dc in ring, join. (12 dc)
Rnd 2: Sl st in next dc, ch 7, sl st in 4th ch from hook, [ch 3, sl st in same ch] twice, sl st in each of next 3 ch, sl st in next dc; repeat from * 5 more times. (6 points with 3 picots each) Fasten off.
Each snowflake is 2 in (5.1 cm) across.
Make All Pieces
- Cream: panel and border, 7 tabs, 3 snowflakes, 7 cords, plus 4 sets of icing, door outlines, windows and chimney tops.
- Brown: 4 house bodies and 4 chimneys.
- Burgundy: 6 bows, 4 doors, 7 tassels.
Layout, left to right:
Tabs:      T   T   T   T   T   T   T
Bows:        B   B   B   B   B   B
Scallops:  S   S   S   S   S   S   S
Ornaments: H   F   H   F   H   F   H
Tassels:   X   X   X   X   X   X   X
T = tab, B = bow, S = scallop, H = house, F = snowflake, X = tassel.
Border
The border uses the same gauge as the panel: 4 sts per 1 in (2.5 cm) on every edge. Each corner is a 3-st group. Counts given “between corners” leave out the corner groups.
Rnd 1 (RS):
- Ch 1, then work 3 sc in the last st of Row 16 (corner).
- Rotate. Work 2 sc in each of the 16 row ends along the side. (32 sc)
- Along the foundation edge: 3 sc in the first st, sc in each of the next 111 sts, 3 sc in the last st.
- Work 2 sc in each row end down the other side. (32 sc)
- Work 3 sc in the first st of Row 16, then sc in each of the next 111 sts (each dc and each ch-1 sp). Join.
Count: 32 + 32 + 111 + 111 + (4 x 3) = 298 sc.
Rnd 2: Sl st to the center sc of the first bottom corner.
- Bottom setup: That center sc is st 1. Skip the flanker sc on its bottom side. The 111 bottom sts are sts 2–112. Skip the bottom-side flanker of the other bottom corner. That corner’s center sc is st 113.
- Scallop repeat (16 sts): Sc in first st; hdc in next, dc in next, 2 dc in next, 2 tr in next, tr in next, 2 tr in next, tr in next, 2 tr in next (center), tr in next, 2 tr in next, tr in next, 2 tr in next, 2 dc in next, dc in next, hdc in next. (23 sts)
- Work the repeat 7 times over sts 1–112, then sc in st 113. (7 x 23 + 1 = 162 sts)
- Next side: Sc in the side flanker, 32 sc, sc in the flanker of the top corner. (34 sc)
- Top corner: 3 sc in the center sc.
- Top: Sc in the flanker, 111 sc, sc in the next flanker. (113 sc)
- Top corner: 3 sc in the center sc.
- Last side: 34 sc, worked as on the first side. Join.
Count: 162 + 34 + 3 + 113 + 3 + 34 = 349 sts.
Rnd 3: Ch 1, rev sc in each st around, join. (349 rev sc) Fasten off.
Why the math works:
- Row 16 has 113 sts, and Rnd 1 keeps 1 sc per stitch. The two bottom corner centers plus the 111 sts between them give 113 = 7 x 16 + 1, which is exactly 7 scallop repeats plus the closing sc.
- Rnd 2 uses every Rnd 1 stitch except the 2 skipped flankers: 113 + 2 + 34 + 1 + 113 + 1 + 34 = 298.
- The three rounds add 0.75 in (1.9 cm) on each side, so the width becomes 28 + 1.5 = 29.5 in (74.9 cm).
- The height becomes 8 + 0.75 + 1.25 = 10 in (25.4 cm).
Joining the Parts
Marking: Count the 57 dc posts of Row 16 from one end.
- Mark posts 5, 13, 21, 29, 37, 45 and 53. These sit directly above the scallop centers and set the tab and cord columns.
- Mark posts 9, 17, 25, 33, 41 and 49 for the bows. These sit above the valleys.
Tabs: Fold each tab in half. Whipstitch both ends to the WS of the top edge on a tab column, overlapping the panel by 0.75 in (1.9 cm). Each loop rises 2.25 in (5.7 cm) above the panel.
Bows: Center each bow on a bow column at Row 7. Sew through the pinched center and both loop ends into the dc posts.
Cords (make 7):
- Join cream with a sl st at the back of a scallop’s center pair of tr.
- Ch 76, then sl st in the back bump of the 2nd ch from hook and of each ch back to the panel. (75 sl sts)
- Sl st into the same peak st and fasten off.
Each cord is 15 in (38.1 cm) long.
Ornaments: Sew the houses to cords 1, 3, 5 and 7, and the snowflakes to cords 2, 4 and 6. Center each one 6.25 in (15.9 cm) below its scallop peak. Stitch the cord to the back of the ornament along its full height.
Tassels (make 7):
- Wrap burgundy 40 times around the 3.5 in (8.9 cm) card.
- Tie the top with a 10 in (25.4 cm) strand, then cut the wraps at the bottom.
- Wrap the neck 6 times, 0.5 in (1.3 cm) below the top.
- Knot the top ties through the last stitch of a cord and trim the tassel to 3.5 in (8.9 cm).
Tension: Sew with even, moderate tension. Tight stitches pull in the mesh, and loose ones let the parts droop.
Size checkpoint: Lay the valance flat. The tabs, scallop peaks and cords should line up vertically, 4 in (10.2 cm) apart center to center.
Final Blocking
- Weave in the ends through solid stitches, never across the mesh.
- Soak the valance in cool water for 10 minutes, then press it dry in a towel.
- Pin the panel to 29.5 in x 10 in (74.9 cm x 25.4 cm), with a pin in every edge mesh and at each scallop peak.
- Straighten the mesh columns against a ruler.
- Pin the houses square, open out each snowflake point and pull the cords straight.
- Spray with starch and let everything dry completely, at least 24 hours.
- Comb and trim the tassels.
Final Quality-Control Checklist
- Panel is 29.5 in x 10 in (74.9 cm x 25.4 cm), with 56 meshes x 16 rows.
- There are 7 even scallops of 23 sts each.
- Tabs are spaced 4 in (10.2 cm) apart.
- There are 6 bows, one over each valley.
- All cords are 15 in (38.1 cm) long.
- Houses and snowflakes alternate and hang level.
- Tassels are 3.5 in (8.9 cm) long and evenly trimmed.
- No yarn ends show on the RS.
Troubleshooting
- Mesh slants: Work each dc into the dc below, not into the ch-1 sp.
- Scallops ruffle: Recount 16 sts per repeat and work the tr more tightly.
- Scallops cup: Block firmly, or work 1 tr instead of 2 tr in the center st.
- Cords are uneven: Recount the 76 ch. Chain gauge varies more than any other.
- Houses curl: Starch them, or back them with brown felt.
- Bows twist: Add a stitch at each loop end.
Care
Hand wash in cool water with mild soap, roll in a towel and dry flat. Re-starch and reshape after each wash.
Final Notes
Mesh gauge sets the panel at 28 in x 8 in (71.1 cm x 20.3 cm), and the border brings it to 29.5 in x 10 in (74.9 cm x 25.4 cm). The 16-st scallop repeat spaces the tabs, cords and bows 4 in (10.2 cm) apart. Cords of 15 in (38.1 cm) and tassels of 3.5 in (8.9 cm) complete the 30.75 in (78.1 cm) drop. Check each measurement before moving on to the next step, and the parts will line up.
Happy crocheting!