

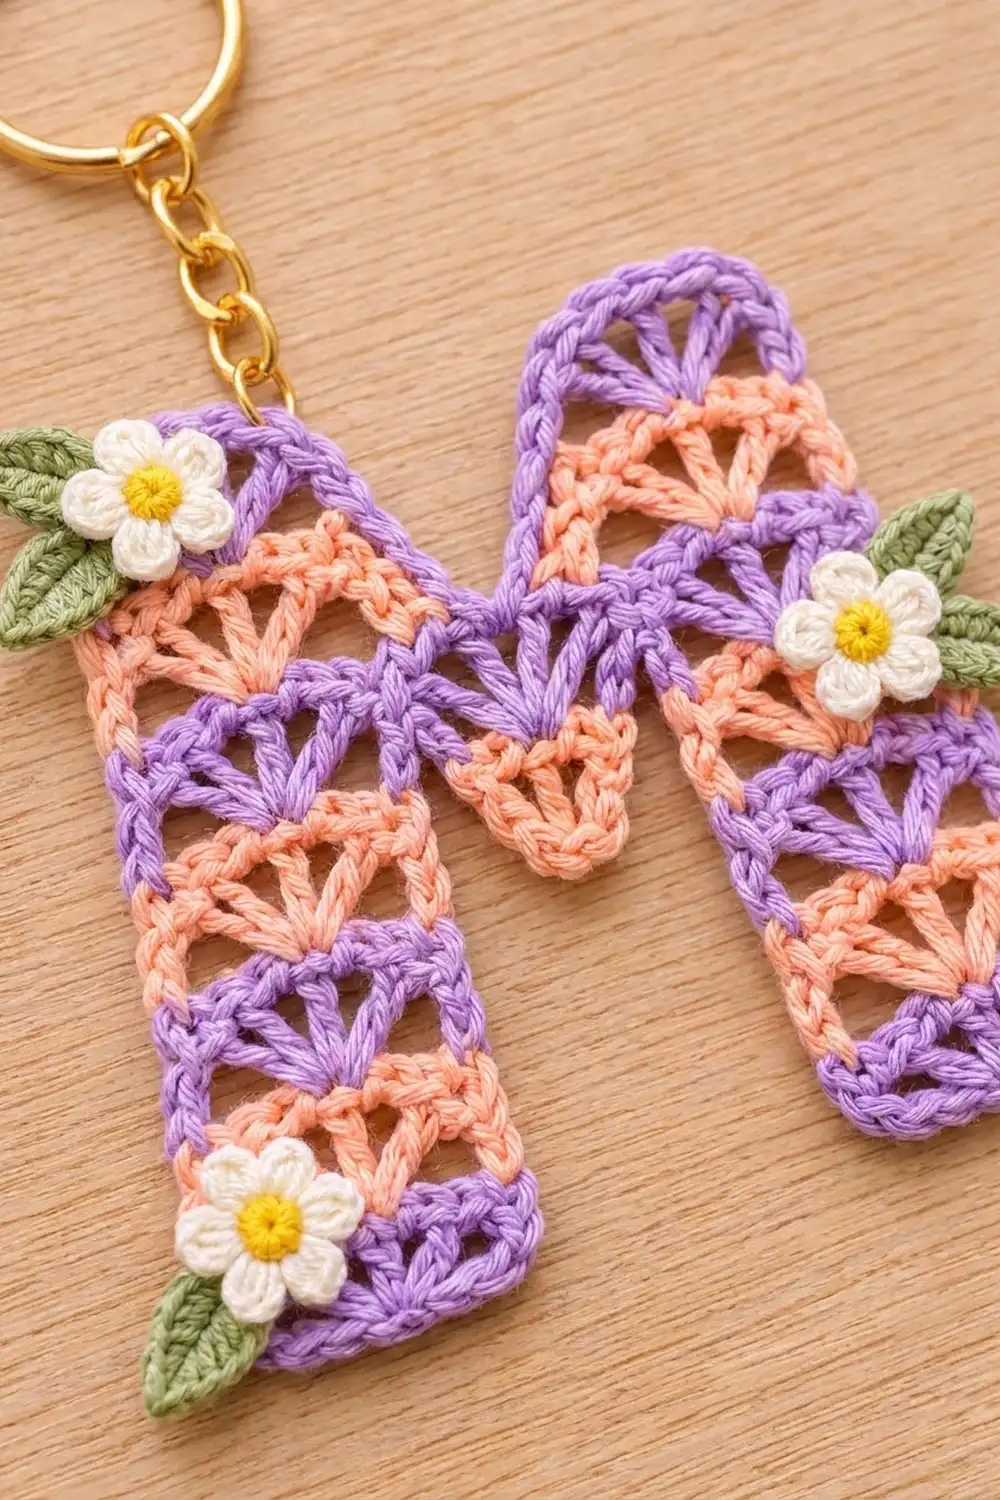
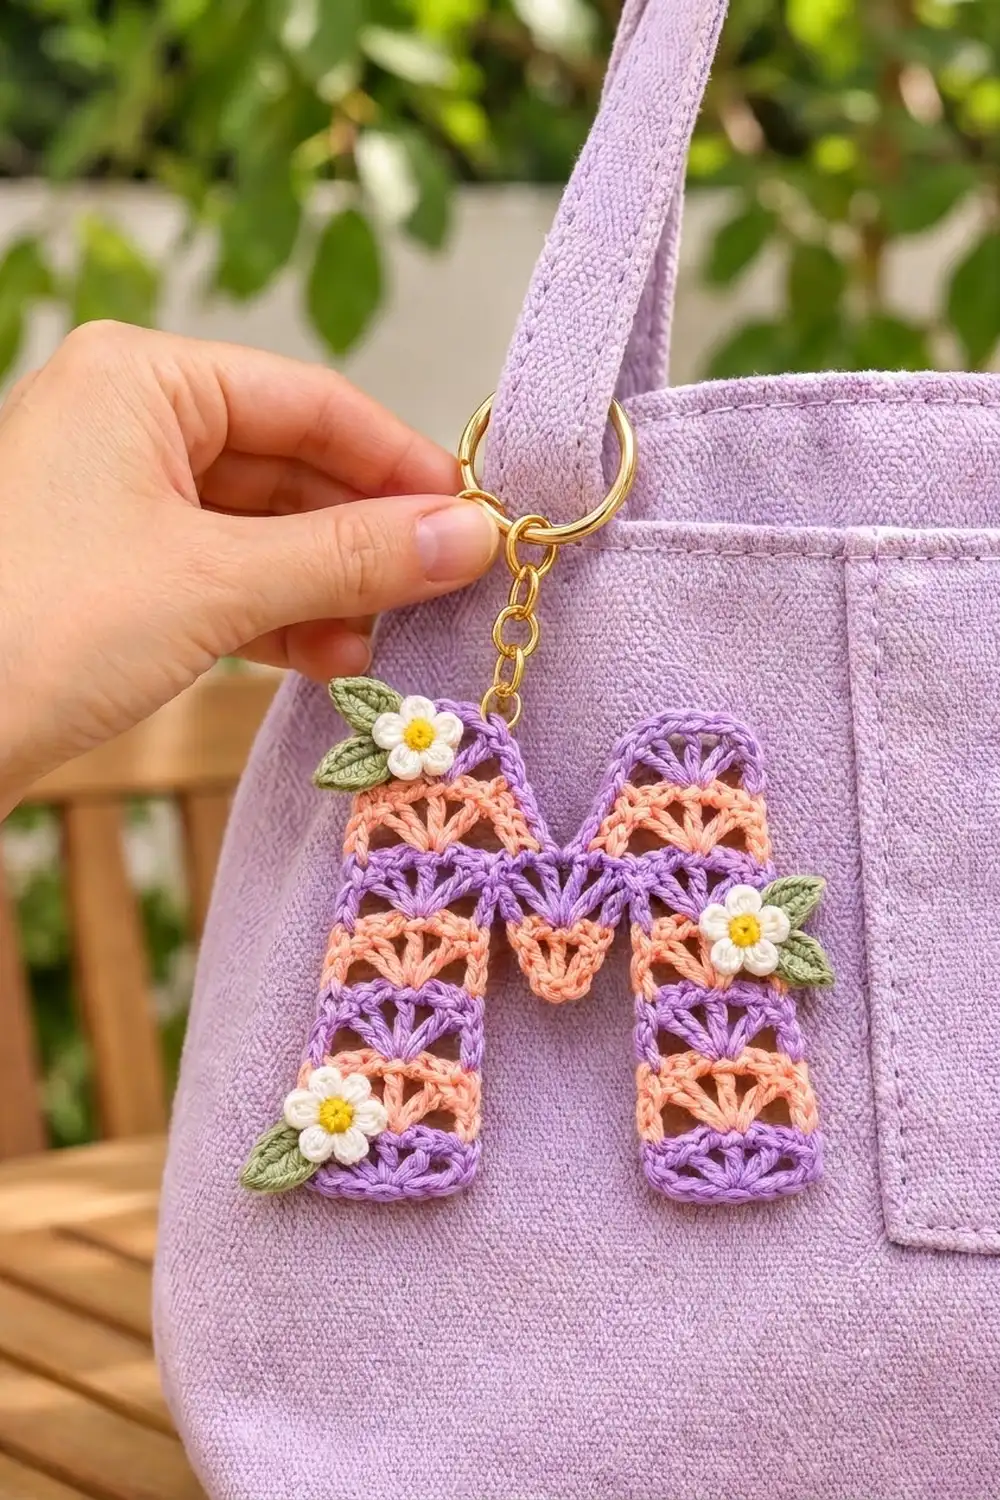
This little letter M turns leftover cotton into a bag charm that is personal and quick to make. Rows of open shell stitch stack up in alternating lavender and peach bands, and a crisp lavender outline holds the letter’s shape.
Three tiny white flowers with yellow centers and green leaves add a spring touch. A gold split ring on a short chain lets you clip the M to a tote, backpack or set of keys.
The pattern uses US crochet terms. The finished letter measures 4.2 in (10.7 cm) wide by 4.1 in (10.4 cm) tall after the border.
You’ll make the letter as one piece in turned rows. First you work two separate legs, then a lavender joining band across both legs, then each peak on its own. A small peach point is added under the joining band, and one round of single crochet in lavender outlines the whole letter. Last, you sew on the flowers and attach the hardware.
Finished Size and Construction
- Finished size: 4.2 in (10.7 cm) wide x 4.1 in (10.4 cm) tall
- Skill level: Easy-Intermediate
- Terminology: US
- Yarn weight: Sport (#2) cotton
- Hook: 2.75 mm (C-2)
- Number of pieces: 1 letter, plus 3 flower appliqués and 6 leaves as trim
- Layout: Two legs, a full-width middle band, two peaks, and a center point
- Leg and peak width: 7 sts, 1.4 in (3.6 cm)
- Gap between legs: 5 ch, 1.0 in (2.5 cm)
- Size before border: 3.8 in (9.7 cm) wide x 3.7 in (9.4 cm) tall
- Border depth: 1 round of sc, 0.2 in (0.5 cm) on every edge
Materials
Use a smooth, mercerized sport-weight cotton, about 50 g / 155 m per ball. Cotton holds the shell texture and stays crisp on a keychain that gets handled a lot.
- Lavender (A): 6 g / 19 m
- Peach (B): 4 g / 12 m
- White (C): 2 g / 6 m
- Yellow (D): 1 g / 3 m
- Green (E): 2 g / 6 m
These quantities include a margin for swatching and tails.
Tools:
– 2.75 mm (C-2) crochet hook
– Tapestry needle
– Scissors
– Stitch markers (2)
– 1 in (2.5 cm) gold split ring with a 1 in (2.5 cm) chain
– 2 small gold jump rings
– 2 pairs of flat-nose pliers
– Blocking mat and pins
Abbreviations (US Terms)
- ch: chain
- sl st: slip stitch
- sc: single crochet
- hdc: half double crochet
- dc: double crochet
- sk: skip
- st(s): stitch(es)
- sc2tog: single crochet 2 together
- sc3tog: single crochet 3 together
- RS: right side
Shell: 5 dc in the same stitch.
Shell row over 7 sts: Ch 3 (counts as dc), sk 2, shell in next st, sk 2, dc in last st. This makes 7 sts: 1 dc + 5 dc + 1 dc.
Color change: Work the last yarn over of the final st in the new color.
Gauge and Checkpoints
Gauge: 5 sc = 1 in (2.5 cm). One sc row = 0.2 in (0.5 cm) tall, and one shell row = 0.3 in (0.8 cm) tall. That makes one two-row stripe 0.5 in (1.3 cm) tall.
Leg A is your gauge swatch, so make it first and measure it before you go on.
- After Row 3: The leg is 1.4 in (3.6 cm) wide and 0.7 in (1.8 cm) tall.
- After Row 9: The leg is 1.4 in (3.6 cm) wide and 2.2 in (5.6 cm) tall.
- After Row 12: The piece is 3.8 in (9.7 cm) wide and 2.9 in (7.4 cm) tall.
- After Row 15: The piece is 3.7 in (9.4 cm) tall.
- After the border: The letter is 4.2 in (10.7 cm) x 4.1 in (10.4 cm).
If your leg is wider than 1.4 in (3.6 cm), go down to a 2.5 mm hook. If it’s narrower, go up to a 3.0 mm hook. If only the height is off, adjust how tall your dc stitches are instead, since loose dc stitches stretch the shell rows.
Leg A
With A, ch 8.
Row 1 (A): Sc in the 2nd ch from the hook and in each ch across. Turn. (7 sc)
Row 2 (A): Shell row over 7 sts. Turn. (7 sts)
Row 3 (A): Ch 1, sc in each st across, changing to B in the last st. Turn. (7 sc)
Row 4 (B): Shell row over 7 sts. Turn. (7 sts)
Row 5 (B): Ch 1, sc in each st across, changing to A in the last st. Turn. (7 sc)
Row 6 (A): Shell row over 7 sts. Turn. (7 sts)
Row 7 (A): Ch 1, sc in each st across, changing to B in the last st. Turn. (7 sc)
Row 8 (B): Shell row over 7 sts. Turn. (7 sts)
Row 9 (B): Ch 1, sc in each st across. (7 sc)
Fasten off and weave in the ends. Check the 2.2 in (5.6 cm) checkpoint now.
Leg B
Work Rows 1–9 exactly as for Leg A. In the last st of Row 9, change to A. Don’t fasten off.
Middle Band (Joining the Legs)
Lay Leg A to the left of Leg B. Both legs should show the same side, with their Row 9 tops level.
Row 10 (A): Turn. Ch 1, sc in each of the 7 sts of Leg B. Ch 5. Then sc in each of the 7 sts of Leg A, starting with the st nearest the chain. Turn.
Count: 7 sc + 5 ch + 7 sc = 19 sts.
Row 11 (A): Ch 3 (counts as dc). Sk 2, shell in next st, sk 2, dc in next st. Repeat from * 2 more times. Turn.
Count: 4 dc + 3 shells of 5 = 19 sts.
The middle shell sits in the 3rd bridge chain, so a lavender fan is centered over the gap between the legs.
Row 12 (A): Ch 1, sc in each st across. Turn. (19 sc)
Check the size: 3.8 in (9.7 cm) wide and 2.9 in (7.4 cm) tall. Place a marker in the 1st st of Row 12 (above Leg A) and another in the 13th st.
Peaks
Peak A
Row 13 (B): Join B in the marked 1st st. Work a shell row over sts 1–7 only. Turn. (7 sts)
Row 14 (B): Ch 1, sc in each of the 7 sts, changing to A in the last st. Turn. (7 sc)
Row 15 (A): Shell row over 7 sts. (7 sts)
Fasten off.
Peak B
With the same side facing as for Peak A’s Row 13, join B in the 13th st (marked) and repeat Rows 13–15 over sts 13–19.
Sts 8–12 of Row 12 stay unworked. They form the bottom of the V notch, which is 1.0 in (2.5 cm) wide and 0.8 in (2.0 cm) deep. The piece now measures 3.7 in (9.4 cm) tall.
Center Point
Turn the letter upside down so the bridge chain from Row 10 faces up.
Row a (B): Join B in the free bottom loop of the 1st bridge ch. Ch 1, sc in the same loop and in each of the next 4 free loops. Turn. (5 sc)
Row b (B): Ch 1, sc2tog, sc in next st, sc2tog. Turn. (3 sts)
Row c (B): Ch 1, sc3tog. (1 st)
Fasten off. The peach point hangs 0.6 in (1.5 cm) down between the legs.
Flowers and Leaves (Make 3 Flowers, 6 Leaves)
Flower: With D, make a magic ring and ch 1. Work 5 sc into the ring, pull the ring closed, and join with a sl st to the first sc. Change to C. In each sc, work (sl st, ch 2, 2 dc, ch 2, sl st). You’ll have 5 petals. Fasten off, leaving a 6 in (15.2 cm) tail. Each flower is about 0.7 in (1.8 cm) across.
Leaf: With E, ch 4. Sl st in the 2nd ch from the hook, hdc in the next ch, sc in the last ch. You’ll have 3 sts. Fasten off, leaving a 6 in (15.2 cm) tail. Each leaf is about 0.6 in (1.5 cm) long.
Border
Border gauge: Along tops of stitches and the foundation, work 1 sc per st (5 sc = 1 in). Along row ends, work 1 sc per sc row and 2 sc per shell row.
Here is how many sc go along each outer edge:
- Outer side, Rows 1–15: 8 sc rows give 8 sc, and 7 shell rows give 14 sc, for 22 sc.
- Inner side of a leg, Rows 1–9: 5 sc rows give 5 sc, and 4 shell rows give 8 sc, for 13 sc.
- Inner side of a peak, Rows 13–15: 2 + 1 + 2 = 5 sc.
Round 1 (A): With the RS facing, join A in the 1st foundation ch of Leg A at the bottom inner corner. Ch 1 and work around the letter as follows:
- Leg A bottom: 3 sc in the 1st foundation st, 1 sc in each of the next 5, and 3 sc in the last. That’s 7 worked 1-per-st + 4 extra corner sts = 11.
- Leg A outer side: 22 sc.
- Peak A top: 3 sc in the first st of Row 15, 1 sc in each of the next 5, and 3 sc in the last. That’s 7 + 4 extra = 11.
- Peak A inner side: 5 sc.
- Notch bottom: 1 sc in each of the 5 unworked sts of Row 12, for 5 sc.
- Peak B inner side: 5 sc.
- Peak B top: 11 sc, worked like Peak A.
- Leg B outer side: 22 sc.
- Leg B bottom: 11 sc, worked like Leg A.
- Leg B inner side: 13 sc.
- Center point: 1 sc in the end of Row a, 1 sc in the end of Row b, 3 sc in the Row c st, 1 sc in the end of Row b, and 1 sc in the end of Row a. That’s 7 sc.
- Leg A inner side: 13 sc.
Join with a sl st to the first sc. Fasten off.
Total: 11 + 22 + 11 + 5 + 5 + 5 + 11 + 22 + 11 + 13 + 7 + 13 = 136 sc.
Why the math works: The corner increases belong only to the bottom and top segments. The side counts cover row ends only, so no corner is counted twice. The inner corners and notch get no increases, which keeps the V and leg gaps sharp instead of rounded.
Two sc in each 0.3 in (0.8 cm) shell row end fills the tall dc post without gaps. The shell fans pull in slightly, so the edge blocks flat. The border adds 0.2 in (0.5 cm) on every side: 3.8 in (9.7 cm) + 0.4 in (1.0 cm) = 4.2 in (10.7 cm) wide, and 3.7 in (9.4 cm) + 0.4 in (1.0 cm) = 4.1 in (10.4 cm) tall.
Final Blocking
- Weave in all the letter’s ends along stitches of the same color.
- Spritz the letter lightly with water until it’s damp but not soaked.
- Pin it to 4.2 in (10.7 cm) x 4.1 in (10.4 cm) on a blocking mat.
- Pin each leg straight and 1.4 in (3.6 cm) wide plus border, and keep the gap 1.0 in (2.5 cm) wide.
- Ease each peak top into a smooth arch with your fingers.
- Pin the V notch and the center point into crisp points.
- Open each shell fan so the arches on either side of it show clearly.
- Let it dry completely, then unpin.
- Sew a flower with 2 leaves tucked behind it to the top outer corner of Peak A. Sew another to the outer edge of Leg B at middle-band height, and the third near the bottom outer corner of Leg A.
- Open a jump ring with the pliers, thread it through the center 2 border sts at the top of Peak A, and link it to the chain and split ring. Close it fully.
Final Quality-Control Checklist
- [ ] Each leg and peak is 7 sts wide, with the 1.4 in (3.6 cm) checkpoint met.
- [ ] Rows 11, 13 and 15 have a full 5-dc fan.
- [ ] The color order from bottom to top is A, B, A, B, A, B, A.
- [ ] The center lavender fan sits over the gap.
- [ ] The peach point has 5, 3 and 1 sts.
- [ ] The border has 136 sc with no gaps at the row ends.
- [ ] The letter measures 4.2 in (10.7 cm) x 4.1 in (10.4 cm).
- [ ] The flowers are stitched securely, and no tails show on the front.
- [ ] The jump rings are closed with no gap.
Troubleshooting
The legs lean or twist: Your tension is uneven between the sc rows and dc rows. Block firmly, and keep the turning ch 3 snug.
There’s a gap where the bridge meets a leg: Close it with a stitch of matching yarn when you weave in the ends.
The border ruffles along the sides: Work only 1 sc in the end of each sc row, and recount to 22 sc.
The border cups at the corners: Use exactly 3 sc in each outer corner st, and never increase at inner corners.
The fans look crowded: Make sure you skipped 2 sts on each side of every shell.
The center point flips up: Steam it lightly and pin it downward while it dries.
Care
Spot clean with mild soap and cool water, reshape, and let it dry flat. Remove the metal hardware before washing more thoroughly.
Final Notes
Each 7-st section measures 1.4 in (3.6 cm), and the two legs plus the 5-ch bridge add up to 19 sts, or 3.8 in (9.7 cm). The rows stack up to 2.2 in (5.6 cm) for the legs, 2.9 in (7.4 cm) through the middle band and 3.7 in (9.4 cm) at the peaks. One 136-sc border round brings the letter to 4.2 in (10.7 cm) x 4.1 in (10.4 cm). Check each of these measurements as you go and the letter will come out right.
Happy crocheting!