

This airy curtain is made from cream daisies set inside sage-green lace frames. A small ring links each motif to the one below it, and pointed side tips link the two columns. The result is an open garden lattice that lets the light through. At the bottom, one last daisy brings each panel to a soft point.
The colors are cream for the petals, mustard gold for the centers, and sage green for the frames, stems, and leaves. The style is cottage-garden lace and works well in a bedroom, kitchen, or sunny reading corner.
This pattern uses US crochet terms. Each finished panel measures 8.8 in (22.4 cm) wide by 56 in (142.2 cm) long, measured from the top band to the bottom tip. The rod loops add about 1.2 in (3.0 cm) more.
You will make 34 motifs. Each panel uses 17: two columns of eight, plus one tip motif. Each motif is built in this order: daisy center, chain-loop petals, filled petals, and a green frame with a stem at the top and bottom. You join the motifs as you go. To finish each panel, you add a chain V at the bottom and a short green top band with rod loops.
Finished Size and Construction
- Finished size (each panel): 8.8 in x 56 in (22.4 cm x 142.2 cm), not counting the rod loops
- Skill level: Intermediate
- Terminology: US
- Yarn weight: DK (#3) cotton
- Hook: 3.5 mm (E-4)
- Number of pieces: 34 motifs (17 per panel, 2 panels)
- Layout (per panel): 2 columns x 8 rows, plus 1 tip motif centered at the bottom
- Motif size: 4.4 in (11.2 cm) from side tip to side tip; 6 in (15.2 cm) from ring tip to ring tip
- Size before border: 8.8 in x 55.4 in (22.4 cm x 140.7 cm)
- Border (top band) depth: 0.6 in (1.5 cm), plus 1.2 in (3.0 cm) rod loops
Materials
Use a smooth mercerized or combed DK cotton. It shows the stitches clearly and blocks to crisp points. The amounts below assume about 115 m per 50 g.
- Color A, mustard gold (centers): 40 g / 92 m
- Color B, cream (petals): 160 g / 368 m
- Color C, sage green (frames, leaves, joins, band): 150 g / 345 m
Tools:
- 3.5 mm (E-4) crochet hook
- Tapestry needle
- Scissors
- Stitch markers
- Rust-proof pins and a blocking board at least 60 in (152.4 cm) long, or several interlocking mats
- Spray bottle
All amounts include a margin of about 20% for gauge swatches, yarn tails, and small differences in tension.
Abbreviations (US Terms)
- ch – chain
- sl st – slip stitch
- sc – single crochet
- hdc – half double crochet
- dc – double crochet
- tr – treble crochet
- sp – space
- st(s) – stitch(es)
- MR – magic ring
Special stitches
- Leaf: Ch 8, then sl st in the stem ch where you started, to make a narrow loop. Work (sc, hdc, 2 dc, ch 2, 2 dc, hdc, sc) into that loop, then sl st in the same stem ch. That gives 8 sts plus a ch-2 tip.
- Picot join: Use this in place of a ch-3 side picot. Ch 1, sl st in the neighboring motif’s ch-3 picot, ch 1.
- Ring join: Use this in place of a ch-8 ring. Ch 4, sl st in the neighboring motif’s ring, ch 4.
Gauge and Checkpoints
Make one full motif first, before you start joining. Check it against these measurements:
- After Round 2: the gold center measures 1 in (2.5 cm) across.
- After Round 4: the daisy measures 3.2 in (8.1 cm) from petal tip to petal tip.
- After Round 6: the frame measures 4.4 in (11.2 cm) from side picot to side picot, and 3.7 in (9.4 cm) from top to bottom.
- After the stems: the motif measures 6 in (15.2 cm) from ring tip to ring tip.
- Band gauge: 5 sc = 1 in (2.5 cm).
If your motif is more than 0.2 in (0.5 cm) too large, go down half a hook size. If it is too small, go up half a size. If only the frame is off, the chain-7 spaces are usually the cause. Loose chains make the frame wavy, and tight chains make the petals cup.
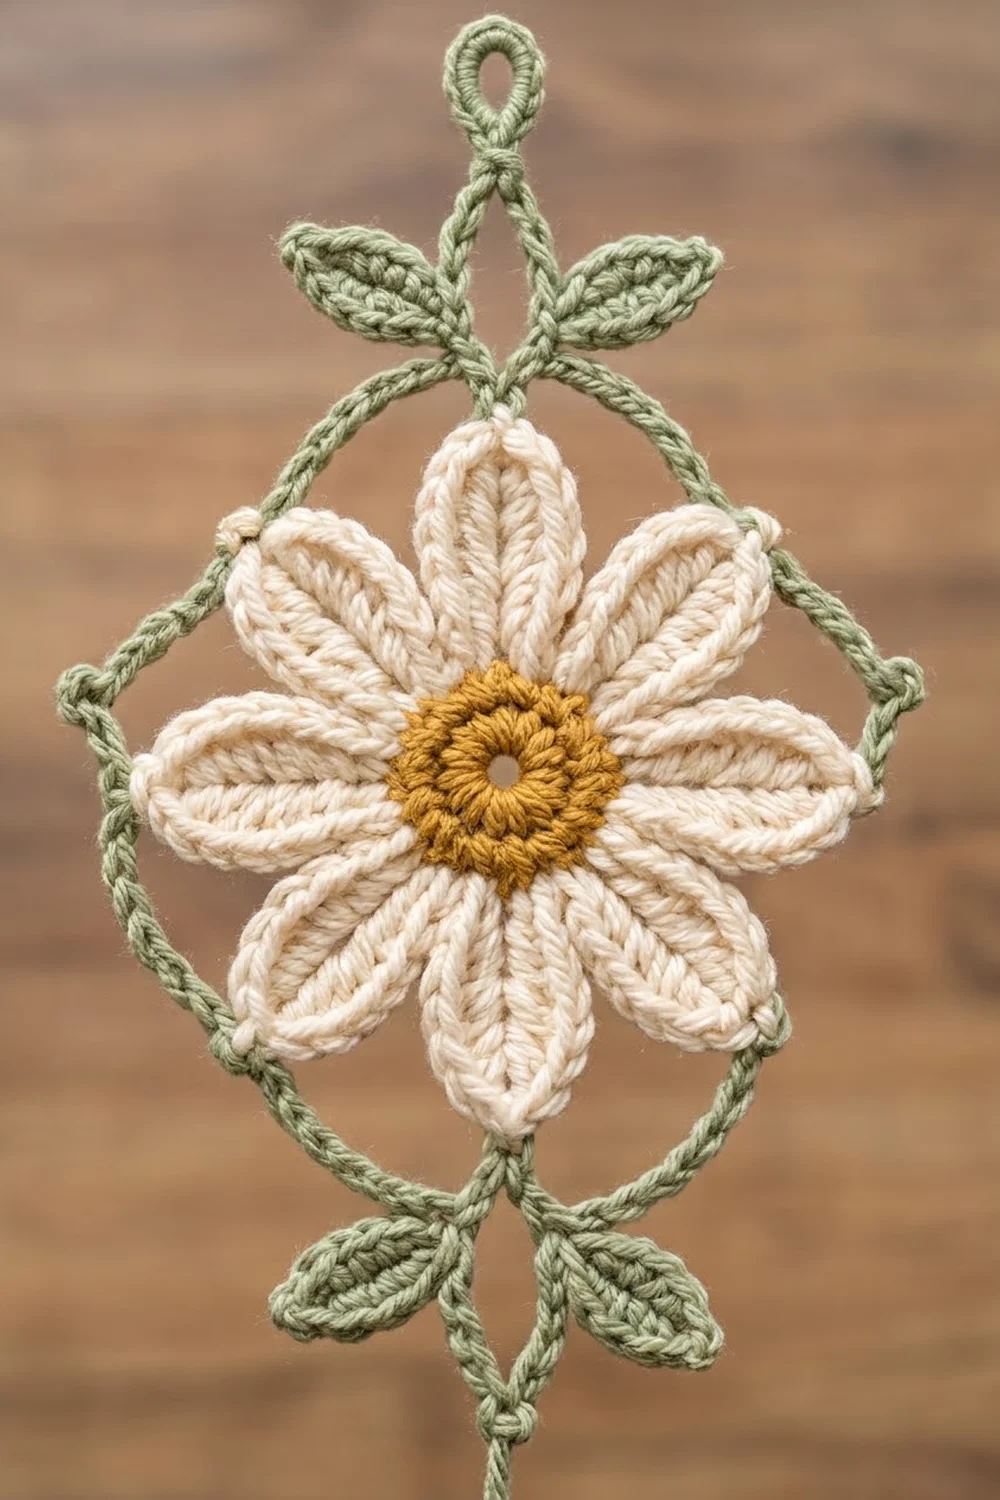
Motif Pattern (Make 34)
Daisy Center
Round 1 (Color A): Make a MR. Ch 1, then work 8 sc in the ring. Join with a sl st to the first sc. Pull the ring snug, but leave a small center hole. (8 sts)
Round 2: Ch 1, then work 2 sc in each st around. Join. (16 sts) Fasten off Color A.
Petals
Round 3 (Color B): Join Color B with a sl st in any st. Ch 9, skip 1 st, sl st in the next st. Repeat from * 7 more times. The last sl st lands in the joining st. (8 ch-9 loops)
This round makes the open-loop daisy shown in the progress photo.
Round 4: Sl st into the first loop. In each loop, work (sc, hdc, 2 dc, 2 tr, ch 2, 2 tr, 2 dc, hdc, sc), then sl st in the sl st between loops. (8 petals; 12 sts plus a ch-2 tip each, 96 sts total) Fasten off.
The chain loop runs up the middle of each petal and forms the vein. The ch-2 makes the pointed tip.
Frame
Hold the daisy with one petal tip at the top. Name the tips like a compass: N, NE, E, SE, S, SW, W, NW.
Round 5 (Color C): Join Color C with sc in the N ch-2 tip. Ch 7, sc in the next tip. Repeat from * around, ending with ch 7. Join to the first sc. (8 sc, 8 ch-7 sps)
Round 6: Ch 1. Work the round in this order:
- Sc in the N sc.
- 8 sc in the next ch-7 sp, then sc in the NE sc.
- 8 sc in the next sp, then (sc, ch 3, sc) in the E sc to make the right side picot.
- 8 sc in the next sp, then sc in the SE sc.
- 8 sc in the next sp, then sc in the S sc.
- 8 sc in the next sp, then sc in the SW sc.
- 8 sc in the next sp, then (sc, ch 3, sc) in the W sc to make the left side picot.
- 8 sc in the next sp, then sc in the NW sc.
- 8 sc in the last sp. Join to the first sc.
Count: 8 sps x 8 sc = 64 sc, plus 6 single tip sc, plus 2 x 2 picot-tip sc = 74 sc and 2 ch-3 picots.
The dense sc over the chains gives the frame its corded look, and the side picots give it the pointed outline.
Top Stem
Continue from the N sc:
- Ch 2. Work a Leaf anchored in the 2nd ch, then work a second Leaf in the same ch so the two leaves splay left and right.
- Ch 2 more, then ch 8 and sl st in the last stem ch to make the ring.
- Sl st in each of the 3 stem chains below the ring, then sl st in the N sc.
Count: 4 stem ch, 2 leaves of 8 sts each, 1 ch-8 ring. Fasten off.
Bottom Stem
Join Color C with a sl st in the S sc. Repeat the Top Stem steps exactly. Fasten off and weave in the ends.
Checkpoint: 4.4 in x 6 in (11.2 cm x 15.2 cm).
Make All Pieces
Each panel needs 17 motifs, so you need 34 in total. Work Rounds 1–4 for every motif first. Then add the frames and stems in joining order (see the next section).
Totals for both panels:
- Color A: 34 centers
- Color B: 34 petal rounds
- Color C: 34 frames and 68 stems
Layout (per panel):
Row 1:   M1    M2
Row 2:   M3    M4
Row 3:   M5    M6
Row 4:   M7    M8
Row 5:   M9    M10
Row 6:   M11   M12
Row 7:   M13   M14
Row 8:   M15   M16
Tip:        M17
Joining
Method: You join each motif as you go while you work its Round 6 and its top stem.
- Side joins: Each right-column motif (M2, M4, … M16) joins to its left-column neighbor. When you reach its W picot, work a picot join into the neighbor’s E picot.
- Vertical joins: From Row 2 down, each motif joins to the motif directly above it. When you make its top ring, work a ring join into the bottom ring of the motif above.
Stitch-to-stitch logic:
- A picot join (ch 1, sl st, ch 1) replaces a ch-3 picot, so Round 6 still has 74 sc.
- A ring join (ch 4, sl st, ch 4) replaces a ch-8 ring, so the ring length stays the same.
- No stitches are added at any seam.
Tension: Make the joining sl st firmly, but without pulling. The two picots should meet tip to tip. Lay the strip flat after each row of motifs to check that it isn’t puckering.
Size checkpoint: After 2 rows of motifs, the strip measures 8.8 in x 12 in (22.4 cm x 30.5 cm). After 8 rows, it measures 8.8 in x 48 in (22.4 cm x 121.9 cm).
Tip Motif and V
Make M17 without any joins.
- Join Color C with a sl st in the bottom ring of M15. Ch 13, sl st in the top ring of M17, ch 13, sl st in the bottom ring of M16.
- Turn. Work 13 sc in the ch-13 sp, sl st in M17’s ring, 13 sc in the next ch-13 sp, then sl st in M15’s ring. (26 sc) Fasten off.
Why it fits: Each 13-chain arm is about 2.6 in (6.6 cm) long. The arm spans the 2.2 in (5.6 cm) horizontal gap between M15’s ring and M17’s ring, which leaves about 1.4 in (3.6 cm) of drop.
Size before border: 0.6 in + 48 in + 1.4 in + 6 in would include the band, so leave it out: 48 in + 1.4 in + 6 in = 55.4 in (140.7 cm).
Border: Top Band and Rod Loops
Border gauge: 5 sc = 1 in (2.5 cm).
The band runs along the top edge only, between the top rings of M1 and M2.
Row 1: Join Color C with a sl st in M1’s top ring. Ch 1. Work 4 sc in the ring, ch 17, then 4 sc in M2’s top ring. Turn.
Count: (2 motifs x 4 sc each = 8 sc) + 17 bridging ch = 25 sts.
Row 2: Ch 1, then sc in each sc and each ch across. Turn. (25 sc)
Row 3 (rod loops):
- Ch 1, sc in the first sc, then ch 12 and sl st in the same sc.
- Sc in each of the next 8 sc, ch 12, sl st in the last sc made. Repeat from * 2 more times.
Count: 1 + (3 x 8) = 25 sc and 4 rod loops, placed at stitches 1, 9, 17, and 25. Fasten off.
Why the math works:
- The two rings sit 4.4 in (11.2 cm) apart, center to center, and each ring adds about 0.3 in (0.8 cm) on its outer side.
- That gives a total span of 5 in (12.7 cm), and 25 sts at 5 sc per inch is exactly 5 in.
- The rod loops land 8 sts apart, which spaces them evenly at 1.6 in (4.1 cm).
- The three band rows add 0.6 in (1.5 cm), which brings the panel to 56 in (142.2 cm).
Repeat everything for the second panel.
Final Blocking
- Soak each panel in cool water with a little wool wash for 10 minutes.
- Press out the water in a towel. Don’t wring it.
- Lay the panel face up on your blocking mats.
- Pin the band straight to 5 in (12.7 cm).
- Pin the column edges to 8.8 in (22.4 cm) wide.
- Check the length: 56 in (142.2 cm).
- Pin every side picot, petal tip, and leaf tip so they are sharp.
- Open each center hole and each ring with a pin.
- Leave it to dry completely, which takes 24–48 hours.
Final Quality-Control Checklist
- Every center has 16 sts and a small open hole.
- Every daisy has 8 even petals with pointed tips.
- Every frame has 74 sc and 2 side picots.
- Every stem has 2 leaves and 1 ring.
- All side joins and ring joins are secure.
- The V has 26 sc.
- The band has 25 sc and 4 rod loops.
- The panel measures 8.8 in x 56 in (22.4 cm x 142.2 cm).
- All ends are woven in along the frame stitches.
Troubleshooting
- The petals cup forward: The ch-9 loops are too tight. Chain more loosely, or use a hook one size larger for Round 3 only.
- The frame ripples: The ch-7 spaces are too loose. Tighten them, or work 7 sc per space instead and adjust the count to 66 sc.
- The columns splay apart: The picot joins are too loose. Redo them with a firmer sl st.
- The panel is too long: The rings have stretched. Block the panel to length and pin it before it dries.
- The band is wider than the motifs: Your sc gauge is loose. Work the band with a 3.25 mm hook.
- The tip motif tilts: The V arms are uneven. Check that both arms have exactly 13 ch and 13 sc.
Care
Hand wash in cool water and lay flat to dry, reshaping the points while the panels are damp. Don’t tumble dry. Iron on low through a cloth if needed.
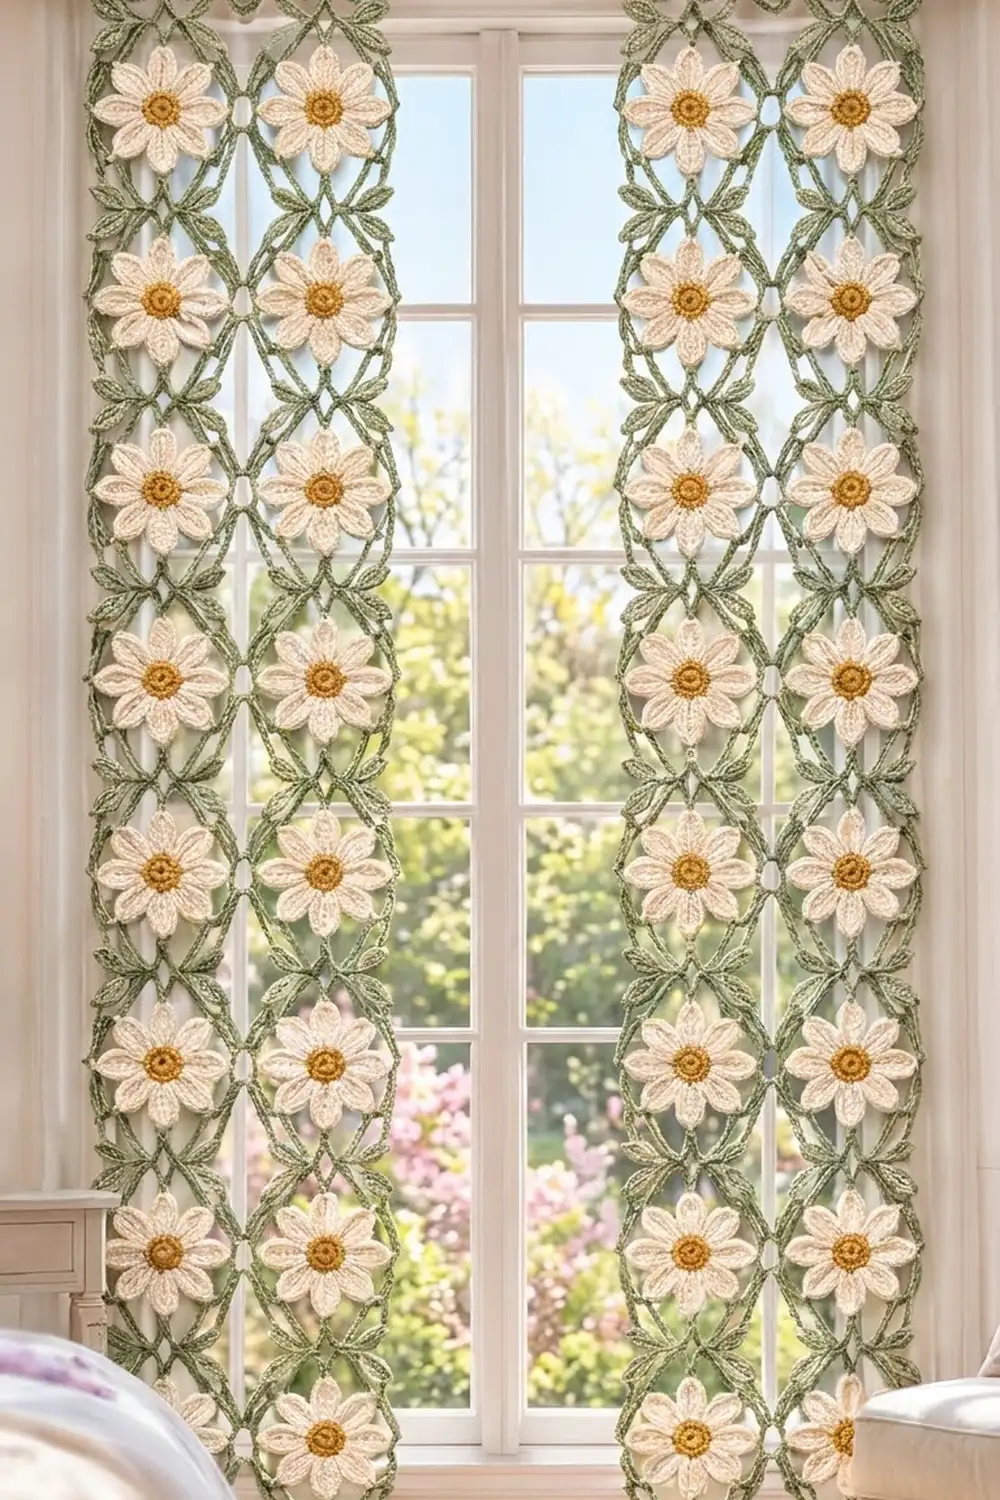
Final Notes
Here is how the measurements build on each other:
- The 1 in (2.5 cm) center grows to a 3.2 in (8.1 cm) daisy.
- The frame brings the motif to 4.4 in (11.2 cm) wide.
- The stems bring it to 6 in (15.2 cm) tall.
- Eight joined rows give 48 in (121.9 cm).
- The V and the tip motif add 7.4 in (18.8 cm).
- The 25-stitch band, sized to the ring spacing, finishes each panel at 8.8 in x 56 in (22.4 cm x 142.2 cm).
If every motif matches the checkpoint, the curtain will fit together. Happy crocheting!