

This valance is a cream lace panel with seven scalloped fans along the bottom, each edged in burgundy. A row of seven burgundy rosettes with cream centers and sage-green leaves runs across a solid band in the middle. Seven tabs on the top edge slide over a curtain rod.
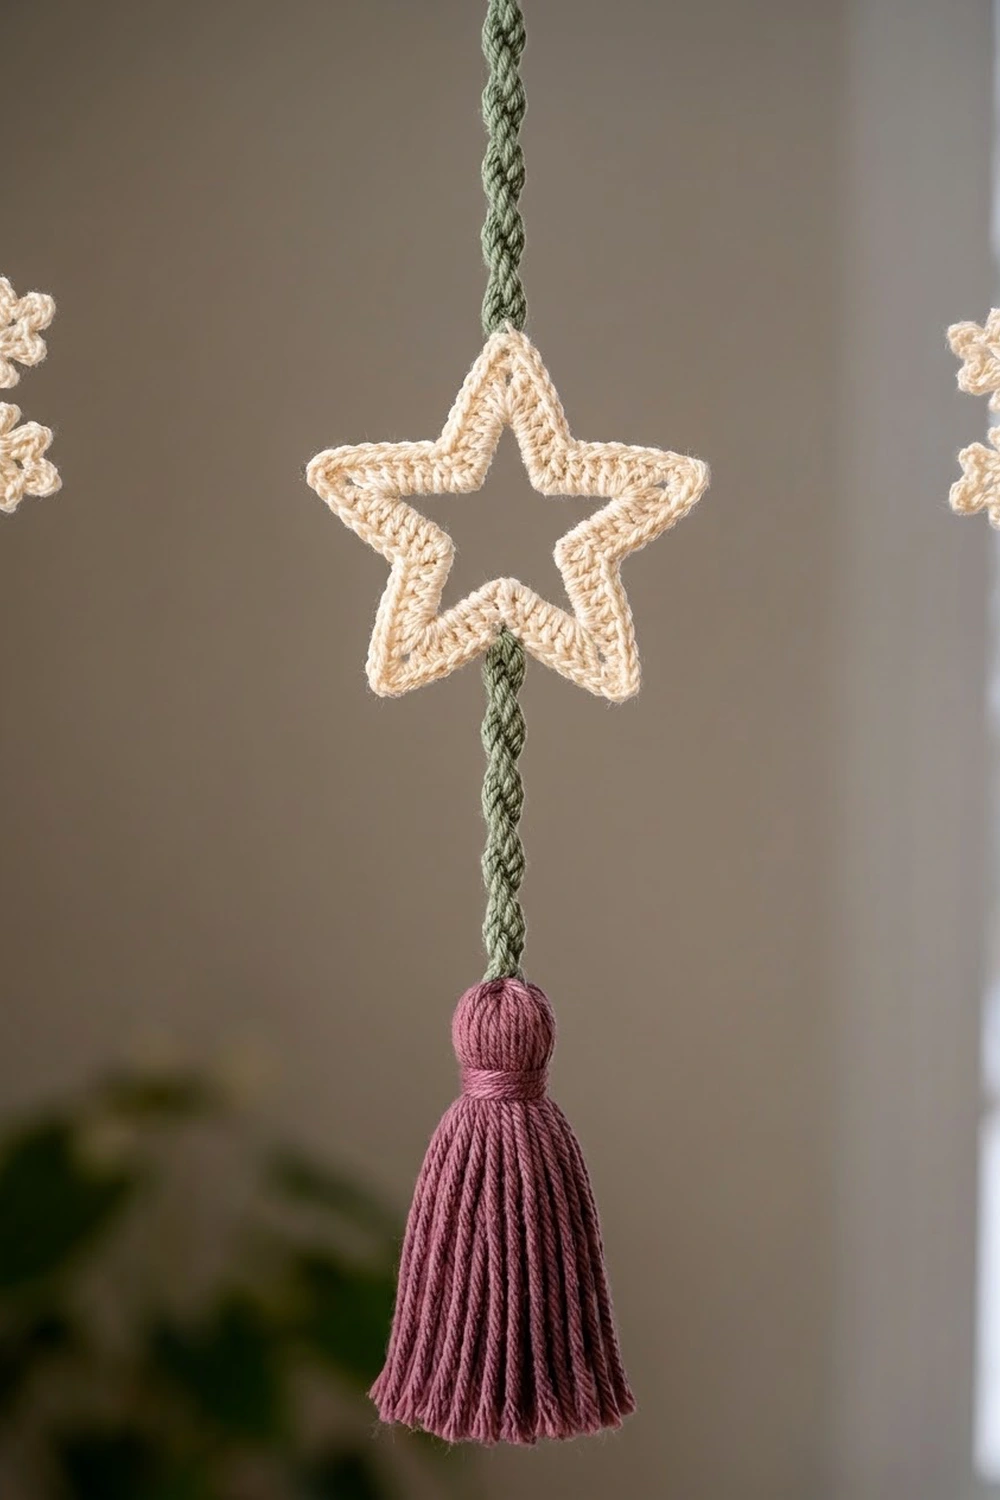
Seven twisted green cords hang below the scallops. Each cord carries one ornament (a rosette, a snowflake, or an open star) and ends in a plump burgundy tassel. The look is cozy cottage winter.
The pattern uses US crochet terms. The panel measures 28.25 in (71.8 cm) wide and 6 in (15.2 cm) deep at the scallop centers. The tabs add 2 in (5.1 cm) above. The cords and tassels hang 18 in (45.7 cm) below, for a total drop of 26 in (66.0 cm).
You work the panel in rows from the top down: a mesh band, a solid band, then four fan rows. A burgundy border finishes the scallops. Then you add the tabs, sew on the rosettes and leaves, and attach the cords, ornaments, and tassels.
Finished Size and Construction
- Finished size: 28.25 × 6 in (71.8 × 15.2 cm) panel; 26 in (66.0 cm) total drop
- Skill level: Intermediate
- Terminology: US
- Yarn weight: DK / light (3) cotton
- Hooks: 4.0 mm (G-6) for all parts; 5.0 mm (H-8) for the cords only
- Number of pieces: 1 panel, 7 tabs worked onto the panel, 10 rosettes, 14 leaves, 2 snowflakes, 2 stars, 7 cords, 7 tassels
- Layout: 7 repeats across, each with one tab, one rosette, one scallop, and one cord
- Repeat size: 18 sts = 4 in (10.2 cm)
- Size before border: 28.25 × 5.75 in (71.8 × 14.6 cm)
- Border depth: 0.25 in (0.6 cm)
Materials
Smooth mercerized cotton keeps the lace crisp and the scallops defined. These amounts assume a yarn of about 50 g = 120 m (131 yd).
- Cream: 150 g, 360 m (394 yd) for the panel, tabs, rosette centers, snowflakes, and stars
- Burgundy: 100 g, 240 m (262 yd) for the border, rosettes, and tassels
- Sage green: 50 g, 120 m (131 yd) for the leaves and cords
All quantities include about a 20% margin for swatching and tassel trimming.
Tools: 4.0 mm and 5.0 mm hooks, tapestry needle, scissors, stitch markers, a 4.5 in (11.4 cm) cardboard rectangle, rustproof pins, a blocking mat, and a spray bottle.
Abbreviations (US Terms)
- ch: chain
- sl st: slip stitch
- sc: single crochet
- hdc: half double crochet
- dc: double crochet
- tr: treble crochet
- sk: skip
- sp(s): space(s)
- MR: magic ring
- RS / WS: right side / wrong side
Picot: ch 3, sl st in 3rd ch from hook.
Turning chains: In dc rows, ch 3 counts as a dc. In mesh rows, ch 4 counts as dc + ch 1.
Gauge and Checkpoints
Gauge: 18 dc and 10 dc rows = 4 in (10.2 cm) on the 4.0 mm hook.
Test piece first: Ch 21 and work Rows 1–10 over 19 sts. Then work Rows 11–14 as one sc plus one full fan repeat. Before the fan rows, the swatch should measure 4.25 in (10.8 cm) wide and 4 in (10.2 cm) tall.
Checkpoints:
- After Row 1: 28.25 in (71.8 cm) wide.
- After Row 5: 2 in (5.1 cm) tall.
- After Row 10: 4 in (10.2 cm) tall.
- After Row 14: 5.75 in (14.6 cm) at the fan centers.
- After the border: 6 in (15.2 cm) at the fan centers.
If your swatch is too big, go down a half hook size. If it’s too small, go up a half size. Being off by one stitch per 4 in changes the panel width by about 1.5 in (3.8 cm).
Panel
With cream and the 4.0 mm hook, ch 129.
Row 1 (RS): Dc in 4th ch from hook and in each ch across, turn. (127 dc; the skipped ch-3 counts as a dc)
Row 2 (WS, mesh): Ch 4, sk next st, dc in next st, *ch 1, sk next st, dc in next st; rep from * across, turn. (64 dc, 63 ch-1 sps)
Rows 3–5: Ch 4, dc in next dc, *ch 1, dc in next dc; rep from * across, ending with dc in 3rd ch of turning ch, turn. (64 dc, 63 ch-1 sps per row)
Row 6 (conversion row): Ch 3, *dc in next ch-1 sp, dc in next dc; rep from * across, turn. (127 dc = 64 dc worked into dc + 63 dc worked into sps)
Rows 7–10: Ch 3, dc in each st across, turn. (127 dc per row)
Rows 6–10 form the solid rosette band. The panel now measures 4 in (10.2 cm) tall.
Scallop Fans
Each fan repeat uses 18 sts: 7 × 18 + 1 = 127.
Row 11 (RS): Ch 1, sc in first st, *sk 3, ch 3, sc in next st, sk 4, (dc, [ch 1, dc] 4 times) in next st, sk 4, sc in next st, ch 3, sk 3, sc in next st; rep from * 6 more times, turn. (7 fans of 5 dc each; 8 notch sc)
Row 12 (WS): Ch 1, sc in first sc, *ch 3, sk next ch-3 sp and sc, dc in first dc of fan, [ch 2, dc in next dc] 4 times, ch 3, sk next sc and ch-3 sp, sc in next sc; rep from * across, turn. (Each fan: 5 dc, 4 ch-2 sps)
Row 13: Ch 1, sc in first sc, *ch 3, dc in first dc of fan, [ch 1, dc in next ch-2 sp, ch 1, dc in next dc] 4 times, ch 3, sc in next sc; rep from * across, turn. (Each fan: 9 dc, 8 ch-1 sps)
Row 14: Ch 1, sc in first sc, *ch 2, sk ch-3 sp, [dc in next dc, ch 2] 8 times, dc in last dc of fan, ch 2, sc in next sc; rep from * across. (Each fan: 9 dc, 10 ch-2 sps; 8 notch sc) Fasten off.
The fans hang 1.75 in (4.4 cm) below Row 10, so the panel now measures 5.75 in (14.6 cm) at the fan centers.
Tabs (Make 7)
Turn the panel RS facing with the foundation chain on top. The tab centers are sts 10, 28, 46, 64, 82, 100, and 118. That spaces them 4 in (10.2 cm) apart and 2 in (5.1 cm) in from each side edge.
Row 1: Join cream 2 sts before a center st (for example, st 8). Ch 3, dc in next 4 sts, turn. (5 dc)
Row 2: Ch 4, sk 1, dc in next st, ch 1, sk 1, dc in top of turning ch, turn. (3 dc + 2 ch-1 sps = 5 sts)
Row 3: Ch 3, dc in each st and sp across, turn. (5 dc)
Rows 4–10: Repeat Rows 2–3, ending after a Row 2.
Each tab measures 1.1 in (2.8 cm) wide and 4 in (10.2 cm) long. Fold it to the WS and whipstitch the last row to the back of Row 1. This makes a 2 in (5.1 cm) loop that fits a rod up to 1 in (2.5 cm) across.
Rosette (Make 10)
Rnd 1: With cream, MR, ch 1, 10 sc in ring, sl st to first sc. (10 sc) Fasten off.
Rnd 2: Join burgundy in any st, ch 1, sc in same st, ch 3, sk 1, *sc in next st, ch 3, sk 1; rep from * around, sl st to first sc. (5 sc, 5 ch-3 sps)
Rnd 3: (Sc, hdc, 3 dc, hdc, sc) in each ch-3 sp, sl st to first sc. (5 front petals, 35 sts)
Rnd 4: Working behind the petals, *ch 4, sl st around post of next Rnd 2 sc; rep from * around. (5 ch-4 loops)
Rnd 5: (Sc, hdc, 5 dc, hdc, sc) in each ch-4 loop, sl st to first sc. (5 back petals, 45 sts) Fasten off.
The rosette measures 2 in (5.1 cm) across. Embroider one burgundy French knot in the cream center.
Leaf (Make 14)
With green, ch 8. Sl st in 2nd ch from hook, then work sc, hdc, dc, dc, hdc, sc across the next 6 ch. Ch 2. Working along the other side of the chain, work sc, hdc, dc, dc, hdc, sc, then sl st in the tip. (14 sts plus a ch-2 point) The leaf measures 1.5 in (3.8 cm) long. Leave a sewing tail.
Snowflake (Make 2)
Rnd 1: With cream, MR, ch 3, 11 dc in ring, sl st to top of ch-3. (12 dc)
Rnd 2: *Sc in next 2 sts, ch 6, sl st in 3rd ch from hook, [picot, sl st in same ch as last sl st] twice, sl st in next 3 ch; rep from * 5 more times, sl st to first sc. (6 arms, each with a 3-picot tip) Fasten off.
The snowflake measures 2 in (5.1 cm) across.
Star (Make 2)
Rnd 1: With cream, ch 20, sl st to first ch to form a ring.
Rnd 2: Ch 1, sc in each ch around, sl st to first sc. (20 sc)
Rnd 3: *Sc in next st, ch 6, sl st in 2nd ch from hook, sc in next ch, hdc in next ch, dc in next ch, tr in last ch, sk next 2 sts, sl st in next st; rep from * 4 more times. (5 points, 4 sts per point) Fasten off.
The open star measures 2.25 in (5.7 cm) from point to point.
Tassel (Make 7)
Wrap burgundy 30 times around the 4.5 in (11.4 cm) card. Slip a 10 in (25.4 cm) tie under the top loops and knot it tightly, then cut the bottom loops. Wrap the neck 8 times, 0.75 in (1.9 cm) below the top, to form a rounded head. Trim the tassel to 4 in (10.2 cm).
Cord (Make 7)
Hold 2 strands of green together and use the 5.0 mm hook. Chain until the cord measures 14 in (35.6 cm) under light tension; the doubled strand gives it a twisted look. Leave 8 in (20.3 cm) tails at both ends.
Make All Pieces
- Cream: 1 panel, 7 tabs, 10 rosette centers, 2 snowflakes, 2 stars
- Burgundy: 10 rosettes, 7 tassels, bottom border
- Green: 14 leaves, 7 cords
Layout from left to right (R = rosette, S = snowflake, T = star):
Tabs:       T1  T2  T3  T4  T5  T6  T7
Band:       R   R   R   R   R   R   R
Scallops:   1   2   3   4   5   6   7
Ornaments:  R   S   T   R   S   T   R
Tassels:    x   x   x   x   x   x   x
Joining
Panel rosettes: Center a rosette over each tab-center stitch (sts 10, 28 … 118) so it spans Rows 6–10. Tuck 2 leaves behind it, angled left and right. Sew around the back petals with matching yarn, using stitches about 0.5 in (1.3 cm) apart and keeping the panel flat.
Cords: Attach the cords after the border is done. Each cord hangs from the 15th stitch after a notch sc in Border Row 1, which is the lowest point of the scallop. Pull the top tail through that stitch, knot it twice on the WS, and weave it into Row 14.
Ornaments: Sew the rosettes and snowflakes 3 in (7.6 cm) below the panel and the stars 4 in (10.2 cm) below, so the stars sit slightly lower.
Tassels: Tie each cord’s bottom tail to a tassel tie and hide the knot inside the head.
Tension: Never stretch a cord while sewing it, or it will shrink back and pucker.
Size checkpoint: Each cord should measure 14 in (35.6 cm) from the panel edge to the tassel head.
Border
Border gauge: Working 2 sc in each ch-2 sp and 1 sc in each dc keeps the edge flat.
Side edges (cream): Work 2 sc in each row-end of Rows 1–10. (20 sc per side) The fan rows end in sc and need no edging.
Border Row 1 (burgundy, RS): Join in the first sc of Row 14, ch 1, sc in same sc, *2 sc in next ch-2 sp, sc in first dc, [2 sc in next ch-2 sp, sc in next dc] 8 times, 2 sc in next ch-2 sp, sc in next notch sc; rep from * 6 more times. (211 sc)
Border Row 2: Do not turn. Ch 1, reverse sc in each sc across. (211 reverse sc) Fasten off.
Why the math works: Each fan has 9 dc and 10 ch-2 sps, so 9 + (10 × 2) = 29 sc, plus 1 notch sc makes 30 per repeat. Adding the shared starting sc gives 1 + (7 × 30) = 211. Each fan’s 5th dc lands on the 15th stitch of its repeat, with 14 stitches on each side, so every cord hangs dead center.
Final Blocking
- Before adding the cords, soak the panel in cool water for 10 minutes.
- Press out the water in a towel without wringing.
- Pin Row 1 straight at 28.25 in (71.8 cm).
- Pin each fan center at 6 in (15.2 cm), with the notches 1/8 in (0.3 cm) higher.
- Pin open the mesh and fan spaces.
- Let the panel dry completely.
- Steam the rosettes lightly without pressing, then attach the cords.
Final Quality-Control Checklist
- Panel measures 28.25 × 6 in (71.8 × 15.2 cm)
- Row 1 and Rows 6–10 have 127 sts each; Rows 2–5 have 64 dc each
- There are 7 fans, each with 9 dc in Row 14
- Border Row 1 has 211 sc
- The 7 tabs are 4 in (10.2 cm) apart and the same length
- Each of the 7 rosettes sits level with 2 leaves
- Cords measure 14 in (35.6 cm); tassels measure 4 in (10.2 cm)
- Ornaments follow the order R–S–T–R–S–T–R
Troubleshooting
- Panel is the wrong width: Check your gauge and restart with a different hook size.
- Fans ruffle: Use a hook one size smaller for Rows 11–14.
- Fans cup: Work the chain spaces a little looser.
- Border waves: Work 1 sc instead of 2 in each fan’s outer ch-2 sps.
- Tabs are uneven: Check that every tab has 10 rows.
- Cords twist sideways: Steam them, then let the valance hang freely for a day.
- Tassel head is loose: Rewrap the neck more tightly.
Care
Hand wash in cool water with mild soap, roll the valance in a towel, and dry it flat with the cords laid straight. Fluff the tassels once they’re dry.

Final Notes
The sizing follows a simple chain. At 18 dc = 4 in (10.2 cm), 127 sts make a panel 28.25 in (71.8 cm) wide. Ten rows = 4 in (10.2 cm), the fans bring the depth to 5.75 in (14.6 cm), and the border finishes it at 6 in (15.2 cm). Add 2 in (5.1 cm) of tabs and 18 in (45.7 cm) of cord and tassel for a 26 in (66.0 cm) drop. If every checkpoint matches, everything lines up on the 4 in (10.2 cm) repeat.
Happy crocheting!