

This curtain is made of five lace strips. Each strip is a column of round cream motifs, and every motif holds a sky-blue five-petal flower with a butter-yellow center. Leafy green vines run between the strips, and each strip ends in a lacy point with a tiny flower dangling below.
The look is cottage-garden lace: open and airy, so light comes through. The strips are 6, 7, 8, 7 and 6 motifs long, which gives the bottom edge a gentle V.
The pattern uses US terms. The finished curtain is 21.75 in (55.2 cm) wide and 29.5 in (74.9 cm) long at the center, measured from the top motif to the tip point. Including the tabs and dangles, the center measures 33.5 in (85.1 cm).
Construction: crochet 34 motifs and join them into five strips as you go. Add a crossed lattice edging and a pointed tip to each strip. Join the strips with four leafy vines, then add the tabs and dangles.
Finished Size and Construction
- Size: 21.75 in (55.2 cm) × 29.5 in (74.9 cm) at the center
- Skill level: Intermediate
- Terminology: US
- Yarn weight: DK cotton (weight 3)
- Hook: 3.5 mm (E-4)
- Number of pieces: 34 motifs, 4 vines, 5 dangle flowers
- Layout: strips of 6-7-8-7-6 motifs, with a vine between each pair of strips
- Piece size: each motif is 3.5 in (8.9 cm); each strip with edging is 3.75 in (9.5 cm) wide
- Size before border: 21.75 in (55.2 cm) × 29.5 in (74.9 cm)
- Border depth: each tab is 4 in (10.2 cm) long and folds into a 2 in (5.1 cm) loop
Materials
Choose a smooth mercerized cotton in DK weight. It holds lace shapes, blocks crisply and stands up to window light. The amounts below assume about 115 m per 50 g.
- Cream (A): 200 g, about 460 m
- Sky blue (B): 60 g, about 138 m
- Butter yellow (C): 15 g, about 35 m
- Leaf green (D): 50 g, about 115 m
These quantities include a margin of about 15–20%.
Tools:
– 3.5 mm (E-4) hook
– Tapestry needle
– Stitch markers
– Rust-proof pins
– Blocking mats
– Spray bottle
– Measuring tape
– A rod up to 1.25 in (3.2 cm) in diameter
Abbreviations (US Terms)
ch – chain; sl st – slip stitch; sc – single crochet; hdc – half double crochet; dc – double crochet; sk – skip; sp – space; st(s) – stitch(es); FLO/BLO – front/back loop only; RS – right side.
Special stitches
- Picot: ch 3, sl st in the 3rd ch from the hook.
- Joining picot: ch 1, sl st in the matching picot of the previous motif, ch 1, sl st in the base of the first ch.
- Leaf: ch 6, then working back along the chain: sc in the 2nd ch from the hook, hdc in the next ch, dc in the next ch, hdc in the next ch, sl st in the last ch. (5 sts)
- Leaf pair: make 2 leaves from the same point on the stem so they splay apart.
Gauge and Checkpoints
Gauge: 20 sc and 22 rows = 4 in (10.2 cm). One motif = 3.5 in (8.9 cm) from picot to picot after light blocking.
Make one test motif first and measure it at each stage:
- After Round 2: 1.25 in (3.2 cm)
- After Round 4: 2.25 in (5.7 cm)
- After Round 6: 3.5 in (8.9 cm)
If your motif is off:
– More than 1/8 in (0.3 cm) too big: go down half a hook size.
– More than 1/8 in (0.3 cm) too small: go up half a hook size.
Every length in this pattern is built from the motif, so getting this one measurement right matters most.
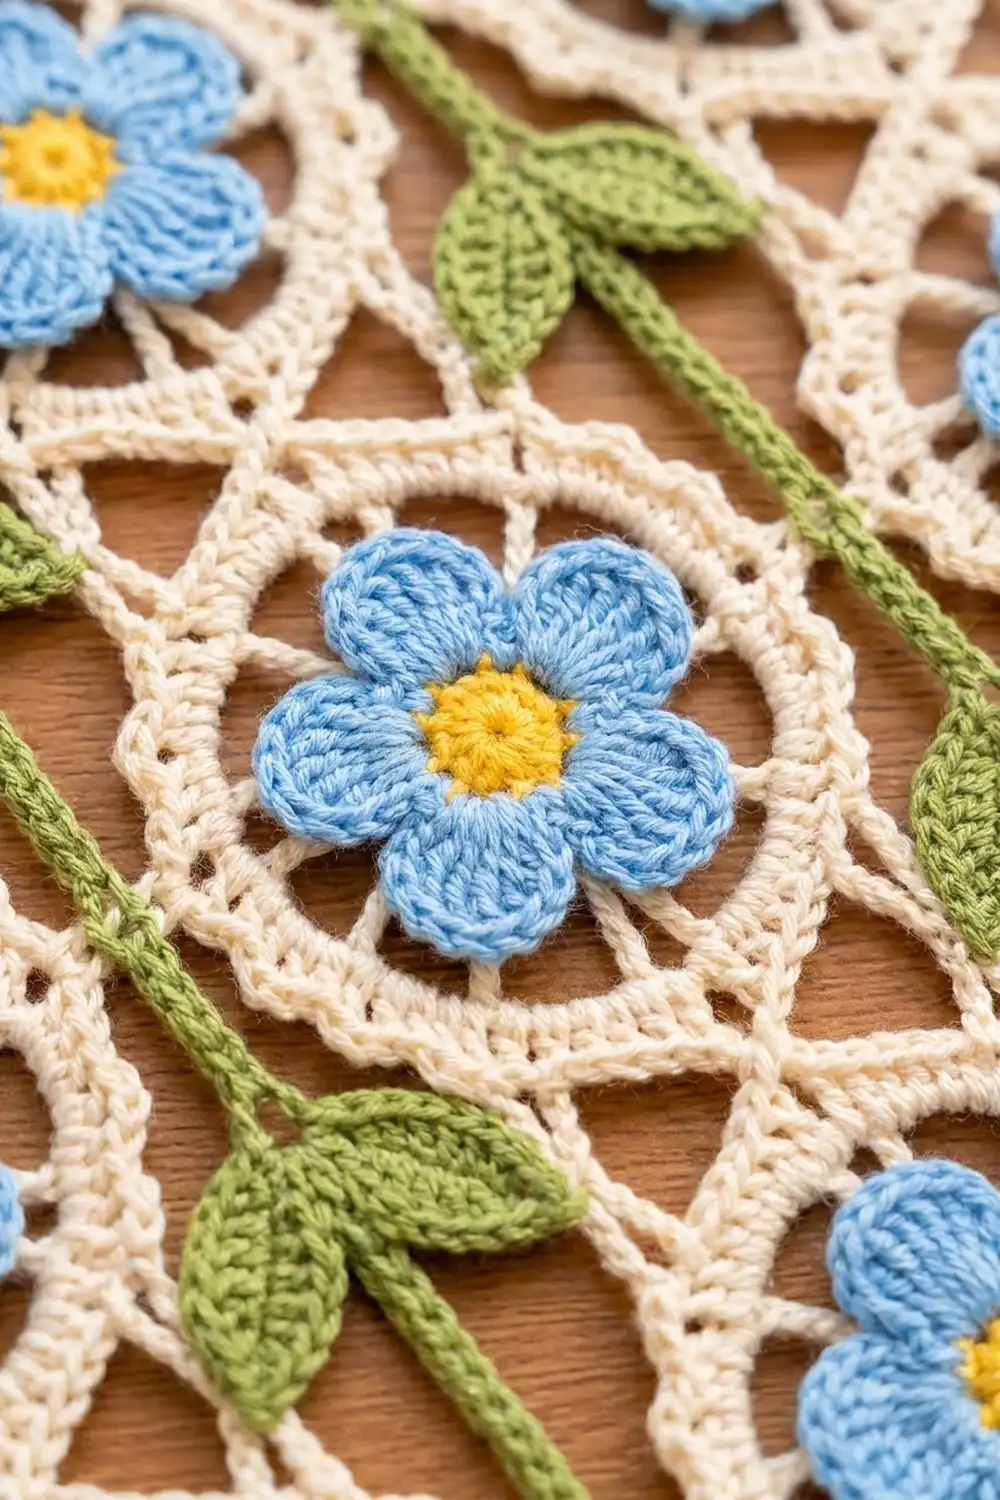
Flower Motif (Make 34)
Round 1 (C): Make a magic ring, ch 1, 10 sc in the ring, sl st to the first sc. Fasten off. (10 sc)
Round 2 (B): Join in any sc, ch 1, 2 sc in each st around, sl st to the first sc. (20 sc)
Round 3 (B, FLO of Round 2): Sl st in the next st, (hdc, 2 dc) in the next st, (2 dc, hdc) in the next st, sl st in the next st; repeat from * 4 more times. Fasten off. (40 sts: 5 petals of 8 sts)*
Round 4 (A, BLO of Round 2): Fold the petals forward. Join in any free back loop, ch 3 (counts as dc), dc in the same st, 2 dc in each remaining back loop, sl st to the top of the ch-3. (40 dc)
This round sits behind the petals, so cream shows between them.
Round 5: Ch 1, sc in the same st, ch 5, sk 3, sc in the next st; repeat from * 8 more times, ch 5, sk 3, sl st to the first sc. (10 sc, 10 ch-5 loops)*
Round 6: Sl st into the first loop. In each loop work (sc, hdc, 2 dc, picot, 2 dc, hdc, sc). Join and fasten off. (10 scallops: 80 sts + 10 picots)
Scallop labels: Lay the motif RS up with one scallop at 12 o’clock and call it S1. Number the rest S2–S10 in your working direction, so S6 lands at 6 o’clock. S2–S5 form Side A and S7–S10 form Side B.
Joining Motifs into Strips
For each motif after the first, work Round 6 as written, except work the S1 picot as a joining picot into the S6 picot of the previous motif. The motifs then touch at one point, which leaves an open notch on each side.
Make these strips:
- Strips 1 and 5: 6 motifs, 21 in (53.3 cm) long
- Strips 2 and 4: 7 motifs, 24.5 in (62.2 cm) long
- Strip 3: 8 motifs, 28 in (71.1 cm) long
Checkpoint: each motif adds exactly 3.5 in (8.9 cm) of length.
Lattice Edging (Each Strip)
Use A and work with the RS facing you. In each notch, “upper” means the motif above and “lower” means the motif below.
Start: Join with sc in S2 of the top motif, ch 5, sc in S3, ch 5.
Side A, at each notch going down: sc in upper S4, ch 8, sc in lower S2, ch 4, sc in upper S5, ch 8, sc in lower S3, ch 5. The two ch-8 chains cross to form the X.
Bottom motif: sc in S4, ch 5, sc in S5, ch 5, sc in S6, ch 5, sc in S7, ch 5.
Side B, at each notch going up: sc in lower S8, ch 5, sc in lower S9, ch 8, sc in upper S7, ch 4, sc in lower S10, ch 8.
Top motif: sc in S8, ch 5, sc in S9, ch 5, sc in S10, ch 5, sc in S1, ch 5, sl st to the first sc. Fasten off.
Counts (8 × motifs + 2):
– 6 motifs: 50 sc and 50 loops (20 ch-8, 10 ch-4, 20 ch-5)
– 7 motifs: 58 sc and 58 loops (24 ch-8, 12 ch-4, 22 ch-5)
– 8 motifs: 66 sc and 66 loops (28 ch-8, 14 ch-4, 24 ch-5)
Checkpoint: each edged strip measures 3.75 in (9.5 cm) wide.
Pointed Tip (Each Strip)
Work into the four ch-5 loops below the bottom motif, from S4–S5 to S7–S8.
Row 1: Join A with sc in the S4–S5 loop, ch 6, sc in the next loop; repeat from * 2 more times. Turn. (3 ch-6 loops)*
Row 2: Sl st in the first 3 ch, ch 1, sc in the same loop, ch 6, sc in the next loop; repeat from * once. Turn. (2 loops)*
Row 3: Sl st in the first 3 ch, ch 1, sc in the same loop, ch 6, sc in the next loop. Turn. (1 loop)
Row 4: In the last loop, work (3 sc, ch 4, 3 sc). Fasten off. (6 sc + ch-4 point)
Checkpoint: the tip adds 1.5 in (3.8 cm) of length.
Dangle Flowers (Make 5)
Round 1 (C): Make a magic ring, ch 1, 5 sc in the ring, join. Fasten off. (5 sc)
Round 2 (B): Join in any sc. In each sc work (ch 2, 2 dc, ch 2, sl st). (5 petals)
To attach it, ch 4 and sl st into the ch-4 point of a tip, then fasten off. Each flower is 1 in (2.5 cm) across and hangs about 2 in (5.1 cm) below the tip.
Make All Pieces
- Motifs: 34 (C centers, B petals, A frames)
- Dangles: 5 (C and B)
- Vines: 4 (D)
Layout: lay the strips RS up with the tops aligned and Side A of each strip facing right.
           S1   V   S2   V   S3   V   S4   V   S5
Rows 1-6:   O   |    O   |    O   |    O   |    O
Row 7:               O   |    O   |    O
Row 8:                            O
Tips:       v        v        v        v        v
Key: O = motif; | = vine level; v = tip with dangle.
Joining: Leafy Vines
Each vine connects Side A of the left strip to Side B of the right strip at every motif level the two strips share:
- Outer vines (strips 1–2 and 4–5): 6 levels
- Inner vines (strips 2–3 and 3–4): 7 levels
Stitch-to-stitch logic: the vine attaches to the outer ch-5 loops, S3–S4 on Side A and S8–S9 on Side B. These loops sit level with each motif’s center, so the levels are 3.5 in (8.9 cm) apart.
Vine (D):
- Ch 4 for the top of the stem.
- Level bar: ch 2, sl st in the left strip’s S3–S4 loop, sl st back along the 2 ch. Then ch 2, sl st in the right strip’s S8–S9 loop, sl st back along the 2 ch.
- Stem: ch 4, leaf pair; repeat from * 2 more times, ch 4. (16 stem ch, 3 leaf pairs)*
- Repeat Steps 2–3 until every level is joined, ending with a level bar.
- Tail: *ch 4, leaf pair; repeat from * once, ch 3, 1 leaf. Fasten off.
The outer vines have 35 leaves each and the inner vines have 41 each.
Tension: each stem section must lie flat over 3.5 in (8.9 cm).
– If the stem pulls, add 1 ch to each ch-4.
– If it buckles, work the last ch-4 of each section as ch 3.
Size checkpoint: each gap between strips is 0.75 in (1.9 cm). Total width = 5 × 3.75 in + 4 × 0.75 in = 21.75 in (55.2 cm).
Border: Hanging Tabs
Border gauge: 20 sc and 22 rows = 4 in (10.2 cm).
Starting count: each tab sits on 1 strip, so one tab starts with 1 × 7 = 7 sts. Across all five tabs, that is 35 sts.
Row 1: Join A in the top motif’s S10–S1 loop. Work 3 sc in that loop, sc in the S1 sc, then 3 sc in the S1–S2 loop. Turn. (7 sc)
Row 2: Ch 1, sc in the next 3 sts, ch 1, sk 1, sc in the last 3 sts. Turn. (6 sc + 1 ch-1 sp = 7 sts)
Row 3: Ch 1, sc in the next 3 sts, sc in the ch-1 sp, sc in the last 3 sts. Turn. (7 sc)
Rows 4–21: Repeat Rows 2–3 nine more times.
Row 22: Ch 1, sc across. Fasten off, leaving a 10 in (25.4 cm) tail. (7 sc)
Fold the tab to the back and sew Row 22 to the back of Row 1.
Why the math works:
– Width: 7 sc ÷ 5 sc per inch = 1.4 in (3.6 cm), centered on the 3.5 in (8.9 cm) motif.
– Length: 22 rows ÷ 5.5 rows per inch = 4 in (10.2 cm). Folded, this makes a 2 in (5.1 cm) loop with a 4 in (10.2 cm) circumference, which fits a rod up to 1.25 in (3.2 cm) across.
Final Blocking
- Weave in all ends.
- Soak the curtain for 10 minutes, then press it in a towel. Do not wring it.
- Lay it flat with the tops aligned.
- Pin each motif round at 3.5 in (8.9 cm), with a pin in every picot.
- Pin the gaps between strips at 0.75 in (1.9 cm) and check that the total width is 21.75 in (55.2 cm).
- Pin each tip to a point 1.5 in (3.8 cm) below its last motif.
- Open out each leaf with a pin.
- Leave it to dry fully, for at least 24 hours.
Final Quality-Control Checklist
- [ ] 34 motifs, each 3.5 in (8.9 cm)
- [ ] Strip lengths of 21 / 24.5 / 28 / 24.5 / 21 in (53.3 / 62.2 / 71.1 / 62.2 / 53.3 cm)
- [ ] A crossed X on both sides of every notch
- [ ] Lattice counts of 50 / 58 / 66 / 58 / 50 sc
- [ ] Vines with 6 / 7 / 7 / 6 levels, all lying flat
- [ ] Total width of 21.75 in (55.2 cm)
- [ ] Five matching 7-st tabs
- [ ] Five dangles attached securely
Troubleshooting
- Petals ruffle or cup: check that Round 2 has exactly 20 sc, and adjust your hook size.
- No cream shows behind the petals: Round 4 must go into the back loops of Round 2.
- The X doesn’t cross: the chains should run from upper S4 to lower S2 and from upper S5 to lower S3.
- A strip curves: the ch-8 chains are too tight on one side. Rework them more loosely.
- The vine puckers the curtain: add 1 ch to each stem section.
- Tabs flare: keep 7 sts per row, and count the ch-1 space as a stitch.
Care
Hand wash in cool water with mild soap, then dry flat and re-pin the motifs. Limit long periods of harsh direct sun to protect the blue and green.

Final Notes
Everything starts from the motif:
- One motif is 3.5 in (8.9 cm).
- Each strip grows by 3.5 in (8.9 cm) per motif, plus a 1.5 in (3.8 cm) tip.
- With edging, each strip is 3.75 in (9.5 cm) wide.
- Four vine gaps of 0.75 in (1.9 cm) bring the total width to 21.75 in (55.2 cm).
If the first motif measures right, the rest of the curtain will too.
Happy crocheting!