

This little letter E is a cheerful, chunky bag charm. It is made from puff stitch stripes in periwinkle blue and butter yellow. Each stripe is a neat row of plump puffs, so the letter looks soft and quilted. A smooth blue single crochet edge outlines the whole shape and keeps the corners crisp.
Three tiny white daisies with yellow centers and sage green leaves sit on the letter: one at the top left corner, one at the tip of the middle arm, and one at the bottom left corner. A gold split ring and short chain turn it into a keychain for a handbag, backpack, or set of keys.
The pattern uses US crochet terms. The finished letter is about 2.8 in (7.1 cm) wide and 4.6 in (11.7 cm) tall, including the border.
You work the letter flat in one piece, in rows, from the bottom up. Each stripe is one single crochet row followed by one puff row in the same color. To make the arms, you stop short on the spine rows and add a short chain where each new arm begins. One round of single crochet finishes the edge. The flowers and leaves are made separately and sewn on.
Finished Size and Construction
- Finished size: 2.8 in (7.1 cm) wide x 4.6 in (11.7 cm) tall
- Skill level: Easy+ (confident beginner)
- Terminology: US crochet terms
- Yarn weight: DK (light worsted, #3) cotton or cotton blend
- Hook: 3.5 mm (E-4)
- Number of pieces: 1 letter, plus 3 daisy appliqués and 4 leaves
- Layout: single piece; no joining
- Piece size before border: 2.6 in (6.6 cm) x 4.4 in (11.2 cm)
- Border depth: about 0.1 in (0.3 cm) per side, 1 round of sc
- Stripes: 11 stripes, 2 rows each, 22 rows total
Materials
Choose a smooth cotton in DK weight, either mercerized or soft. Cotton gives the puffs good definition and helps the letter hold its shape on a keychain. Avoid fuzzy yarns, which blur the puff texture.
- Color A, periwinkle blue: 6 g, about 14 m (15 yd)
- Color B, butter yellow: 4 g, about 10 m (11 yd)
- Color C, white or cream (petals): 2 g, about 5 m (5 yd)
- Color D, sage green (leaves): 1 g, about 3 m (3 yd)
- Small scrap of Color B for the flower centers (included above)
These amounts include a margin of about 20% for swatching and weaving in ends.
Tools:
- 3.5 mm (E-4) crochet hook
- Tapestry needle
- Scissors
- Stitch markers (2)
- 1 in (2.5 cm) gold split key ring with a short chain and jump ring
- Small pliers for opening the jump ring
- Ruler or tape measure
- Pins and a blocking mat or folded towel
Abbreviations (US Terms)
- ch – chain
- sl st – slip stitch
- sc – single crochet
- sc2tog – single crochet 2 together
- hdc – half double crochet
- dc – double crochet
- st(s) – stitch(es)
- sk – skip
- sp – space
- RS / WS – right side / wrong side
- yo – yarn over
Puff stitch (puff): (Yo, insert hook in st, yo and pull up a loop to the height of a dc) 3 times, yo and pull through all 7 loops on hook.
Puff row pattern (worked on N sts, N odd): Ch 1 (does not count), sc in first st, *puff in next st, ch 1, sk next st; repeat from * to last 2 sts, puff in next st, sc in last st. This makes (N − 1) ÷ 2 puffs, and the row total stays at N sts: 2 sc + puffs + ch-1 sps.
Gauge and Checkpoints
Gauge: 5 sts and 5 rows = 1 in (2.5 cm) in the stripe pattern. One sc row plus one puff row = 0.4 in (1.0 cm).
To test your gauge, work Rows 1–4 of the letter first. They should measure 2.6 in (6.6 cm) wide and 0.8 in (2.0 cm) tall. If they match, keep going; your swatch becomes the bottom arm.
Checkpoints:
- After Row 4: 2.6 in (6.6 cm) wide, 0.8 in (2.0 cm) tall
- After Row 10: the spine is 1 in (2.5 cm) wide and the piece is 2 in (5.1 cm) tall
- After Row 14: the middle arm reaches 2.2 in (5.6 cm) from the left edge
- After Row 22: 2.6 in (6.6 cm) x 4.4 in (11.2 cm)
- After the border: 2.8 in (7.1 cm) x 4.6 in (11.7 cm)
If your piece is too big, go down a hook size (3.25 mm). If it is too small, go up a hook size (3.75 mm). If only the height is off, make sure you pull each puff up to dc height every time.
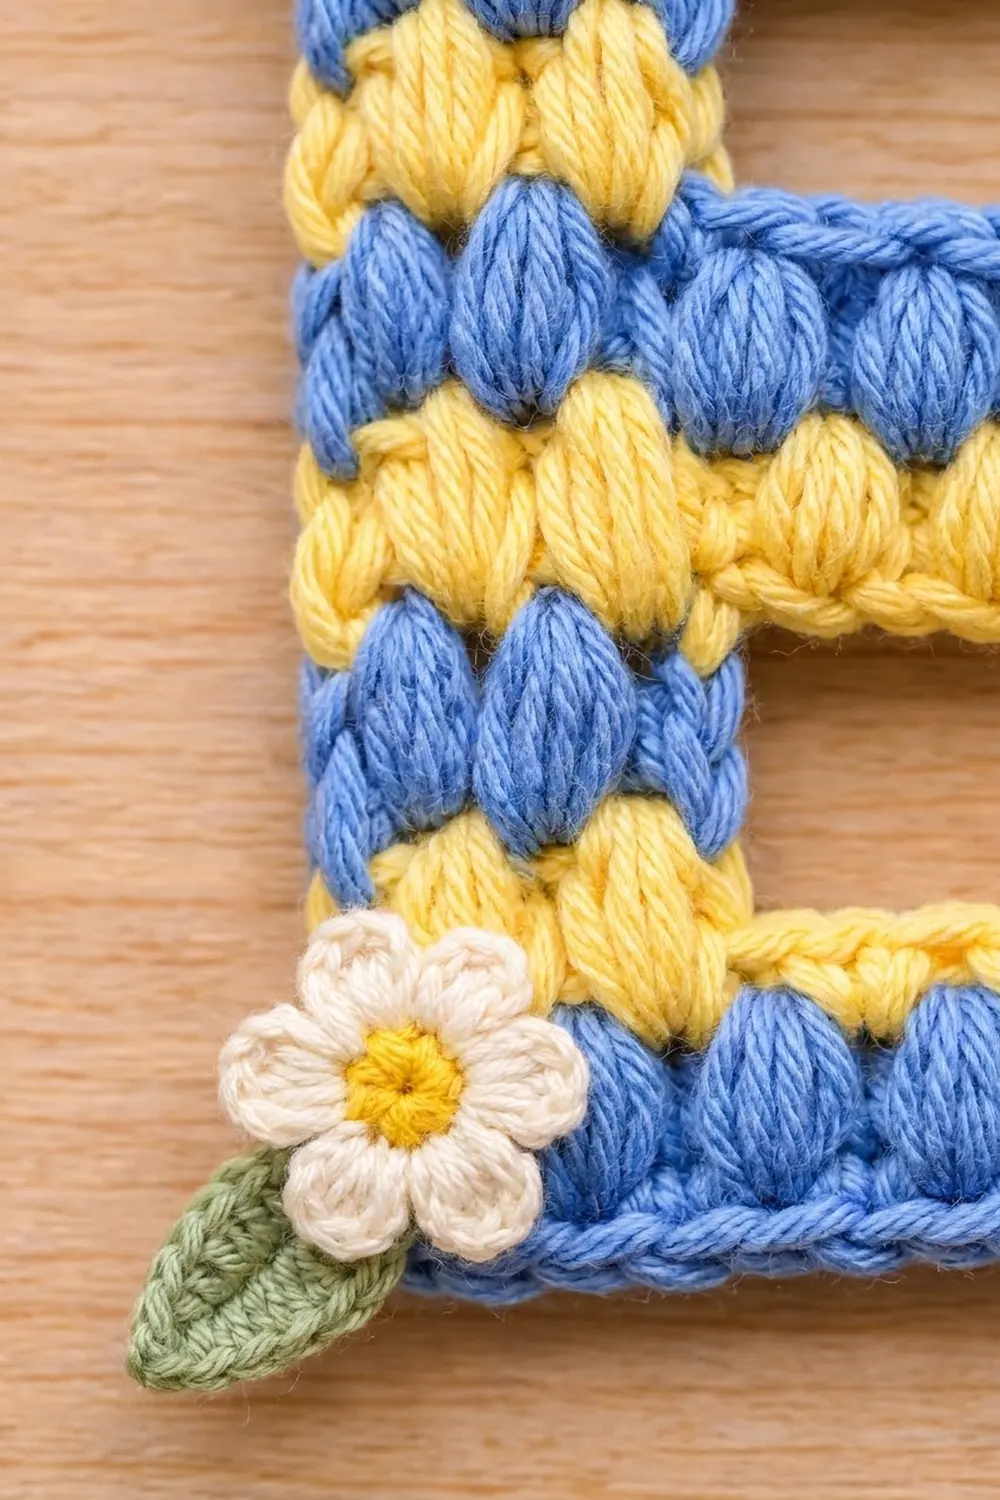
Letter E
Color notes: Each stripe is 2 rows. Change color in the final yo of the last sc of each puff row. Every color change happens on the left edge (as seen from the RS), so carry the unused color loosely up that edge instead of cutting it. The border will cover it.
Odd rows are WS sc rows, and even rows are RS puff rows. Each WS row starts at the left edge of the letter (RS view).
Row 1 (WS), Color A: Ch 14, sc in 2nd ch from hook and in each ch across. Turn. (13 sts)
Row 2 (RS), Color A: Work the puff row pattern across. Change to Color B. Turn. (13 sts: 6 puffs, 5 ch-1 sps, 2 sc)
Row 3 (WS), Color B: Ch 1, sc in each sc, puff, and ch-1 sp across. Turn. (13 sc)
Row 4 (RS), Color B: Puff row pattern. Change to Color A. Turn. (13 sts, 6 puffs)
The bottom arm is now done, and the spine begins.
Row 5 (WS), Color A: Ch 1, sc in first 5 sts. Turn, leaving the remaining 8 sts unworked. (5 sc)
Row 6 (RS), Color A: Puff row pattern. Change to Color B. Turn. (5 sts: 2 puffs, 1 ch-1 sp, 2 sc)
Row 7, Color B: Ch 1, sc across. Turn. (5 sc)
Row 8, Color B: Puff row pattern. Change to A. Turn. (5 sts, 2 puffs)
Row 9, Color A: Ch 1, sc across. Turn. (5 sc)
Row 10, Color A: Puff row pattern. Change to B. Turn. (5 sts, 2 puffs)
Row 11 (WS), Color B: Ch 1, sc in each of 5 sts, ch 7. Turn. (5 sc + 7 ch)
Row 12 (RS), Color B: Sc in 2nd ch from hook (first st), *puff in next st, ch 1, sk next st; repeat from * 3 times more across the remaining ch and sc, puff in next st, sc in last st. Change to A. Turn. (11 sts: 5 puffs, 4 ch-1 sps, 2 sc)
The 6 ch you worked into plus the 5 spine sts make 11 sts. The skipped chain acts as the turning chain at the arm tip.
Row 13, Color A: Ch 1, sc across. Turn. (11 sc)
Row 14, Color A: Puff row pattern. Change to B. Turn. (11 sts, 5 puffs)
Row 15 (WS), Color B: Ch 1, sc in first 5 sts. Turn, leaving 6 sts unworked. (5 sc)
Row 16, Color B: Puff row pattern. Change to A. Turn. (5 sts, 2 puffs)
Row 17, Color A: Ch 1, sc across. Turn. (5 sc)
Row 18, Color A: Puff row pattern. Change to B. Turn. (5 sts, 2 puffs)
Row 19 (WS), Color B: Ch 1, sc in each of 5 sts, ch 9. Turn. (5 sc + 9 ch)
Row 20 (RS), Color B: Sc in 2nd ch from hook (first st), *puff in next st, ch 1, sk next st; repeat from * 4 times more, puff in next st, sc in last st. Change to A. Turn. (13 sts: 6 puffs, 5 ch-1 sps, 2 sc)
The 8 ch you worked into plus the 5 spine sts make 13 sts.
Row 21, Color A: Ch 1, sc across. Turn. (13 sc)
Row 22, Color A: Puff row pattern. Fasten off Color A and cut Color B, leaving 4 in (10.2 cm) tails. (13 sts, 6 puffs)
Check: The letter should now measure 2.6 in (6.6 cm) x 4.4 in (11.2 cm). From the bottom, the stripes go blue, then yellow, then alternate blue and yellow up the spine. On the middle and top arms, yellow sits below blue.
Border
Border gauge: Work 1 sc per st or chain along the top and bottom edges, and 1 sc per row end along the sides. The fabric has 5 sts and 5 rows per inch, so this ratio keeps every edge flat.
Corner rules: The letter has 8 outer corners and 4 inner corners.
- At each outer corner, work 3 sc into the corner st. That st counts once in its edge, and the corner adds 2 extra sc.
- At each inner corner, sc2tog over the last st of one edge and the first st of the next. Each inner corner removes 1 sc.
Round 1, Color A: With RS facing, join Color A with a sl st in the top right corner st (first st of Row 22). Ch 1 and work counterclockwise around the letter:
- Top edge (Row 22): 13 sc
- Left edge (row ends of Rows 22–1): 22 sc
- Bottom edge (free loops of foundation ch): 13 sc
- Bottom arm tip (row ends of Rows 1–4): 4 sc
- Top of bottom arm (unworked sts of Row 4): 8 sc
- Inner spine edge (row ends of Rows 5–11): 7 sc
- Underside of middle arm (free loops of Row 11 ch): 6 sc
- Middle arm tip (row ends of Rows 12–14): 3 sc
- Top of middle arm (unworked sts of Row 14): 6 sc
- Inner spine edge (row ends of Rows 15–19): 5 sc
- Underside of top arm (free loops of Row 19 ch): 8 sc
- Top arm tip (row ends of Rows 20–22): 3 sc
Base count: 13 + 22 + 13 + 4 + 8 + 7 + 6 + 3 + 6 + 5 + 8 + 3 = 98.
Outer corners add 8 x 2 = 16, and inner corners remove 4 x 1 = 4. Sl st to the first sc. Total: 110 sc. Fasten off.
Why the math works: Each edge gets exactly one sc per stitch or row, and the gauge is square (5 x 5 per inch), so no edge stretches or ruffles. The 2 extra sc at each outer corner let the border turn 90 degrees without pulling. The sc2tog at each inner corner removes bulk that would otherwise pucker into the angle. The border adds about 0.1 in (0.3 cm) per side. That takes the width from 2.6 in (6.6 cm) to 2.8 in (7.1 cm) and the height from 4.4 in (11.2 cm) to 4.6 in (11.7 cm).
Daisies (make 3)
Round 1, Color B: Magic ring, ch 1, 5 sc in ring. Sl st to first sc. Fasten off and pull the ring closed. (5 sc)
Round 2, Color C: Join in any sc. *(Sl st, ch 2, 2 dc, ch 2, sl st) in same st, move to next sc; repeat from * around. Fasten off, leaving a 10 in (25.4 cm) tail. (5 petals)
Each daisy measures about 0.75 in (1.9 cm) across.
Leaves (make 4)
Color D: Ch 5. Sc in 2nd ch from hook, hdc in next ch, dc in next ch, sc in last ch. Ch 1 at the tip. Working in the free loops on the other side: sc in first ch, dc in next ch, hdc in next ch, sc in last ch. Sl st to the base. Fasten off, leaving an 8 in (20.3 cm) tail. (8 sts)
Each leaf is about 0.6 in (1.5 cm) long.
Assembly
- Sew 2 leaves at the top left corner, angled out to the left, one pointing up and one pointing down.
- Sew a daisy over their bases, centered on the top left corner.
- Sew 1 leaf pointing right at the tip of the middle arm. Sew a daisy over its base so it overlaps the arm end.
- Sew 1 leaf angled down and left at the bottom left corner, with a daisy over its base.
- Sew through the back loops of the petals only, so your stitches stay hidden.
- Open the jump ring and pass it through 2 border stitches at the top of the spine, just right of the top daisy. Close it firmly.
Final Blocking
- Weave in all ends along the left edge and the back of the border.
- Lightly spray the letter with water until it is damp, not soaked.
- Pin it RS up on a mat to 2.8 in (7.1 cm) x 4.6 in (11.7 cm).
- Pin each arm straight and square, and pin the inner corners crisply.
- Gently pinch each puff to round it out. Do not flatten the puffs.
- Let it dry fully, then remove the pins.
- If you can, block before adding the flowers and hardware; the letter is easier to pin that way.
Final Quality-Control Checklist
- Size is 2.8 in (7.1 cm) x 4.6 in (11.7 cm)
- 11 stripes alternate blue and yellow, with blue at the top and bottom
- The spine is 2 puffs wide; the top and bottom arms show 6 puffs and the middle arm shows 5
- The border has 110 sc, with crisp outer corners and no puckered inner corners
- No carried strands show on the RS
- 3 daisies and 4 leaves are sewn on securely
- The jump ring is closed with no gap
Troubleshooting
Puffs lean or look uneven: Pull every loop to the same height before closing the puff. The ch 1 after each puff locks it in place.
Border edge waves: Your border sc are too loose. Go down a hook size for the border only.
Inner corners bunch up: Check that you worked sc2tog at all 4 inner corners.
Arm tips are crooked: Check the extension chain counts: 7 ch on Row 11 and 9 ch on Row 19.
Carried yarn shows: Carry it loosely, and catch it under the first sc of each WS row.
Wrong stitch count on a puff row: Recount. N sts should give (N − 1) ÷ 2 puffs.
Care
Hand wash in cool water, roll it in a towel to press out the water, and dry flat. Do not wring it; gentle handling keeps the puffs and hardware in good shape.

Final Notes
The measurement chain is simple. At 5 sts and 5 rows per inch, 22 rows give a body of 2.6 in (6.6 cm) x 4.4 in (11.2 cm). One round of 110 sc adds 0.1 in (0.3 cm) per side, for a finished letter of 2.8 in (7.1 cm) x 4.6 in (11.7 cm). Check your size after Row 4, after Row 22, and after the border, and the daisies will sit right where they belong.
Happy crocheting!