

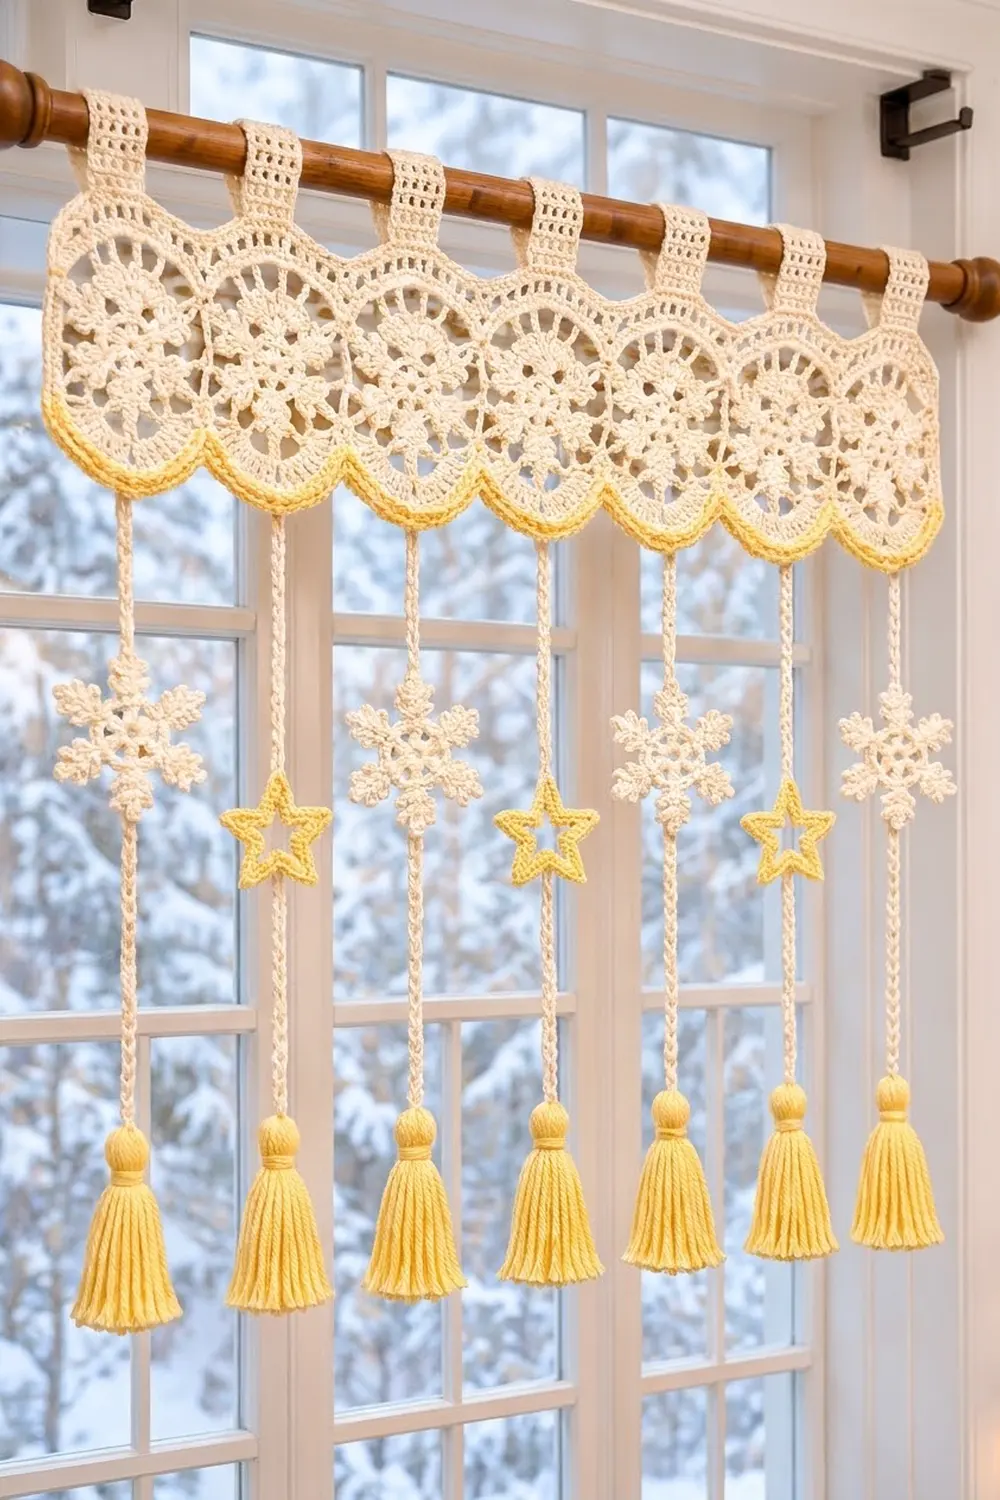
The Winter Glow Valance is a lacy window topper for the cold months. It’s a row of seven round snowflake motifs in soft cream, with a butter-yellow scalloped edge along the bottom. Below each motif hangs a cord with a small snowflake or a yellow star, and every cord ends in a full yellow tassel.
The style is light and calm, and the warm yellow keeps it cozy. It looks good on a kitchen window, a bedroom window or a glass door, and it hangs from any rod up to 1 in (2.5 cm) thick by its built-in tabs.
This pattern uses US crochet terms. The finished valance body measures about 28.5 in (72.4 cm) wide by 5.2 in (13.2 cm) tall, not counting the tabs. With cords and tassels, the total drop is about 25.2 in (64.0 cm).
Construction is simple and modular:
1. Make 7 large motifs and join them in a row.
2. Add a cream top band, then the tabs.
3. Edge the bottom scallops in yellow.
4. Make the hanging cords, small snowflakes, stars and tassels, and attach them.
Finished Size and Construction
- Finished body size: 28.5 in x 5.2 in (72.4 cm x 13.2 cm)
- Total drop with tassels: 25.2 in (64.0 cm), plus tab loops of about 2 in (5.1 cm)
- Skill level: Intermediate
- Terminology: US
- Yarn weight: Worsted (#4), cotton
- Hook: 4.0 mm (G-6)
- Number of pieces: 7 large motifs, 7 tabs, 7 cords, 4 small snowflakes, 3 stars, 7 tassels
- Layout: 7 motifs in a single row (1 x 7)
- Large motif size: 4 in (10.2 cm) across
- Size before border: 28 in x 4 in (71.1 cm x 10.2 cm)
- Border depth: top band 0.8 in (2.0 cm); yellow edging 0.4 in (1.0 cm); end edges 0.25 in (0.6 cm) each
Materials
Use a smooth, mercerized or matte worsted cotton. Cotton keeps the picots crisp and holds its shape when blocked. Avoid fuzzy yarns, because they blur the lace.
- Cream: 150 g / 255 m (motifs, band, tabs, cords, small snowflakes)
- Butter yellow: 70 g / 119 m (scallop edging, stars, tassels)
Quantities include a margin of about 15–20% for gauge swatching and tassel trimming.
Tools:
– 4.0 mm (G-6) crochet hook
– Tapestry needle
– 8 locking stitch markers
– 4 in (10.2 cm) piece of stiff cardboard for tassels
– Scissors
– Rustproof pins, blocking mats and a spray bottle
Abbreviations (US Terms)
- ch – chain
- sl st – slip stitch
- sc – single crochet
- hdc – half double crochet
- dc – double crochet
- tr – treble crochet
- sk – skip
- st(s) – stitch(es)
- sp – space
- RS / WS – right side / wrong side
- rev sc – reverse single crochet (crab stitch)
Special stitches
– Picot: ch 3, sl st in the 3rd ch from the hook.
– Rev sc: Working from left to right (right-handed), insert the hook into the next stitch to the right, yarn over, pull up a loop, yarn over, and pull through both loops. This makes the twisted, corded edge.
Gauge and Checkpoints
Gauge: 16 sc and 18 rows = 4 in (10.2 cm). Chain gauge: 16 ch = 4 in (10.2 cm).
Make one large motif before anything else and check it against these points:
- After Round 1: 1.25 in (3.2 cm) across
- After Round 2: 2.25 in (5.7 cm) across
- After Round 3, tip to tip: 3.25 in (8.3 cm)
- After Round 5: 4 in (10.2 cm) across
If your motif is larger than 4 in (10.2 cm), go down to a 3.5 mm hook. If it’s smaller, go up to a 4.5 mm hook. Being off by 0.25 in (0.6 cm) per motif adds up to 1.75 in (4.4 cm) across 7 motifs, so check carefully.
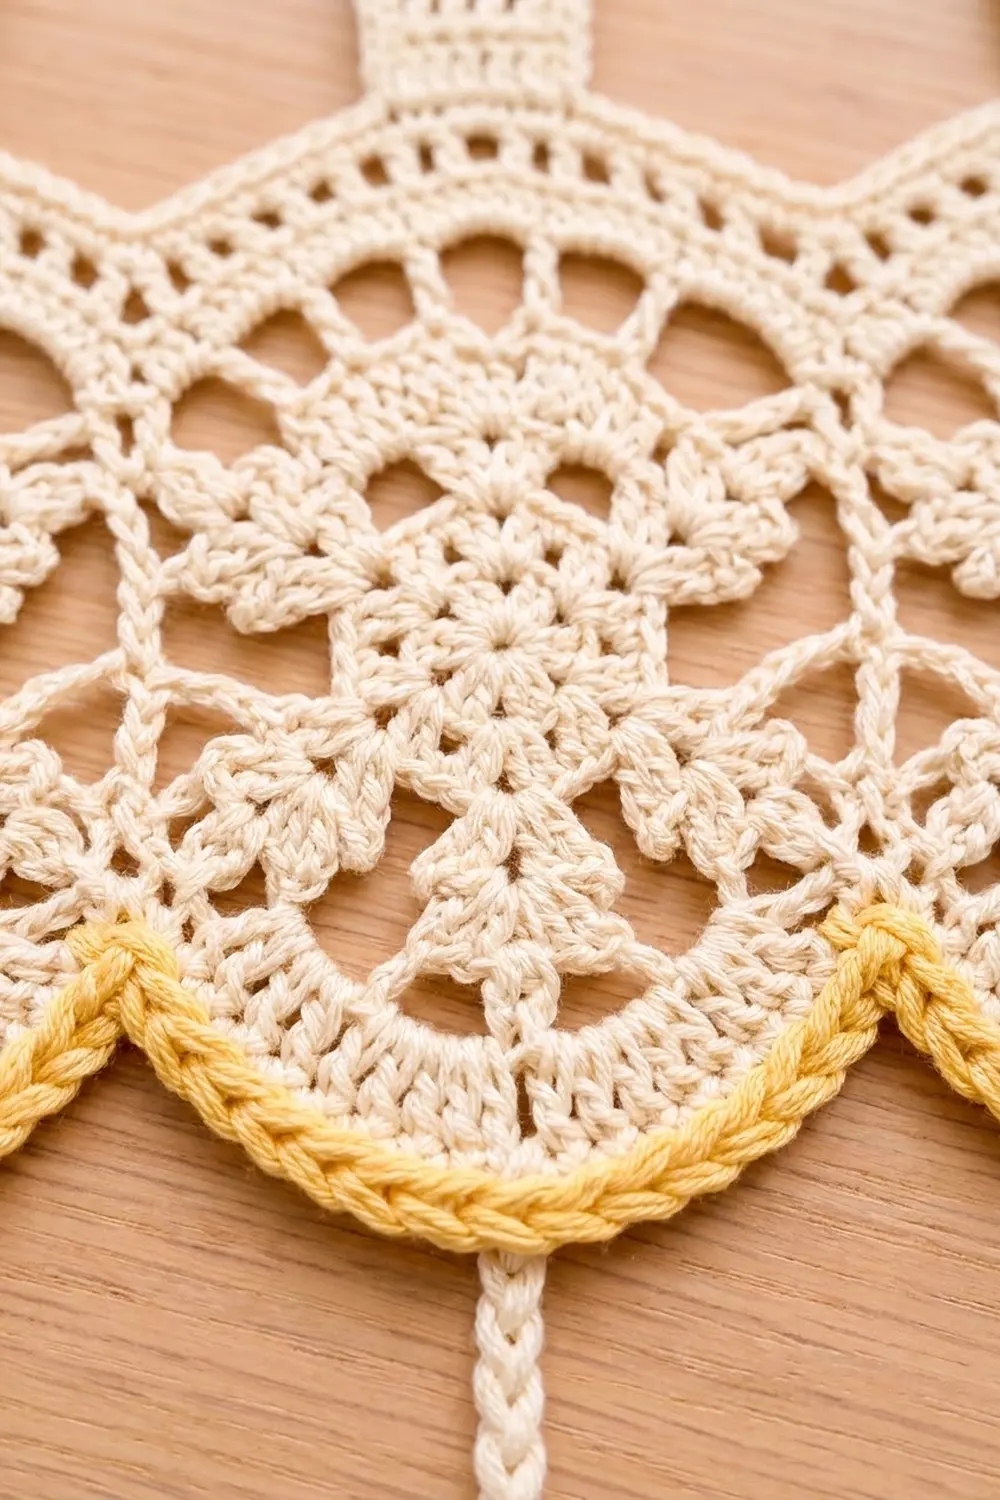
Large Snowflake Motif (Make 7, Cream)
Round 1: Make a magic ring. Ch 3 (counts as dc), 11 dc in ring. Join with sl st to the top of ch-3. (12 dc)
Round 2: Ch 3 (counts as dc), dc in same st, 2 dc in each st around. Join. (24 dc)
Round 3 (arms): Ch 1. Sc in next dc, ch 3, picot, ch 3, sk next 3 dc. Repeat from * 6 times. Join to the first sc. (6 sc, 6 pointed arms, each with 1 picot)
Each repeat uses 4 dc, and 6 x 4 = 24, so the arms are spaced evenly.
Round 4: Sl st in each of the first 3 ch and into the picot. Ch 1. Sc in picot, ch 7. Repeat from * 6 times. Join to the first sc. (6 sc, 6 ch-7 sps)
Round 5: Ch 1. Sc in sc, 7 sc in next ch-7 sp. Repeat from * 6 times. Join. (48 sc)
Fasten off and leave a 12 in (30.5 cm) tail on the first motif only. Weave in the ends on the others.
Mapping the motif: Number the Round 5 stitches 1–48, starting with the sc above the first arm. The sc above an arm tip falls at sts 1, 9, 17, 25, 33 and 41. Turn the motif so that st 1 points straight up. Then:
- Top arc: sts 43–48 and 1–7 = 13 sts, centered on st 1
- Right side: sts 8–13 = 6 sts
- Bottom arc: sts 14–36 = 23 sts, centered on st 25
- Left side: sts 37–42 = 6 sts
Check: 13 + 6 + 23 + 6 = 48. Mark sts 1 and 25 on every motif.
Make All Pieces
Cream:
– 7 large motifs
– 7 tabs (worked onto the band later)
– 7 cords
– 4 small snowflakes
Yellow:
– 3 stars
– 7 tassels
– Scallop edging (worked onto the strip)
Layout grid (T = tab, M = motif, S = small snowflake, ★ = star, Y = tassel):
 T    T    T    T    T    T    T
[M1] [M2] [M3] [M4] [M5] [M6] [M7]
 |    |    |    |    |    |    |
 S    |    S    |    S    |    S
 |    ★    |    ★    |    ★    |
 |    |    |    |    |    |    |
 Y    Y    Y    Y    Y    Y    Y
Joining
Lay all 7 motifs RS up in a row with the marked st 1 at the top of each.
Method: Hold Motif 1 and Motif 2 RS together. With cream, sl st through both loops of both layers, matching Motif 1’s right side (sts 8–13) to Motif 2’s left side (sts 42 down to 37). That’s 6 stitches joined to 6 stitches, one for one, with no extra stitches. Fasten off.
Repeat to join each remaining motif, for 6 seams in total.
Tension: Keep the slip stitches as loose as the Round 5 stitches. A tight seam makes the strip cup and pulls the scallops out of line.
Checkpoint: The joined strip should measure 28 in x 4 in (71.1 cm x 10.2 cm), with 4 in (10.2 cm) from the center of one motif to the center of the next.
Border
Border gauge: 16 sts = 4 in (10.2 cm), the same as the main gauge.
Top Band (Cream)
Row 1 (conversion row): With RS facing, join cream in st 43 of Motif 1. Across each motif’s 13 top-arc stitches, work:
2 tr in first st, tr, dc, dc, hdc, sc, 2 sc in st 1, sc, hdc, dc, dc, tr, 2 tr in last st.
That gives 16 sts per motif. Move directly to st 43 of the next motif without adding stitches.
Row total: 91 sts worked one per stitch (7 x 13) + 21 added (7 x 3) = 112 sts.
The tall stitches fill the valley where two circles meet. The short stitches sit on the top of each circle, so the top edge comes out level.
Row 2: Ch 1, turn, sc in each st across. (112 sc)
Row 3: Ch 2 (does not count), turn, hdc in each st across. (112 hdc) Do not fasten off.
Tabs (Cream, make 7)
Each motif’s 16 band stitches split as 5 skipped + 6 for the tab + 5 skipped.
- Row 1: With RS facing, join cream in the 6th st of a motif’s 16. Ch 3 (counts as dc), dc in next 5 sts. (6 dc)
- Rows 2–8: Ch 3, turn, dc in each st across. (6 dc)
Fasten off and leave a 10 in (25.4 cm) tail.
Each tab measures 1.5 in x 4 in (3.8 cm x 10.2 cm). Fold the tab to the WS and sew the last row to the back of Row 1 of the band. This makes a loop about 2 in (5.1 cm) tall.
End Edges (Cream)
Work sc evenly down each short end:
– 2 sc in the Row 1 row-end
– 1 sc in the Row 2 row-end
– 1 sc in the Row 3 row-end
– 1 sc in each of the end motif’s 6 free side stitches
That’s 10 sc per end.
Scallop Edging (Yellow)
Row 1: With RS facing, join yellow in st 14 of Motif 1. Sc in each of the 23 bottom-arc sts of every motif, moving straight across each seam. (7 x 23 = 161 sc)
Row 2: Do not turn. Ch 1, rev sc in each st back across. (161 rev sc) Fasten off.
Why the math works:
– The motif’s 48 stitches split cleanly as 13 + 6 + 23 + 6.
– The top band starts at 7 x 13 = 91 and grows to 112. At 16 sts per 4 in (10.2 cm), 112 sts span exactly 28 in (71.1 cm), the same width as the joined strip.
– The bottom stays at 7 x 23 = 161, with nothing added at the seams, so each scallop keeps its curve.
Hanging Pieces
Cords (Cream, make 7)
With RS facing, join cream in the yellow edging directly below marked st 25, the bottom center of the motif.
Ch 64. Sl st in the back bump of each ch back toward the motif, then sl st into the edging to anchor. (64 sl st)
Each cord is 16 in (40.6 cm) long. Fasten off and leave a tail at the bottom for the tassel.
Note: If you prefer, chain 64, work the slip stitches back up, and anchor at the motif. Either way, leave a long tail at the bottom.
Small Snowflakes (Cream, make 4)
Round 1: Make a magic ring. Ch 3 (counts as dc), 11 dc in ring. Join. (12 dc)
Round 2: Sc in next dc, ch 6, sl st in 3rd ch from hook, [ch 3, sl st in same ch] twice (3-picot tip made), sl st in each of next 3 ch down the arm, sk next dc. Repeat from * 6 times. Join. (6 arms)
Each repeat uses 2 dc (6 x 2 = 12). The small snowflake measures 3 in (7.6 cm) tip to tip.
Stars (Yellow, make 3)
Foundation: Ch 12 and join into a ring.
Round 1: Ch 1, 15 sc in ring. Join. (15 sc)
Round 2: Sc in next st, ch 4, sl st in 2nd ch from hook, hdc in next ch, dc in next ch (point made), sk next st, sc in next st. Repeat from * 5 times. Join. (5 points)
Each repeat uses 3 sts (5 x 3 = 15). The star measures 2.75 in (7.0 cm) across and has an open center.
Tassels (Yellow, make 7)
- Wrap yellow 30 times around the 4 in (10.2 cm) card.
- Thread the cord’s tail under the wraps at the top edge and tie tightly.
- Cut the wraps along the bottom edge.
- Wrap a separate 12 in (30.5 cm) strand tightly 5 times around the tassel 0.75 in (1.9 cm) below the top, knot it and bury the ends inside the tassel.
- Trim the tassel to 4 in (10.2 cm).
Placement
- Cords 1, 3, 5 and 7: Sew a small snowflake to the front of the cord with its center 5 in (12.7 cm) below the yellow edge.
- Cords 2, 4 and 6: Sew a star to the front of the cord with its center 7 in (17.8 cm) below the yellow edge.
Final Blocking
- Weave in all ends except the tassel threads.
- Spray the valance body until it’s damp, but not dripping.
- Pin it to 28.5 in x 5.2 in (72.4 cm x 13.2 cm). Keep the top band straight and pin each scallop into a smooth half circle.
- Pin each motif’s picots outward so the arms read clearly.
- Pin the small snowflakes to 3 in (7.6 cm) and the stars to 2.75 in (7.0 cm), opening the star points.
- Hang the cords straight, or lay them flat, and lightly mist them.
- Let everything dry completely before unpinning.
- Steam the tassels lightly and comb them straight, then retrim them to 4 in (10.2 cm).
Final Quality-Control Checklist
- Each motif has 48 sts in Round 5 and measures 4 in (10.2 cm) across.
- All 6 seams join 6 sts to 6 sts, with st 1 at the top of every motif.
- The top band has 112 sts in every row and a level top edge.
- There are 7 tabs, each 6 sts wide and centered over its motif.
- Each end edge has 10 sc.
- The yellow edging has 161 sc and 161 rev sc.
- All 7 cords are 16 in (40.6 cm) long and anchored at bottom center.
- The snowflakes sit at 5 in (12.7 cm) and the stars at 7 in (17.8 cm).
- All tassels are 4 in (10.2 cm) long and hang level.
Troubleshooting
- Motifs ruffle: The Round 4 chains are too long for your tension. Work ch 6 and put 7 sc in each space, as written, for 48 sts.
- Motifs cup: Go up 0.5 mm in hook size for Round 5.
- Top band dips at the seams: Make sure you used the 2 tr at both ends of each motif’s 13 top stitches.
- Top band is wider than the strip: Your band tension is looser than your motif tension. Rework Row 2 and Row 3 with a 3.5 mm hook.
- Scallops flatten out: Your rev sc is too loose. Rework Row 2 more snugly.
- Cords twist: Steam the cords and let them hang with a tassel weight while they dry.
- Tassels are uneven: Wet them, comb them straight, let them dry, then trim.
Care
Hand wash in cool water with mild soap, press out the water in a towel, and dry flat, reshaping the scallops and picots. Comb the tassels once they’re dry.
Final Notes
The whole valance depends on one measurement chain:
– Each motif measures 4 in (10.2 cm) with 48 sts.
– Seven joined motifs make 28 in (71.1 cm).
– The 112-st top band matches that width at 16 sts per 4 in (10.2 cm).
– The end edges bring the width to 28.5 in (72.4 cm).
– The band and yellow edging bring the height to 5.2 in (13.2 cm).
– The 16 in (40.6 cm) cords and 4 in (10.2 cm) tassels bring the total drop to 25.2 in (64.0 cm).
Check the first motif carefully, and the rest of the valance will fit together.
Happy crocheting!