
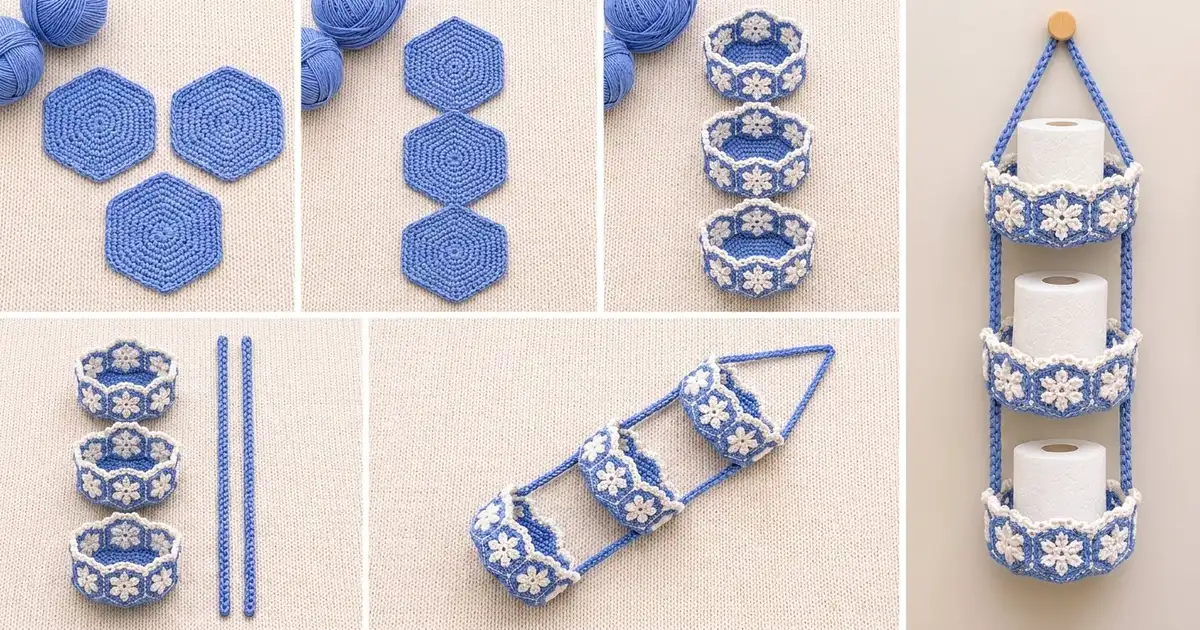
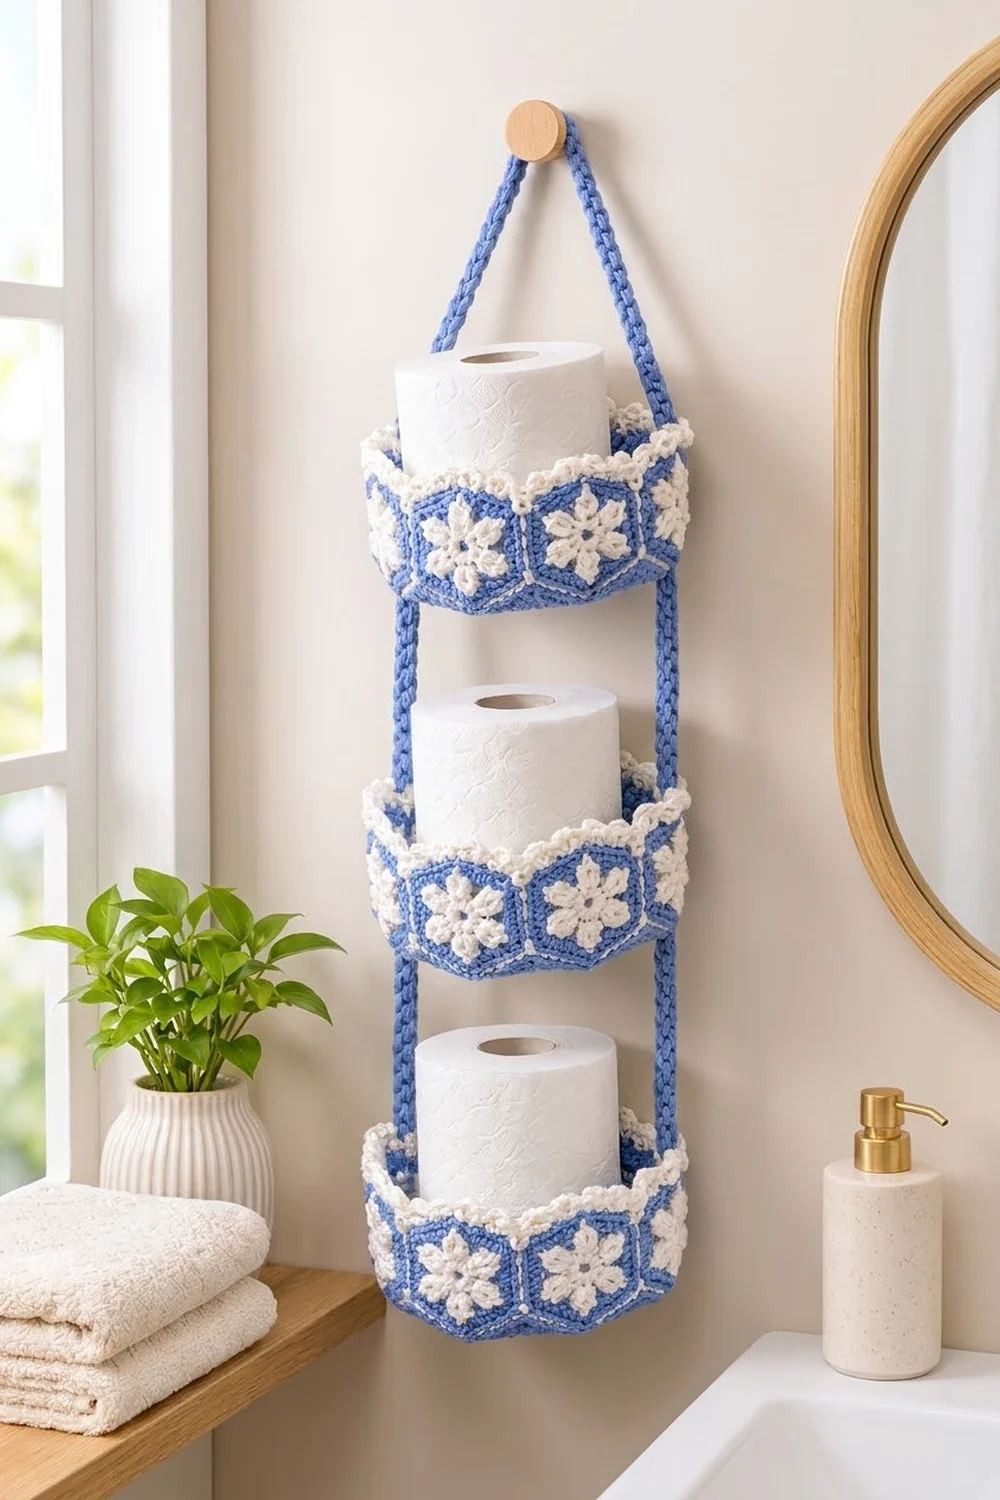
This three-tier hanging holder stores three spare toilet rolls in a small strip of wall space. Each tier is a hexagon basket. Its wall is a ring of six point-up flower motifs, so the top edge forms a soft zigzag with white picot edging.
The palette is just cornflower blue and white. The blue gives a crisp, fresh look and the white flowers echo classic blue-and-white tiles, so the holder suits most bathrooms. The pattern uses US crochet terms throughout.
Each basket measures about 7 in (17.8 cm) point to point and 6 in (15.2 cm) flat to flat at the base. It stands about 5 in (12.7 cm) tall at the motif points. The finished holder hangs about 35 in (88.9 cm) long, including the hanging loop.
Construction overview: you make the solid bases in rounds and the flower motifs separately. Six motifs join into a ring, and two leveling rounds straighten the ring’s bottom edge. A white round then joins the ring to its base, and a picot border finishes the top edge. Two flat straps are sewn to opposite seams of all three baskets and joined at the top.
Finished Size and Construction
- Basket size: 7 in (17.8 cm) point to point, 6 in (15.2 cm) flat to flat, about 5 in (12.7 cm) tall
- Total hanging length: about 35 in (88.9 cm)
- Skill level: Intermediate
- Terminology: US
- Yarn weight: worsted (#4) cotton
- Hook: 4.5 mm (US 7)
- Number of pieces: 23 (3 bases, 18 motifs, 2 straps)
- Layout: 6 motifs in a ring per basket, 3 baskets stacked on 2 straps
- Motif size: 2 in (5.1 cm) per side, 3.5 in (8.9 cm) wide flat to flat, 4 in (10.2 cm) tall point to point
- Wall size before border: 21 in (53.3 cm) around, about 4.5 in (11.4 cm) tall at the points
- Border depth: about 0.5 in (1.3 cm)
Materials
Use a smooth, firm worsted-weight cotton or cotton blend. Cotton holds the basket shape well and survives bathroom humidity. Avoid fluffy or very stretchy acrylic, because the straps will sag under the weight of the rolls.
- Cornflower blue: 200 g (about 340 m)
- White: 100 g (about 170 m)
Both quantities include a margin of roughly 30%, enough for a gauge swatch and a re-made motif or two.
Tools:
– 4.5 mm (US 7) crochet hook
– Tapestry needle
– 12 stitch markers
– Rust-proof pins and a blocking mat
– Measuring tape
– Scissors
Abbreviations (US Terms)
- ch – chain
- sl st – slip stitch
- sc – single crochet
- hdc – half double crochet
- dc – double crochet
- tr – treble crochet
- sc2tog – single crochet 2 together
- sp – space
- st(s) – stitch(es)
- MR – magic ring
- RS / WS – right side / wrong side
Special stitches:
- Petal: work [sl st, ch 2, dc, ch 1, dc, ch 2, sl st] all in the same st.
- Picot-sc: sc in the st, ch 3, then sl st in the first ch of that ch-3.
Gauge and Checkpoints
Gauge: 16 sc and 16 rounds = 4 in (10.2 cm) in a flat sc hexagon. Before making all the pieces, make one base and one motif and measure them.
Checkpoints:
- Base after Round 8: 48 sts, 4 in (10.2 cm) point to point.
- Base after Round 14: 84 sts, 7 in (17.8 cm) point to point, 6 in (15.2 cm) flat to flat.
- Motif after Round 4: each side 2 in (5.1 cm), 3.5 in (8.9 cm) flat to flat.
If a piece is too big, go down 0.5 mm in hook size. If it is too small, go up 0.5 mm. The base side and the motif width must match, so both pieces must hit gauge with the same hook.
Hexagon Base (make 3, blue)
To keep the corners crisp, always work the increases in the same place each round. Join every round with a sl st to the first sc. Do not turn.
Round 1: MR, ch 1, 6 sc in ring. (6 sts)
Round 2: ch 1, 2 sc in each st. (12 sts)
Round 3: ch 1, sc in next st, 2 sc in next st; repeat from * 5 more times. (18 sts)
Round 4: ch 1, sc in next 2 sts, 2 sc in next st; repeat from * 5 more times. (24 sts)
Rounds 5–14: keep the same pattern, adding 1 plain sc before each increase in every round. Round n has 6 × n sts:
- Round 5: 30 sts
- Round 6: 36 sts
- Round 7: 42 sts
- Round 8: 48 sts
- Round 9: 54 sts
- Round 10: 60 sts
- Round 11: 66 sts
- Round 12: 72 sts
- Round 13: 78 sts
- Round 14: 84 sts
After Round 14 each side has 14 sts, including that side’s corner increase pair. Fasten off and weave in the ends.
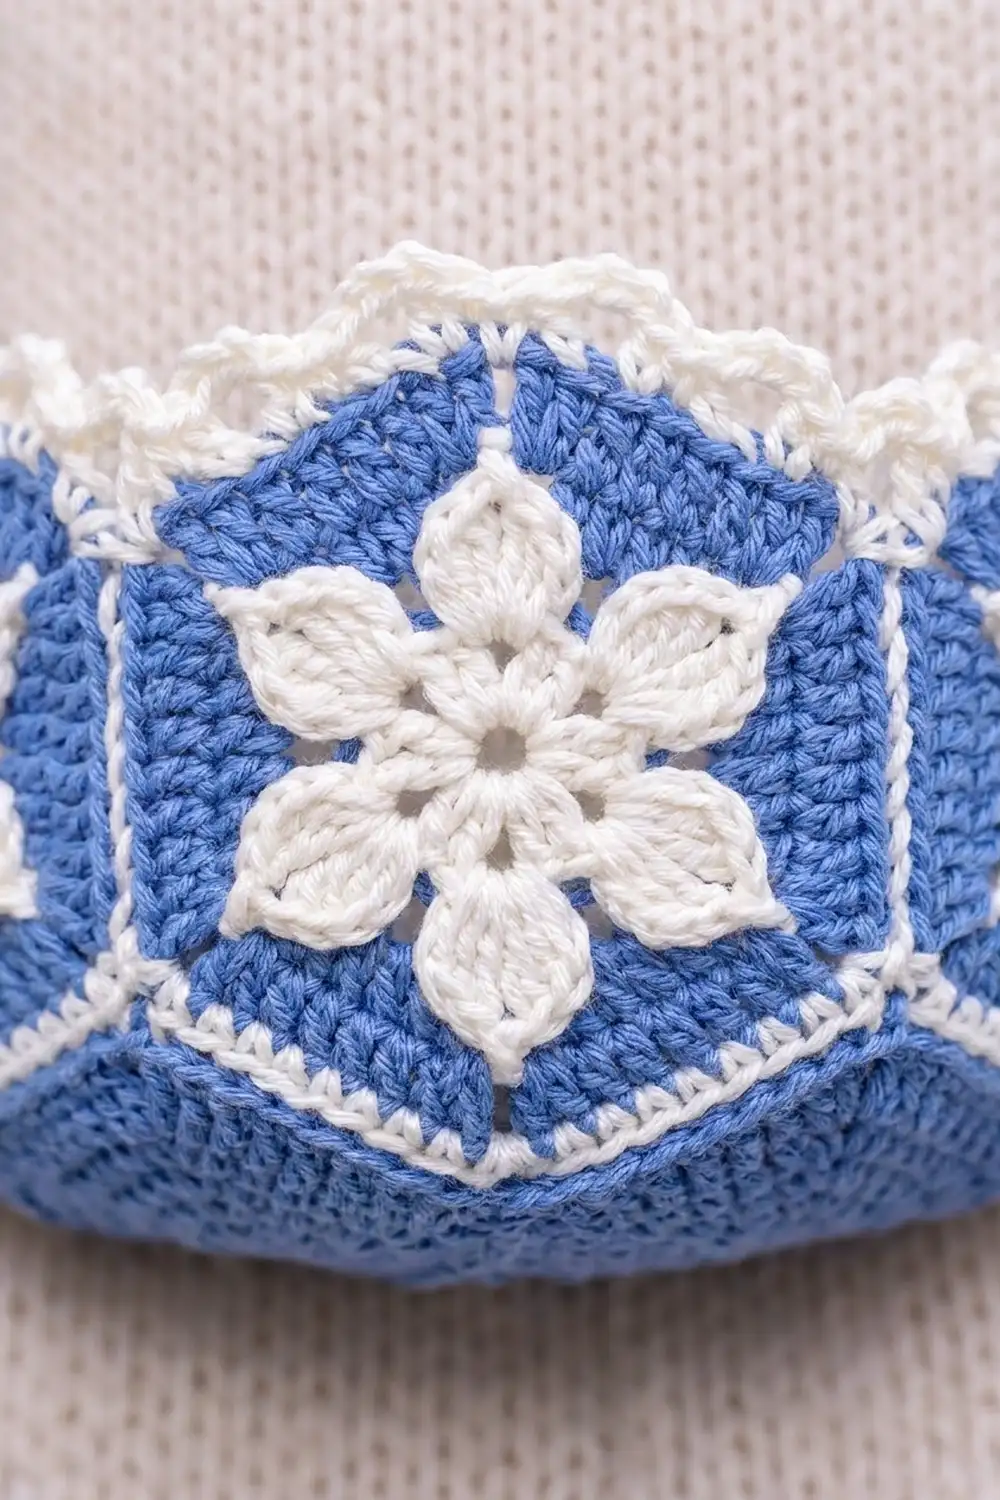
Flower Hexagon Motif (make 18)
Round 1 (white): MR, ch 1, 6 sc in ring, then sl st to the first sc. (6 sts)
Round 2 (white): work 1 Petal in each sc. (6 petals) Fasten off white.
Round 3 (blue): join blue in the ch-1 sp at the tip of any petal.
1. Ch 1, then work (sc, ch 2, sc) in the same sp.
2. Ch 3.
3. Work (sc, ch 2, sc) in the next petal-tip ch-1 sp, ch 3; repeat from * 4 more times.
4. Sl st to the first sc.
Count: 12 sc, 6 corner ch-2 sps and 6 ch-3 sps.
Round 4 (blue): sl st into the first corner ch-2 sp.
1. Ch 1, then work (sc, ch 2, sc) in the same sp.
2. Sc in next sc, 3 sc in the ch-3 sp, sc in next sc, then (sc, ch 2, sc) in the next corner sp.
3. Repeat from * around, ending the last repeat before the first corner.
4. Sl st to the first sc and fasten off.
Count: 42 sc and 6 corner ch-2 sps. Each side has 7 sc: 5 plain sc plus the 2 corner sc.
The six petals point into the six corners, which gives the snowflake-like look.
Make All Pieces
Blue:
– 3 bases
– 2 straps (instructions below)
– Round 3 onward of all 18 motifs
White:
– Rounds 1–2 of all 18 motifs
– All edging and joining rounds
Layout of one basket: 6 motifs in a closed ring, all standing point-up, seen here from the side:
 /\  /\  /\  /\  /\  /\
|M1||M2||M3||M4||M5||M6|  -> M6 joins back to M1
 \/  \/  \/  \/  \/  \/
[------- base (84 sts) -------]
Stack: top basket, 4 in (10.2 cm) gap, middle basket, 4 in (10.2 cm) gap, bottom basket.
Joining
Join the Motif Ring (blue)
- Stand each motif point-up, so its left and right sides are vertical.
- Hold two motifs RS together and whipstitch the right vertical side of the first to the left vertical side of the second. Work through the back loops only.
- Each side gives 9 matching points: corner ch-2 sp, 7 sc, corner ch-2 sp. Match them stitch to stitch.
- Join M1 to M2, M2 to M3, and so on to M6, then close the ring by joining M6 to M1. That makes 6 seams.
Keep the whipstitch snug but not tight. The seam should lie flat and be no shorter than the motif side.
Level the Bottom Edge (white)
Turn the ring upside down so the bottom zigzag faces you. The motif points poke down and the seams form notches between them. Each motif’s bottom edge has two slanted sides of 7 sc each, with the point’s ch-2 sp between them.
Leveling Round 1: join white in the joined seam corner sps of any seam. Ch 4 (counts as the first tr). For each motif, work:
– tr, tr, dc, dc, hdc, hdc, sc along the first slanted side
– sc in the point ch-2 sp
– sc, hdc, hdc, dc, dc, tr, tr along the second slanted side
– 1 tr worked under both joined corner sps of the next seam (skip this one on the last repeat, because the ch-4 already counts as that seam’s tr)
Sl st to the top of the ch-4. Each motif gets 16 sts (1 seam tr + 7 + 1 + 7), for a total of 96 sts.
Leveling Round 2: ch 1. For each motif, work:
– sc2tog over the seam tr and the next tr
– sc in next 12 sts
– sc2tog over the last 2 tr
Sl st to the first st. Each motif now has 14 sts (16 – 2 decreases), for a total of 84 sts. The edge is now level.
Size checkpoint: the ring should measure 21 in (53.3 cm) around the bottom, which is 3.5 in (8.9 cm) per panel.
Join the Wall to the Base (white)
- Place the base inside the ring, both RS facing out. Line up each of the 6 seams with a base corner (the second sc of the corner increase pair).
- Working through 1 leveling st and 1 base st together, sc around: 84 sc, which is 14 per panel and 14 per base side.
- Sl st to the first sc and fasten off.
This makes the white ridge around the bottom of the basket. Because both edges have exactly 84 sts, the wall stands straight with no puckering.
Border (top edge, white)
Border gauge: about 4 sc per 1 in (2.5 cm) along the motif edges, matching the motif sts one to one.
The top edge is a zigzag. Each motif has two slanted sides of 7 sc each, a top point ch-2 sp, and a seam valley on each side.
Border Round 1: join white in the first sc after any seam and ch 1. For each motif, work:
– sc in the 7 sc of the slanted side
– 3 sc in the top point ch-2 sp
– sc in the 7 sc of the next slanted side
– sc2tog, with one leg in each joined corner sp at the seam
Sl st to the first sc. Each motif gets 18 sts (7 + 3 + 7 + 1), for a total of 108 sts.
Border Round 2: ch 1, sc in next 2 sts, picot-sc in next st; repeat from * around (36 repeats). Sl st to the first sc and fasten off. That makes 108 sts and 36 picots: 6 per motif.
Why the math works: 18 sts per motif divides evenly by the 3-st repeat. Counting from the first sc after a seam, the picots land on sts 3, 6, 9, 12, 15 and 18. That puts st 9 (the middle of the 3 point sc) at the motif tip and st 18 (the sc2tog) in the seam valley, so every basket’s edging is symmetric.
Straps (make 2, blue)
- Ch 137.
- Row 1: sc in the 2nd ch from the hook and in each ch across. (136 sts)
- Row 2: ch 1, turn, sl st in each st across. (136 sts)
- Fasten off.
Each strap measures about 34 in (86.4 cm) long and 0.5 in (1.3 cm) wide.
Attaching:
- On each basket, mark two opposite seams.
- Line up the bottom end of each strap with the base of the bottom basket. Sew the strap up the outside of the marked seam over the full 5 in (12.7 cm) wall height.
- Leave a 4 in (10.2 cm) gap, then sew on the middle basket the same way.
- Leave another 4 in (10.2 cm) gap, then sew on the top basket.
This uses 23 in (58.4 cm) of each strap, leaving 11 in (27.9 cm) free above the top basket.
Hanging loop:
- Overlap the free ends by 1 in (2.5 cm) and sew them together to form the apex.
- Join blue at the apex and ch 12. Sl st back into the apex, then work 16 sc into the loop.
- Fasten off.
The loop hangs about 2 in (5.1 cm) long.
Final Blocking
- Weave in all ends before blocking.
- Dampen each basket evenly with a spray bottle.
- Stuff each basket firmly with a towel shaped like a hexagon, about 6 in (15.2 cm) flat to flat.
- Pin the picot points upward so the zigzag stands crisp.
- Lay the straps flat and pin them straight to 34 in (86.4 cm). Do this before sewing, or as a touch-up after assembly.
- Let everything dry completely, usually 24 hours.
- Remove the pins and check the measurements again.
Final Quality-Control Checklist
- [ ] All 3 bases have 84 sts and measure 7 in (17.8 cm) point to point.
- [ ] All 18 motifs measure 2 in (5.1 cm) per side.
- [ ] Each ring has 6 seams, each matched across 9 points.
- [ ] The leveling rounds counted 96, then 84 sts.
- [ ] The base joining round counted 84 sc, with every seam on a base corner.
- [ ] The top border counted 108 sts with 36 picots.
- [ ] The straps are sewn to opposite seams with equal 4 in (10.2 cm) gaps.
- [ ] The holder hangs level, without tilting.
- [ ] All ends are woven in and secured.
Troubleshooting
The base cups or ruffles. If it cups, your tension is too tight, so go up a hook size. If it ruffles, check that each round has exactly 6 increases.
The base corners drift into a circle. Mark each corner increase and stack every new increase directly above the last one.
The motif doesn’t match the base side. Remake the motif with a different hook. Do not force a mismatched join.
The bottom edge is still wavy after leveling. Your tr sts may be too short to fill the notches. Work them more loosely, or use dtr at the seams.
The baskets tilt on the straps. Check that both straps attach at exactly opposite seams and at matching heights.
The straps stretch. Work the sl st row tightly, or add a second sl st row.
Care
Hand wash in cool water with mild soap, gently press out the water, and reshape over a towel to dry. Do not tumble dry.
Final Notes
Each stage sets up the next measurement. A base of 14 rounds gives 84 sts, which is 14 per side and 3.5 in (8.9 cm) per side. Each motif’s 7 sc sides make a panel 3.5 in (8.9 cm) wide, so 6 panels make a 21 in (53.3 cm) ring. The leveling rounds bring the ring from 96 sts down to 84, which matches the base exactly. The 108-st border divides evenly into 36 picots. Two 34 in (86.4 cm) straps then carry three baskets spaced 4 in (10.2 cm) apart.
Check each number at its checkpoint and the holder will hang straight and neat.
Happy crocheting!