

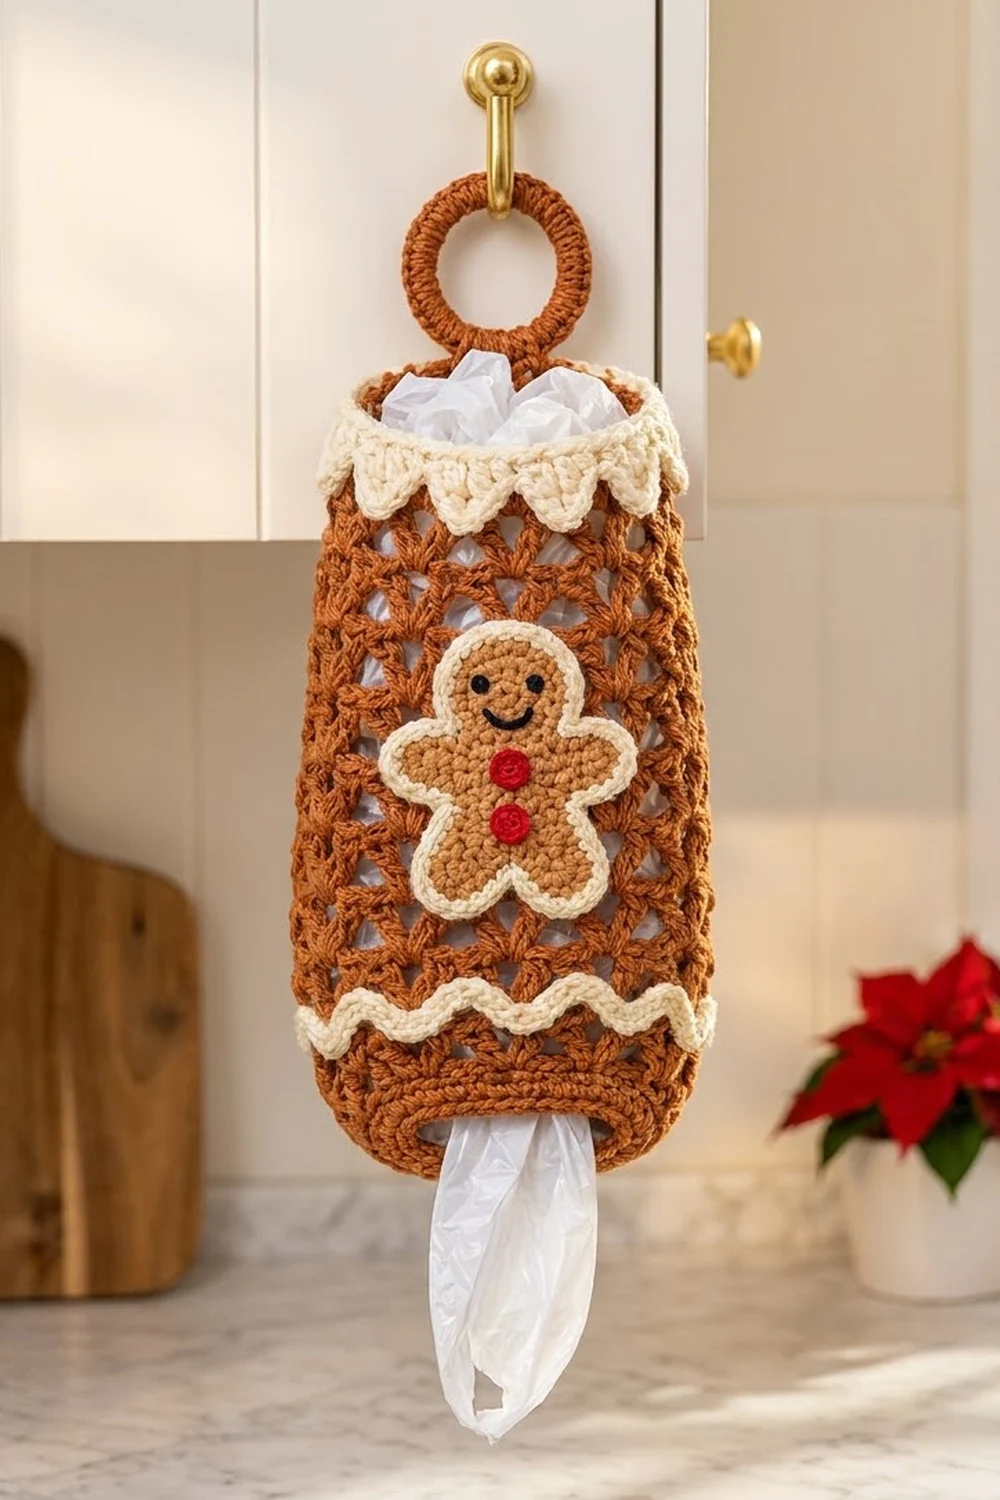
This holiday bag holder turns a pile of grocery bags into kitchen decor. The body is an open V-stitch mesh tube in warm cinnamon brown, so you can see the bags inside. A cream pointed trim finishes the top, and a cream wavy band circles the lower body like icing on a cookie.
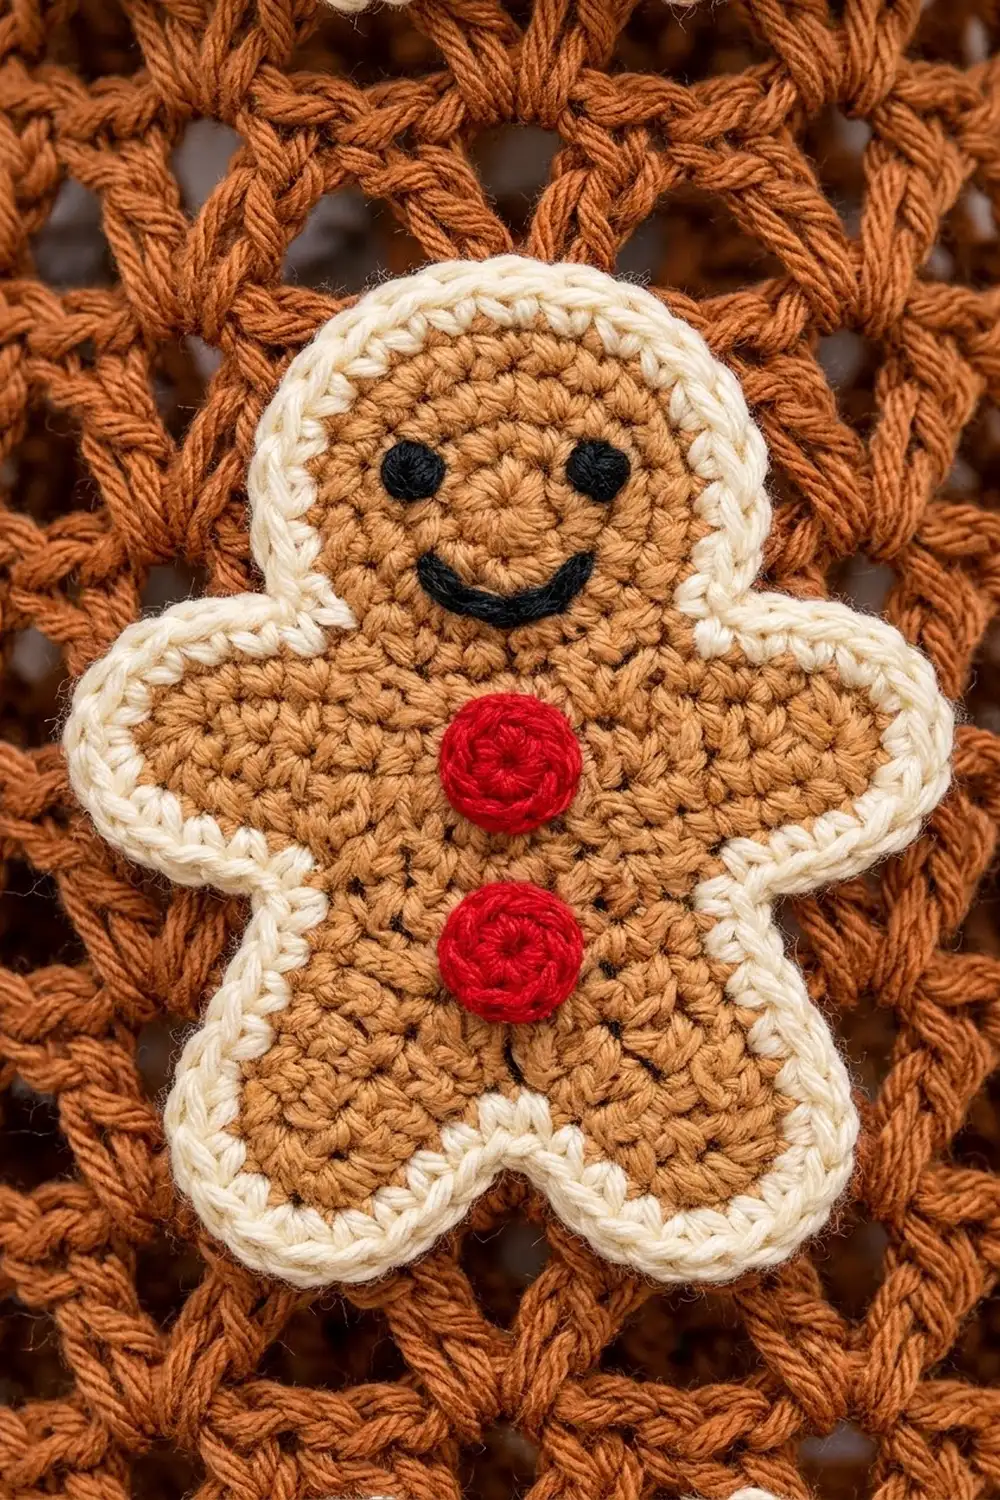
The centerpiece is a light caramel gingerbread man with a cream outline, a stitched black smile and two red crocheted buttons. A covered ring at the top lets the holder hang from a cabinet hook. You push bags in at the top and pull them out through the narrow opening at the bottom.
The pattern uses US crochet terms. The finished body measures 8 in (20.3 cm) wide when laid flat and 18.7 in (47.5 cm) tall. With the ring, it hangs about 22 in (55.9 cm) long.
You work the body in joined rounds from the bottom opening up. It has three parts: a solid single crochet base, 27 rounds of offset V-stitch mesh and a solid single crochet top rim. Then you make the ring hanger, top trim, wave band, gingerbread and buttons separately and sew them on.
Finished Size and Construction
- Finished size: 8 in (20.3 cm) wide flat x 18.7 in (47.5 cm) tall; about 22 in (55.9 cm) long including the ring
- Skill level: Advanced beginner
- Terminology: US
- Yarn weight: Worsted (#4)
- Hook: 5.0 mm (H-8)
- Number of pieces: 1 body tube plus 6 small parts (ring hanger, top trim, wave band, gingerbread, 2 buttons)
- Layout: One holder; all trims are sewn onto the body
- Piece size: body circumference 16 in (40.6 cm); 60 stitches around
- Size before border: 8 in x 18.7 in (20.3 cm x 47.5 cm)
- Border depth: the top trim is 1.25 in (3.2 cm) deep at the points; it overlaps the rim, so it adds no length
Materials
Choose a smooth worsted-weight cotton or cotton blend. Cotton holds its shape when the holder is full of bags and won’t stretch out over time. Acrylic also works, but the mesh will stretch more.
- Cinnamon brown (main): 110 g, about 200 m
- Cream: 20 g, about 36 m
- Light caramel: 10 g, about 18 m
- Red: 3 g, about 5 m
- Black: about 1 m of yarn or embroidery floss for the face
These quantities include about 10 percent extra.
Tools:
- 5.0 mm (H-8) crochet hook
- 2.5 in (6.4 cm) plastic or wooden craft ring
- Yarn needle
- Stitch markers
- Scissors
- Straight pins
- Measuring tape
- Spray bottle and blocking mat
Abbreviations (US Terms)
- ch: chain
- sl st: slip stitch
- sc: single crochet
- hdc: half double crochet
- dc: double crochet
- sc2tog: single crochet 2 together
- fsc: foundation single crochet
- MR: magic ring
- sp: space
- st(s): stitch(es)
- rnd: round
Special stitch, V-st (V-stitch): (dc, ch 2, dc) in the same stitch or space.
Gauge and Checkpoints
- Single crochet: 15 sc and 16 rnds = 4 in (10.2 cm)
- V-st mesh: 5 repeats (V-st + ch 1) = 4 in (10.2 cm) wide; 5 rnds = 3 in (7.6 cm) tall. One repeat is 0.8 in (2.0 cm) wide, and one mesh round is 0.6 in (1.5 cm) tall.
Use the body itself as your gauge test. Work Rnds 1–12, then lay the tube flat and measure it before you go on.
Checkpoints:
- After Rnd 1: circumference 9.6 in (24.4 cm); flat width 4.8 in (12.2 cm)
- After Rnd 6: flat width 8 in (20.3 cm); height 1.5 in (3.8 cm)
- After Rnd 12: height 5.1 in (13.0 cm)
- After Rnd 33: height 17.7 in (45.0 cm)
- After Rnd 37: height 18.7 in (47.5 cm)
Too big? Change to a 4.5 mm hook. Too small? Change to a 5.5 mm hook. If only the height is off, add or remove mesh rounds; each one is 0.6 in (1.5 cm). Keep the stitch counts the same, because the trims are sized for exactly 60 stitches.
Body
Work in joined rounds with the right side facing. Don’t turn.
Bottom opening and base
With cinnamon brown, ch 36. Join with a sl st to the first ch to form a ring, taking care not to twist.
Rnd 1: Ch 1, sc in each ch around, join with a sl st to the first sc. (36 sc)
Rnds 2–4: Ch 1, sc in each st around, join. (36 sc)
Rnd 5: Ch 1, sc in next 2 sts, 2 sc in next st; repeat from * 12 times total, join. (48 sc)
Rnd 6: Ch 1, sc in next 3 sts, 2 sc in next st; repeat from * 12 times total, join. (60 sc)
These six rounds make a firm 1.5 in (3.8 cm) collar around the oval opening. The two increase rounds widen it to the full body width.
Mesh body
Rnd 7: Ch 5 (counts as dc + ch 2), dc in the same st as the join, ch 1, skip next 2 sts, V-st in next st, ch 1, skip next 2 sts; repeat from * 19 more times. Join with a sl st to the 3rd ch of the beginning ch-5. (20 V-sts, 20 ch-1 sps)
Each repeat uses 3 stitches of the round below, and 60 ÷ 3 = 20 repeats.
Rnd 8: Sl st in next ch-2 sp, sl st in next dc, sl st in next ch-1 sp. Ch 5 (counts as dc + ch 2), dc in the same ch-1 sp, ch 1, V-st in next ch-1 sp, ch 1; repeat from * 19 more times. Join to the 3rd ch of the beginning ch-5. (20 V-sts, 20 ch-1 sps)
Each V-st goes into the ch-1 space between two V-sts of the round below. This moves every round over by half a repeat, which creates the diamond pattern.
Rnds 9–33: Repeat Rnd 8. (20 V-sts, 20 ch-1 sps in every round)
That makes 27 mesh rounds in total (Rnds 7–33), measuring 16.2 in (41.1 cm).
Top rim
Rnd 34 (conversion): Sl st in next ch-2 sp. Ch 1, sc in next dc, sc in next ch-2 sp, sc in next dc, skip ch-1 sp; repeat around, join. Count: (40 sc, 1 in each dc) + (20 sc, 1 in each ch-2 sp) = 60 sc.
Rnds 35–37: Ch 1, sc in each st around, join. (60 sc)
Fasten off and weave in the ends. Lay the tube flat with the round joins along one side fold. The opposite fold marks the center front.
Ring Hanger
With cinnamon brown, join the yarn around the craft ring.
Rnd 1: Ch 1, work 40 sc over the ring, packing them tightly so no plastic shows. Join. (40 sc)
Tab, Row 1: Ch 1, sc in the same st and the next 5 sts. (6 sc)
Rows 2–5: Ch 1, turn, sc in each st across. (6 sc)
Fasten off, leaving a 12 in (30.5 cm) tail. The tab is 1.6 in (4.1 cm) wide and 1.25 in (3.2 cm) long. The covered ring is about 3 in (7.6 cm) across.
Wave Band
With cream, ch 60. Join with a sl st to form a ring, without twisting.
Rnd 1 (top of the chain): Sl st in next ch, sc in next ch, hdc in next ch, dc in next ch, hdc in next ch, sc in next ch; repeat from * 10 times total, join. (60 sts)
Rnd 2 (bottom loops of the chain): Turn the band so the bottom loops of the starting chain are on top. Working into those loops, dc in next loop, hdc in next, sc in next, sl st in next, sc in next, hdc in next; repeat from * 10 times total, join. (60 sts)
Each dc sits opposite a sl st, so one edge rises where the other edge dips. This gives 10 waves around, about 1 in (2.5 cm) from top to bottom. Fasten off, leaving a long tail.
Gingerbread Appliqué
With light caramel, work flat in turned rows. Begin each row with ch 1, which does not count as a stitch.
Leg 1: Ch 4, sc in 2nd ch from hook and in each ch across. (3 sc) Rows 2–4: Sc in each st. (3 sc) Fasten off.
Leg 2: Work as for Leg 1, but don’t fasten off.
Row 5: Ch 1, turn, sc in 3 sts of Leg 2, ch 1, sc in 3 sts of Leg 1. (7 sts: 6 sc + 1 ch)
Rows 6–7: Sc in each st and ch. (7 sc) At the end of Row 7, ch 5.
Row 8 (arms): Sc in 2nd ch from hook and next 3 ch, sc in 7 body sts, fsc 4. (15 sts)
Rows 9–10: Sc across. (15 sc)
Row 11: Turn, sl st in first 4 sts, ch 1, sc in next 7 sts, leave the last 4 sts unworked. (7 sc)
Row 12 (neck): Sc2tog, sc in next 3, sc2tog. (5 sc)
Row 13: 2 sc in first st, sc in next 3, 2 sc in last st. (7 sc)
Row 14: 2 sc in first st, sc in next 5, 2 sc in last st. (9 sc)
Rows 15–16: Sc across. (9 sc)
Row 17: Sc2tog, sc in next 5, sc2tog. (7 sc)
Row 18: Sc2tog, sc in next 3, sc2tog. (5 sc) Fasten off.
Outline: Join cream at the top of the head and work 1 round of sc around the whole shape.
- Work 5 sc across the top of the head.
- Going down one side, work 6 sc down the side of the head, 2 at the neck, 4 along the top of the arm, 4 around the arm tip, 4 under the arm, 3 down the side of the body, 4 down the outer leg, 5 around the foot (3 sc in the center stitch) and 4 up the inner leg.
- Work 1 sc in the ch between the legs.
- Work the same counts back up the other side, in reverse order. Join. (78 sc: 5 + 36 + 1 + 36)
The finished gingerbread man is about 4.5 in x 5 in (11.4 cm x 12.7 cm).
Face: With black, make two small stitches for the eyes and backstitch a curved smile.
Buttons (make 2): With red, MR, ch 1, 6 sc in ring, pull the ring closed, join. (6 sc) Each button is about 0.5 in (1.3 cm) across. Sew both buttons down the center of the body.
Assembly
- Ring: Slip the tab inside the top rim at the back fold, overlapping it by 1 in (2.5 cm) so the ring sits above the edge. Whipstitch all four sides of the overlap through Rnds 34–37.
- Wave band: Slide the band onto the tube and center it 3 in (7.6 cm) above the bottom edge, with a wave peak at the center front. Pin it, then tack it down at each peak and dip.
- Gingerbread: Center the gingerbread man on the front, with the top of the head 1.75 in (4.4 cm) below the top edge. Whipstitch through the cream outline into the mesh behind it. Keep one hand inside the tube so you don’t sew through to the back.
Border: Pointed Top Trim
Border gauge: same as the body, 15 sc = 4 in (10.2 cm). With the holder laid flat, each side (front and back) has 30 stitches.
With cream, ch 60. Join with a sl st to form a ring, without twisting.
Rnd 1: Ch 1, sc in each ch, join. (60 sc; 30 per side)
Rnd 2: Ch 2 (does not count as a stitch), hdc in each st, join. (60 hdc; 30 per side)
Rnd 3 (points, conversion): Sl st in next st, sc in next st, hdc in next st, V-st in next st, hdc in next st, sc in next st; repeat from * 10 times total, join. Count: (60 sts, 1 in each st) + (10 extra dc from the V-sts) = 70 sts plus 10 ch-2 tips. That is 35 sts and 5 points per side. Fasten off, leaving a long tail.
Attach: Pull the trim over the top of the holder with the points facing down. Whipstitch trim Rnd 1 to body Rnd 37, matching them stitch for stitch. The points hang down over the rim to the first mesh round.
Why the math works: The body rim, trim chain and wave band chain all have 60 stitches. At gauge that is 16 in (40.6 cm), so nothing has to be stretched or gathered. Each point uses 6 stitches, so 60 stitches make exactly 10 points: 5 per side, with the side folds falling between points.
Final Blocking
- Weave in all remaining ends inside the solid rims.
- Lay the holder flat with the gingerbread centered on the front.
- Mist lightly until damp.
- Pat it to 8 in (20.3 cm) wide and 18.7 in (47.5 cm) tall.
- Pin each trim point downward and even out the wave peaks.
- Ease the mesh so the diamonds line up in straight vertical columns.
- Let it dry completely before you unpin it.
Final Quality-Control Checklist
- Body has 60 sts at the rim and 20 V-sts in every mesh round
- Bottom opening lies flat at 4.8 in (12.2 cm)
- Body measures 8 in x 18.7 in (20.3 cm x 47.5 cm)
- Trim has 10 even points, 5 per side
- Wave band is level all the way around
- Gingerbread is centered, with an unbroken cream outline
- Face, buttons and ring tab are secure
Troubleshooting
Mesh twists into a spiral: Start each round in the ch-1 space next to the join. Starting one space off makes the rounds drift.
Bottom opening ruffles: Redo Rnds 1–4 with a 4.5 mm hook.
Rim is wider than the mesh: Skip the ch-1 spaces in Rnd 34 exactly as written.
Trim doesn’t fit the rim: Recount Rnd 1 of the trim; it needs exactly 60 sc.
Gingerbread curls: Block it flat before sewing it on, and work the outline round loosely.
Plastic shows through the ring: Add 2–4 sc to Rnd 1 of the ring hanger.
Care
Hand wash in cold water and lay flat to dry, reshaping the trims. Don’t tumble dry.
Final Notes
All the measurements work together. The 36-stitch collar widens to 60 stitches. Those 60 stitches become 20 mesh repeats and then go back to 60 sc at the rim. The trim and wave band are also built on 60 stitches. That gives a 16 in (40.6 cm) circumference, or 8 in (20.3 cm) laid flat. The height is 1.5 in (3.8 cm) of base plus 16.2 in (41.1 cm) of mesh plus 1 in (2.5 cm) of rim, for a total of 18.7 in (47.5 cm). If you match the gauge at each checkpoint, every trim will fit.
Happy crocheting!