

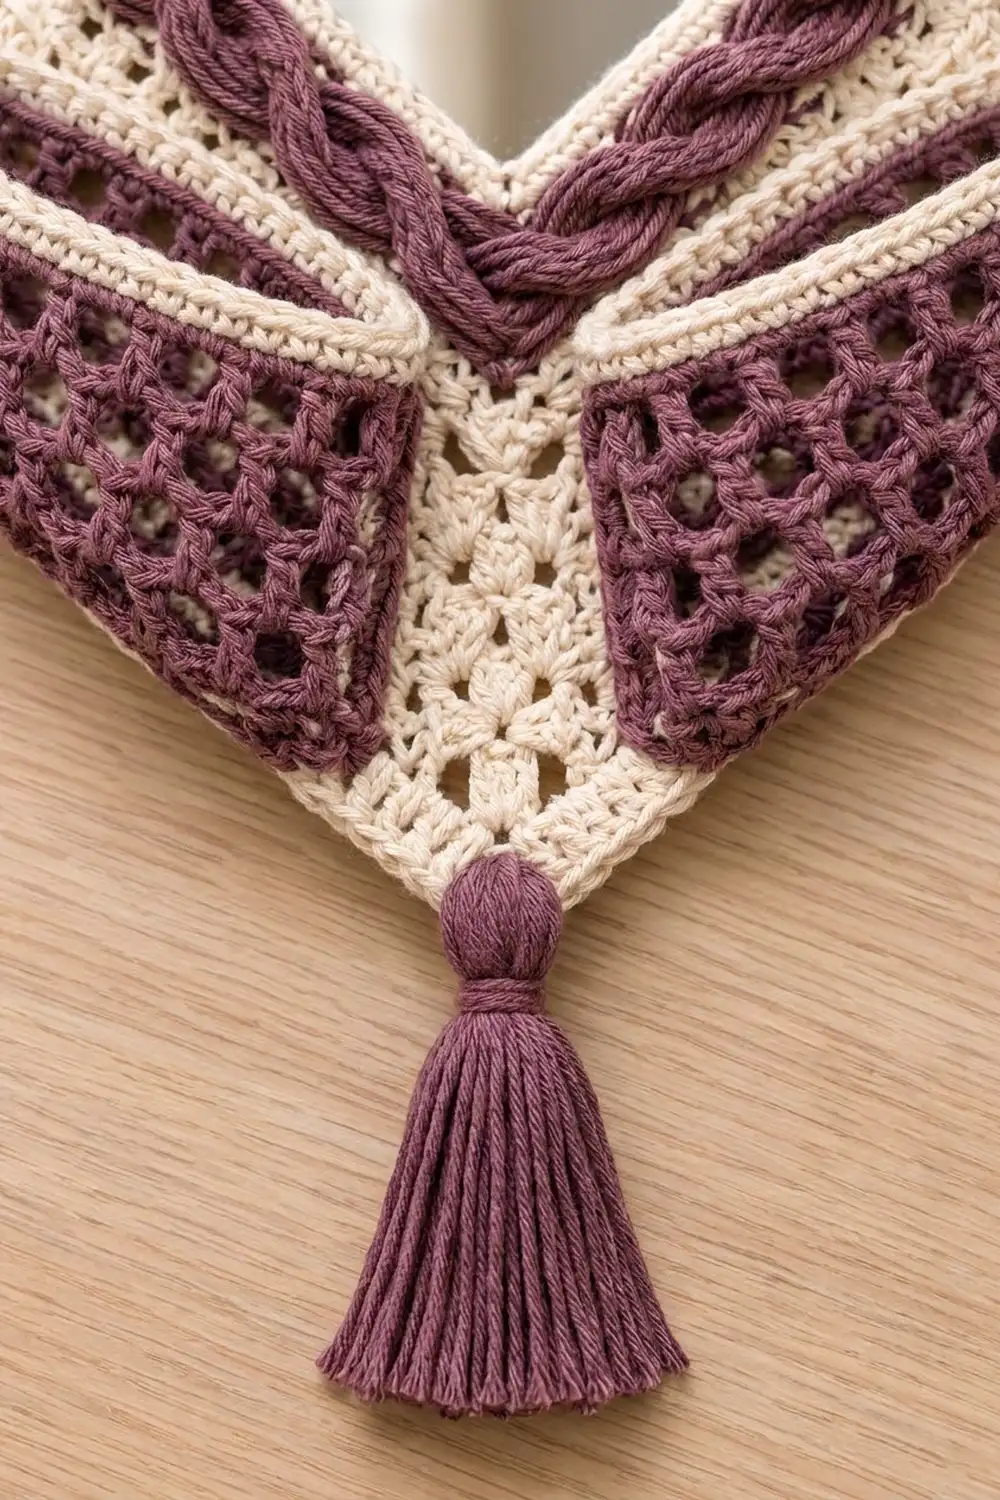
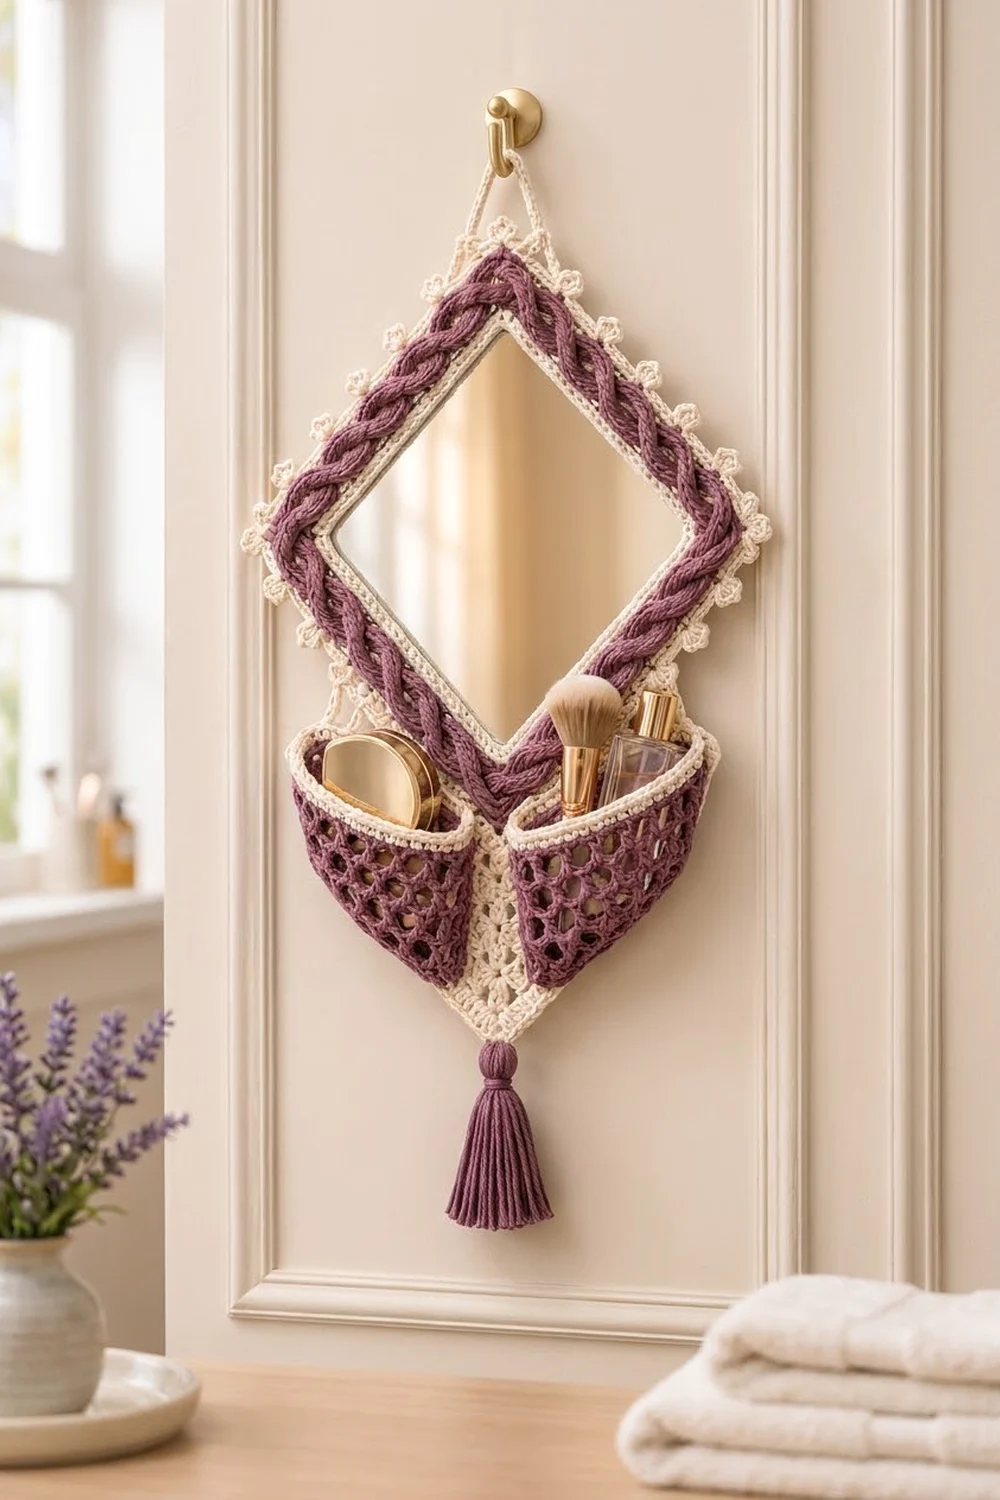
This mirror wall organizer is set on point like a diamond. A chunky plum braid wraps around the mirror and sits inside a crisp cream frame trimmed with small trefoil picots. Below the frame, a cream lace panel holds two deep plum mesh pockets, which are useful for brushes, a compact or a small bottle. A plum tassel finishes the bottom point.
The palette is two colors, cream and a dusty mulberry plum, so it suits a vanity, an entryway or a bedroom wall. The style mixes boho texture (braid, tassel, open mesh) with the clean geometry of a mitered square.
All terms are US crochet terms. The finished piece measures about 15.5 in (39.4 cm) wide at the side corners. It is about 19 in (48.3 cm) tall from the top trefoil to the panel point, or about 23.5 in (59.7 cm) including the tassel. The framed square measures 10.5 in (26.7 cm) per side.
Construction is simple and done in stages:
1. Work a mitered cream front frame and a solid back square, and sew a three-strand plum braid onto the front.
2. Sandwich a 6 in (15.2 cm) mirror between the front and back while working a joining round.
3. Add the trefoil border.
4. Make the lace panel, pockets, tassel and hanger, then sew everything together.
Finished Size and Construction
- Framed square: 10.5 in (26.7 cm) per side to the sc edge
- Overall size: 15.5 in (39.4 cm) wide x 19 in (48.3 cm) tall, plus a 4.5 in (11.4 cm) tassel
- Skill level: Intermediate
- Terminology: US
- Yarn weight: worsted (#4) cotton
- Hooks: 4.5 mm for most parts; 5.5 mm for the braid strands (worked with the yarn doubled)
- Number of pieces: one finished item made from 10 components (front frame, back square, 3 braid strands, lace panel, 2 pockets, tassel, hanger cord)
- Layout: square on point, with the lace panel and pockets along the two lower sides
- Front frame after Rnd 9: 9.5 in (24.1 cm) per side, with a 5 in (12.7 cm) opening
- Size before border: 10 in (25.4 cm) per side after the joining round
- Border depth: 0.25 in (0.6 cm) of sc, plus trefoils that stand about 0.5 in (1.3 cm) proud of the edge
Materials
Use a smooth, firm worsted cotton or cotton blend. Cotton holds the mitered corners crisply and keeps the pockets from sagging. The amounts below assume about 180 m (197 yd) per 100 g.
- Cream (MC): 150 g, about 270 m (295 yd)
- Plum (CC): 120 g, about 216 m (236 yd)
Tools and notions:
– 4.5 mm and 5.5 mm hooks
– 6 in (15.2 cm) square craft mirror, glass with safety backing or acrylic, no thicker than 0.125 in (0.3 cm)
– Tapestry needle
– Stitch markers
– Pins
– 5 in (12.7 cm) piece of cardboard for the tassel
– Scissors
– Measuring tape
Quantities include a margin of about 20% for gauge swatches and differences in tension.
Abbreviations (US Terms)
- ch – chain
- sc – single crochet
- dc – double crochet
- sl st – slip stitch
- sk – skip
- sp – space
- st(s) – stitch(es)
- rnd(s) – round(s)
- RS / WS – right side / wrong side
- rev sc – reverse single crochet (crab stitch)
- V-st – (dc, ch 1, dc) in the same stitch or space
Special stitch: trefoil picot (tp). [Ch 3, sl st in 3rd ch from hook] 3 times, then sl st in the base of the first picot. This makes the small three-petal bumps.
Gauge and Checkpoints
- Sc in joined rounds (not turned): 16 sts and 16 rnds = 4 in (10.2 cm) with the 4.5 mm hook
- V-st rows: 8 V-sts and 8 rows = 4 in (10.2 cm)
- Braid strand: 3 sc = 1 in (2.5 cm) with the yarn doubled and the 5.5 mm hook
Test with the back square first. It is the quickest gauge check.
– After Rnd 10 it should measure 5 in (12.7 cm) per side.
– After Rnd 19 it should measure 9.5 in (24.1 cm) per side.
If your square is too big, go down 0.5 mm in hook size. If it is too small, go up 0.5 mm. The front and back must match within 0.25 in (0.6 cm), or the joining round will pucker.
Stage checkpoints:
– Front frame: 5.5 in (14.0 cm) per side after Rnd 1, 7.5 in (19.1 cm) after Rnd 5, 9.5 in (24.1 cm) after Rnd 9
– Joined frame: 10 in (25.4 cm) after Rnd 10
– Bordered frame: 10.5 in (26.7 cm) after Rnd 11
– Lace panel: 11.75 in (29.8 cm) along each outer side
Pattern
Counting note: On every square, the “per side” count includes the 2 corner sc on that side. Corner ch-2 spaces are never counted as stitches.
Front Frame (MC, 4.5 mm hook)
Rnd 1: Ch 88 and join with a sl st, taking care not to twist the chain. Ch 1, sc in next 22 ch, ch 2 4 times. Join with a sl st to the first sc.
– Count: 88 sc (22 per side).
– The inner opening measures 5 in (12.7 cm).
Rnd 2: Ch 1, sc in each sc to the next corner, (sc, ch 2, sc) in the ch-2 sp 4 times. Join.
– Count: 96 sc (24 per side).
Rnds 3–9: Repeat Rnd 2. Each round adds 2 sts per side:
| Rnd | Per side | Total |
|---|---|---|
| 3 | 26 | 104 |
| 4 | 28 | 112 |
| 5 | 30 | 120 |
| 6 | 32 | 128 |
| 7 | 34 | 136 |
| 8 | 36 | 144 |
| 9 | 38 | 152 |
Fasten off. The frame now measures 9.5 in (24.1 cm) per side, and the band is 2.25 in (5.7 cm) wide.
Back Square (MC, 4.5 mm hook)
Rnd 1: Magic ring, ch 1, (2 sc, ch 2) 4 times. Join.
– Count: 8 sc (2 per side).
Rnd 2: Ch 1, sc in each sc to the corner, (sc, ch 2, sc) in the ch-2 sp 4 times. Join.
– Count: 16 sc (4 per side).
Rnds 3–19: Repeat Rnd 2.
– Rnd 10: 80 sc (20 per side).
– Rnd 19: 152 sc (38 per side).
Fasten off. The square measures 9.5 in (24.1 cm) per side, matching the front.
Braid Strands (CC doubled, 5.5 mm hook; make 3)
Ch 109. Sc in the back bump of the 2nd ch from the hook and in each ch across.
– Count: 108 sc.
– Each strand measures 36 in (91.4 cm).
Fasten off, leaving a 10 in (25.4 cm) tail.
Braiding and Sewing the Braid
- Stitch the three strands together at one end and braid them firmly and evenly.
- The braid should be about 1.5 in (3.8 cm) wide. It must cover Rnds 2–8 of the front frame, a band 1.75 in (4.4 cm) wide, leaving Rnd 1 and Rnd 9 visible in cream.
- Pin the braid around the front frame, centered on Rnd 5. Rnd 5 has 30 sts per side, so the centerline perimeter is 30 in (76.2 cm).
- Start and end at the bottom corner. At each corner, ease the braid into a soft mitered bend.
- If any strand is left over, unravel the extra sc from its end, fasten off again, and stitch the three ends flat so they butt against the starting end.
- Using a CC tail, sew through the braid edges into Rnds 2 and 8, catching only the front frame.
Joining Round (MC, 4.5 mm hook)
Place the front frame (RS up) on the back square (WS facing the front), matching corners and stitches.
Rnd 10: Join MC in any corner sp, going through both layers.
1. Ch 1, sc through both layers in each of the next 38 sts, (sc, ch 2, sc) in the corner sp 4 times. Join.
2. Before you finish the fourth side, slide the mirror between the layers and center it under the opening.
– Count: 160 sc (40 per side).
The frame measures 10 in (25.4 cm) per side. The mirror overlaps the opening by 0.5 in (1.3 cm) all around.
Lace Panel (MC, 4.5 mm hook)
The panel is worked flat in turned rows as a mitered V that matches the two lower sides of the frame.
Row 1: Ch 78. Sc in the 2nd ch from the hook and the next 37 ch, (sc, ch 2, sc) in the next ch, sc in the last 38 ch. Turn.
– Count: 78 sc (39 per side).
– Each side measures 9.75 in (24.8 cm).
Row 2 (sets up the V-sts):
1. Ch 3 (counts as dc), [sk 1, V-st in next st] 19 times. The last V-st lands in the corner sc.
2. Ch 2 and skip the corner sp.
3. V-st in the next corner sc, [sk 1, V-st in next st] 18 times, sk 1, dc in the last sc. Turn.
– Count: 38 V-sts (19 per side), 2 edge dc, 1 corner ch-2.
Row 3 (growth row):
1. Ch 3, V-st in the ch-1 sp of each V-st to the corner (19).
2. (V-st, ch 2, V-st) in the corner ch-2 sp.
3. V-st in the ch-1 sp of each remaining V-st (19), dc in the top of the turning ch. Turn.
– Count: 40 V-sts (20 per side).
Rows 4–6: Repeat Row 3.
| Row | Per side | Total V-sts |
|---|---|---|
| 4 | 21 | 42 |
| 5 | 22 | 44 |
| 6 | 23 | 46 |
Row 7 (conversion row):
1. Ch 1, sc in the edge dc.
2. Sc in the next V-st sp, sc between that V-st and the next 22 times, then sc in the last V-st sp.
3. (Sc, ch 2, sc) in the corner sp.
4. Mirror the second side, ending with sc in the turning ch.
– Count per side: 1 edge sc + 44 + 1 + 1 corner sc = 47.
– Total: 94 sc.
Fasten off. Each outer side measures 11.75 in (29.8 cm). The panel is 3 in (7.6 cm) deep.
Pockets (make 2, 4.5 mm hook)
Rnd 1 (CC): Ch 21.
1. Sc in the 2nd ch from the hook and the next 18 ch, then 3 sc in the last ch.
2. Working along the other side of the chain, sc in the next 18 ch, then 2 sc in the first ch. Join.
– Count: 42 sc (19 + 3 + 18 + 2).
– The base measures 5 in (12.7 cm).
Rnd 2: Ch 1, sc in the back loop of each st. Join.
– Count: 42 sc. This turns the walls upward.
Rnd 3: Ch 1, sc in the first st, (ch 4, sk 2, sc in next) 13 times, ch 4, sk 2. Join to the first sc.
– Count: 14 ch-4 loops.
Rnds 4–5: Sl st to the center of the first loop, ch 1, sc in the same loop, (ch 4, sc in next loop) 13 times, ch 4. Join.
– Count: 14 loops.
Rnds 6–8: Work as Rnd 4, but with ch 5 instead of ch 4.
– Count: 14 ch-5 loops. These longer loops flare the pocket slightly.
Fasten off CC.
Rnd 9 (conversion round, MC): Join in any loop. Ch 1, 4 sc in each loop. Join.
– Count: 56 sc (14 loops x 4).
Rnds 10–11: Ch 1, sc in each st. Join.
– Count: 56 sc.
Rnd 12: Ch 1, rev sc in each st. Join.
– Count: 56 rev sc. This forms the rolled cream rim.
Fasten off. The pocket measures about 7 in (17.8 cm) wide flat and 4.5 in (11.4 cm) tall.
Tassel (CC)
- Wrap the yarn 40 times around the 5 in (12.7 cm) card.
- Tie the top and cut the bottom loops.
- Wrap the neck 0.75 in (1.9 cm) below the top.
- Trim the tassel to 4.5 in (11.4 cm).
Hanger Cord (MC)
Ch 61. Sl st in the back bump of the 2nd ch from the hook and in each ch across.
– Count: 60 sl st.
– The cord measures about 12 in (30.5 cm).
Assembly
- Panel: Pin the panel behind the frame so its Row 1 edge sits under Rnd 10 of the two lower sides, with the corners aligned. Whipstitch it to the back square only. The trefoil border lies over the panel.
- Pockets: Flatten each pocket. Place one on each lower side with the rim running along the frame edge, the outer end at the side corner and the inner end 1 in (2.5 cm) from the center line. Sew the back wall and base to the panel and the frame’s back. Leave the front wall free.
- Tassel: Attach it through the panel’s corner ch-2 sp.
- Hanger: Sew one end of the cord behind the first side trefoil on each upper side, about 1.25 in (3.2 cm) from the top corner.
Border: Trefoil Picot Edge
Border gauge: 4 sc = 1 in (2.5 cm). Work the border after the joining round and before assembly.
Rnd 11 (MC): Join in any corner sp.
1. Ch 1, (sc, tp, sc) in the corner sp.
2. Sc in next 4 sts, (tp, sc in next 8 sts) 4 times, tp, sc in next 4 sts.
3. Work (sc, tp, sc) in the next corner sp, then repeat from * around. Join.
Count per side: 4 + 32 + 4 = 40 sc worked into Rnd 10’s 40 sts, plus 2 corner sc = 42 sc per side, with 5 side trefoils.
Total: 168 sc and 24 trefoils (20 side + 4 corner).
Why the math works: Rnd 10 has exactly 40 sts per side. Five trefoils spaced 8 sts apart use 32 sts, and the remaining 8 sts split evenly as 4 at each end. That spacing makes each side symmetrical and puts the corner trefoils 4 sts plus the corner sc away from their neighbors. The two corner sc add 0.25 in (0.6 cm) at each end, so the side grows from 10 in (25.4 cm) to 10.5 in (26.7 cm).
Final Blocking
- Remove the mirror before wet blocking. Leave one side of Rnd 10 unfinished until after blocking, or block the frame and back square before joining.
- Mist the lace panel and pockets lightly.
- Pin the panel to a mitered V with 11.75 in (29.8 cm) outer sides and a 3 in (7.6 cm) depth.
- Pin each trefoil open into three petals.
- Stuff the pockets with a rolled towel so they dry rounded.
- Let everything dry completely, then insert the mirror and finish the join.
Final Quality-Control Checklist
- The front and back each have 38 sts per side, and the joined frame has 40.
- The braid is centered on Rnd 5, the join is hidden at the bottom corner, and no CC stitching shows on the cream.
- There are 5 evenly spaced trefoils per side plus 4 corner trefoils.
- The panel has 47 sc per outer side and is sewn straight behind both lower sides.
- The pocket rims are level and the front walls open freely.
- The tassel hangs at the exact bottom point, and the hanger cords are the same length.
Troubleshooting
- The frame ruffles: You are working too loosely. Go down a hook size, or check that each corner has only one (sc, ch 2, sc).
- The frame cups: You are working too tightly. Go up a hook size.
- The braid twists or gaps: Braid with even tension and pin every 1 in (2.5 cm) before sewing.
- The mirror slides: Add a few sc stitches through both layers just outside the mirror’s edges.
- The pockets sag: Use firmer cotton, or line the back wall with felt.
- The panel won’t lie flat: Reblock it. If it still ripples, redo Row 7 with tighter sc.
Care
Spot clean only, with a damp cloth and mild soap, and keep the mirror dry. Reshape the pockets by hand if needed.
Final Notes
Here is the measurement chain to keep in mind:
– The front frame grows from a 5 in (12.7 cm) opening to 9.5 in (24.1 cm) at 38 sts per side, and the back square matches it.
– The joining round brings the frame to 10 in (25.4 cm), and the trefoil border finishes it at 10.5 in (26.7 cm).
– The lace panel runs from 9.75 in (24.8 cm) inner sides to 11.75 in (29.8 cm) outer sides.
– Each pocket is 7 in (17.8 cm) wide.
If every checkpoint matches, the assembled organizer will measure about 15.5 in (39.4 cm) wide by 19 in (48.3 cm) tall, plus the tassel.
Happy crocheting!