

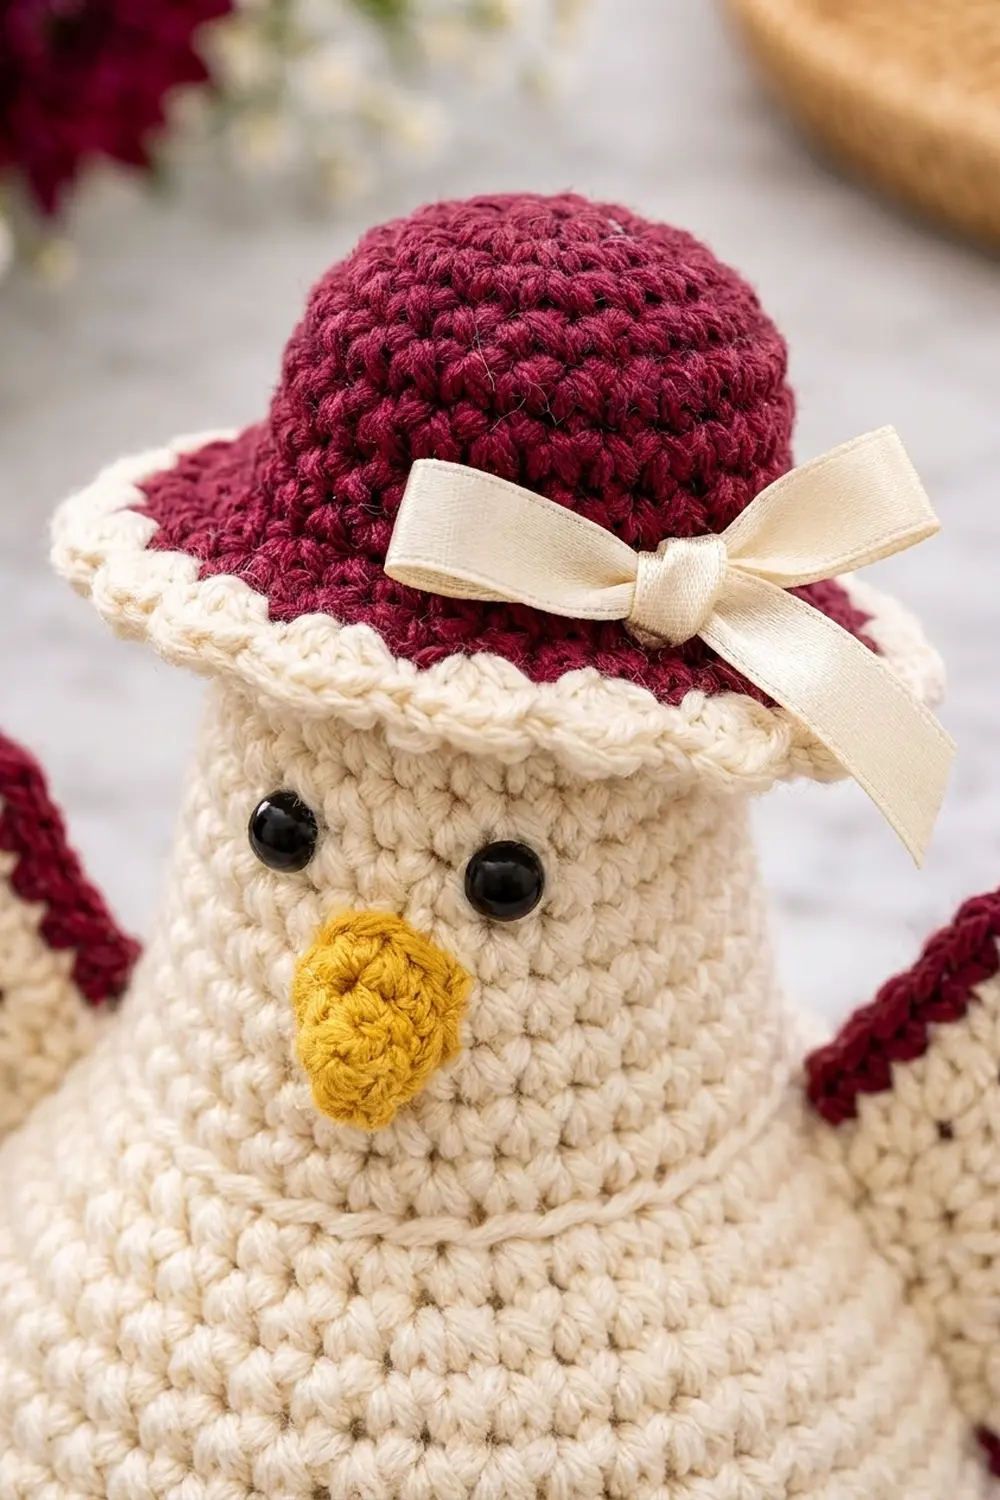
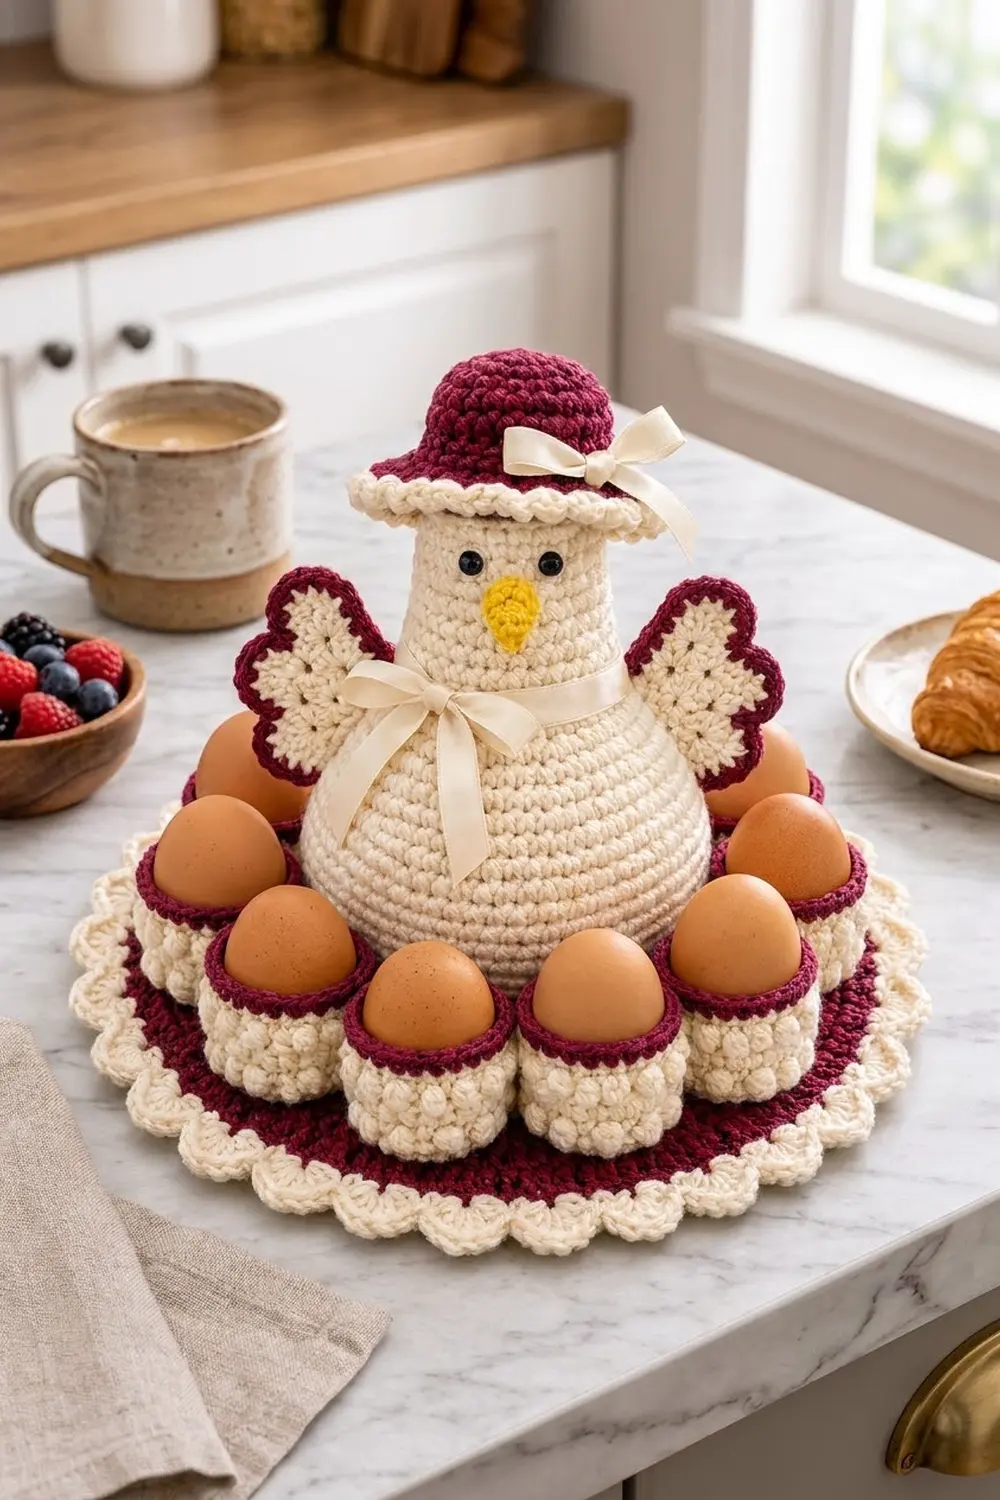
The Bonnet Hen Egg Nest is a tabletop egg holder: a plump cream hen in a burgundy sun hat sits in the middle of a round burgundy base, with ten bobbled egg cups set in a ring around her. A scalloped cream border finishes the base, and satin bows at the hat and neck give it a country-kitchen look.
The palette is deep burgundy and soft cream, with golden yellow for the beak and black safety eyes. Burgundy goes on the base, cup rims, hat crown and wing edges. Cream goes on the body, cups, wing centers, hat brim edging and base border.
This pattern uses US crochet terms. The base measures 10.5 in (26.7 cm) across including the border, and the piece stands about 7 in (17.8 cm) tall with the hat on. Each cup is 2.25 in (5.7 cm) across and holds a medium or large egg.
You’ll crochet 16 pieces: a flat base worked in the round, a hen body worked from the bottom up, ten cups, two wings, a hat and a beak. Then you sew everything to the base, stitch to stitch.
Finished Size and Construction
- Finished size: 10.5 in (26.7 cm) diameter; about 7 in (17.8 cm) tall
- Skill level: Intermediate
- Terminology: US
- Yarn weight: Worsted (#4) cotton
- Hook: 3.5 mm (E-4)
- Number of pieces: 16 (1 base, 1 body, 10 cups, 2 wings, 1 hat, 1 beak)
- Layout: hen in the center, 10 cups in a ring around her
- Piece size: cups 2.25 in (5.7 cm) wide x 1.6 in (4.1 cm) tall; hen 4.2 in (10.7 cm) wide x 5.5 in (14.0 cm) tall
- Base before border: 9 in (22.9 cm)
- Border depth: 0.75 in (1.9 cm)
Materials
Use a smooth, mercerized or combed worsted-weight cotton. Cotton holds the cups and wings in shape and wipes clean easily. Avoid fuzzy yarn, because it hides the popcorns and scallops.
- Burgundy: 70 g, about 119 m
- Cream: 160 g, about 272 m
- Golden yellow: 3 g, about 5 m
All quantities include a margin of about 15%.
Tools and notions:
- 3.5 mm (E-4) crochet hook
- Two 8 mm black safety eyes
- Polyester fiberfill, about 60 g
- Optional: a small fabric pouch of plastic pellets for weight
- 1 yd (91.4 cm) of cream satin ribbon, 3/8 in (1.0 cm) wide
- Stitch markers (at least 12)
- Tapestry needle, scissors, fabric glue
Abbreviations (US Terms)
- ch – chain
- sl st – slip stitch
- sc – single crochet
- hdc – half double crochet
- dc – double crochet
- inc – 2 sc in the same stitch
- dec – sc2tog (invisible decrease recommended)
- BLO / FLO – back loop only / front loop only
- MR – magic ring
- st(s) – stitch(es)
Mini popcorn (mpc): Work 3 dc in the same stitch. Take your hook out of the loop, insert it from front to back through the top of the first dc, catch the dropped loop and pull it through. The mpc counts as 1 stitch and pops toward you, so with the right side facing it sits on the outside of the cup.
Gauge and Checkpoints
Gauge: 20 sc and 22 rounds = 4 in (10.2 cm) in sc worked in the round.
Make one egg cup first. It’s quick and uses every main technique except the border.
Checkpoints:
- Cup Rnd 5 (30 sts): 1.9 in (4.8 cm) across
- Finished cup: 2.25 in (5.7 cm) across the popcorns, 1.6 in (4.1 cm) tall
- Base Rnd 8 (48 sts): 3 in (7.6 cm)
- Base Rnd 16 (96 sts): 6 in (15.2 cm)
- Base Rnd 24 (144 sts): 9 in (22.9 cm)
- Hen at her widest (66 sts): 4.2 in (10.7 cm)
If your cup is too big, switch to a 3.25 mm (D-3) hook, because ten oversized cups won’t fit around the hen. If it’s too small, switch to a 3.75 mm (F-5) hook so a large egg still fits. Keep your tension firm on all pieces so the stuffing doesn’t show.
Egg Cups (Make 10)
Work in cream in continuous rounds, and mark the first stitch of each round.
Rnd 1: 6 sc in MR. (6)
Rnd 2: Inc in each st. (12)
Rnd 3: (Sc, inc) x 6. (18)
Rnd 4: (2 sc, inc) x 6. (24)
Rnd 5: (3 sc, inc) x 6. (30)
This is the flat disc base. Check that it measures 1.9 in (4.8 cm).
Rnd 6: Sc in BLO of each st. (30) This turns the wall up sharply and leaves the 30 front loops of Rnd 5 free for sewing later.
Rnd 7: Sc in each st. (30)
Rnd 8: (2 sc, mpc) x 10. (30)
Rnd 9: Sc in each st. (30)
Rnd 10: (Sc, mpc, sc) x 10. (30) The popcorns sit one stitch over from those in Rnd 8, so the rows are staggered.
Rnd 11: Sc in each st. (30)
Rnd 12: (2 sc, mpc) x 10. (30)
Change to burgundy.
Rnds 13–14: Sc in each st. (30) Sl st in the next st, fasten off and weave in the ends.
You now have three staggered rows of popcorns, 30 in total, under a two-round burgundy rim. Push each popcorn outward with a fingertip.
Base
Work in burgundy in continuous rounds.
Rnd 1: 6 sc in MR. (6)
Rnd 2: Inc in each st. (12)
Rnds 3–24: For Rnd n, work (n−2 sc, inc) x 6, for a total of 6 x n sts. On even-numbered rounds, put half of the first sc group before the first inc and the rest after the last repeat. This staggers the increases so the disc stays round instead of turning into a hexagon.
Key totals: Rnd 8: 48; Rnd 12: 72; Rnd 16: 96; Rnd 18: 108; Rnd 20: 120; Rnd 24: 144.
Measure at Rnds 8, 16 and 24 against the checkpoints. If the disc ruffles, go down a hook size. If it cups, go up one. Fasten off the burgundy.
Hen Body
Work in cream in continuous rounds.
Rnds 1–8: Work as base Rnds 1–8. (48) This forms a flat bottom 3 in (7.6 cm) across.
Rnd 9 (BLO): (7 sc, inc) x 6. (54) This leaves the 48 front loops of Rnd 8 free for sewing to the base.
Rnd 10: Sc in each st. (54)
Rnd 11: (8 sc, inc) x 6. (60)
Rnd 12: Sc in each st. (60)
Rnd 13: (9 sc, inc) x 6. (66)
Rnds 14–20: Sc in each st. (66) This is her widest point, 4.2 in (10.7 cm) across.
Rnd 21: (9 sc, dec) x 6. (60)
Rnd 22: (8 sc, dec) x 6. (54)
Rnd 23: (7 sc, dec) x 6. (48)
Rnd 24: (6 sc, dec) x 6. (42)
Rnd 25: (5 sc, dec) x 6. (36)
Rnd 26: Sc in each st. (36)
Rnd 27: (4 sc, dec) x 6. (30)
Rnds 28–29: Sc in each st. (30)
Rnd 30: (8 sc, dec) x 3. (27)
Rnds 31–33: Sc in each st. (27)
Insert the safety eyes between Rnds 31 and 32, 5 sts apart, on the side opposite the round’s beginning.
Rnd 34: (7 sc, dec) x 3. (24)
Rnds 35–38: Sc in each st. (24) Sl st in the next st and fasten off. The neck opening is 1.5 in (3.8 cm) across.
If you’re using the pellet pouch, put it in the bottom first. Then stuff the body firmly up to the rim. The hat will cover the opening.
Beak
With yellow:
Rnd 1: 4 sc in MR. (4)
Rnd 2: (Sc, inc) x 2. (6)
Rnd 3: Sc in each st. (6) Fasten off and leave a long tail.
Flatten the beak into a teardrop. Sew it centered one round below the eyes, with the point facing down.
Wings (Make 2)
Row 1: With cream, ch 3 (counts as dc), then work 6 dc in the MR. Close the ring but don’t join. Turn. (7)
Row 2: Ch 3 (counts as dc), dc in the same st, 2 dc in each of the next 6 sts. Turn. (14)
Row 3: Ch 3 (counts as dc), dc in the same st, dc in the next st, (2 dc in the next st, dc in the next st) x 6. Turn. (21)
Row 4 (lobes): Sc in st 1, hdc in st 2, 2 dc in each of sts 3–8, hdc in st 9, sc in st 10, sl st in st 11, sc in st 12, hdc in st 13, 2 dc in each of sts 14–19, hdc in st 20, sc in st 21. (33)
The sl st in st 11 forms the dip between the two rounded lobes, which gives the heart shape. The dc posts fanning out from the ring look like feather lines. Fasten off the cream.
Rnd 5 (edging): Join burgundy in the first st of Row 4. Work 33 sc across the lobes, 6 sc down the side (2 per row end), 3 sc in the bottom point and 6 sc up the other side. Sl st to the first sc. (48)
Rnd 6: Sl st loosely in each st. (48) Fasten off.
Each wing measures 2.5 in (6.4 cm) wide x 2.25 in (5.7 cm) tall.
Hat
Rnds 1–5: With burgundy, work as cup Rnds 1–5. (30)
Rnds 6–11: Sc in each st. (30) This forms the crown, 1.9 in (4.8 cm) across.
Rnd 12 (FLO): (Sc, inc) x 15. (45)
Rnd 13: (2 sc, inc) x 15. (60)
Rnd 14: Change to cream. Sc in each st. (60)
Rnd 15: (Sc in the next st, skip 1, 3 dc in the next st, skip 1) x 15. You’ll have 15 small scallops. Sl st to the first sc and fasten off.
The brim measures about 4 in (10.2 cm) across.
Make All Pieces
- Burgundy: 1 base, 10 cup rims, 2 wing edgings, 1 hat crown and brim
- Cream: 1 hen body, 10 cups, 2 wing centers, 1 hat brim edging, 1 base border
- Yellow: 1 beak
Layout (top view; C = cup, H = hen):
          C   C
      C           C
    C      H H      C
    C      H H      C
      C           C
          C   C
Border
Work the border on the base before you join anything, so the scallops are easy to reach.
Border gauge: Each scallop uses 4 base stitches and measures about 0.9 in (2.3 cm) along the outer edge.
To keep count, divide the 144 sts of Rnd 24 into four quarters of 36 sts and mark each quarter.
Rnd 25: Join cream. Sc in each st around, then sl st to the first sc. This is a trim round: 144 sts worked one per existing stitch + 0 added = 144, or 36 per quarter.
Rnd 26: (Sc in the next st, skip 1, 5 dc in the next st, skip 1) x 36. Sl st to the first sc. You’ll have 36 scallops, 9 per quarter, made from 216 sts (36 sc + 180 dc).
Why the math works: Each repeat uses exactly 4 stitches. 144 ÷ 4 = 36 scallops, and 36 ÷ 4 = 9 per quarter, with nothing left over. Spreading 5 dc over 4 stitches gives the edge a gentle ripple without frilling. The border adds 0.75 in (1.9 cm) on each side, so 9 in + 2 x 0.75 in = 10.5 in (26.7 cm).
Joining
Hen to base: Line up the 48 free front loops of hen Rnd 8 with the 48 sts of base Rnd 8, one to one. Whipstitch them together with cream. Because the counts match exactly, the hen sits dead center with no easing.
Cups to base: On base Rnd 18 (108 sts), place 10 markers with these gaps between them: 11, 11, 11, 11, 10, 11, 11, 11, 11, 10 (8 x 11 + 2 x 10 = 108). Each marker is the center of one cup. Whipstitch the 30 free Rnd 5 front loops of each cup to the base, catching base stitches evenly around the circle. Where neighboring rims touch, tack them together with 2 small burgundy stitches, 10 joins in total.
Wings, hat and bows: Sew each wing’s bottom point and lower edges to the hen’s sides between Rnds 22 and 28, with the lobes angled up and outward. Set the hat over the neck and sew the inside of crown Rnd 11 to body Rnd 36 all the way around. Tie 16 in (40.6 cm) of ribbon around Rnd 27 and finish with a bow at the front. Tie a 10 in (25.4 cm) piece into a bow and stitch it to the brim. Seal all cut ends with glue.
Tension: Pull each sewing stitch just snug. Pulling too hard puckers the base, and sewing too loosely lets the cups tilt when they’re full.
Size checkpoint: The cup ring should be about 9 in (22.9 cm) across the outside and leave a center gap of about 4.6 in (11.7 cm) for the hen.
Final Blocking
- Lightly mist the base with water.
- Pin it flat as a circle 10.5 in (26.7 cm) across.
- Pin each scallop open at its center dc.
- Pin the wings flat with both lobes opened out.
- While the cups are still damp, shape each one around an egg or a 1.75 in (4.4 cm) round object.
- Let everything air-dry completely. Keep heat away from the safety eyes.
Final Quality-Control Checklist
- The base lies flat and measures 10.5 in (26.7 cm).
- There are 36 scallops, 9 per quarter.
- Every cup has 30 popcorns, all facing outward.
- The cups are evenly spaced, with neighboring rims touching.
- The hen is centered and upright, with level eyes and a centered beak.
- The wings match each other.
- The hat completely covers the neck opening.
- The bows are secure and the ribbon ends are sealed.
Troubleshooting
- Popcorns sink inward: Close each one by inserting the hook from front to back, then push it out with a fingertip.
- Base ruffles: Use a smaller hook, and check that you’re adding only 6 increases per round.
- Base looks hexagonal: Stagger the increases on alternate rounds.
- Hen leans: Stuff the bottom more firmly or add the pellet pouch.
- Cups don’t fit in the ring: Your gauge is too loose. Remake the cups with a smaller hook.
- Scallops are uneven: Recount the quarters. Each one needs exactly 36 sts.
Care
Spot clean with a damp cloth and mild soap, then air-dry flat. Don’t machine-wash it, because the safety eyes and ribbon won’t hold up.
Final Notes
The measurements build on each other. Start with the cup gauge: 30 sts should measure 1.9 in (4.8 cm). The base then grows to 144 sts and 9 in (22.9 cm). The hen’s 48-stitch bottom sews stitch for stitch to base Rnd 8, and the ten cups are centered on base Rnd 18. Finally, the 36-scallop border brings the base out to 10.5 in (26.7 cm). If each checkpoint matches, ten eggs will fit neatly around your hen.
Happy crocheting!