

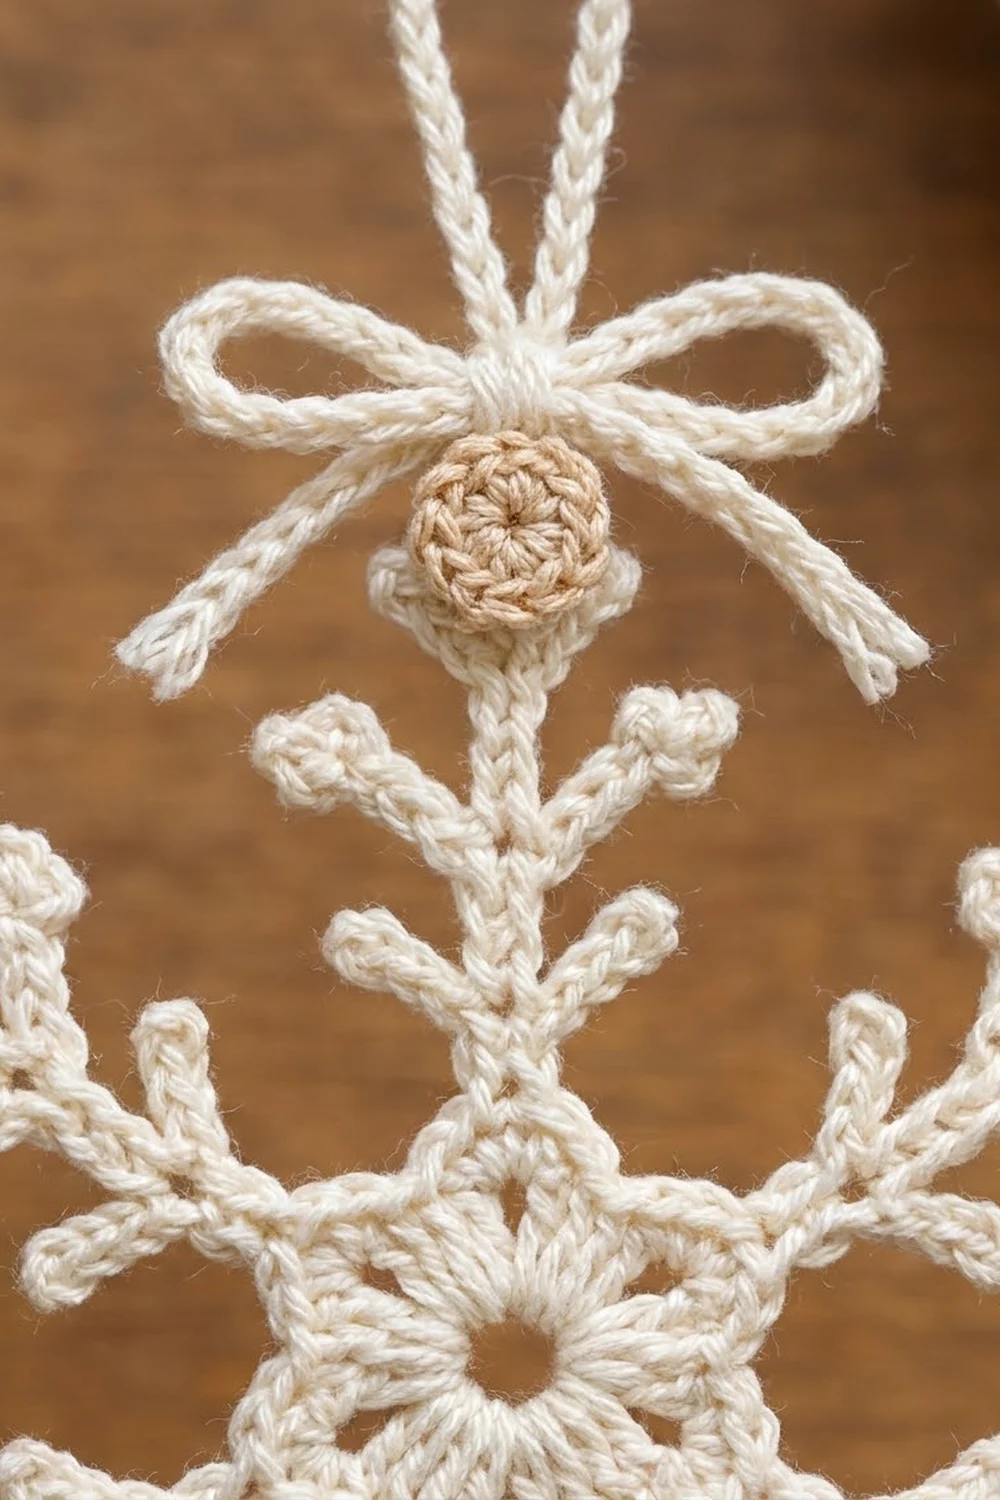
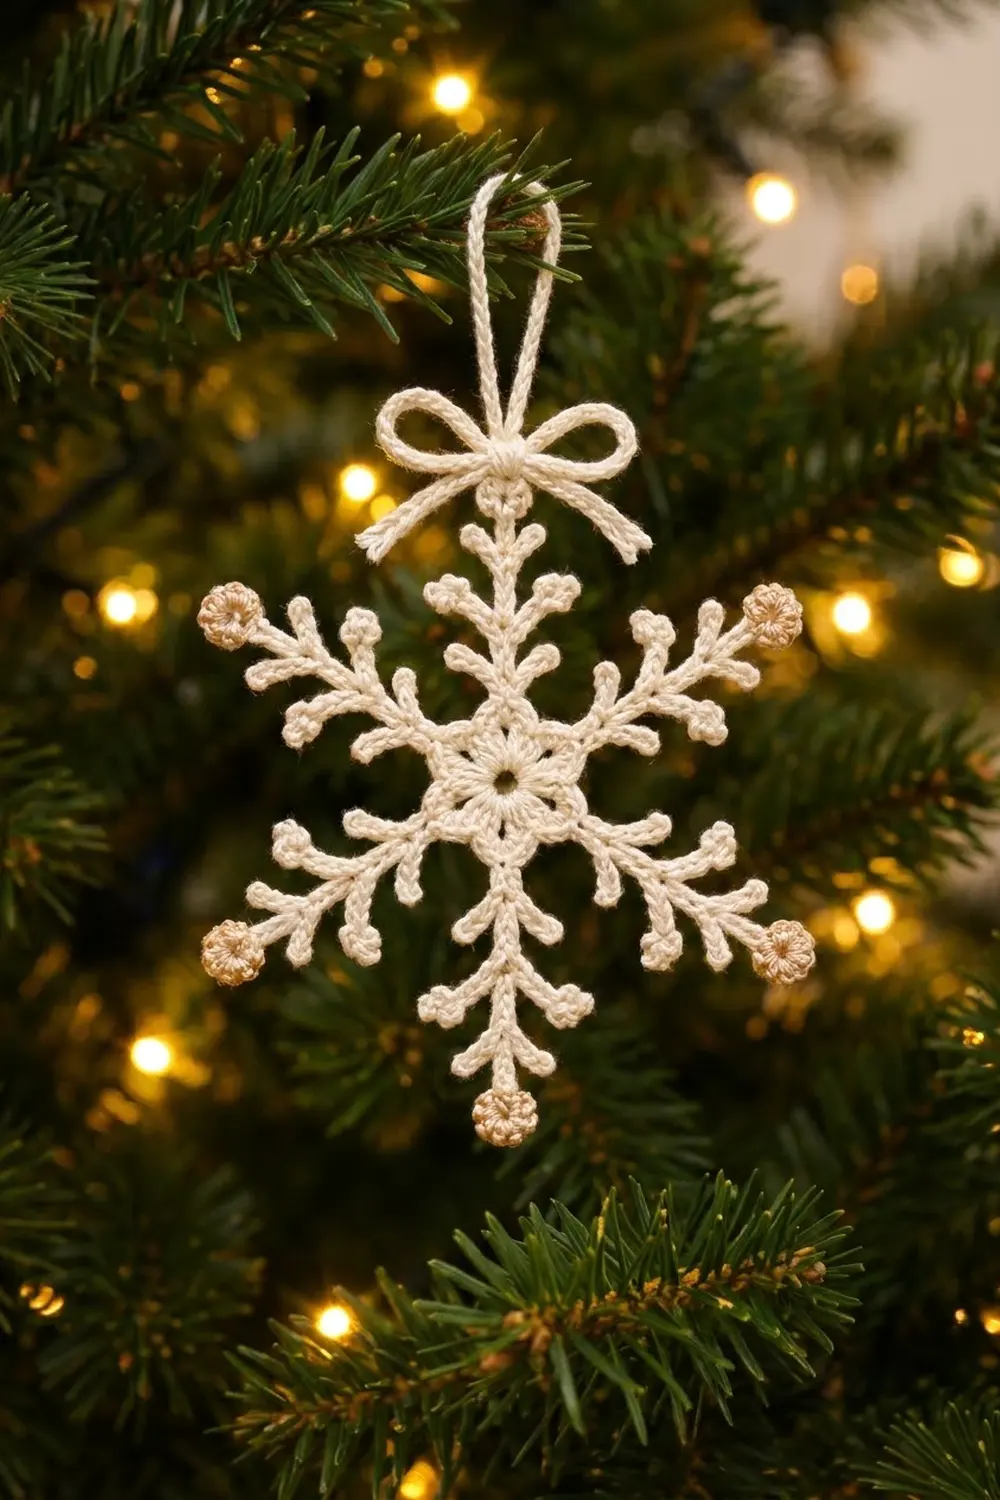
The Frosted Bloom Snowflake is a delicate six-armed ornament with a little flower at its heart. Each arm is a straight stem with three pairs of branches. Every branch ends in a tiny picot bump, which makes the snowflake look frosty and slightly beaded.
Most of the snowflake is soft ivory cotton. A light tan rosette at the end of each arm adds a warm, gilded touch without stealing attention from the lacy shape. The top arm carries an ivory hanging loop and a tied chain-cord bow, so it’s ready for the tree.
The pattern uses US crochet terms. The finished snowflake measures 5.5 in (14.0 cm) from tip to tip. With the hanging loop, it is about 7.25 in (18.4 cm) tall.
You’ll start with a three-round flower center. All six arms are then worked in one continuous round: each arm goes out along a chain and comes back down it. Tan rosettes are added at the tips as the edging, and the hanging loop and bow finish the ornament.
Finished Size and Construction
- Finished size: 5.5 in (14.0 cm) tip to tip, or 7.25 in (18.4 cm) tall including the loop
- Skill level: Easy-intermediate
- Terminology: US crochet terms
- Yarn weight: Sport-weight (2) mercerized cotton
- Hook: 2.5 mm
- Number of pieces: 1 snowflake. The hanging loop is worked directly onto it, and the bow is a short cord tied on.
- Layout: Six arms radiating from a six-petal center
- Center size: 1.5 in (3.8 cm) across the petal tips
- Size before edging: 5.0 in (12.7 cm) tip to tip (ivory only)
- Edging depth: Each tan rosette adds about 0.25 in (0.6 cm) to its arm
Materials
Choose a smooth, mercerized cotton in sport weight. Mercerized cotton gives the crisp stitch definition that makes the picots read as little beads, and it takes starch very well. Avoid fuzzy or acrylic yarns, because they blur the fine branches and won’t hold a blocked shape.
- Color A, ivory: 8 g (about 24 m)
- Color B, light tan or beige: 2 g (about 6 m)
Both quantities include a margin of roughly 30 percent for checking gauge, a practice arm, and weaving in ends. Leftovers from a larger project are often enough.
Tools:
– 2.5 mm crochet hook
– Tapestry needle
– Scissors
– Blocking board or foam mat
– Rust-proof pins (at least 40)
– Fabric starch or a 1:1 mix of white craft glue and water
– Small ruler or measuring tape
Abbreviations (US Terms)
- ch: chain
- sl st: slip stitch
- sc: single crochet
- hdc: half double crochet
- dc: double crochet
- sk: skip
- sp: space
- st(s): stitch(es)
- MR: magic ring
Special stitch (picot): Ch 3, sl st in 3rd ch from hook. Each picot makes one small round bump.
Gauge and Checkpoints
Lace gauge is easier to check with checkpoint measurements than with a swatch. Treat your first center as the test piece. Measure it before starting the arms, then make one complete arm and measure it before you continue around.
- After Round 1: 0.75 in (1.9 cm) across.
- After Round 3: 1.5 in (3.8 cm) across, from one petal tip to the opposite petal tip.
- One finished arm (stem plus tip ring): 1.75 in (4.4 cm) from the petal tip to the outer edge of the tip ring, measured lightly stretched.
- Before edging: 5.0 in (12.7 cm) tip to tip after pinning.
- After edging and blocking: 5.5 in (14.0 cm) tip to tip.
If it’s too big: Switch to a 2.25 mm hook, or keep your chains snugger. Loose chains are the most common cause of long arms.
If it’s too small: Switch to a 2.75 mm hook. If only the arms are short, try working the stem chains more loosely while keeping the same hook for the center.
Center Flower
Work with Color A.
Round 1: Make a MR. Ch 3 (counts as dc), then work 11 dc into the ring. Pull the ring snug, but leave a small open hole at the center about 0.25 in (0.6 cm) wide. Sl st to the top of the beginning ch-3. (12 dc)
Checkpoint: 0.75 in (1.9 cm) across.
Round 2: Ch 1, sc in the same st as the join, ch 3, sk next dc. Sc in next dc, ch 3, sk next dc. Repeat from * 4 more times. Sl st to the first sc. (6 sc, 6 ch-3 sps)
Round 3 (petal round): Sl st into the first ch-3 sp. Work (sc, hdc, dc, hdc, sc) in each ch-3 sp around. Sl st to the first sc. (6 petals; 30 sts: 12 sc, 12 hdc, 6 dc)
Checkpoint: 1.5 in (3.8 cm) across the petal tips. Do not fasten off.
Each petal now has one dc at its tip. These 6 dc are the bases for the six arms. Between two neighboring tip dc there are exactly 4 sts (hdc, sc, sc, hdc), and the arm round relies on that count.
Arms
All six arms are worked in one continuous round. Each arm goes out along a chain, forms a tip ring, and comes back down the chain, adding branches as it goes.
Set-up: Sl st in the next hdc and the next dc. You are now at the tip dc of the first petal.
Round 4 (arm round):
*Sc in the tip dc.
Stem: Ch 18.
Tip ring: Ch 4, sl st in 4th ch from hook to form a small ring.
Back down the stem (work into the 18 stem ch only, ignoring the ring):
- Sc in each of next 3 ch.
- Short branch pair: Ch 2, picot, sl st in each of the 2 branch ch. Repeat once more, so the two branches lie on opposite sides of the stem.
- Sc in each of next 4 ch.
- Medium branch pair: Ch 3, picot, sl st in each of the 3 branch ch. Repeat once more.
- Sc in each of next 4 ch.
- Long branch pair: Ch 4, picot, sl st in each of the 4 branch ch. Repeat once more.
- Sc in each of the last 7 ch, ending at the base of the stem.
Sl st in the same tip dc where the arm began.
Move to the next petal: Sl st in each of the next 4 sts (hdc, sc, sc, hdc), then sl st in the next tip dc.*
Repeat from * to * 5 more times. On the final repeat, finish with the sl st into the first tip dc. Fasten off and weave in.
Stem check: 3 + 4 + 4 + 7 = 18 sc. That matches the 18 stem chains, so the back pass uses every stem chain exactly once.
Count per arm: 18 sc on the stem, 6 branches (2 short, 2 medium, 2 long), 6 picots, and 1 tip ring.
Round total: 6 arms, with 108 stem sc, 36 branches, 36 ivory picots, and 6 tip rings.
The short branches sit nearest the tip and the long ones nearest the center, which gives each arm a tapered, tree-like silhouette. Returning along each branch with sl sts keeps the branches thin. Working the stem back pass in sc gives it a slightly thicker, raised spine.
Keep each branch pair snug against the stem before moving on. A loose sl st at a branch base leaves a gap that is hard to block out later.
Checkpoint: one arm measures 1.75 in (4.4 cm) from the petal tip to the outer edge of its tip ring. Pinned out, the ivory snowflake measures 5.0 in (12.7 cm) tip to tip, which is 1.5 in (3.8 cm) of center plus 1.75 in (4.4 cm) for each of the two opposite arms.
Edging: Tan Tip Rosettes
On this snowflake, the edging is just the six small rosettes at the arm tips. Each one is worked separately into its tip ring with Color B.
Edging gauge: Each finished rosette is 0.5 in (1.3 cm) across and extends about 0.25 in (0.6 cm) beyond the ivory tip ring.
Rosette (work one on each of the 6 arms):
Join Color B with a sl st in any tip ring. Ch 1. Sc in the ring, picot. Repeat from * 5 more times, so that 6 sc and 6 picots go into the same ring. Sl st to the first sc. Fasten off, leaving a 4 in (10.2 cm) tail.
Count per arm: 6 sc + 6 picots = 12 elements.
Edging total: 36 sc and 36 tan picots across all 6 arms.
Why the math works: A ch-4 ring holds 6 short sc comfortably at this gauge. The stitches lie flat without crowding or leaving gaps. A picot after every sc spaces six bumps evenly around the circle, so each rosette repeats the snowflake’s six-fold symmetry. Each rosette adds 0.25 in (0.6 cm) at each end of an axis, so 5.0 in (12.7 cm) becomes 5.5 in (14.0 cm).
Weave each tan tail back through its own rosette only, so no tan shows on the ivory stem. With 2 tails per rosette, that’s 12 tan ends in total.
Checkpoint: 5.5 in (14.0 cm) tip to tip after pinning.
Hanging Loop and Bow
Choose any arm to be the top arm.
Hanging loop: Join Color A with a sl st at the base of the top rosette, where the tip ring meets the stem. Ch 36, then sl st into the same st to close the loop. Turn, and sl st in each of the 36 ch around the loop. Sl st into the joining st and fasten off. (36 ch, 36 sl st)
The finished loop is about 3.5 in (8.9 cm) around and hangs about 1.75 in (4.4 cm) above the snowflake. Its slip-stitch spine makes a firm cord that holds an oval shape.
Bow cord: With Color A, ch 60. Sl st in the back bump of the 2nd ch from hook, then in the back bump of each ch across. (59 sl st) Fasten off and weave both tails into the cord itself. The cord should be about 6 in (15.2 cm) long.
Tying the bow: Wrap the cord once around the base of the hanging loop, just above the top rosette. Tie a standard bow with each bow loop about 0.75 in (1.9 cm) long and tails about 1 in (2.5 cm) long, angled down and outward. Tighten the knot. Then make a single stitch with Color A through the knot and into the top rosette to anchor the bow.
Final Blocking
- Soak the snowflake in cool water for a few minutes. Press out the water gently in a towel; don’t wring it.
- Dip it in fabric starch or the glue mix, then blot off the excess so the openings don’t fill in.
- Lay it on the blocking board. Pin the center ring open with one pin, then pin the six petal tips into a neat circle 1.5 in (3.8 cm) across.
- Pin each tip rosette so the arms sit 60 degrees apart and measure 5.5 in (14.0 cm) tip to tip. Measure all three pairs of opposite tips.
- Straighten each stem. Pin each branch so it angles about 45 degrees toward the tip, and put one pin through each tan picot to open it into a round bump.
- Pin the bow loops flat and fan out the tails.
- Let it dry completely, usually 12 to 24 hours, then unpin.
Final Quality-Control Checklist
- Center hole is open, about 0.25 in (0.6 cm) wide
- Six even petals, each with an arm starting from its tip dc
- Each arm has 18 stem sc and 3 branch pairs (short, medium, long, from the tip inward)
- All 36 ivory picots are round and open
- Six tan rosettes, each with 6 sc and 6 picots
- Measures 5.5 in (14.0 cm) tip to tip across all three axes
- Hanging loop is firmly attached to the top arm and the bow knot is anchored
- No visible ends, with tan tails hidden inside the rosettes
Troubleshooting
Arms curl or twist. The stem chains were tighter than the back pass. Re-block with extra starch and pin along the stem every 0.5 in (1.3 cm).
Center cups. The magic ring was pulled too tight. Loosen it slightly before weaving in the tail.
Center ruffles. The Round 1 dc are too tall or loose. Remake Round 1 with a 2.25 mm hook.
Branches are lopsided. Count chains carefully on each side; both branches in a pair must use the same number of chains.
Rosettes ruffle. The tip ring is too small. Make the ring with ch 5 next time, or work the rosette sc more loosely.
Snowflake is too large. Go down a hook size, and check the Round 3 checkpoint before starting the arms.
Bow slips down the loop. Add a second anchoring stitch through the knot.
Care
Hand wash in cool water with mild soap, then re-starch and re-block to restore the shape. Store flat between sheets of tissue paper, away from humidity.
Final Notes
The measurement chain is short. Round 1 is 0.75 in (1.9 cm) across and Round 3 is 1.5 in (3.8 cm). Each arm adds 1.75 in (4.4 cm), bringing the ivory snowflake to 5.0 in (12.7 cm). The tan rosettes bring it to 5.5 in (14.0 cm), and the loop makes the finished ornament 7.25 in (18.4 cm) tall. If each checkpoint matches, the finished snowflake will match too.
Make a few to hang on the tree, give as a small gift, or tie onto a wrapped package.
Happy crocheting!