
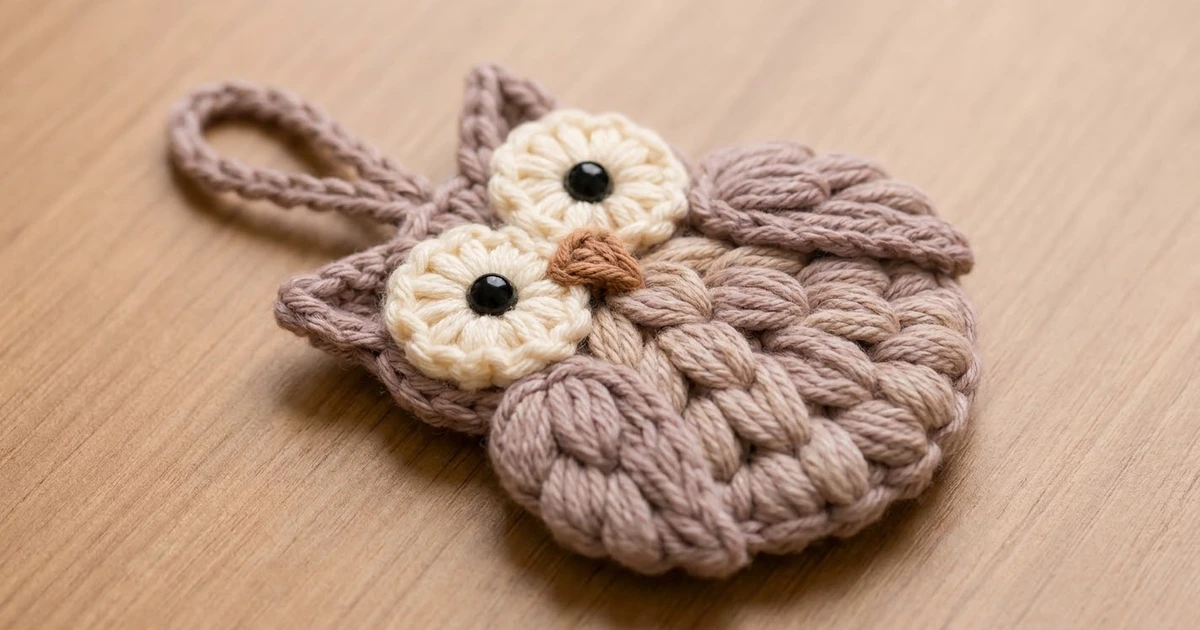
This little owl is a flat, single-layer ornament for the tree. Rows of puff-stitch “feathers” cover the body in a staggered brick pattern, which makes the front soft and scalloped. Pointed ears, big cream eyes, a small brown beak and two textured wings finish the face.
The colors are quiet and natural. The body, ears, wings and loop are a dusty mauve-taupe. The eyes are cream, the beak is warm brown, and the eye centers are black safety eyes. The owl suits a rustic tree, and it also works as a gift tag.
This pattern uses US crochet terms. The finished owl is 3.65 in (9.3 cm) wide and 4.4 in (11.2 cm) tall. The hanging loop adds about 1.5 in (3.8 cm).
You crochet the body flat in rows from the bottom up and shape the ears on top. Then you work one round of sc around the whole outline. You make the eyes, beak and wings separately and sew them on. The loop goes on last.
Finished Size and Construction
- Finished size: 3.65 in (9.3 cm) x 4.4 in (11.2 cm), plus a 1.5 in (3.8 cm) loop
- Skill level: Easy (confident beginner)
- Terminology: US crochet terms
- Yarn weight: Worsted (#4)
- Hook: 4.0 mm (US G-6)
- Number of pieces: 1 ornament made from 6 parts: 1 body, 2 eyes, 2 wings and 1 beak
- Layout: A single ornament with appliqués on the front. No motifs are joined.
- Body size before border: 3.25 in (8.3 cm) wide x 4.0 in (10.2 cm) tall, including the ears
- Border depth: 1 round of sc, 0.2 in (0.5 cm) on every edge
- Appliqués: eyes are 1.1 in (2.8 cm) across. Each wing is 2.1 in (5.3 cm) x 1.1 in (2.8 cm). The beak is 0.5 in (1.3 cm) x 0.4 in (1.0 cm).
Materials
Use a smooth worsted-weight yarn. Cotton or a cotton blend shows the puffs most clearly, and acrylic gives you a lighter ornament. Avoid fuzzy yarn, because it hides the feathers.
- Color A, dusty mauve-taupe (body, border, wings, loop): 25 g, about 50 m
- Color B, cream (eyes): 5 g, about 10 m
- Color C, warm brown (beak): 2 g, about 4 m
These amounts include a margin for your test piece and for the extra yarn that puff stitches use.
Tools:
- 4.0 mm (US G-6) hook
- 2 black 8 mm safety eyes with backs
- Tapestry needle and scissors
- 2-3 stitch markers
- Rustproof pins and a blocking mat or folded towel
- Spray bottle
Abbreviations (US Terms)
- ch – chain
- sl st – slip stitch
- sc – single crochet
- hdc – half double crochet
- dc – double crochet
- tr – treble crochet
- sc2tog – single crochet 2 together
- BLO – back loop only
- st(s) – stitch(es)
- RS / WS – right side / wrong side
- PS – puff stitch
Puff stitch (PS):
1. Yarn over, insert the hook in the st, yarn over and pull up a loop to hdc height. Do this 3 times in the same st, so you have 7 loops on the hook.
2. Yarn over and draw through all 7 loops.
3. Ch 1 to lock.
The locking ch-1 is part of the puff, not a separate st. On the next row, work 1 sc into the top of the puff.
Gauge and Checkpoints
Gauge: 16 sc and 20 rows = 4 in (10.2 cm) with the 4.0 mm hook. That is 4 sc per inch. One sc row is 0.2 in (0.5 cm) tall, and one puff row is 0.3 in (0.8 cm) tall.
Use the body as your test piece. It is small, and every measurement in this pattern starts from it.
Checkpoints:
- After Row 1: 5 sc = 1.25 in (3.2 cm) wide.
- After Row 10: 13 sts = 3.25 in (8.3 cm) wide.
- After Row 14: 3.4 in (8.6 cm) tall. That is 8 sc rows x 0.2 in plus 6 puff rows x 0.3 in.
- After the ears: 4.0 in (10.2 cm) tall.
- After the border: 3.65 in (9.3 cm) x 4.4 in (11.2 cm).
If the body is too big, start again with a 3.75 mm hook. If it is too small, use a 4.5 mm hook. Pull every puff up to the same height. Uneven puffs throw off the height more than anything else.

Body
Use Color A. Row 1 is a WS row. The even rows from 2 to 12 are puff rows. They are RS rows, so the puffs face you. Turn at the end of every row. The ch 1 at the start of a row doesn’t count as a st.
Row 1 (WS): Ch 6, sc in 2nd ch from hook and in each ch across, turn. (5 sc)
Row 2 (RS): Ch 1, sc in first st, PS in next st, sc in next st, repeat from * once more, turn. (5 sts: 2 PS, 3 sc)
Row 3 (increase): Ch 1, 2 sc in first st, sc in next 3 sts, 2 sc in last st, turn. (7 sc)
Row 4: Ch 1, sc in first st, PS in next st, sc in next st, repeat from * 2 more times, turn. (7 sts: 3 PS, 4 sc)
Row 5 (increase): Ch 1, 2 sc in first st, sc in next 5 sts, 2 sc in last st, turn. (9 sc)
Row 6: Ch 1, sc in first st, PS in next st, sc in next st, repeat from * 3 more times, turn. (9 sts: 4 PS, 5 sc)
Row 7 (increase): Ch 1, 2 sc in first st, sc in next 7 sts, 2 sc in last st, turn. (11 sc)
Row 8: Ch 1, sc in first st, PS in next st, sc in next st, repeat from * 4 more times, turn. (11 sts: 5 PS, 6 sc)
Row 9 (increase): Ch 1, 2 sc in first st, sc in next 9 sts, 2 sc in last st, turn. (13 sc)
Row 10: Ch 1, sc in first st, PS in next st, sc in next st, repeat from * 5 more times, turn. (13 sts: 6 PS, 7 sc)
Each increase row shifts the stitches over by one. That puts each new row of puffs between the puffs below and creates the brick pattern.
Row 11: Ch 1, sc in each st across, turn. (13 sc)
Row 12: Ch 1, sc in first 2 sts, PS in next st, sc in next st, repeat from * 4 more times, sc in last st, turn. (13 sts: 5 PS, 8 sc)
With no increase in Row 11, the 2 opening sc keep these puffs staggered.
Row 13 (decrease): Ch 1, sc2tog, sc in next 9 sts, sc2tog, turn. (11 sc)
Row 14: Ch 1, sc in each st across. Fasten off. (11 sc)
Rows 13 and 14 form the plain head area. The eyes will cover most of it.
Ears
Use stitch markers to divide the 11 sts of Row 14, counting from the WS. Ear A uses sts 1-3. Sts 4-8 stay unworked. Ear B uses sts 9-11.
Ear A, Row 1: With the WS facing, join Color A in st 1. Ch 1, sc in the same st and in the next 2 sts, turn. (3 sc)
Ear A, Row 2: Ch 1, sc2tog, sc in last st, turn. (2 sts)
Ear A, Row 3: Ch 1, sc2tog. Fasten off. (1 st)
Ear B: Join in st 9 with the WS facing and repeat Rows 1-3. (3, then 2, then 1 st) Fasten off.
The body now measures 3.25 in (8.3 cm) x 4.0 in (10.2 cm).
Border
Border gauge: Work 1 sc per row end on the sides and 1 sc per st on the top and bottom edges. The border is 0.2 in (0.5 cm) deep, so it adds 0.4 in (1.0 cm) to both the width and the height.
Round 1: With the RS facing, join Color A in the first foundation ch at the bottom right corner. Work these sections in order:
- Bottom edge: Ch 1, 2 sc in the first ch, sc in the next 3 chs, 2 sc in the last ch. (7 sc)
- Side 1: Work 1 sc in the end of each row from Row 1 to Row 14. (14 sc)
- First ear: Work 1 sc in the end of ear Row 1 and 1 sc in the end of ear Row 2. Work (sc, ch 2, sc) in the tip st. Then work 1 sc in the end of ear Row 2 and 1 sc in the end of ear Row 1. (6 sc + ch-2 tip)
- Top edge: Work 1 sc in each of the 5 unworked sts of Row 14. (5 sc)
- Second ear: Work as for the first ear. (6 sc + ch-2 tip)
- Side 2: Work 1 sc in the end of each row from Row 14 down to Row 1. (14 sc)
Sl st to the first sc. (52 sc + 2 ch-2 tips)
Check: 7 + 14 + 6 + 5 + 6 + 14 = 52.
Why the math works: Along each side, Rows 1-10 slope outward by 1.0 in (2.5 cm), and Rows 11-14 rise almost straight up. Together they make a side edge about 3.6 in (9.1 cm) long. Fourteen sc at 4 per inch cover 3.5 in (8.9 cm). That is within 0.1 in (0.3 cm) of the edge, so the side lies flat. The 2 extra sc at each bottom corner round off the base, and the ch-2 tips sharpen the ears.
Hanging Loop
Don’t fasten off. Sl st along the border to the 3rd of the 5 top sc, which is the center top.
- Ch 18, which is about 3 in (7.6 cm) long.
- Sl st into the same sc to close the loop.
- Sl st into each of the 18 ch to make a firm cord, then sl st into the center sc again.
- Fasten off.
The loop stands about 1.5 in (3.8 cm) tall.
Eyes (Make 2)
Use Color B.
Round 1: Make a magic ring. Ch 2 (doesn’t count as a st) and work 12 dc in the ring. Pull the ring almost closed, leaving a small hole for the safety eye. Sl st to the first dc. (12 dc) The eye is now 0.75 in (1.9 cm) across.
Round 2: Ch 1, sc in next st, 2 sc in next st, repeat from * 5 more times. Sl st to the first sc. (18 sc) Fasten off and leave a 12 in (30.5 cm) tail.
The finished eye is 1.1 in (2.8 cm) across. The dc posts look like spokes around the center.
Beak (Make 1)
Use Color C.
Row 1: Ch 3, sc in 2nd ch from hook and in the next ch, turn. (2 sc)
Row 2: Ch 1, sc2tog. (1 st) Fasten off and leave a 6 in (15.2 cm) tail.
The beak is a triangle 0.5 in (1.3 cm) wide x 0.4 in (1.0 cm) tall.
Wings (Make 2)
Use Color A. Each wing is a leaf shape worked around both sides of a chain. The tall dc and tr posts make the lengthwise ridges.
Round 1: Ch 9. Skip the ch closest to the hook. Then work along the remaining 8 chs:
- First side: sc in the next ch, hdc in the next ch, dc in the next 2 chs, tr in the next 2 chs, dc in the next ch. (7 sts)
- Rounded end: 5 dc in the last ch. (5 sts)
- Second side: Working in the free loops on the other side of the chain: dc in the next ch, tr in the next 2 chs, dc in the next 2 chs, hdc in the next ch, sc in the last ch. (7 sts)
- Point: Ch 2 and sl st to the first sc.
(19 sts + ch-2 tip)
Round 2: Ch 1. Working in BLO: sc in the next 7 sts, 2 sc in each of the next 5 sts, sc in the next 7 sts, then (sc, ch 2, sc) in the ch-2 tip. Sl st to the first sc. (26 sc + ch-2 tip)
Check: 7 + 10 + 7 + 2 = 26. Fasten off and leave a 12 in (30.5 cm) tail.
Each wing is 2.1 in (5.3 cm) x 1.1 in (2.8 cm). The BLO round leaves a raised ridge just inside the outline.
Assembly
- Safety eyes: Push a safety eye through the center of each cream eye, then through the body, and fix the back on the WS. Place the eye centers at Row 13, each 0.55 in (1.4 cm) from the center line, so the eyes touch in the middle. Together they span 2.2 in (5.6 cm) of the 2.75 in (7.0 cm) head.
- Eyes: Whipstitch Round 2 of each eye to the body.
- Beak: Center the beak just below where the eyes meet, with the point facing down over Row 12. Sew around all 3 edges.
- Wings: Put the rounded end of each wing at Row 11 and the tip near Row 5, angled slightly outward. Let the outer edge overlap the border by 0.1 in (0.3 cm). Sew around the upper half of the wing and leave the tip loose.
- Weave in all ends on the WS.
If the owl will be near small children, embroider the eyes with black yarn instead of using safety eyes.
Final Blocking
- Mist the owl until it is damp but not soaked.
- Lay it face up on the mat.
- Pin the outline to 3.65 in (9.3 cm) x 4.4 in (11.2 cm).
- Pin each ear into a sharp point.
- Pinch any flattened puffs back into shape. Never press them.
- Pin the loop straight up.
- Let the owl dry completely before unpinning.
Never iron acrylic. Heat flattens the puffs permanently.
Final Quality-Control Checklist
- Body is 3.25 in (8.3 cm) x 4.0 in (10.2 cm) before the border
- Border has 52 sc plus 2 ch-2 tips
- Finished owl is 3.65 in (9.3 cm) x 4.4 in (11.2 cm)
- Puffs are staggered and all the same height
- Ears match and come to points
- Eyes are 1.1 in (2.8 cm) across, touch in the middle and sit level
- Beak is centered and points down
- Wings mirror each other at the same height
- Loop is centered and firm
- All ends are woven in
Troubleshooting
Flat puffs: Pull every loop to hdc height and always lock the puff with ch 1.
Puffs stacked instead of staggered: Check that Row 12 starts with 2 sc.
Ruffled sides: Work exactly 1 sc per row end, 14 per side.
Sides pulling in: Work the border with a hook one size larger.
Blunt ears: Make sure each tip has (sc, ch 2, sc), then pin the points while blocking.
Large hole in the eye: Pull the magic ring tighter before you join.
Curling wings: Work Round 2 more loosely and block the wings flat.
Care
Spot clean with mild soap and cool water, reshape the owl and let it dry flat. Store it flat so the ears and loop keep their shape.

Final Notes
Each measurement leads to the next one:
- Five sc make a base 1.25 in (3.2 cm) wide.
- Increasing to 13 sts makes the widest row 3.25 in (8.3 cm).
- Fourteen body rows plus 3 ear rows make the body 4.0 in (10.2 cm) tall.
- One border round of 52 sc adds 0.2 in (0.5 cm) on every edge, for a finished size of 3.65 in (9.3 cm) x 4.4 in (11.2 cm).
The 1.1 in (2.8 cm) eyes and 2.1 in (5.3 cm) wings are sized to fit that body. If your gauge matches, everything lines up.
Happy crocheting!