

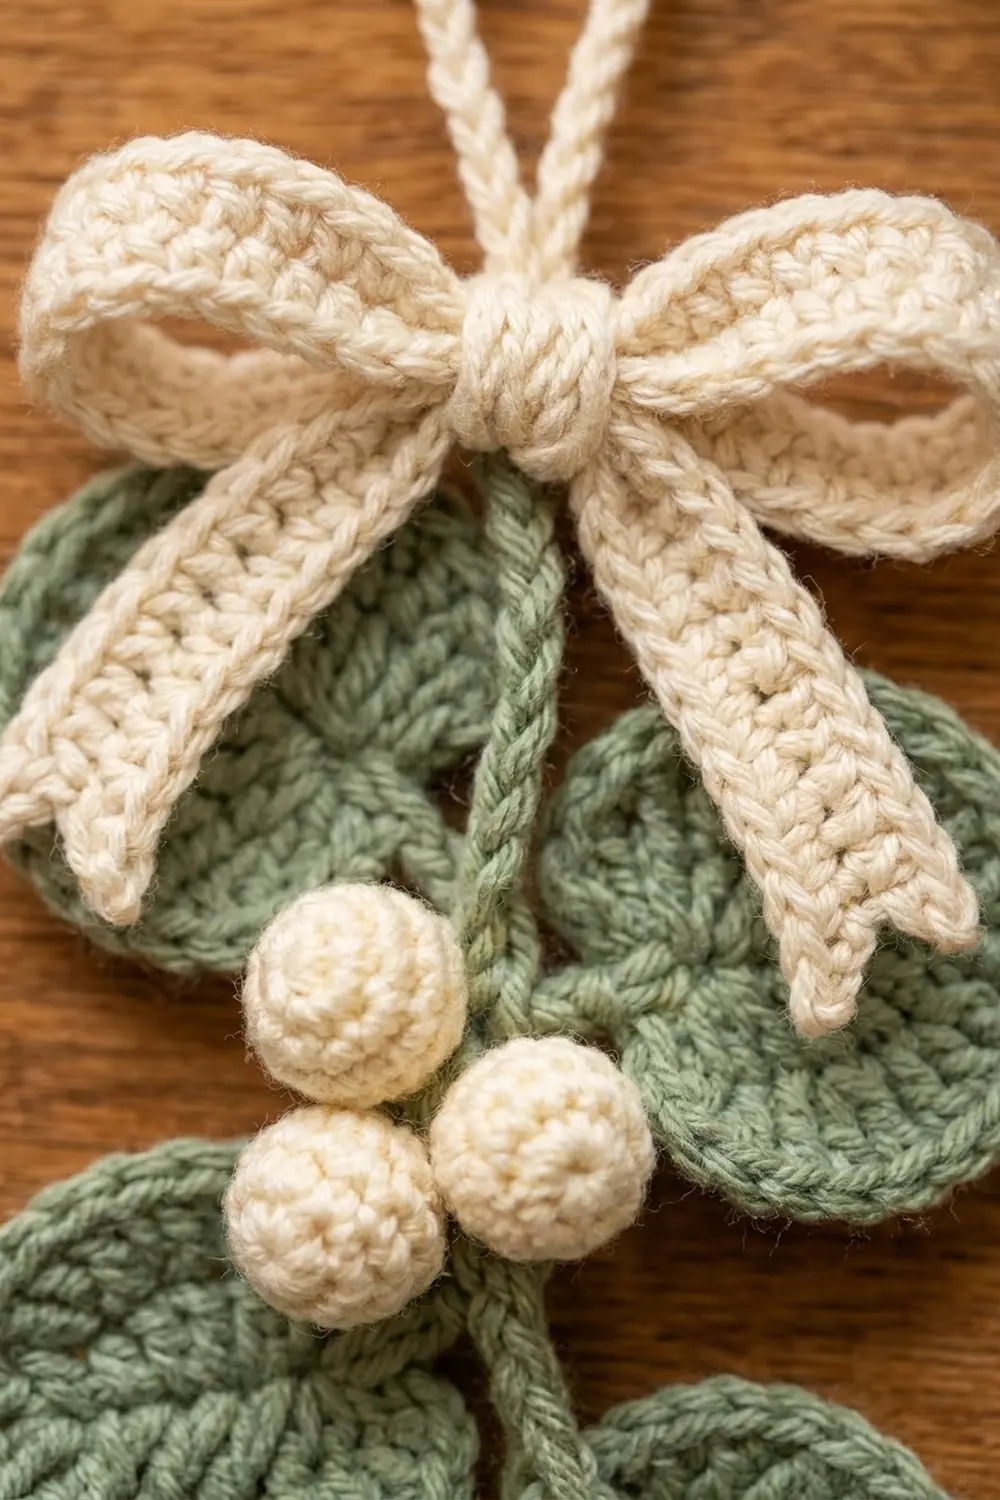
This little hanging ornament looks like a fresh sprig of eucalyptus tied up for the holidays. Seven round sage-green leaves sit in alternating pairs along a thin slip-stitch stem. Three cream berries are tucked in near the top, and a soft cream bow with a hanging loop finishes it off.
The colors are quiet and natural: sage green for the leaves and stem, and cream for the berries, bow and loop. The simple farmhouse style works on a tree, a door handle, a gift box or a wreath.
This pattern uses US crochet terms. The finished ornament is about 4 in (10.2 cm) wide and 8.5 in (21.6 cm) tall from the top of the bow to the tip of the bottom leaf. The hanging loop rises about 2 in (5.1 cm) above the bow.
The construction is simple. You crochet seven flat round leaves, one slip-stitch cord stem, three stuffed berries, a bow made from three small strips, and a slip-stitch hanging loop. Then you sew everything together into one ornament.
Finished Size and Construction
- Finished size: about 4 in (10.2 cm) wide x 8.5 in (21.6 cm) tall, not counting the loop
- Skill level: Easy / advanced beginner
- Terminology: US crochet terms
- Yarn weight: Worsted (#4), cotton or cotton blend
- Hook: 4.0 mm (G-6)
- Number of pieces: 15 small components sewn into 1 ornament (7 leaves, 1 stem, 3 berries, 3 bow strips, 1 loop)
- Layout: leaves alternate left and right along a vertical stem, with 1 leaf at the tip
- Leaf size: 2 in (5.1 cm) across
- Leaf size before the edge round: 1.75 in (4.4 cm) across
- Edge round depth: about 1/8 in (0.3 cm) all around
Materials
Choose a smooth worsted-weight cotton or cotton blend. Cotton keeps the leaves flat and crisp and shows the stitch texture clearly. Avoid fuzzy or very splitty yarns, because the berries and slip-stitch cords look neatest in a firm, round yarn.
- Color A, sage green: 20 g, about 34 m (leaves and stem)
- Color B, cream: 10 g, about 17 m (berries, bow and loop)
These amounts include a comfortable margin for swatching and sewing tails.
Tools:
- 4.0 mm (G-6) crochet hook
- Tapestry needle
- A small amount of fiberfill or scrap cream yarn for stuffing the berries
- Stitch marker
- Scissors
- Pins, a ruler and a blocking surface
- Spray bottle with water
Abbreviations (US Terms)
- ch: chain
- sl st: slip stitch
- sc: single crochet
- dc: double crochet
- sc2tog: single crochet 2 together
- st(s): stitch(es)
- MR: magic ring
- Rnd: round
Special technique, slip-stitch cord: Chain the number given. Then sl st into the back bump of the 2nd ch from the hook and into each ch across. Working into the back bumps makes a firm cord that looks slightly twisted and does not stretch.
Gauge and Checkpoints
Exact gauge is not critical for an ornament, but it does control the proportions. Make one leaf first and check it before making the rest.
- Sc gauge: 18 sc and 20 rows = 4 in (10.2 cm), or 4.5 sts per 1 in (2.5 cm)
- Leaf after Rnd 1: 1 in (2.5 cm) across
- Leaf after Rnd 2: 1.75 in (4.4 cm) across
- Leaf after Rnd 3: 2 in (5.1 cm) across
- Stem: 6 in (15.2 cm) long
- Berry: 0.75 in (1.9 cm) across
If your finished leaf is larger than 2.25 in (5.7 cm), go down to a 3.5 mm hook. If it is smaller than 1.75 in (4.4 cm) after Rnd 3, go up to a 4.5 mm hook. Use the new hook for every piece so the whole ornament stays in proportion.
Leaves (Make 7)
With Color A.
Rnd 1: Make a MR. Ch 2 (does not count as a st) and work 12 dc into the ring. Pull the ring tight. Sl st to the first dc. (12 dc)
Rnd 2: Ch 2 (does not count as a st), 2 dc in each st around. Sl st to the first dc. (24 dc)
Checkpoint: the leaf measures 1.75 in (4.4 cm) across and lies flat. The joins at the ch-2 starts make a faint line from the center to the edge, like the center vein of a real leaf. Keep this line, because it marks where the stem attaches.
Go straight on to the Edge Round in the Border section below. Make 7 leaves in total.
Stem (Make 1)
With Color A, leave a 6 in (15.2 cm) starting tail.
Ch 28. Sl st in the back bump of the 2nd ch from the hook and in each ch across. (27 sl st)
Fasten off, leaving a 6 in (15.2 cm) tail.
Checkpoint: the stem measures 6 in (15.2 cm), because 27 sts ÷ 4.5 sts per inch = 6 in.
Berries (Make 3)
With Color B.
Rnd 1: MR, 6 sc in the ring. Do not join. Work in a spiral and put a marker in the first st. (6 sc)
Rnd 2: 2 sc in each st around. (12 sc)
Rnd 3: Sc in each st around. (12 sc)
Stuff firmly with a small pinch of fiberfill or cream scrap yarn.
Rnd 4: Sc2tog 6 times. (6 sts)
Fasten off, leaving an 8 in (20.3 cm) tail. Weave the tail through the front loops of the last 6 sts and pull the hole closed. Keep the tail for sewing.
Checkpoint: each berry is a firm ball about 0.75 in (1.9 cm) across.
Bow (3 Strips) and Hanging Loop
Work all of these pieces with Color B.
Bow loop strip: Ch 29.
- Row 1: Sc in the 2nd ch from the hook and in each ch across. (28 sc)
- Rows 2–3: Ch 1, turn, sc in each st across. (28 sc)
Fasten off with a 10 in (25.4 cm) tail. The strip measures about 6.2 in (15.7 cm) by 0.6 in (1.5 cm).
Bow tail strip: Ch 19.
- Row 1: Sc in the 2nd ch from the hook and in each ch across. (18 sc)
- Rows 2–3: Ch 1, turn, sc in each st across. (18 sc)
Fasten off. The strip measures 4 in (10.2 cm) by 0.6 in (1.5 cm).
Center knot strip: Ch 8.
- Row 1: Sc in the 2nd ch from the hook and in each ch across. (7 sc)
- Rows 2–3: Ch 1, turn, sc in each st across. (7 sc)
Fasten off with an 8 in (20.3 cm) tail. The strip measures about 1.5 in (3.8 cm) long.
Hanging loop: Ch 26. Sl st in the back bump of the 2nd ch from the hook and in each ch across. (25 sl st) Fasten off with a 6 in (15.2 cm) tail. The cord measures about 5.5 in (14.0 cm).
Make All Pieces
Before you start sewing, check that you have:
- Color A: 7 leaves, 1 stem
- Color B: 3 berries, 1 bow loop strip, 1 bow tail strip, 1 center knot strip, 1 hanging loop
Layout (front view, measured down the stem from its top end):
              [ BOW + LOOP ]        top of stem, 0 in (0 cm)
   [Leaf 1] --|                     0.75 in (1.9 cm), left
              |-- [Leaf 2]          1.5 in (3.8 cm), right
     (o)(o)(o)|                     berries, 2 in (5.1 cm)
   [Leaf 3] --|                     2.75 in (7.0 cm), left
              |-- [Leaf 4]          3.5 in (8.9 cm), right
   [Leaf 5] --|                     4.25 in (10.8 cm), left
              |-- [Leaf 6]          5 in (12.7 cm), right
           [Leaf 7]                 stem tip, 6 in (15.2 cm), center
Joining
Method: whipstitch with the leaf tails and a tapestry needle, working from the back of the ornament.
How each leaf attaches: each leaf joins at its notch, which is the sl st in the Edge Round. Lay the stem over the leaf so it crosses the notch and runs about 0.5 in (1.3 cm) along the vein line toward the leaf center. Sew 3 to 4 stitches, catching one sl st of the stem and one dc post of the leaf with each pass. This makes the stem look like it grows into the leaf.
- Pin Leaf 7 to the tip of the stem so its notch points up and the stem ends at the leaf center.
- Pin Leaves 1 to 6 at the positions shown in the layout, alternating sides. Angle each leaf slightly downward, about 30 degrees from horizontal. The leaf edges should overlap the stem but not each other.
- Sew each leaf in place, then weave in its tail on the back.
- Sew the 3 berries in a small triangle at 2 in (5.1 cm): two touching the stem on the left and one tucked just above them on the right, overlapping the inner edges of Leaves 1 and 3.
Tension: pull each sewing stitch just snug. Stitches that are too tight pucker the leaves and twist the stem.
Bow assembly:
- Sew the short ends of the bow loop strip together to make a ring. Flatten it with the seam at the center back. The flattened ring makes a bow about 3 in (7.6 cm) wide.
- Fold the bow tail strip in half into an upside-down V and place it behind the flattened ring.
- Pinch both pieces together at the center. Wrap the center knot strip around the pinch, overlap its ends on the back, and sew it closed. The wrap forms the raised knot.
- Fold the hanging loop in half, place the cut ends behind the bow knot, and sew them in place.
- Sew the bow over the top 0.5 in (1.3 cm) of the stem, covering the end of the stem and the upper part of Leaf 1.
Size checkpoint: the assembled ornament measures about 4 in (10.2 cm) wide and 8.5 in (21.6 cm) tall without the loop. The loop rises about 2 in (5.1 cm) above the bow.
Border
The border in this design is the Edge Round on each leaf. It firms up the edge, adds the small notch where the stem attaches, and brings each leaf to its final size of 2 in (5.1 cm).
Border gauge: about 4.5 sc per inch along the outer edge.
Edge Round (Rnd 3), worked on each leaf right after Rnd 2: Ch 1. Sl st in the first st (this is the notch). [2 sc in next st, sc in next st] 11 times, 2 sc in last st. Sl st to the first sl st. Fasten off with a 12 in (30.5 cm) tail for sewing.
Count: 24 sts worked one into each existing stitch + 12 added sts = 36 sts (1 sl st and 35 sc).
A circle has no true sides, so check the count in quarters: each quarter of the edge holds 9 sts (36 ÷ 4 = 9).
Why the math works: a flat circle needs to add the same number of stitches every round as the first round has. Rnd 1 has 12, so Rnd 2 adds 12 to make 24, and the Edge Round adds 12 more to make 36. The sc in this round are shorter than the dc below them, so these 12 increases keep the edge flat and smooth. The single sl st sits lower than the sc on each side of it, which makes the small dip at the top of each leaf.
Final Blocking
- Lay the assembled ornament face up on a blocking mat.
- Mist it lightly with water until it is damp but not wet.
- Pat each leaf into a circle 2 in (5.1 cm) across, with the notch pointing toward the stem.
- Shape the stem into a gentle, natural curve.
- Shape the bow loops into rounded wings and spread the tails into an even V.
- Pin only the leaf edges and the bow tails. Do not pin or flatten the berries.
- Check the overall size: 4 in (10.2 cm) by 8.5 in (21.6 cm).
- Let it dry completely, then remove the pins.
Final Quality-Control Checklist
- 7 leaves, each 2 in (5.1 cm) across with 36 edge sts
- Stem 6 in (15.2 cm) long, 27 sl st
- 3 berries, each firm and about 0.75 in (1.9 cm) across
- Leaves alternate left and right, with Leaf 7 centered at the tip
- Bow loop strip 28 sts, tail strip 18 sts and knot strip 7 sts, each 3 rows deep
- Hanging loop 25 sl st, folded and secured behind the bow
- No loose tails on the front
- The ornament hangs straight from the loop without tipping forward
Troubleshooting
Leaves cup into bowls: there are too few stitches or your tension is too tight. Recount Rnd 2 (24) and the Edge Round (36), or go up one hook size.
Leaves ruffle: there are too many stitches or your tension is too loose. Recount, and go down one hook size.
Big hole in the leaf center: pull the magic ring tighter and weave the tail through the Rnd 1 stitches one more time.
Stem curls or twists: spray it lightly with water, then pin it straight until dry.
Berries look lumpy: use less stuffing, and roll the berry between your palms before closing it.
Bow droops: sew one extra stitch through the knot into each bow wing to hold its shape.
Ornament tilts: the leaves are unbalanced. Compare the leaf positions with the layout and move any leaf that sits too far from its partner.
Care
Spot clean with cool water and mild soap, then lay flat to dry and reshape the leaves and bow. Store the ornament flat or hanging, not crushed in a box.

Final Notes
The measurements build in a short chain that is easy to check. Rnd 1 is 1 in (2.5 cm) across, Rnd 2 grows to 1.75 in (4.4 cm), and the Edge Round brings the leaf to 2 in (5.1 cm). Seven of those leaves on a 6 in (15.2 cm) stem, topped with a 3 in (7.6 cm) bow, make an ornament about 4 in (10.2 cm) wide and 8.5 in (21.6 cm) tall. If your first leaf matches the checkpoints, the rest of the sprig will come out the right size.
Happy crocheting!