
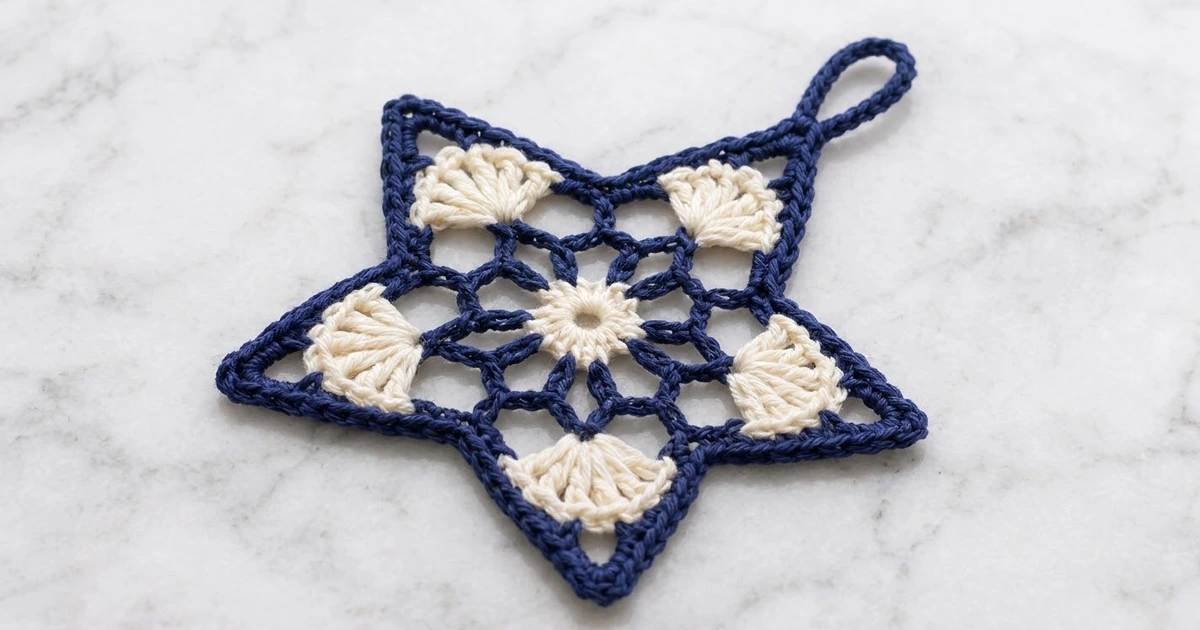
This lacy five-pointed star pairs deep navy with soft cream. A small cream ring sits at the center, surrounded by an open navy mesh. Five cream fans fill the points, and a firm navy outline gives the star a crisp, graphic shape that shows up well against green branches.
The pattern uses US crochet terms throughout. The finished star measures 4.5 in (11.4 cm) from point to point and 4.25 in (10.8 cm) tall, not counting the 1.25 in (3.2 cm) hanging loop.
You make the star in one piece, working in the round from the center out. Start with a cream ring, then add two navy mesh rounds. Next, work a cream fan into every other mesh loop. Last, add one navy round that builds the points and two navy border rounds that shape and firm the outline. You’ll finish with a single-crochet-covered hanging loop.
There’s no joining and no assembly. The only real fiddly part is working the five separate fans, and that takes just a few minutes.
Finished Size and Construction
- Finished size: 4.5 in (11.4 cm) point to point, 4.25 in (10.8 cm) tall
- Hanging loop: 1.25 in (3.2 cm) tall
- Skill level: Easy / advanced beginner
- Terminology: US crochet terms
- Yarn weight: Sport weight (#2) cotton
- Hook: 2.75 mm (US C-2)
- Number of pieces: 1
- Layout: Single star, worked in the round
- Size before border: 4 in (10.2 cm) point to point after Round 5
- Border depth: 2 rounds of sc, about 0.25 in (0.6 cm) on each side
Materials
Yarn: Use a smooth, mercerized sport weight cotton or a cotton blend. Cotton holds the points crisp and blocks well, and the stitches show clearly. Avoid fuzzy or very stretchy yarn because it blurs the mesh. Choose a dark navy with good contrast against your cream.
- Navy (Color A): 10 g, about 31 m (34 yd)
- Cream (Color B): 5 g, about 16 m (17 yd)
These quantities include a margin for swatching and weaving in ends. One 50 g ball of each color makes several stars.
Tools:
- 2.75 mm (US C-2) crochet hook
- Tapestry needle
- Scissors
- Stitch marker
- Blocking mat and rust-proof pins
- Spray bottle with water
- Optional: fabric stiffener or starch
Abbreviations (US Terms)
- ch – chain
- sl st – slip stitch
- sc – single crochet
- dc – double crochet
- sp – space
- st(s) – stitch(es)
- sc3tog – single crochet 3 together
- Rnd – round
Special stitch – sc3tog: (Insert hook in next st, yarn over, pull up a loop) 3 times. You now have 4 loops on the hook. Yarn over and pull through all 4 loops. This uses 3 stitches and makes 1. You’ll use it at each valley to keep the inner corners sharp.
Fan: Ch 3 (counts as the first dc), then work 8 dc in the same ch-5 loop. That’s 9 dc in total.
Gauge and Checkpoints
Gauge isn’t critical for an ornament, but it decides the final size and how crisp the mesh looks. Make one star and measure it at each checkpoint before you make a set.
- After Rnd 1: The cream ring measures 0.75 in (1.9 cm) across.
- After Rnd 3: The navy mesh measures 2 in (5.1 cm) across.
- After Rnd 5: The star measures 4 in (10.2 cm) point to point.
- After Rnd 7: The star measures 4.5 in (11.4 cm) point to point and 4.25 in (10.8 cm) tall.
If your star is too big: Go down to a 2.5 mm hook, or keep the chains in Rnds 2–3 snug.
If your star is too small or the mesh puckers: Go up to a 3 mm hook. Tight chains are the most common cause, so loosen your chain tension first.

Pattern
Round 1 – Center Ring (Cream)
With Color B, make a magic ring.
Rnd 1: Ch 3 (counts as dc), work 19 dc in the ring, then sl st to the top of the beginning ch-3. Pull the ring snug but leave a small open hole about 0.25 in (0.6 cm) wide. (20 dc)
Fasten off Color B.
Checkpoint: The ring measures 0.75 in (1.9 cm) across.
Rounds 2–3 – Navy Mesh
Rnd 2: Join Color A with sc in any dc. Ch 4, skip 1 dc, sc in next dc. Repeat from * 8 more times. Ch 4, skip the last dc, and sl st to the first sc. (10 sc, 10 ch-4 loops)
Rnd 3: Sl st in the next 2 ch to reach the center of the first loop. Ch 1, then sc in the same loop. Ch 5, sc in next ch-4 loop. Repeat from * 8 more times. Ch 5 and sl st to the first sc. (10 sc, 10 ch-5 loops)
Fasten off Color A.
Checkpoint: The mesh measures 2 in (5.1 cm) across. Number the ch-5 loops 1 to 10 going counterclockwise. Odd loops will hold fans, and even loops will become valleys. Placing a marker in loop 1 helps.
Round 4 – Cream Fans
You work each fan separately into an odd-numbered loop.
Fan: Join Color B with sl st in loop 1. Ch 3 (counts as dc), work 8 dc in the same loop, then fasten off. (9 dc)
Repeat in loops 3, 5, 7 and 9. (5 fans, 45 dc total)
Work every fan in the same direction (counterclockwise). That way the beginning ch-3 is always the first stitch of the fan. Leave the even loops (2, 4, 6, 8, 10) empty.
Weave in the cream ends now, along the back of each fan, while they’re easy to reach.
Round 5 – Building the Points (Navy)
This round frames each fan and makes the open triangle at each tip.
Rnd 5: Join Color A with sc in the top of the beginning ch-3 of any fan (dc 1).
- Sc in the next 3 dc. You now have 4 sc on the fan.
- Ch 9 and skip dc 5, the center dc.
- Sc in each of dc 6–9. That’s another 4 sc on the fan.
- Ch 3, sc in the next empty even loop (the valley), then ch 3.
- Sc in dc 1 of the next fan, then repeat steps 1–4.
Continue around. After the final ch-3, sl st to the first sc.
Per point: 8 sc on the fan, 1 ch-9 arch, 2 ch-3 spaces and 1 valley sc.
Round total: 45 sc, 5 ch-9 arches and 10 ch-3 spaces.
Checkpoint: The star measures 4 in (10.2 cm) point to point. Each ch-9 arch stands out beyond its fan as a rounded loop. The border will sharpen it into a point.
Round 6 – Border Round 1 (Navy)
Rnd 6: Ch 1. Then repeat this sequence for each point:
- Sc in the next 4 sc (fan).
- Work into the ch-9 arch: sc in the next 4 ch, 3 sc in the next ch (the tip), then sc in the next 4 ch. That makes 11 sc.
- Sc in the next 4 sc (fan).
- Work 2 sc in the ch-3 sp, sc in the valley sc, then 2 sc in the next ch-3 sp. That makes 5 sc.
After the fifth point, sl st to the first sc.
Per point: 4 + 11 + 4 + 5 = 24 sc
Round total: 24 × 5 = 120 sc
This is a conversion round. The 8 fan sc are worked 1 per stitch (8). Each ch-9 arch gets 1 sc per chain plus 2 extra at the tip (9 + 2 = 11). The valley gets 1 sc in the valley sc plus 2 in each ch-3 space (1 + 4 = 5). So 8 + 11 + 5 = 24.
Round 7 – Border Round 2 (Navy)
In Round 6, each point’s 24 stitches run in this order: 4 fan, 4 side, 3 tip (the middle one is the tip center), 4 side, 4 fan, 2 valley, the valley sc, and 2 valley.
Rnd 7: Ch 1. Then repeat this sequence for each point:
- Sc in the next 9 sts.
- Work 3 sc in the tip center.
- Sc in the next 9 sts.
- Sc in the next st.
- Sc3tog over the next st, the valley sc and the next st.
- Sc in the next st.
After the fifth point, sl st to the first sc. Do not fasten off yet.
Per point: You use 9 + 1 + 9 + 1 + 3 + 1 = 24 stitches and make 9 + 3 + 9 + 1 + 1 + 1 = 24 sc.
Round total: 120 sc
Why the math works: Each point gains 2 stitches at the tip (3 sc in 1) and loses 2 at the valley (3 sts into 1). The count stays at 24 per point. Meanwhile the extra stitches at the tip push it outward, and the decrease pulls the valley inward. That’s what gives the star its sharp outline. The two border rounds add about 0.25 in (0.6 cm) to each side, taking the star from 4 in (10.2 cm) to 4 + 0.25 + 0.25 = 4.5 in (11.4 cm) point to point.
Hanging Loop (Navy)
The tip center of the first point is the 11th stitch of Rnd 7.
- Fasten off. Rejoin Color A with sl st in the tip center of any point. This becomes the top of the star.
- Ch 20, then sl st in the same tip stitch to close the loop.
- Work 28 sc into the loop, over the chain, so the chain is fully covered.
- Sl st in the tip stitch and fasten off.
Checkpoint: The loop stands 1.25 in (3.2 cm) above the tip. It should be firm and rounded, about as thick as the border.
Weave in all ends along the back of the border so they don’t show through the mesh.
Final Blocking
- Lightly mist the star with water until it’s damp, not dripping. You can also dip it in diluted fabric stiffener and squeeze out the excess.
- Lay it face up on a blocking mat.
- Pin each of the five tips so the star is 4.5 in (11.4 cm) point to point. Check that all tips sit at the same distance from the center.
- Pin each valley inward to sharpen the inner corners.
- With your fingertip, open the center hole and spread the mesh loops evenly. Then fan out each cream fan.
- Pin the hanging loop straight up from the top point.
- Let it dry completely, about 4–6 hours or overnight with stiffener.
- Unpin it and check the final measurements: 4.5 in (11.4 cm) wide and 4.25 in (10.8 cm) tall.
Final Quality-Control Checklist
- The center ring has 20 dc, with a small, even hole.
- Rnds 2 and 3 each have 10 loops, and no loop is noticeably tighter than the others.
- Five cream fans of 9 dc each sit in alternating loops.
- Each point has one open navy triangle beyond its fan.
- Rnds 6 and 7 each count 120 sc (24 per point).
- All five tips are sharp, and all five valleys turn cleanly inward.
- The star measures 4.5 in (11.4 cm) point to point and 4.25 in (10.8 cm) tall.
- The hanging loop is fully covered and centered on the top point.
- All ends are woven in and invisible from the front.
Troubleshooting
The mesh ruffles or cups. Your chains are too long or loose. Keep the ch-4s and ch-5s even, or go down a hook size for Rnds 2–3 only.
The star curls into a bowl. Your chains are too tight. Go up a hook size for the mesh rounds and the ch-9 arches.
The fans look crowded. Make sure all 9 dc go into the ch-5 loop itself, not around the sc beside it. Spread them evenly as you work.
The tips are rounded, not pointed. Check that you worked 3 sc in the tip center on both Rnd 6 and Rnd 7. Then pin the tips firmly when blocking.
The valleys are shallow. Make sure the sc3tog is centered on the valley sc. Pull each loop up snugly before closing it.
Your stitch count is off in Rnd 6. Count the ch-9 arches. One extra or missing chain changes the point’s total. Each arch must take exactly 11 sc.
Cream shows through the navy. Weave all the cream ends along the back of the fans, not under the navy stitches.
Care
Hand wash in cool water with mild soap, roll it in a towel to remove the water, and reblock it flat to dry. Store the star flat in tissue so the points don’t bend.

Final Notes
The size of this star builds in stages, and each one can be checked. The 0.75 in (1.9 cm) cream ring grows to a 2 in (5.1 cm) navy mesh. The fans and ch-9 arches then take it to 4 in (10.2 cm) point to point. Finally, two balanced 120-stitch border rounds add 0.25 in (0.6 cm) on each side, for a finished star of 4.5 in (11.4 cm). If you hit each checkpoint, every star in your set will match. Hang a whole row of them on the tree, or tuck one into a gift.
Happy crocheting!