

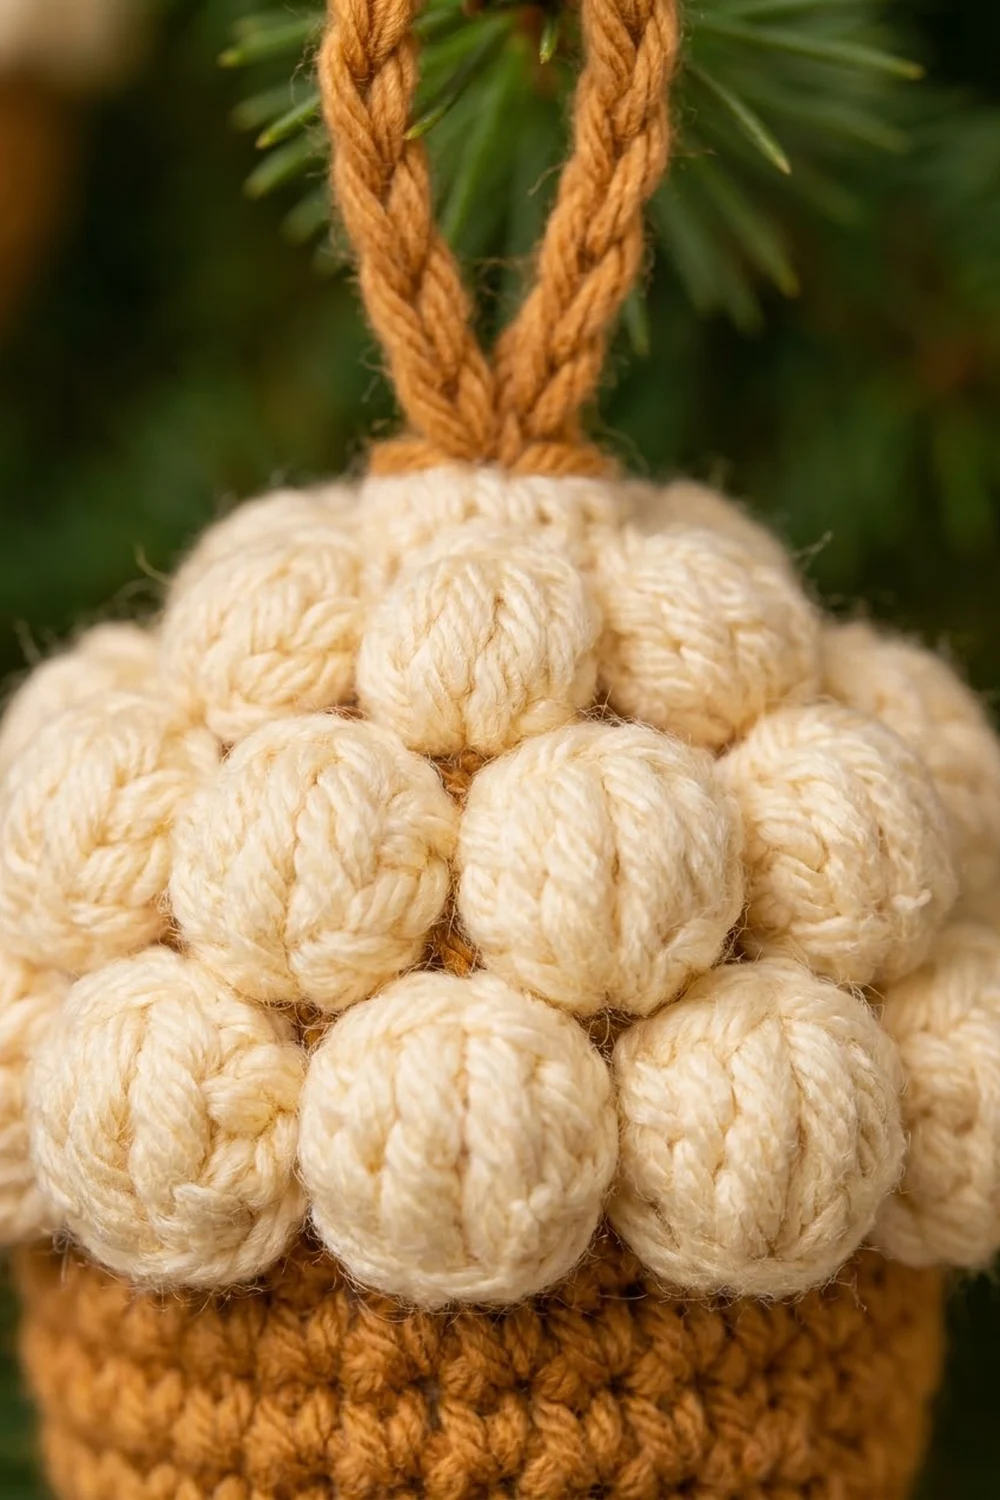
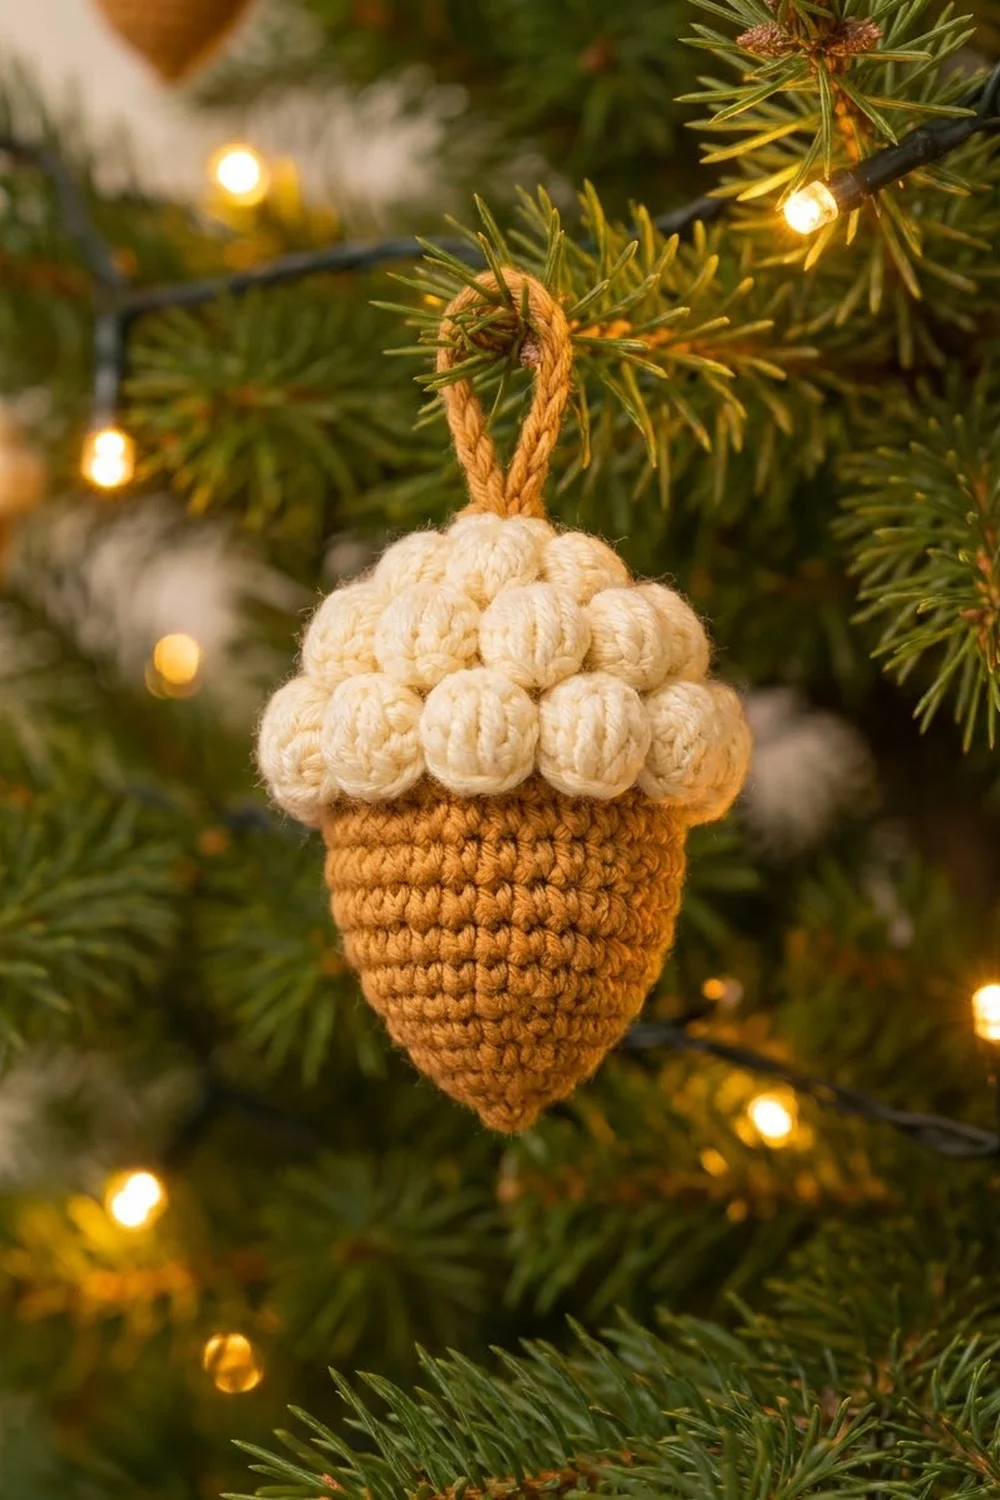
This little acorn is a quick, cozy ornament with a smooth caramel body and a puffy cream cap. The cap has three tiers of bobbles stacked like a soft crown. A slim caramel cord at the top lets it hang from a tree branch, a gift tag, or a window hook.
The palette is just two shades: a warm golden caramel for the nut and a soft cream for the cap. The style is classic amigurumi. Tight single crochet is worked in a continuous spiral so the stuffing never shows through. The contrast between the smooth body and the textured cap is what makes it look like a real acorn.
The pattern uses US crochet terms. The finished acorn is about 3 in (7.6 cm) tall without the loop and about 2.6 in (6.6 cm) wide across the bobble rim. With the loop it is about 4.25 in (10.8 cm) tall.
The acorn is made in one piece from bottom to top. You start at the pointed tip and increase to the full body width. Then you change to cream for the cap, work three bobble tiers with decreases between them, stuff, and close the top. A slip-stitch hanging loop finishes it.
Finished Size and Construction
- Finished size: about 3 in (7.6 cm) tall without the loop, 4.25 in (10.8 cm) with the loop
- Cap width: about 2.6 in (6.6 cm) across the bobble rim
- Body width: about 2.1 in (5.3 cm) when stuffed
- Skill level: Easy-intermediate
- Terminology: US crochet terms
- Yarn weight: Worsted (#4)
- Hook: 3.5 mm (E-4), one size smaller than the yarn label suggests
- Number of pieces: 1 (plus the attached hanging cord)
- Layout: one acorn, worked in the round from the tip upward
- Piece size before the cap: the body is 2.4 in (6.1 cm) tall after Round 12
- Cap (“border”) depth: about 0.6 in (1.5 cm) above the body; the rim hangs over the body by about 0.25 in (0.6 cm) on each side
Materials
Choose a smooth worsted-weight cotton or acrylic. Cotton gives crisp bobbles and a slight sheen like the sample. Acrylic is softer and a little more forgiving. Avoid fuzzy or loosely plied yarn, because the bobbles lose their round shape and the stitches are hard to count.
- Color A, caramel brown: 10 g, about 18 m (19.7 yd)
- Color B, cream: 14 g, about 26 m (28.4 yd)
- 3.5 mm (E-4) crochet hook
- About 5 g polyester fiberfill
- 1 stitch marker
- Tapestry needle
- Scissors
The quantities include a small margin for gauge differences, a test swatch, and weaving in ends. If you plan to make several acorns, one 100 g ball of each color makes about six.
Abbreviations (US Terms)
- MR – magic ring
- ch – chain
- sl st – slip stitch
- sc – single crochet
- inc – 2 sc in the same stitch
- sc2tog – single crochet 2 together (an invisible decrease is recommended)
- BLO – back loop only
- st(s) – stitch(es)
- rnd – round
- bob – bobble (see below)
Special stitch – Bobble (bob): Yarn over, insert the hook in the stitch, yarn over and pull up a loop, then yarn over and pull through 2 loops (2 loops remain). Repeat 4 more times in the same stitch (6 loops on the hook). Yarn over and pull through all 6 loops. One bobble counts as 1 stitch.
Bobbles tend to lean toward the inside of the work. After each bobble round, gently push every bobble out to the right side with your fingertip.
Gauge and Checkpoints
Gauge is 18 sc and 20 rnds = 4 in (10.2 cm), worked in sc in the round. That is 4.5 sts and 5 rnds per inch (2.54 cm). Exact gauge matters less than tight fabric for an ornament, but the checkpoints below assume this gauge.
Make one acorn first and check it at each stage:
- After Round 8: the cone is about 6.7 in (17.0 cm) around the top edge (30 sts ÷ 4.5).
- After Round 12: the body is about 2.4 in (6.1 cm) tall from the tip to the edge. Flattened and unstuffed, it is about 3.3 in (8.4 cm) wide.
- After stuffing: the body is about 2.1 in (5.3 cm) wide.
- After Round 14: the bobble rim is about 2.6 in (6.6 cm) across.
If your acorn is too big or the stuffing shows, go down 0.5 mm. If it is too small or very stiff, go up 0.5 mm. Changing the hook keeps all stitch counts and proportions the same.
Body (Color A, Caramel)
Work in a continuous spiral and do not join rounds. Place the marker in the last stitch of each round and move it up as you go.
Rnd 1: With Color A, 4 sc in MR. Pull the ring tight. (4 sts)
Rnd 2: (Sc in next st, inc) 2 times. (6 sts)
Rnd 3: (Sc in next st, inc) 3 times. (9 sts)
Rnd 4: (Sc in next 2 sts, inc) 3 times. (12 sts)
Rnd 5: (Sc in next 3 sts, inc) 3 times. (15 sts)
Rnd 6: (Sc in next 4 sts, inc) 3 times. (18 sts)
Rounds 3 to 6 add only 3 stitches each. These slow increases make the narrow pointed tip.
Rnd 7: (Sc in next 2 sts, inc) 6 times. (24 sts)
Rnd 8: (Sc in next 3 sts, inc) 6 times. (30 sts)
Rounds 7 and 8 add 6 stitches each. These faster increases round out the shoulders of the nut.
Rnds 9–12: Sc in each st around. (30 sts each round)
Checkpoint: the body is a cup about 2.4 in (6.1 cm) tall.
Color change: Work the last sc of Round 12 until 2 loops remain on the hook. Drop Color A, then yarn over with Color B and pull through. Cut Color A, leaving a 4 in (10.2 cm) tail, and tie it loosely to the Color B tail on the inside so the change stays neat.
Stuffing the Body
Stuff the tip and lower body firmly now, because the point is much harder to reach once the cap narrows. Use small tufts of fiberfill and push them into the tip with the back of the hook. Then fill the body loosely up to Round 12. You will add more stuffing as the cap closes. A firm, even fill keeps the shape smooth and stops the bobbles from sinking in.
Border: Bobble Cap Tiers (Color B, Cream)
For this one-piece ornament, the “border” is the bobble cap. It frames the top of the body the way a border frames a flat piece. Its stitch count has to match the body’s 30-stitch top edge exactly.
Border gauge: one repeat of (bob, sc) is 2 sts and measures about 0.45 in (1.1 cm) along the rim. Bobble rounds are taller than sc rounds, about 0.3 in (0.8 cm) each.
Rnd 13 (cap base): With Color B, sc in the BLO of each st around. (30 sts)
Working in the back loops leaves a caramel ridge of front loops at the join. This makes the cap sit as a separate layer on the nut instead of blending into it.
Rnd 14 (rim tier): (Bob in next st, sc in next st) 15 times. (30 sts: 15 bobbles + 15 sc)
Push every bobble to the outside. This is the widest tier, and it hangs over the body by about 0.25 in (0.6 cm) on each side.
Rnd 15: (Sc in next st, sc2tog) 10 times. (20 sts)
Work the sc and the decreases into the tops of both the bobbles and the sc. This round pulls the cap inward so the next tier sits above and behind the rim.
Rnd 16 (middle tier): (Bob in next st, sc in next st) 10 times. (20 sts: 10 bobbles + 10 sc)
Push the bobbles out. Now stuff the upper body and the cap until the acorn feels firm and the rim tier is pushed outward.
Rnd 17: Sc2tog 10 times. (10 sts)
Rnd 18 (crown tier): (Bob in next st, sc in next st) 5 times. (10 sts: 5 bobbles + 5 sc)
Push the bobbles out and top up the stuffing through the small opening.
Rnd 19: Sc2tog 5 times. (5 sts)
Fasten off, leaving an 8 in (20.3 cm) tail. Thread the tail on the tapestry needle, weave it through the front loops of the last 5 sts, and pull tight to close the top. Do not cut the tail yet.
Why the math works: the body ends at 30 sts, and Round 13 keeps all 30 with one sc in each existing stitch. Each bobble tier uses a 2-stitch repeat, so each tier needs an even starting count: 30 sts make 15 repeats, 20 sts make 10, and 10 sts make 5. Round 15 removes one-third of the stitches (30 to 20). Rounds 17 and 19 each remove half (20 to 10, then 10 to 5). That gives the stepped 15, 10, and 5 bobble stack.
Hanging Loop (Color A, Caramel)
Cord: With Color A, ch 16. Sl st in the 2nd ch from the hook and in each ch across. (15 sl sts)
The cord is about 3 in (7.6 cm) long. Fold it in half and sew both ends to the center top of the cap, right over the closed Round 19, using the cord tails. Secure it with a few stitches through the center of the cap. Then use the cream tail from Round 19 to tack the base of the loop so it stands upright. The loop should stand about 1.25 in (3.2 cm) above the crown.
Weave all tails into the stuffing and trim them close.
Final Blocking
Amigurumi is shaped by hand rather than pinned. Work gently:
- Shape the tip. Roll the bottom point between your fingers to sharpen it. If it dents, push in a little more stuffing.
- Round the body. Squeeze and roll the body until the 30-stitch section is evenly round, about 2.1 in (5.3 cm) wide.
- Fluff the bobbles. Push each bobble outward with a fingertip and check that none are tucked inside.
- Steam lightly. Hold a steam iron 1–2 in (2.5–5.1 cm) above the cap without touching it. Let the steam relax the bobbles, then shape them while they are warm. If you don’t want to soften acrylic too much, skip the steam and use a damp cloth and your fingers instead.
- Set the loop. Straighten the cord and stand it upright. Let the acorn dry and cool on a flat surface for at least 1 hour.
Final Quality-Control Checklist
- The tip is pointed and centered at the bottom.
- The body is about 2.4 in (6.1 cm) from the tip to the caramel ridge.
- No stuffing shows between stitches.
- The caramel BLO ridge runs evenly around the cap edge.
- The rim tier has 15 bobbles, the middle tier 10, and the crown tier 5.
- All bobbles face outward.
- The cap is about 2.6 in (6.6 cm) wide.
- The top is fully closed with no gap.
- The loop is centered, upright, and about 1.25 in (3.2 cm) tall.
- All tails are hidden inside the stuffing.
Troubleshooting
Stuffing shows through. Your tension is too loose. Go down a hook size, or use the yarn-under single crochet for tighter stitches.
The tip is blunt or rounded. Make sure Round 1 has only 4 sc and that Rounds 3 to 6 have 3 increases each, not 6. Stuff the tip in small pieces.
Bobbles disappear inside. Push them out after every bobble round. If they keep flipping in, tighten the sc between the bobbles.
The bobble count is off. Recount the round before. The rim tier needs 30 sts and the middle tier needs 20 sts before you start.
The cap looks flat instead of tiered. The decrease rounds were skipped or worked loosely. Round 15 must bring the count to 20 sts and Round 17 to 10 sts.
There is a jog at the color change. This is normal in spiral rounds. Turn the acorn so the jog is at the back, or sl st into the next stitch before starting Round 13.
The acorn tilts on the loop. The cord is off-center. Move it so it sits directly over the closed Round 19.
There is a hole at the top. Weave the tail through the front loops once more and pull firmly before you sew on the loop.
Care
Spot clean with cool water and mild soap, then reshape and air dry. Do not machine wash or tumble dry, because this can flatten the bobbles and shift the stuffing.
Final Notes
A gauge of 4.5 sts per inch (2.54 cm) gives a 30-stitch body about 6.7 in (17.0 cm) around and 2.4 in (6.1 cm) tall. Stuffed, that becomes a nut about 2.1 in (5.3 cm) wide. The 30-stitch cap base leads straight into a 15-bobble rim about 2.6 in (6.6 cm) wide. Tiers of 10 and 5 bobbles then build the crown. A 1.25 in (3.2 cm) loop brings the finished ornament to about 4.25 in (10.8 cm).
Make one, check your measurements, then make a whole basket of acorns for the tree, gift wrap, or an autumn bowl. They also look lovely tied onto a wreath in a small cluster of three.
Happy crocheting!