

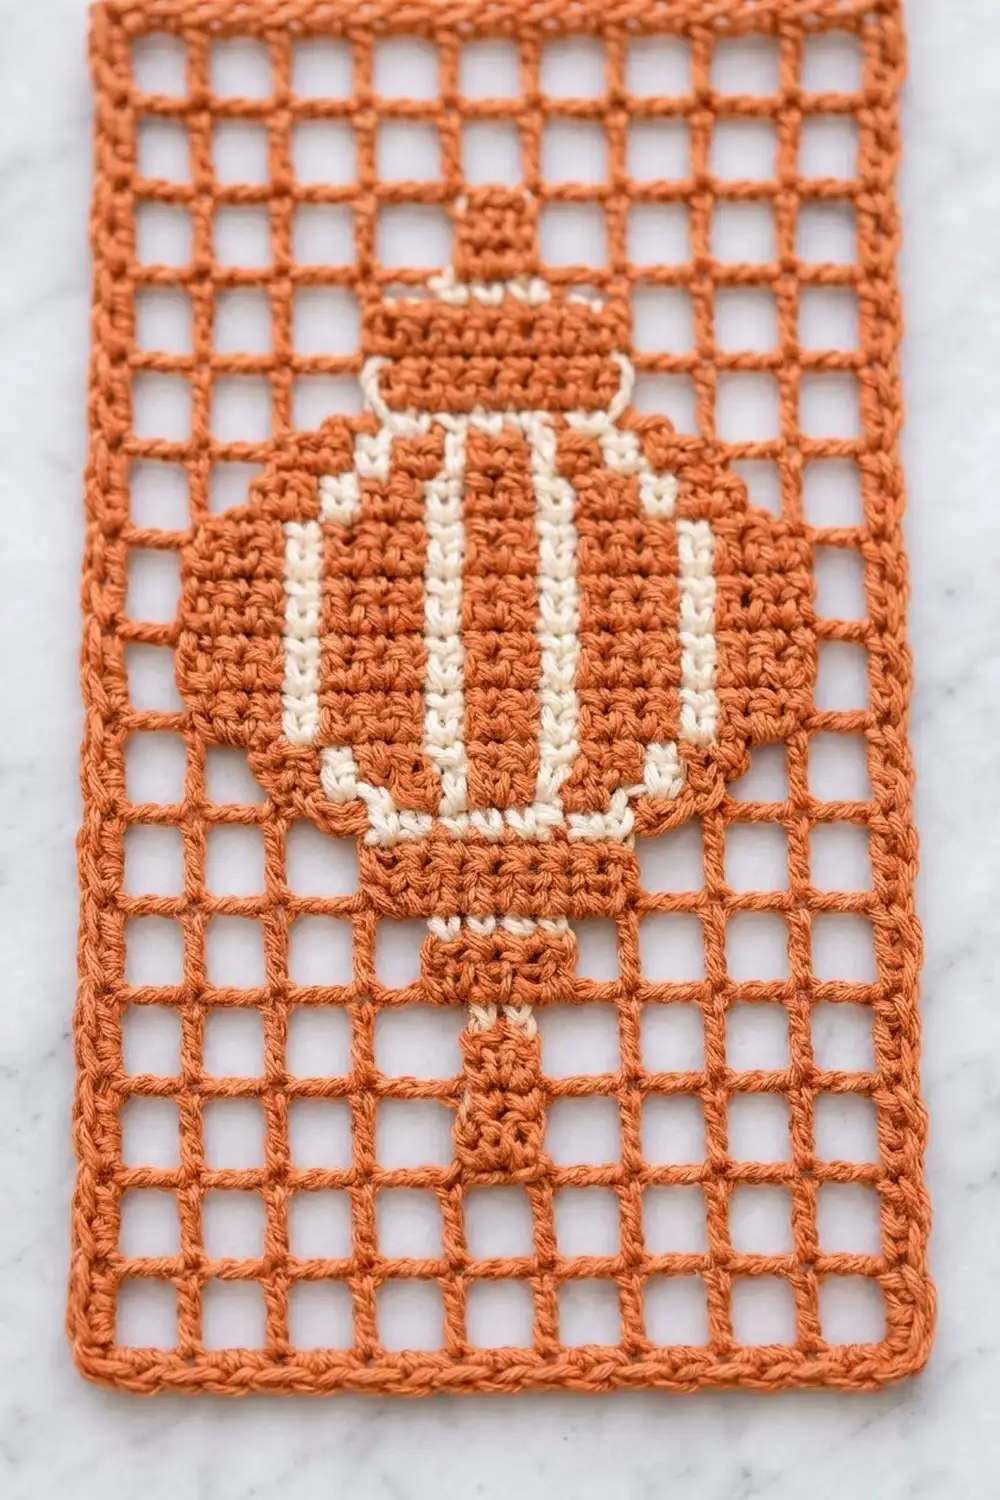
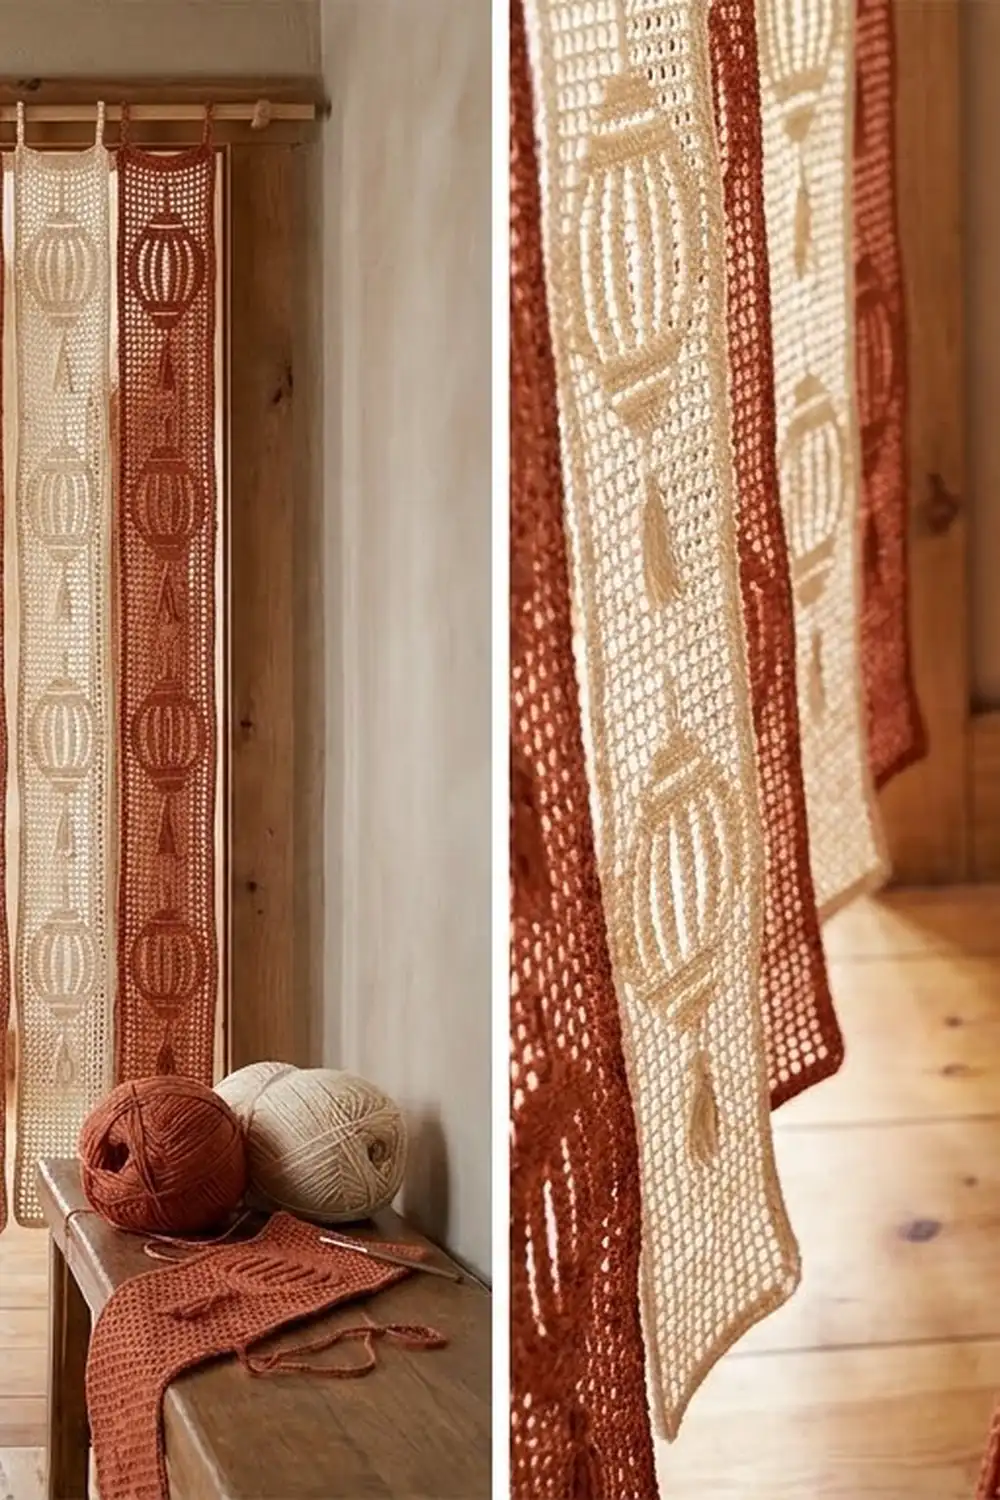
This door curtain is made of seven long filet crochet strips that hang side by side from a curtain rod. Each strip carries a column of stacked lanterns, worked as solid blocks against an open mesh background. Thin open lines run down each lantern body and read as ribs.
The strips alternate terracotta and cream: four terracotta and three cream, set A–B–A–B–A–B–A. Every strip is a single color. The lanterns come from the contrast between filled blocks and open mesh, so you never carry a second yarn.
The pattern uses US crochet terms. Each finished strip measures 6.2 in (15.7 cm) wide and 80.8 in (205.2 cm) long, plus two hanging loops. Seven strips together span about 43.4 in (110.2 cm) on the rod.
You work each strip from the bottom up in small filet mesh, following a 24-row lantern repeat eight times. Two rounds of single crochet border the strip, and then you add two corded loops at the top. The strips are not sewn together. They hang separately, so people can walk through the curtain.
Finished Size and Construction
- Finished strip size: 6.2 in x 80.8 in (15.7 cm x 205.2 cm), not counting the loops
- Skill level: Intermediate (easy stitches, long repeat)
- Terminology: US crochet terms
- Yarn weight: DK (light worsted / #3) cotton or cotton blend
- Hook: 3.5 mm (E-4), or whatever size gives gauge
- Number of pieces: 7 separate strips (4 terracotta, 3 cream)
- Layout: 7 strips in a single row on the rod, colors alternating, no seams
- Piece size before border: 5.4 in x 80 in (13.7 cm x 203.2 cm), which is 13 mesh squares wide and 200 rows long
- Border depth: 0.4 in (1.0 cm) per edge, from 2 rounds of sc
- Hanging loops: 2 per strip, about 1.75 in (4.4 cm) tall. They fit a rod up to 1 in (2.5 cm) in diameter.
Materials
Yarn: Use a smooth, mercerized or combed DK cotton. Cotton holds the mesh crisp and square, and it doesn’t stretch much when the strips hang for a long time. Avoid fuzzy or very stretchy yarns. They blur the lantern outlines and the strips grow longer over time.
- Color A, terracotta: 600 g (about 1,380 m) for 4 strips
- Color B, cream: 450 g (about 1,035 m) for 3 strips
These amounts assume about 2.3 m per gram (roughly 115 m per 50 g). One strip uses about 130 g including the border and loops. The quantities above include a margin of about 20 g per strip for your gauge swatch and small tension differences.
Tools:
- 3.5 mm (E-4) crochet hook
- Tapestry needle
- Stitch markers (at least 4)
- Measuring tape
- Rust-proof pins and a long blocking surface (foam mats or a clean carpet with a towel)
- Spray bottle
- Wooden curtain rod or tension rod, at least 44 in (111.8 cm) long
Abbreviations (US Terms)
- ch: chain
- sl st: slip stitch
- sc: single crochet
- dc: double crochet
- sk: skip
- st(s): stitch(es)
- sp: space
- rnd: round
- O: open mesh square
- B: block (filled square)
Filet squares (small mesh): Each square is 2 stitches wide, and every row starts and ends with a dc post. A row of 13 squares therefore always has 27 stitches (13 x 2 + 1).
- Open square (O): ch 1, sk next st, dc in next dc.
- Block (B): dc in next st (or ch-1 sp), dc in next dc.
- First square of a row, open: ch 4 (counts as dc + ch 1), sk next st, dc in next dc.
- First square of a row, block: ch 3 (counts as dc), dc in next st, dc in next dc.
- Last dc of every row: work it into the 3rd ch of the turning chain.
Gauge and Checkpoints
Gauge: 20 sts and 10 rows of filet mesh = 4 in (10.2 cm). That’s 5 sts and 2.5 rows per inch, so each square is 0.4 in (1.0 cm) wide and 0.4 in (1.0 cm) tall.
Gauge matters a lot here, because any error repeats over 200 rows. Work the first 10 rows of one strip and treat them as your test piece. Lightly mist the piece, pat it flat, and measure.
Checkpoints for each strip:
- After Row 10: 5.4 in (13.7 cm) wide, 4 in (10.2 cm) tall
- After Row 28 (first lantern complete): 11.2 in (28.4 cm) tall
- After Row 100: 40 in (101.6 cm) tall
- After Row 150: 60 in (152.4 cm) tall
- After Row 200: 80 in (203.2 cm) tall, before the border
If your piece is too big, go down a hook size, or shorten the ch-1 spaces by pulling the chain snug. If it’s too small, go up a hook size. Width matters most for squareness. A 0.2 in (0.5 cm) error in height every 10 rows adds up to 4 in (10.2 cm) over the full strip, so fix row height before you continue.
Strip Pattern (Make 7)
Foundation: Ch 29.
Row 1 (solid): Dc in 4th ch from hook (the skipped 3 ch count as the first dc), dc in each remaining ch across. Turn. (27 sts = 13 B)
Rows 2–4 (all open): Ch 4 (counts as dc + ch 1), sk 1 st, dc in next st; ch 1, sk 1, dc in next st, repeat 11 more times, working the last dc into the top of the turning chain. Turn. (27 sts = 13 O: 14 dc posts + 13 ch-1 sps)
Lantern Repeat (24 rows)
Work the repeat rows below, reading each row as squares from the start of the row. The lantern pattern is symmetrical, so right-side and wrong-side rows read the same way. Each row stays at 27 sts.
- R1–R2 (tassel): 6 O, 1 B, 6 O
- R3 (tassel cap): 5 O, 3 B, 5 O
- R4 (bottom rim): 4 O, 5 B, 4 O
- R5 (lower body): 3 O, 7 B, 3 O
- R6–R13 (ribbed body): 2 O, 2 B, 1 O, 3 B, 1 O, 2 B, 2 O
- R14 (upper body): 3 O, 7 B, 3 O
- R15 (top rim): 4 O, 5 B, 4 O
- R16 (cap): 5 O, 3 B, 5 O
- R17–R18 (hanger): 6 O, 1 B, 6 O
- R19–R24 (spacer): 13 O
The two single open squares in R6–R13 stack into the vertical open lines that make the ribs. The rows widen from 1 to 3, 5, 7 and then 9 squares and narrow again in the same steps, which gives the rounded lantern silhouette. Each lantern is 18 rows tall, 7.2 in (18.3 cm), and 9 squares wide at the body, about 3.6 in (9.1 cm). Together with the 6 spacer rows, one full repeat measures 9.6 in (24.4 cm).
Rows 5–196: Work the 24-row Lantern Repeat 8 times. Strip Rows 5–28 are the first repeat, Rows 29–52 the second, and so on, with Rows 173–196 as the eighth. Put a marker in the first stitch of each finished repeat so you can count lanterns easily.
Rows 197–199 (all open): Work as Rows 2–4. (27 sts = 13 O)
Row 200 (solid): Ch 3 (counts as dc), dc in next ch-1 sp, dc in next dc, repeat across. (27 sts = 13 B)
Don’t fasten off. Continue straight into the border.
Row count check: 1 solid + 3 open + (8 x 24) + 3 open + 1 solid = 200 rows. 200 rows x 0.4 in = 80 in (203.2 cm).
Above the top lantern there are 6 spacer rows plus 3 open rows, which leaves empty mesh under the hanging loops. That area can bunch on the rod without hiding a lantern.
Make All Pieces
- Color A (terracotta): 4 strips
- Color B (cream): 3 strips
Layout on the rod, left to right:
[ A ] [ B ] [ A ] [ B ] [ A ] [ B ] [ A ]
Each strip is identical apart from color. Make and border one strip completely first, then check it against the Final Quality-Control Checklist before you make the other six.
Joining (Hanging the Panels)
The strips are not stitched to each other. Each one hangs on its own two loops, and that’s what lets the curtain part when someone walks through.
Seam logic still matters at the rod. Make sure all seven strips have the same row count (200) and the same border count (862 sts in Rnd 2). If they do, the lanterns line up horizontally across the curtain. Thread the strips onto the rod in the A–B–A–B–A–B–A order. Space them evenly so the edges just touch, or overlap by up to 0.2 in (0.5 cm) on a narrower door.
Tension advice: If one strip hangs longer than the others, it was crocheted looser. Re-block it shorter, or redo its last rows at a tighter tension. Don’t stretch the shorter strips to match it.
Size checkpoint: 7 strips x 6.2 in = 43.4 in (110.2 cm) total width. The bottoms of all strips should sit level, within 0.4 in (1.0 cm) of each other.
Border
Border gauge: 5 sc per inch, which matches the strip’s stitch gauge. On the long sides, 2 sc per dc row-end gives 2 sc per 0.4 in, which is also 5 sc per inch. Because the gauge is the same on all four sides, the edges lie flat without ruffling or cupping.
Corner counts below are listed separately. “Between corners” means every stitch except the center stitch of each corner group.
Rnd 1: Keep the yarn attached after Row 200 and ch 1. Work 3 sc in the first st of Row 200 (corner), then sc in each of the next 25 sts, then 3 sc in the last st (corner). Rotate to work down the long side. Work 2 sc in each row-end of Rows 199 down to Row 2. Work 3 sc in the first st of the foundation (corner). Sc in each of the next 25 foundation chains. Work 3 sc in the last chain (corner). Work 2 sc in each row-end of Rows 2 up to 199. Join with sl st to the first sc. Don’t turn.
- Top and bottom: 25 sc + 2 outer corner sc = 27 sc between corners
- Each long side: 198 row-ends x 2 = 396 sc, + 2 outer corner sc = 398 sc between corners
- Corners: 4 center sc
- Total: 2 x 27 + 2 x 398 + 4 = 854 sc
Rnd 2: Ch 1, sc in each sc around, working 3 sc in each corner center sc. Join with sl st.
- Top and bottom: 29 sc between corners
- Each long side: 400 sc between corners
- Corners: 4 center sc
- Total: 2 x 29 + 2 x 400 + 4 = 862 sc (854 + 8 for the 4 corner increases)
Why the math works: Each corner group adds 2 sts per round, 1 to each neighboring side. Every side gains exactly 2 sts per round, which matches the extra length the corner turns need. The rows already include the corner stitches, so you never count them twice.
Fasten off and weave in the ends.
Hanging Loops
With the top edge facing you, count the 29 sc between corners on Rnd 2, starting from the left.
Left loop: Join yarn with sl st in the 3rd sc. Ch 16, then sl st in the 6th sc. Turn and work 18 sc into the ch-16 loop to cover it. Sl st in the 3rd sc and fasten off.
Right loop: Repeat over the 24th to 27th sc. Join in the 24th sc and sl st in the 27th.
Each loop is about 1.75 in (4.4 cm) tall and sits just inside the corner. Check that both loops on every strip are the same height.
Final Blocking
- Weave in all ends along the dc posts so they disappear into the solid parts of the fabric.
- Lay one strip flat on the blocking surface. If your surface is short, work in sections.
- Pin it to 6.2 in (15.7 cm) wide. Put pins every 4 in (10.2 cm) along both long edges.
- Check the length: 80.8 in (205.2 cm). Ease the strip toward this length without stretching it.
- Straighten the mesh so the open squares look square and the rib lines run straight.
- Spray until damp, not soaked.
- Let it dry completely, then unpin.
- Hang the strip on the rod for 24 hours before you trim or re-adjust anything. Cotton relaxes slightly under its own weight.
- Repeat for all 7 strips.
Final Quality-Control Checklist
- Each strip is 27 sts wide and 200 rows long
- Each strip has 8 complete lanterns, all centered on column 7
- Each lantern has 2 open rib lines running through 8 body rows
- Border Rnd 2 totals 862 sc on every strip
- Blocked width is 6.2 in (15.7 cm), ±0.2 in (0.5 cm)
- Blocked length is 80.8 in (205.2 cm), ±0.4 in (1.0 cm)
- Both loops on each strip are the same size
- You have 4 terracotta and 3 cream strips, hung A–B–A–B–A–B–A
- All ends are woven in securely
Troubleshooting
- Strip is slanting or narrowing: You may be missing the last dc in the turning chain. Count 14 dc posts on each open row.
- Mesh looks rectangular, not square: Your dc is too tall. Pull up a shorter loop, or go down a hook size.
- Lantern is off-center: Recount the squares in R1. There should be 6 open squares on each side of the single block.
- Border ruffles on the long sides: Use exactly 2 sc per row-end, not 3.
- Border pulls in at the top: Make sure each corner has 3 sc in the center stitch.
- One strip is longer than the others: Re-block that strip, or rip back and redo the top rows at a tighter tension.
- Loops stretch: Cover them tightly with sc and use cotton, not acrylic.
Care
Hand wash in cool water with mild detergent, roll in a towel to remove water, and dry flat. Re-block if needed and hang only when completely dry.
Final Notes
The measurement chain starts with gauge: 5 sts and 2.5 rows per inch. That gives 27 sts across at 5.4 in (13.7 cm) and 200 rows at 80 in (203.2 cm). The 24-row lantern repeat measures 9.6 in (24.4 cm) and repeats 8 times. Two border rounds add 0.4 in (1.0 cm) per edge, which brings each strip to 6.2 in x 80.8 in (15.7 cm x 205.2 cm). Seven strips on the rod make a lantern curtain 43.4 in (110.2 cm) wide. If you check gauge, count rows and match the strips to each other, the lanterns will line up across the doorway.
Happy crocheting!